Necromancer Blood Surge Endgame Build (Season 6)
★ NEW: Season 12 Guide and New Features
┗ Seasonal Content: New Uniques | Bloodied Sigils | Slaughterhouses
┗ Seasonal Mechanic: Killstreaks and Bloodied Items
★ NEW: Lord of Hatred Expansion Release Date
★ Check out our Vessel of Hatred expansion guide
This is the Necromancer Blood Surge endgame build and guide for Diablo 4: Vessel of Hatred (D4). Read on to learn more about the Overpower Blood Surge build, including its skills, gear, gems, runes, mercenaries, and paragon boards, as well as how to play the build for Season 6.
 Attention! Attention! |
This build is a Legacy Build that was created from Season 6 (Season of Hatred Rising) and is not updated for the current season. |
|---|
| All Necromancer Guides | ||
|---|---|---|
List of Contents
Blood Surge Build Guide
Blood Surge Build Summary
| Click on a Link to Jump to a Section! | |||||||||||
|---|---|---|---|---|---|---|---|---|---|---|---|
This Necromancer Endgame build is based on a build by Ruse_Cruize over at Goblin Inc (Youtube). The video includes details on how to gear up to get the build online. You can check Ruse_Cruize's Twitch Channel for more Necromancer content!
| Build Summary | |
|---|---|
 Blood Surge Endgame Build Blood Surge Endgame Build |
|
| Focus: DPS, Endgame Clear | |
|
|
|
The build allows us to spam echoes of Blood Surges to nearby targets to quickly deal huge amounts of DPS and build up Overpower hits. Thanks to Soulrift's Essence Regeneration, we are able to spam our Blood Surge to an unlimited amount of number.
How Does It Work?
Despite being a Blood Build, this setup actually uses two main mechanics which are Overpower and Lucky Hits. We generate several corpses from Hewed Flesh and consume it instantly with Cruor's Embrace to generate insane amounts of damage while causing these corpses to spawn Blood Orbs to then allow us to spam Rathma's Vigor's effects.
Aside from Overpower procs, we also deal Decrepify to enemies which will reduce our cooldowns thanks to our high amounts of Lucky Hit chance which then lowers our cooldown for our abilities which can be used for Soulrift which again, generates Essence for the build's main resource generation.
Blood Surge Build Skills and Class Mechanic
| Click on a Link to Jump to a Section! | |||||||||||
|---|---|---|---|---|---|---|---|---|---|---|---|
| Back to the top ▲ | |||||||||||
Blood Surge Build Skills and Passives
※ More skills can be seen by scrolling vertically.
| Active Skills |
|---|
┗
┗
┗
|
┗
┗
┗
┗
┗
|
┗
┗
┗
┗
┗
|
┗
┗
┗
┗
┗
┗
|
┗
┗
┗
┗
┗
┗
|
┗
┗
┗
┗
├
┗
┗
|
Blood Surge Build Book of the Dead
| Skeleton Warriors | Skeleton Mages | Golem |
|---|---|---|
 Defenders Defenders Sacrifice |
 Bone BoneSacrifice |
 Iron IronSacrifice |
For this build, we'll be maximizing our Resistances, Overpower, and Critical Strike Damage by sacrificing Warrior Skirmishers, Bone Mages, and Iron Golem. This will allow us to capitalize on our Overpower and Critical Strike damage bursts.
Despite the Defender - Sacrifice choice which may seem out of place, Sacrificing Defenders will allow us to hit our Resistance caps without investing too much on our items. This will allow us to focus our items on other effects that will push our damage capabilities further!
Blood Surge Build Aspects and Affixes
| Click on a Link to Jump to a Section! | |||||||||||
|---|---|---|---|---|---|---|---|---|---|---|---|
| Back to the top ▲ | |||||||||||
 Masterwork Priority Masterwork Priority |
Affixes marked with ★ are the ones you should aim to upgrade when masterworking. |
|---|
※ More gear Aspects can be seen by scrolling vertically.
| Gear | Aspect and Affixes |
|---|---|
| Head | Succumb to hatred and earn Mother's Favor, increasing your damage dealt by 60%. Briefly steal Mother's Favor from Nearby allies by slaughtering enemies. Stats: ・Critical Strike Chance ・Lucky Hit Chance ★★★ ・Movement Speed ・Ranks to Core Skills |
| Chest | Stats: ・Maximum Life ・Intelligence ・Armor Temper: ・Defensive - Worldly Endurance ┗ Total Armor
・Utility - Decay Innovation
┗ Soulrift Duration
|
| Gloves | Casting Blood Surge consumes nearby Corpses to cause mini novas, dealing 6 - 10 damage. This damage is increased by 10% for each enemy drained by your initial cast, up to 50%, as well as by 20% for each Corpse consumed. Stats: ・Ranks to Tides of Blood ★★★ ・Maximum Life ・Blood Surge Drains +X times from elites ★★★ ・Ranks to Blood Surge |
| Pants | Your Minions' attacks have a 3 - 7% chance to randomly inflict Decrepify or Iron Maiden. You deal 100 - 150% increased Overpower damage to enemies affected by your Curses. Stats: ・Overpower Damage ★★★ ・Maximum Life ・Curse duration ・+ Rank to Curse Skills |
| Boots | Stats: ・Attacks Reduce Evade's Cooldown by 1.5 Seconds ・Movement Speed ★★★ ・Intelligence ・Maximum Life Temper: ・Mobility - Natural Motion ┗ Movement Speed
・Utility - Profane Innovation
┗ Soulrift Duration |
| Amulet | Stats: ・Critical Strike Chance ・Ranks to Tides of Blood ・Ranks to Coalesced Blood Temper: ・Mobility - Necromancer Efficiency ┗ Ultimate Cooldown Reduction
・Utility - Decay Innovation
┗ Soulrift Duration
|
| Ring | Stats: ・Critical Strike Chance ・Maximum Life ★★★[ ・Intelligence Temper: ・Offensive - Blood Finesse ┗ Blood Attack Speed
・Resource - Necromancer Efficiency
┗ Ultimate Cooldown Reduction
|
| Ring | Spending resources reduces your resource costs and increases your damage by 10% for 3 seconds, up to 50%. Stats: ・Attack Speed ・Critical Strike Chance ・Lucky Hit Chance ・Ranks to Core Skills |
| Weapon (1H Mace) |
Stats: ・Intelligence ・Max Life ★★★ ・Overpower Damage Temper: ・Offensive - Blood Finesse ┗ Blood Attack Speed
・Weapon - Blood Augments
┗ Chance for Blood Surge to deal double damage
|
| Weapon (Source) |
Stats: ・Intelligence ・Max Life ★★★ ・Critical Strike Chance Temper: ・Offensive - Blood Finesse ┗ Blood Attack Speed
・Weapon - Blood Augments
┗ Chance for Blood Surge to deal double damage
|
Blood Surge Build Gems and Runewords
| Click on a Link to Jump to a Section! | |||||||||||
|---|---|---|---|---|---|---|---|---|---|---|---|
| Back to the top ▲ | |||||||||||
Blood Surge Build Gems
| Armor | Weapons | Jewelry |
|---|---|---|
 Topaz Topaz
|
 Ruby Ruby
|
 Skull Skull
|
Topaz and Rubies are the best gems to slot in to further ramp up our dps thanks to the Topaz's intelligence bonus and ruby's overpower proc.
We slot in Skull to fill in our missing armor values as our book of the dead will already fill up the resistances. However, feel free to change this depending on the stat values your build currently has.
Blood Surge Build Runewords
| Runeword 1 | Runeword 2 |
|---|---|
|
|
|
Tam and Jah amplifies the build's mobility further by granting us a free Sorcerer Teleport everytime we use Blood Surge 16 times. Despite being a high number, we'll be spamming Blood Surge non-stop which makes this extremely easy to proc. Use Blood Surge and walk to the nearest camp then if the next enemy batch is in a distance, teleport using dodge to repeat the cycle.
Bac Gar is the next one and this aims to alleviate the sluggish nature of the Necromancer by allowing us to gain Movement Speed by moving which essentially means that we get a ramping movement speed to allow our Necro to quickly pick up Blood Orbs as well as traverse the area while exploring.
Blood Surge Build Mercenaries
| Click on a Link to Jump to a Section! | |||||||||||
|---|---|---|---|---|---|---|---|---|---|---|---|
| Back to the top ▲ | |||||||||||
| Mercenary | Reinforcement |
|---|---|
The best mercenary for the Blood Surge Build is Raheir, who gives 5% Fortify (buffing your Overpower damage) with Shield Charge, boosts your Armor by 15% with Raheir's Guard, and grants Damage Reduction and increases damage to enemies with Provoke and Mocking Lure.
For the Reinforcement, Varyana is the best pick as she can use Bloodthirst to boost your Attack Speed by 10%.
Blood Surge Build Paragon Boards
| Click on a Link to Jump to a Section! | |||||||||||
|---|---|---|---|---|---|---|---|---|---|---|---|
| Back to the top ▲ | |||||||||||
| Paragon Boards |
|---|
| 1. Starting Board (Control) |
 |
| 2. Blood Bath (Corporeal) |
 |
| 3. Flesh Eater (Dominate) |
 |
| 4. Blood Begets Blood (Essence) |
 |
| 5. Frailty (Sacrificial) |
 |
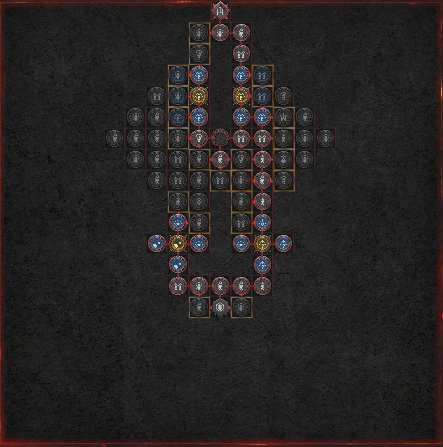
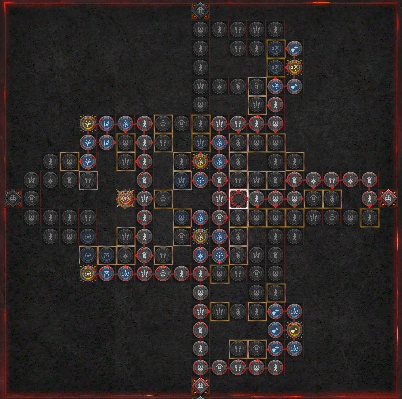
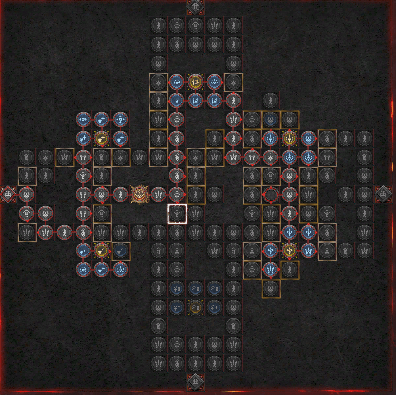
This is our main paragon board setup that shows the priority of nodes we want to tackle for our boards. Mainly, we'll want to prioritize getting Maximum Life, Resistances, and Damage. For damage boards, we'll want to focus on Overpower as this is where the majority of our bursts come from and we'll also want other damage modifiers such as damage to elites as well as flat out damage multipliers.
Blood Surge Build Playstyle and Tips
| Click on a Link to Jump to a Section! | |||||||||||
|---|---|---|---|---|---|---|---|---|---|---|---|
| Back to the top ▲ | |||||||||||
In the guide of Ruse_Cruize himself, the build's gameplay loop is as follows.
- Use Soulrift.
- Use Blood Surge.
This is as simple as it gets as you can pretty much play the build with one hand if you're willing to rebind your keys a bit as you'll only be using Blood Surge, Soul Rift, and evade for this build.
Diablo 4 Related Guides

All Class Builds
| All Classes | |||||
|---|---|---|---|---|---|
All Endgame Builds
| List of Endgame Builds |
|---|
All Leveling Builds
| List of Leveling Builds |
|---|
All Legacy Builds per Season
| Seasons | List of Legacy Builds |
|---|---|
| Season 11 | |
| Season 10 | |
| Season 9 | |
| Season 8 | |
| Season 7 | |
| Season 6 |
|
Comment
Author
Necromancer Blood Surge Endgame Build (Season 6)
Rankings
- We could not find the message board you were looking for.
Gaming News
Popular Games

Genshin Impact Walkthrough & Guides Wiki

Umamusume: Pretty Derby Walkthrough & Guides Wiki

Crimson Desert Walkthrough & Guides Wiki

Monster Hunter Stories 3: Twisted Reflection Walkthrough & Guides Wiki

Honkai: Star Rail Walkthrough & Guides Wiki

Pokemon Pokopia Walkthrough & Guides Wiki

The Seven Deadly Sins: Origin Walkthrough & Guides Wiki

Wuthering Waves Walkthrough & Guides Wiki

Zenless Zone Zero Walkthrough & Guides Wiki

Arknights: Endfield Walkthrough & Guides Wiki
Recommended Games

Fire Emblem Heroes (FEH) Walkthrough & Guides Wiki

Diablo 4: Vessel of Hatred Walkthrough & Guides Wiki

Cyberpunk 2077: Ultimate Edition Walkthrough & Guides Wiki

Yu-Gi-Oh! Master Duel Walkthrough & Guides Wiki

Super Smash Bros. Ultimate Walkthrough & Guides Wiki

Pokemon Brilliant Diamond and Shining Pearl (BDSP) Walkthrough & Guides Wiki

Elden Ring Shadow of the Erdtree Walkthrough & Guides Wiki

Monster Hunter World Walkthrough & Guides Wiki

The Legend of Zelda: Tears of the Kingdom Walkthrough & Guides Wiki

Persona 3 Reload Walkthrough & Guides Wiki
All rights reserved
©2022 BLIZZARD ENTERTAINMENT, INC. ALL RIGHTS RESERVED.
All trademarks referenced herein are the properties of their respective owners.
The copyrights of videos of games used in our content and other intellectual property rights belong to the provider of the game.
The contents we provide on this site were created personally by members of the Game8 editorial department.
We refuse the right to reuse or repost content taken without our permission such as data or images to other sites.


![Death Stranding 2: On The Beach [PC] Review | A Port That Delivers](https://img.game8.co/4447392/15310a0c9aa1b6843bb713b2ea216930.jpeg/show)


