This survey will take about 1 minute.
Your answers will help us to improve our website.
Diablo 4: Vessel of Hatred (D4)
Necromancer Blood Wave Endgame Build (Season 8)
★ NEW: Season 12 Guide and New Features
┗ Seasonal Content: New Uniques | Bloodied Sigils | Slaughterhouses
┗ Seasonal Mechanic: Killstreaks and Bloodied Items
★ NEW: Lord of Hatred Expansion Release Date
★ Check out our Vessel of Hatred expansion guide
This is a Necromancer Blood Wave endgame build and guide for Diablo 4: Vessel of Hatred (D4). Read on to learn more about the Blood Wave build, including its skills, gear, gems, runes, mercenaries, and paragon boards, as well as how to play the build for Season 8 (Belial's Return)!
 Attention! Attention! |
This build is a Legacy Build that was created from Season 8 (Belial's Return) and is not updated for the current season. |
|---|
| All Necromancer Guides | ||
|---|---|---|
List of Contents
Blood Wave Build Guide
Blood Wave Build Summary
| Click on a Link to Jump to a Section! | |||||||||||
|---|---|---|---|---|---|---|---|---|---|---|---|
| Build Summary | |
|---|---|
 Blood Wave Endgame Build Blood Wave Endgame Build |
|
| Focus: Endgame, Torment Pushing | |
|
|
|
The build utilizes the Cooldown Reduction mechanic of Fastblood Aspect and the Blood Wave's Blood Orb generation while utilziing Overpower triggers from Rathma's Vigor.
Blood Wave Build Skills and Class Mechanic
| Click on a Link to Jump to a Section! | |||||||||||
|---|---|---|---|---|---|---|---|---|---|---|---|
Blood Wave Build Skills and Passives
※ More skills can be seen by scrolling vertically.
| Active Skills |
|---|
┗
┗
|
┗
┗
┗
|
┗
┗
┗
┗
┗
|
┗
┗
┗
┗
┗
┗
┗
|
┗
┗
┗
┗
┗
┗
┗
┗
|
┗
┗
┗
┗
┗
┗
┗
|
┗
|
Sever Build Book of the Dead
| Skeleton Warriors | Skeleton Mages | Golem |
|---|---|---|
 Skirmisher Skirmisher Sacrifice |
 Bone BoneSacrifice |
 Iron IronSacrifice |
Our main damage sources are Overpower, Critical Strike, and raw Damage multipliers. The best multipliers we can obtain from our Book of the Dead would be sacrificing warrior Skirmishers, Bone mages, and Iron golems.
Skirmisher would increase our Critical Strike Chance, with our Aspects, this would be almost a 40% increase to crit chance. Bone Mage would straight up increase our Overpower damage and lastly, Iron would multiply our Critical Strike damage even further..
Book of the Dead Guide
Best Boss Powers
| Click on a Link to Jump to a Section! | |||||||||||
|---|---|---|---|---|---|---|---|---|---|---|---|
| Boss Power | Effect/Modifiers |
|---|---|
|
|
Effect: After you Cast an Ultimate Skill, lob 4 bombs that deal XX Fire damage. Gain 15% Cooldown Reduction. |
|
|
Modifier: Activating your Main Boss Power grants unbreakable Stealth for 2 seconds. You deal XX increased Overpower Damage while Stealthed. |
|
|
Modifier: Gain XX Critical Strike Chance, increased by XX for each 1% Shadow Resistance from bonuses you have, up to a maximum of XX. |
|
|
Modifier: Gain XX increased damage to all Elements. For each 1% of an Element's Resistance from bonuses, gain 0.2% increased damage for that Element, up to a maximum of XX. |
As an ultimate focused ability, Urivar's Lobbed Bombs makes it a perfect main power for the build. It also lowers your cooldowns by 15% which is the main highlight of Urivar's Lobbed Boms as an active boss power since our build doesn't really rely on its main damage output.
Belial's Eye Beam is the best modifier to include as everytime you use Blood Wave, you'll gain an unbreakable stealth which makes it a mini-version of Shroud of False Death. Hatred's Embrace and Sinerat's boss powers are then good support powers to amplify our darkness and critical strike damage even further.
Best Boss Powers and Modifiers Guide
Blood Wave Build Aspects and Affixes
| Click on a Link to Jump to a Section! | |||||||||||
|---|---|---|---|---|---|---|---|---|---|---|---|
※ More gear Aspects can be seen by scrolling vertically.
| Gear | Aspect and Affixes |
|---|---|
| Head | ・ Maximum Life ★★★ ・ Elemental Resistances ・ Cooldown Reduction Temper: ・Utility - Thorn Army ┗ + Ranks to Spiked Armor
・Defensive - Worldly Endurance
┗ Maximum Life
|
| Chest | ・ Resistance to Element★★★ ・ Maximum Life ・ Intelligence Temper: ・Utility - Thorn Army ┗ + Ranks to Spiked Armor
・Defensive - Worldly Endurance
┗ Maximum Life
|
| Gloves | ・Overpower Damage ★★★ ・Critical Strike Damage ・Resistance to an Element ・Lucky Hit: Up to a [X%] Chance to Apply a Random CC. |
| Pants | ・Ultimate Damage ・Damage Reduction While Fortified ・Blood Wave Cooldown Reduction★★ ・Chance for Blood Wave to Deal Double Damage★ |
| Boots | ・Movement Speed ・Maximum Life ★★★ ・Lightning Resistance Temper: ・Utility - Thorn Army ┗ + Ranks to Spiked Armor
Mobility - Natural Motion
┗ Movement Speed
|
| Amulet | ・Ranks to Tides of Blood ★★★ ・Maximum Life ・Intelligence Temper: ・Offensive - Blood Finesse ┗ Blood Overpower Damage
・Defensive - Natural Resistance/Worldly Endurance
┗ Resistance to an Element / Maximum Life |
| Ring 1 | Stats: ・Overpower Damage ★★★ ・Maximum Life ・Critical Strike Damage Temper: ・Utility - Necromancer Efficiency ┗ Ultimate Cooldown Reduction
・Offensive - Blood Finesse
┗ Blood Overpower Damage
|
| Ring 2 | Stats: ・Overpower Damage ★★★ ・Maximum Life ・Critical Strike Damage Temper: ・Utility - Necromancer Efficiency ┗ Ultimate Cooldown Reduction
・Offensive - Blood Finesse
┗ Blood Overpower Damage
|
| Weapon | ・Maximum Life ・Critical Strike Damage ・Overpower Damage ★★★ Temper: ・Offensive - Blood Finesse ┗ Blood Overpower Damage
・Weapon - Blood Augment
┗ Chance for Blood Wave to deal Double Damage
|
Blood Wave Build Best Gems and Occult Gems
| Click on a Link to Jump to a Section! | |||||||||||
|---|---|---|---|---|---|---|---|---|---|---|---|
Blood Wave Build Gems
| Weapon | Armor | Jewelry |
|---|---|---|
 Ruby Ruby
|
 Topaz Topaz
|
 Skull Skull
|
Ruby will increase our Ultimate's damage together when it triggers with Rathma's Vigor. Topaz is a straight Intelligence multiplier so let's socket these for our our free armor slots. Lastly, we want Skull or Diamonds for our Jewelry as we'll likely have a lot of time before obtaining all the Occult Gems.
Blood Wave Build Runewords
| Runeword 1 | Runeword 2 |
|---|---|
|
|
|
Zan Wat is the most urgent rune combination we want to equip as this will trigger our Curse effect and increase our survivability. This will apply a Decrepify to all enemies that will likely be hit by Blood Wave and triggering Amplify Damage from our skill tree.
Igni and Qax is a great bossing rune combo as it can charge up our burst and deal insane damages with our Blood Wave when it triggers its effect. Since we don't use Resources, this effect will always trigger a 100% damage increase.
Blood Wave Build Mercenaries
| Click on a Link to Jump to a Section! | |||||||||||
|---|---|---|---|---|---|---|---|---|---|---|---|
| Mercenary | Reinforcement |
|---|---|
The best mercenaries for the Blood Wave Build are Varyana and Raheir.
Varyana is a great debuff bot so we'll want to have her as our main mercenary. Make sure to take her left most skill tree path and take Intimidated to get our much needed free damage reduction.
Raheir is a standard Reinforcement thanks to its Bastion save.
Blood Wave Build Paragon Boards
| Click on a Link to Jump to a Section! | |||||||||||
|---|---|---|---|---|---|---|---|---|---|---|---|
| Paragon Boards |
|---|
| 1. Starting Board (Eliminator) |
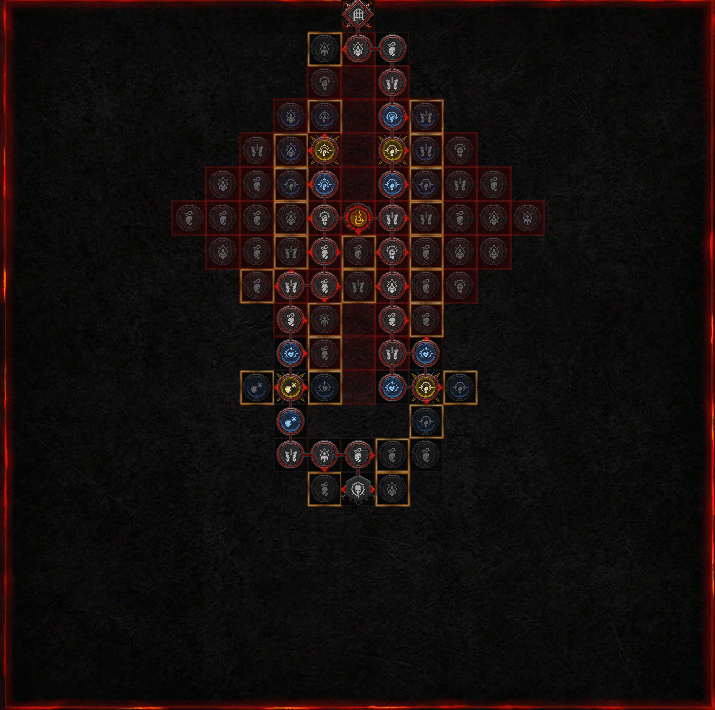 |
| 2. Blood Begets Blood (Sacrificial) |
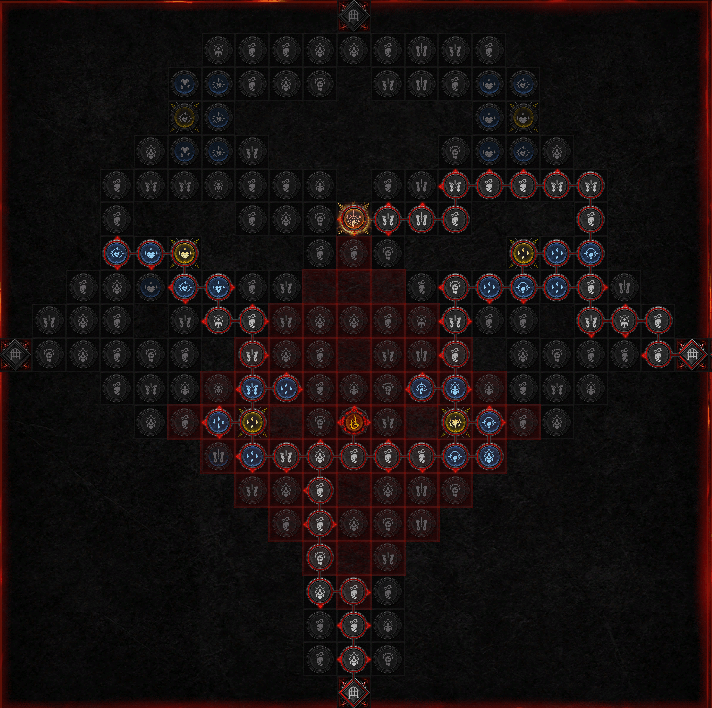 |
| 3. Bloodbath (Dominate) |
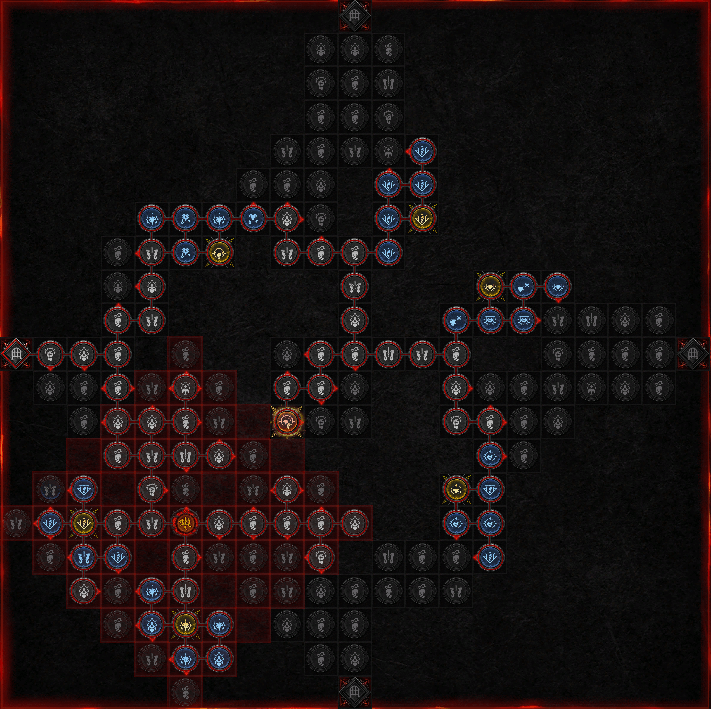 |
These are the three main boards you'll be having for the Blood Wave build. We focus these boards for their blood-focused effects while slotting in Glyphs that will allow us to passively increase our damage.
These will roughly cost around 170+ paragon nodes, you can spend the rest of the nodes from other nodes to focus specific stats like damage to elites, resistances, or take stat nodes to trigger additional effects from the rare nodes in the first three existing boards.
Blood Wave Build Playstyle and Tips
| Click on a Link to Jump to a Section! | |||||||||||
|---|---|---|---|---|---|---|---|---|---|---|---|
The Blood Wave Build uses Blood Wave to dish out your main damage output. With all the multipliers we stack and the new Kessime's Legacy unique pants, this will be the only skill we'll spam throughout the game.
- Use Blood Wave.
- Use Blood Mist to escape if needed against Crowd Control or getting surrounded.
While it may look simple, you'll actually be able to use the build's cooldown steroid by picking up blood orbs. So you'll need to rotate our move repeatedly on the blood wave area to replenish the skill's cooldown. This will allow you to spam Blood Wave while sustaing your HP, Fortify, Overpower Triggers, and Blood Orb damage bonuses.
Diablo 4 Related Guides

All Class Builds
| All Classes | |||||
|---|---|---|---|---|---|
All Endgame Builds
| List of Endgame Builds |
|---|
All Leveling Builds
| List of Leveling Builds |
|---|
All Legacy Builds per Season
| Seasons | List of Legacy Builds |
|---|---|
| Season 9 | |
| Season 8 |
|
| Season 7 | |
| Season 6 |
Comment
Author

Necromancer Blood Wave Endgame Build (Season 8)
Please participate in our site
improvement survey
03/2026
improvement survey
03/2026
Would you assist in
improving Game8's site?
improving Game8's site?

×
We are listening to our users' valuable opinions and discussing how to act on them.
The information collected through this survey will be used for the purpose of improving our services. In addition, the information will only be disclosed a part of a statistic in a format that will not allow identification of personal information.
Begin Survey
Not Now
×
Please rate each item regarding Game8.co's Advertisements.
Amount of Ads
Very Dissatisfied
Somewhat Dissatisfied
Fine
Somewhat Satisfied
Highly Satisfied
Placement of Ads
Timing of Ad Display
Ad Loading Speed
Safeness of Ads
Content of Ads
×
Please rate each item regarding Game8.co's Quality of Articles.
Amount of information
Very Dissatisfied
Somewhat Dissatisfied
Fine
Somewhat Satisfied
Highly Satisfied
Frequency of updates
Speed of new information
Accuracy of articles
Understandibility of articles
Readability of sentences
×
Please rate each item regarding Game8.co's Usability of the Site.
Ease of finding information
Very Dissatisfied
Somewhat Dissatisfied
Fine
Somewhat Satisfied
Highly Satisfied
Loading Speed
Use of Color
Font Size
Visibility of Images
Easy to Understand Layout
×
Please rate each item regarding Game8.co's Message Boards, Comments.
Ease of Writing
Very Dissatisfied
Somewhat Dissatisfied
Fine
Somewhat Satisfied
Highly Satisfied
Readability
Ease in Finding Information
Comment Quality
Comment Quantity
Admin Response
×
Please rate each item regarding Game8.co's Site's new design.
Please rate our site's new design
Very Dissatisfied
Somewhat Dissatisfied
Fine
Somewhat Satisfied
Highly Satisfied
Do you think that the website's design change makes the site easier to use?
Has the new design made it easier for you to find information on the site?
Has the new design improved the overall visual appeal of the site?
How would you rate your overall satisfaction with the new design of the site?
×
How likely are you to recommend Game8 to someone you know?
Very Unlikely
0
1
2
3
4
5
6
7
8
9
10
Very Likely
If you have other opinions regarding potential improvement to the website, please share them with us. We would appreciate your honest opinion.
Note: This is a free response section, so you can proceed without entering anything.
Note: Please be sure not to enter any kind of personal information into your response.
Note: Please be sure not to enter any kind of personal information into your response.
×
Thank You
×
Thank you for participating in our survey! Your answers will help us to improve the quality of our website and services.
We hope you continue to make use of Game8.
We hope you continue to make use of Game8.
Close
Rankings
- We could not find the message board you were looking for.

Gaming News


![Everwind Review [Early Access] | The Shaky First Step to A Very Long Journey](https://img.game8.co/4440226/ab079b1153298a042633dd1ef51e878e.png/thumb)

![Monster Hunter Stories 3 Review [First Impressions] | Simply Rejuvenating](https://img.game8.co/4438641/2a31b7702bd70e78ec8efd24661dacda.jpeg/thumb)
Popular Games

Genshin Impact Walkthrough & Guides Wiki
Honkai: Star Rail Walkthrough & Guides Wiki
Umamusume: Pretty Derby Walkthrough & Guides Wiki
Pokemon Pokopia Walkthrough & Guides Wiki
Resident Evil Requiem (RE9) Walkthrough & Guides Wiki
Monster Hunter Wilds Walkthrough & Guides Wiki
Wuthering Waves Walkthrough & Guides Wiki
Arknights: Endfield Walkthrough & Guides Wiki
Pokemon FireRed and LeafGreen (FRLG) Walkthrough & Guides Wiki
Pokemon TCG Pocket (PTCGP) Strategies & Guides Wiki


Recommended Games
Diablo 4: Vessel of Hatred Walkthrough & Guides Wiki
Fire Emblem Heroes (FEH) Walkthrough & Guides Wiki
Yu-Gi-Oh! Master Duel Walkthrough & Guides Wiki
Super Smash Bros. Ultimate Walkthrough & Guides Wiki
Pokemon Brilliant Diamond and Shining Pearl (BDSP) Walkthrough & Guides Wiki
Elden Ring Shadow of the Erdtree Walkthrough & Guides Wiki
Monster Hunter World Walkthrough & Guides Wiki
The Legend of Zelda: Tears of the Kingdom Walkthrough & Guides Wiki
Persona 3 Reload Walkthrough & Guides Wiki
Cyberpunk 2077: Ultimate Edition Walkthrough & Guides Wiki


All rights reserved
©2022 BLIZZARD ENTERTAINMENT, INC. ALL RIGHTS RESERVED.
All trademarks referenced herein are the properties of their respective owners.
The copyrights of videos of games used in our content and other intellectual property rights belong to the provider of the game.
The contents we provide on this site were created personally by members of the Game8 editorial department.
We refuse the right to reuse or repost content taken without our permission such as data or images to other sites.