Barbarian Mighty Throw Build (Season 8)
★ NEW: Season 12 Guide and New Features
┗ Seasonal Content: New Uniques | Bloodied Sigils | Slaughterhouses
┗ Seasonal Mechanic: Killstreaks and Bloodied Items
★ NEW: Lord of Hatred Expansion Release Date
★ Check out our Vessel of Hatred expansion guide
This is a Barbarian Mighty Throw guide for Season 8 of Diablo 4: Vessel of Hatred (D4). Learn more about the Barbarian Mighty Throw build in the Belial's Return update!
 Attention! Attention! |
This build is a Legacy Build that was created from Season 8 (Belial's Return) and is not updated for the current season. |
|---|
| All Barbarian Guides | ||
|---|---|---|
List of Contents
Barbarian Mighty Throw Endgame Build
Mighty Throw Build Summary
| Click on a Link to Jump to a Section! | |||||||||||
|---|---|---|---|---|---|---|---|---|---|---|---|
This Barbarian build features Fallen Messiah's powerful version of the Barbarian Mighty Throw archetype using the new Bane of Ahjed-Den Unique Glove Armor. Check out more details of the build and more Diablo 4 content on his Youtube Channel, Fallen Messiah.
| Build Summary | |
|---|---|
 Mighty Throw Endgame Build Mighty Throw Endgame Build |
|
| Focus: Single-Target, Burst, Endgame | |
|
|
|
This Barbarian Mighty Throw end-game build for Season 8 uses the new unique Bane of Ahjed-Den Glove to enhance the Mighty Throw skill. Used in conjunction with the aspect, Mighty Throw becomes exponentially stronger, allowing it to one-shot bosses.
Mighty Throw Build Skills and Passives
| Click on a Link to Jump to a Section! | |||||||||||
|---|---|---|---|---|---|---|---|---|---|---|---|
※ More skills can be seen by scrolling vertically.
| Active Skills | |
|---|---|
┗
┗
|
|
┗
┗
┗
|
|
┗
┗
┗
┗
┗
┗
┗
┗
|
|
┗
┗
┗
┗
┗
|
|
┗
┗
┗
┗
┗
┗
┗
|
|
┗
┗
┗
┗
┗
┗
|
|
Mighty Throw Technique Slot
| Weapon Expertise |
|---|
Lucky Hit: Up to a 10% chance to gain 5 Fury when hitting an enemy. Double the amount of Fury gained while Berserking. You deal 15% increased critical strike while Berserking. |
The best Weapon Expertise to choose for the Mighty Throw build is the Two-Handed Mace expertise. Since we will be stacking a lot of cooldown reduction, this build will be in a Berserk state all the time, so this class specialization fits in well for the build.
Arsenal System and Techniques Guide
Mighty Throw Build Best Boss Powers
| Click on a Link to Jump to a Section! | |||||||||||
|---|---|---|---|---|---|---|---|---|---|---|---|
| Boss Power | Effect/Modifiers |
|---|---|
|
|
Effect: After you damage an enemy, spawn a pool of blood that deals XX Bleeding damage per second over 4 seconds. You can have up to 3 active pools. |
|
|
Modifier: Casting a Basic Skill while at Maximum Resource spends it all to make all Nearby enemies Vulnerable. Activating your Main Boss Power grants XX increased Vulnerable Damage for 5 seconds. |
|
|
Modifier: Hitting an Elite enemy with a Main Boss Power creates an inert Blister Clone with 10% of their Maximum Life for 15 seconds. Killing the Blister removes XX of the Elite's Life. An Elite can have up to 1 Blister active at once, and a Boss can have up to 2 Blisters. Enemies with Resilience cannot spawn Blisters. |
|
|
Modifier: Gain XX increased damage to all Elements. For each 1% of an Element's Resistance from bonuses, gain 0.2% increased damage for that Element, up to a maximum of XX. |
Lord Zir's Blood Pool is chosen for its consistency, as the condition required to trigger this boss power is easy to meet. The main highlight of this boss power is the Harbinger of Hatred's Volley modifier, which is used to expend Fury all at once.
Used in conjunction with the Ring of Red Furor, this makes the next attack a guaranteed critical strike, further enhancing Mighty Throw.
Best Boss Powers and Modifiers Guide
Mighty Throw Build Best Aspects and Affixes
| Click on a Link to Jump to a Section! | |||||||||||
|---|---|---|---|---|---|---|---|---|---|---|---|
※ More gear Aspects can be seen by scrolling vertically.
| Gear | Aspect and Affixes |
|---|---|
| Head | ・Fire Resistance ・Ranks to Prolific Fury ・Ranks to Aggressive Resistance ・Lucky Hit: Up to a [X]% Chance to deal Fire Damage |
| Chest | ・ + to All Passives ・+ % Damage on Next Attack After Entering Stealth ・ + Maximum Life ・+ % Resouce Generation |
| Gloves | ・Cooldown Reduction ・Armor ・Ranks to Mighty Throw ・Critical Strike Damage ・Fury Per Second ・Every 12 seconds, your next Mighty Throw detonates its pulses instantly as Fire Damage and deals 400-600% Increased Damage. |
| Pants | ・Strength ・Maximum Life ・Armor ・Basic Skills grant 20% Damage Reduction for (XX) seconds. Temper: ・Utility - Brute Innovation ┗ Total Armor
・Utility - Brute Innovation
┗ Mighty Throw Pulse Size |
| Boots | ・Movement Speed ・Cooldown Reduction ・Resistance to All Elements ・Non-Physical Damage |
| Amulet | ・Strength ・Cooldown Reduction ・Ranks to Heavy Handed Temper: ・Resource - Ultimate Efficiency ┗ Wrath of the Berserker Cooldown Reduction ・Utility - Brute Innovation ┗ Mighty Throw Pulse Size
|
| Ring | ・Maximum Resource ・Attack Speed ・Critical Strike Damage ・Fire Resistance |
| Ring | ・Poison Resistance ・ Strength ・Critical Strike Damage ・Maximum Life Temper: ・Resource - Ultimate Efficiency ┗ Wrath of the Berserker Cooldown Reduction ・Utility - Berserking Augments ┗ Damage while Berserking |
| Weapon (2H Sword) |
・+ All Stats ・+ % Damage ・ Maximum Life ・ Maximum Resonance |
| Weapon (1H Sword) |
・ + All Stats ・+ % Damage ・ Maximum Life ・ Maximum Resonance Temper: ・Weapon - Weapon Augments ┗ Chance of Mighty Throw to deal Double Damage ・Utility - Berserking Augments ┗ Damage while Berserking |
| Weapon (1H Sword) |
・ + All Stats ・1H Sword: Critical Strike Damage ・ Strength ・ Maximum Life ・ Critical Strike Damage Temper: ・Weapon - Weapon Augments ┗ Chance of Mighty Throw to deal Double Damage ・Utility - Berserking Augments ┗ Damage while Berserking |
| Offhand (2H Mace) |
・ + All Stats ・1H Sword: Critical Strike Damage ・ Strength ・ Maximum Life ・ Critical Strike Damage Temper: ・Weapon - Furious Augments ┗ Chance of Frenzy to hit Twice ・Utility - Berserking Augments ┗ Damage while Berserking |
Barbarian Mighty Throw Build Best Gems
| Click on a Link to Jump to a Section! | |||||||||||
|---|---|---|---|---|---|---|---|---|---|---|---|
Mighty Throw Build Gems
| Armor | Weapons | Jewelry |
|---|---|---|
 Ruby Ruby
|
 Emerald Emerald
|
 Diamond Diamond
|
Emeralds on the weapon slot helps with boosting the damage consistency as this build should also be stacking as much Critical Hit Chance as much as possible. As for the Jewelry slots, use Diamonds cap your Resistances or Armor.
Mighty Throw Best Runewords
| Runeword 1 | Runeword 2 |
|---|---|
|
|
|
For the runes, we will use Cir and Igni to increase Offering Capacity and to passively generate it. Frenzy will be the skill used to store more Offering stacks.
Kry is used to group enemies via the Spiritborn's vortex, and spent with Qax to further increase our damage.
Mighty Throw Best Mercenaries
| Click on a Link to Jump to a Section! | |||||||||||
|---|---|---|---|---|---|---|---|---|---|---|---|
| Mercenary | Reinforcement |
|---|---|
 Raheir Raheir |
 Varyana Varyana |
Use Varyana as Your Main Mercenary
Subo will be our main Mercenary. Thanks to her skill Seeker, this allows us to easily identify targets, and gain extra resource upon slaying marked enemies.
The rest of the skills that will be taken focus on crowd control, such as Wire Trap, Ready at Hand, Cover Fire, and Opening Fire, which will mainly benefit us during Mighty Throw downtime as we build more Offering stacks with Frenzy.
Subo Mercenary Guide and Best Skills
Use Raheir For Reinforcement
With Raheir as our Reinforcement Mercenary, he can save use from dicey situations with the Bastion skill set to trigger when we are hit with a Control Impairing Effect. This skill gives us Unstoppable and allows Raheir to instead take most of the damage dealt to us.
Mighty Throw Build Paragon Boards
| Click on a Link to Jump to a Section! | |||||||||||
|---|---|---|---|---|---|---|---|---|---|---|---|
| Paragon Boards |
|---|
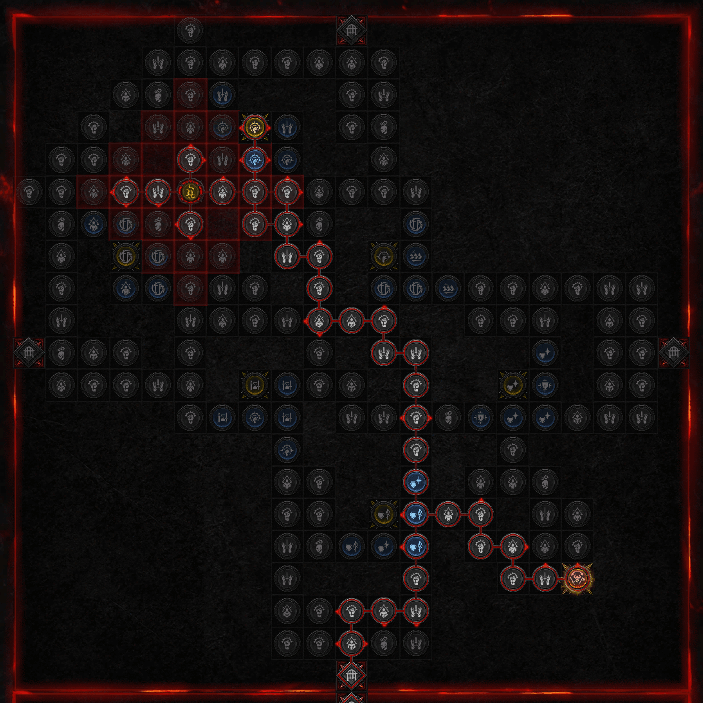
| 1. Starting Board (Wrath) |
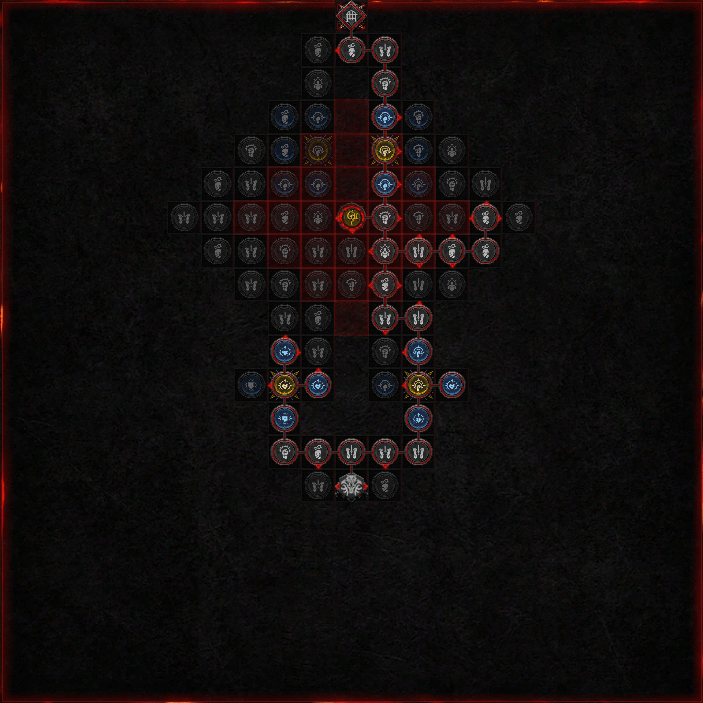 |
| 2. Blood Rage (Challenger) |
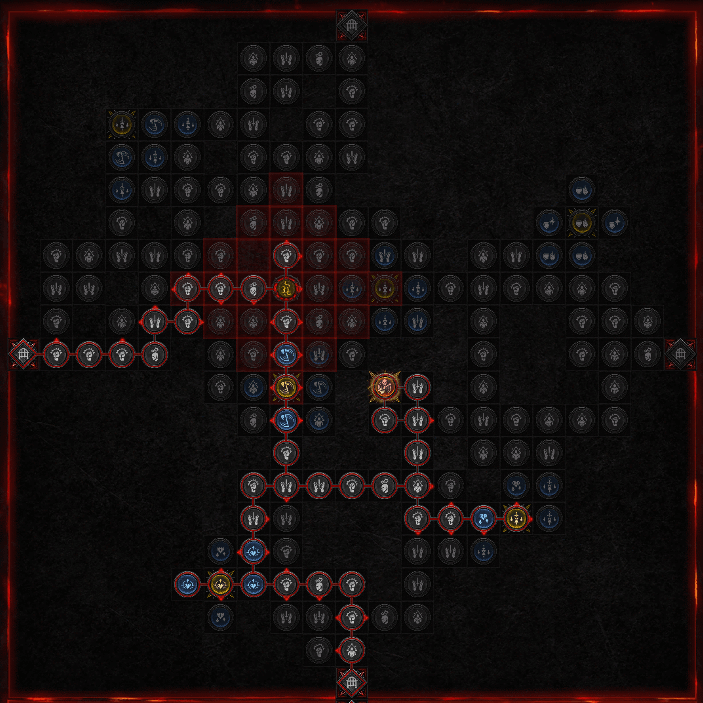 |
| 3. Decimator (Might) |
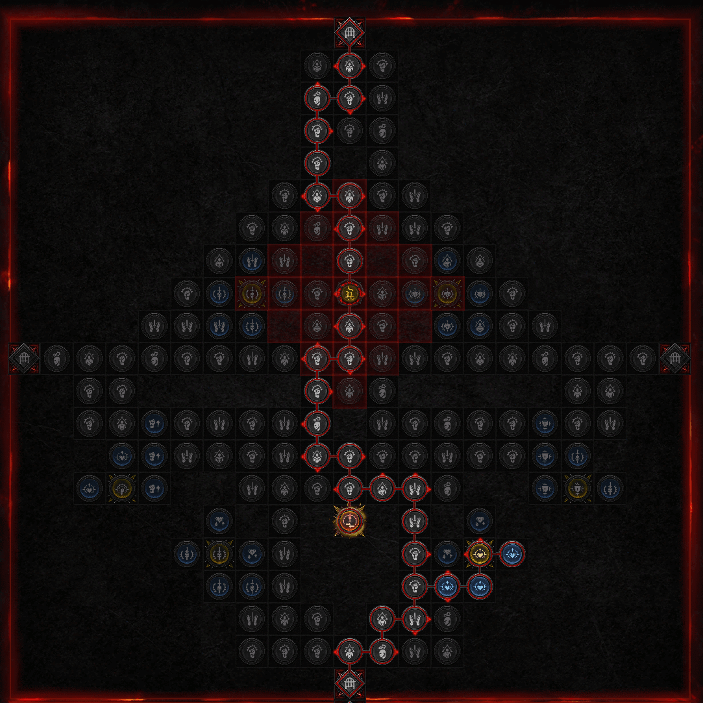 |
| 4. Bone Breaker (Territorial) |
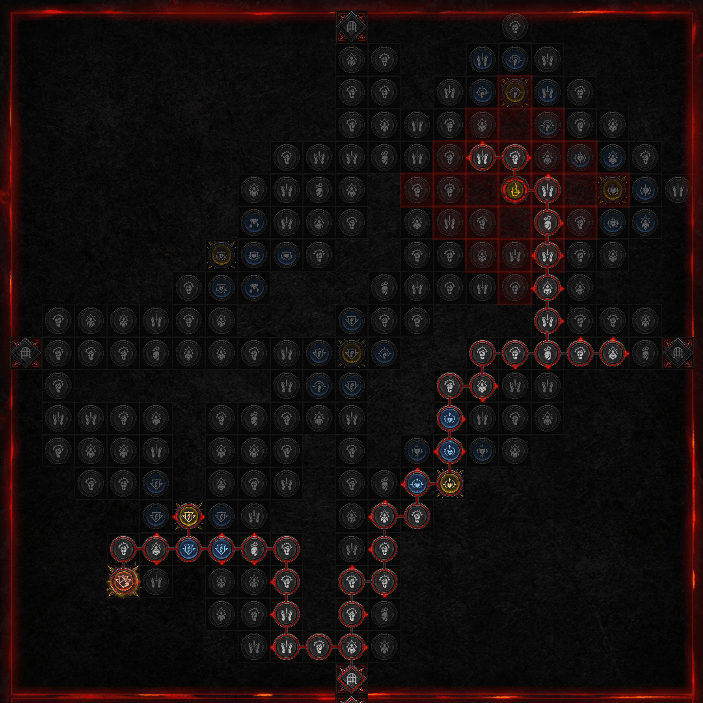 |
| 5. Weapon Master (Crusher) |
 |
Mighty Throw Build Playstyle and Rotation
| Click on a Link to Jump to a Section! | |||||||||||
|---|---|---|---|---|---|---|---|---|---|---|---|
The build will follow a basic 12-second rotation, banking all of our stored damage and unleashing it all at once with Mighty Throw. The build will play around the timing of the Bone Breaker Paragon Node and the Bane Ahjed-den Unique, so if you use Mighty Throw at the 12th second, the skill will do the most damage. The rotation is as follows:
- Use Wrath of the Berserker and War Cry to buff yourself up.
- Start attacking targets with Frenzy to build up Fury.
- At the 11th second mark, disengage from the enemy.
- Use Mighty Throw at the 12th second mark.
- Rinse and Repeat.
Diablo 4 (D4) Related Guides

All Class Builds
| All Classes | |||||
|---|---|---|---|---|---|
All Endgame Builds
| List of Endgame Builds |
|---|
All Leveling Builds
| List of Leveling Builds |
|---|
All Legacy Builds per Season
| Seasons | List of Legacy Builds |
|---|---|
| Season 9 | |
| Season 8 |
|
| Season 7 | |
| Season 6 |
Comment
Author
Barbarian Mighty Throw Build (Season 8)
improvement survey
03/2026
improving Game8's site?

Your answers will help us to improve our website.
Note: Please be sure not to enter any kind of personal information into your response.

We hope you continue to make use of Game8.
Rankings
- We could not find the message board you were looking for.
Gaming News
Popular Games

Genshin Impact Walkthrough & Guides Wiki

Honkai: Star Rail Walkthrough & Guides Wiki

Umamusume: Pretty Derby Walkthrough & Guides Wiki

Pokemon Pokopia Walkthrough & Guides Wiki

Resident Evil Requiem (RE9) Walkthrough & Guides Wiki

Monster Hunter Wilds Walkthrough & Guides Wiki

Wuthering Waves Walkthrough & Guides Wiki

Arknights: Endfield Walkthrough & Guides Wiki

Pokemon FireRed and LeafGreen (FRLG) Walkthrough & Guides Wiki

Pokemon TCG Pocket (PTCGP) Strategies & Guides Wiki
Recommended Games

Diablo 4: Vessel of Hatred Walkthrough & Guides Wiki

Cyberpunk 2077: Ultimate Edition Walkthrough & Guides Wiki

Fire Emblem Heroes (FEH) Walkthrough & Guides Wiki

Yu-Gi-Oh! Master Duel Walkthrough & Guides Wiki

Super Smash Bros. Ultimate Walkthrough & Guides Wiki

Pokemon Brilliant Diamond and Shining Pearl (BDSP) Walkthrough & Guides Wiki

Elden Ring Shadow of the Erdtree Walkthrough & Guides Wiki

Monster Hunter World Walkthrough & Guides Wiki

The Legend of Zelda: Tears of the Kingdom Walkthrough & Guides Wiki

Persona 3 Reload Walkthrough & Guides Wiki
All rights reserved
©2022 BLIZZARD ENTERTAINMENT, INC. ALL RIGHTS RESERVED.
All trademarks referenced herein are the properties of their respective owners.
The copyrights of videos of games used in our content and other intellectual property rights belong to the provider of the game.
The contents we provide on this site were created personally by members of the Game8 editorial department.
We refuse the right to reuse or repost content taken without our permission such as data or images to other sites.


![Everwind Review [Early Access] | The Shaky First Step to A Very Long Journey](https://img.game8.co/4440226/ab079b1153298a042633dd1ef51e878e.png/thumb)

![Monster Hunter Stories 3 Review [First Impressions] | Simply Rejuvenating](https://img.game8.co/4438641/2a31b7702bd70e78ec8efd24661dacda.jpeg/thumb)


