Rogue Andariel's Barrage Endgame Build (Season 6)
★ NEW: Season 12 Guide and New Features
┗ Seasonal Content: New Uniques | Bloodied Sigils | Slaughterhouses
┗ Seasonal Mechanic: Killstreaks and Bloodied Items
★ NEW: Lord of Hatred Expansion Release Date
★ Check out our Vessel of Hatred expansion guide
This is the Rogue Andariel’s Barrage endgame build and guide for Diablo 4: Vessel of Hatred (D4). Read on to learn more about Andariel’s Barrage build, including its skills, gear, gems, runes, mercenaries, paragon boards, and how to play the build for Season 6.
 Attention! Attention! |
This build is a Legacy Build that was created from Season 6 (Season of Hatred Rising) and is not updated for the current season. |
|---|
| All Rogue Guides | ||
|---|---|---|
List of Contents
Andariel's Barrage Build Guide
Andariel's Barrage Build Summary
| Click on a Link to Jump to a Section! | |||||||||||
|---|---|---|---|---|---|---|---|---|---|---|---|
| Build Summary | |
|---|---|
 Barrage Rogue Barrage Rogue |
|
| Focus: Torment 4, Uber Bosses, Infernal Horde | |
|
|
|
The build uses the poison novas from Andariel's Visage and Poison Imbued Barrage to deal with both mobs and bosses. It also takes advantage of Preparation, paired with the No Witnesses and the Close Quarters Combat key passive for high base damage which allows the poison damage to scale higher.
This Barrage Rogue build can take advantage of three Mythic Uniques and 100% Lucky Hit Chance to burst down bosses and efficiently farm high tiers of The Pit.
Skills and Specialization
| Click on a Link to Jump to a Section! | |||||||||||
|---|---|---|---|---|---|---|---|---|---|---|---|
| Back to the top ▲ | |||||||||||
More skills can be seen by scrolling vertically.
| Active Skills |
|---|
┗
┗
|
┗
┗
┗
┗
┗
|
┗
┗
┗
┗
┗
┗
┗
|
┗
┗
┗
┗
┗
┗
┗
┗
|
┗
┗
┗
┗
┗
┗
┗
|
┗
┗
┗
┗
┗
┗
┗
|
Key Passive |
Specialization
| Preparation | Spend 75 Energy to reduce your Ultimate Skill's Cooldown by 5 seconds. Ultimate Skills reset other Cooldowns and grant 15% Damage Reduction for 10 Seconds. |
|---|
Preparation is the best specialization for the build as it keeps your Shadow Clone Active, granting you. This works well with the Attack Speed affixes and Precision key passive for this build, allowing you to cast more barrage to get your Shadow Clone back.
Best Aspects and Affixes
| Click on a Link to Jump to a Section! | |||||||||||
|---|---|---|---|---|---|---|---|---|---|---|---|
| Back to the top ▲ | |||||||||||
 Masterwork Priority Masterwork Priority |
Affixes marked with ★ are the ones you should aim to upgrade when masterworking. |
|---|
More gear Aspects can be seen by scrolling vertically.
| Gear | Aspect and Affixes |
|---|---|
| Head | Stats: ・All Stats ・Life on Hit ・Attack Speed ★★★ ・Maximum Poison Resistance Note: This is a core equipment for the build, if you do not have Andariel's Visage yet, you can replace it with a Mangler's Aspect Helm that has Dexterity GA. |
| Chest | Stats: ・Damage Reduction ・Movement Speed ・Resistance to All Elements ★★★ ・Maximum Resistance to All Elements Note: If you aren't able to get Tyrael's Might, you can use a chest piece with the Aspect of Retribution to boost your damage against crowd-controlled enemies. |
| Gloves | Stats: ・Critical Strike Chance ・Attack Speed ・Lucky Hit Chance ★★★ ・Lucky Hit to Apply a Random Crowd Control |
| Pants | Stats: ・Dexterity ★★★ ・Armor ・Maximum Life Temper: ・Defensive - Rogue Cloaking ┗ Ranks to Second Wind
・Utility - Worldly Fortune
┗ Lucky Hit: Chance to Freeze |
| Boots | Stats: ・Attacks Reduce Evade's Cooldown by 1.5 Seconds ・Maximum Life ・Dexterity ★★★ ・Armor Temper: ・Mobility - Rogue Motion ┗ Movement Speed per Dark Shroud Shadow
・Utility - Worldly Fortune
┗ Lucky Hit: Chance to Freeze |
| Amulet | Stats: ・Dexterity % ・Damage ★★★ ・Ranks to Malice ★★★ Temper: ・Defensive - Natural Resistance ┗ Fire Resistance
・Offensive - Subterfuge Expertise
┗ Damage per Dark Shroud Shadow |
| Ring | Stats: ・Lightning Resistance ・Damage ・Damage Over Time ★★★ ・Dexterity hr] Temper: ・Resource - Rogue Invigoration ┗ Ranks to Innervation
・Offensive - Subterfuge Expertise
┗ Damage per Dark Shroud Shadow |
| Ring | Stats: ・Attack Speed ★★★ ・Critical Strike Chance ・Lucky hit Chance ・Ranks to Core Skills Note: If you aren't able to get the Ring of Starless Skies, you can opt for a ring with a Starlight Aspect which grants a similar effect. |
| Weapon (Bow) |
Stats: ・Damage ・Damage Over Time ★★★ ・Dexterity hr] Temper: ・Weapon - Core Augments ┗ Chance for Barrage to Cast Twice
・Offensive - Subterfuge Expertise
┗ Damage per Dark Shroud Shadow |
| Weapon (Dagger) |
Stats: ・Dexterity ★★★ ・Vulnerable Damage ・Subterfuge Cooldown Reduction ・Innervation |
| Weapon (Dagger) |
Stats: ・Damage ・Damage Over Time ★★★ ・Dexterity hr] Temper: ・Weapon - Core Augments ┗ Chance for Barrage to Cast Twice
・Offensive - Subterfuge Expertise
┗ Damage per Dark Shroud Shadow |
Andariel's Visage and Fists of Fate are the core equipment on the build, as the lucky hit chance from Fists of Fate allows Barrage to continuously apply the poison nova from Andariel's Visage.
The damage of Andariel's Visage poison nova is scaled through increases in base affixes like Damage, Damage over time, and Dexterity, which is improved by the Frostbitten, Creeping Death, and Concussive Strikes aspects.
For defense and sustainability, Tyrael's Might should cover a huge chunk of your elemental resistances. Tam and Mot runes should also provide increased damage reduction from Dark Shroud.
Andariel's Barrage Gems and Runewords
| Click on a Link to Jump to a Section! | |||||||||||
|---|---|---|---|---|---|---|---|---|---|---|---|
| Back to the top ▲ | |||||||||||
Andariel's Barrage Gems
| Armor | Weapons | Jewelry |
|---|---|---|
 Emerald Emerald
|
 Amethyst Amethyst
|
 Skull Skull
|
For gems, it's best to slot in Emeralds in your armor to increase Dexterity, and Amethyst in your weapons to increase Damage Over Time and maintain the build's defenses. Skulls can be replaced with Diamonds if you are low on Resistance.
Andariel's Barrage Runewords
| Runeword 1 | Runeword 2 |
|---|---|
|
|
|
The best runewords for the Barrage Rogue build are Tam + Mot to gain Dark Shroud for more damage and survivability, and Lith + Ohm which boosts your damage while spamming Barrage in a stationary position.
Andariel's Barrage Mercenaries
| Click on a Link to Jump to a Section! | |||||||||||
|---|---|---|---|---|---|---|---|---|---|---|---|
| Back to the top ▲ | |||||||||||
| Mercenary | Reinforcement |
|---|---|
The best mercenary for the Barrage Rogue Build is Subo who gives an increase to Critical Strike Damage with Opening Fire and helps with staggering bosses through his Wire Traps.
For the Reinforcement, pick Raheir and pair his Bastion to the opportunity when you're crowd-controlled to remove control-impairing effects.
Paragon Board Setup
| Click on a Link to Jump to a Section! | |||||||||||
|---|---|---|---|---|---|---|---|---|---|---|---|
| Back to the top ▲ | |||||||||||
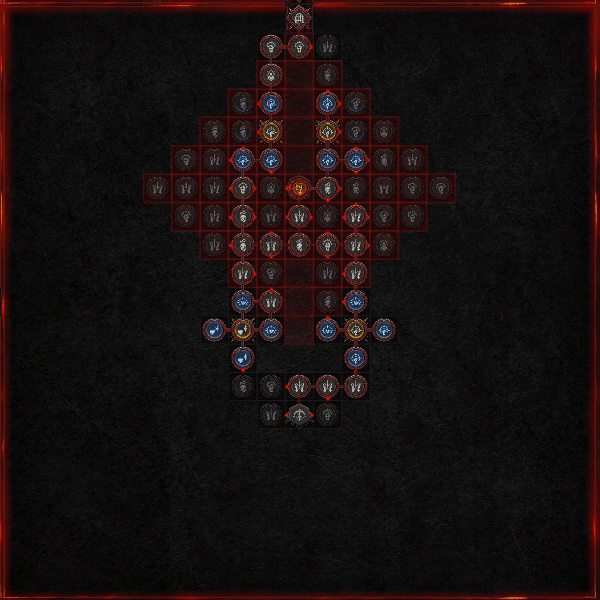
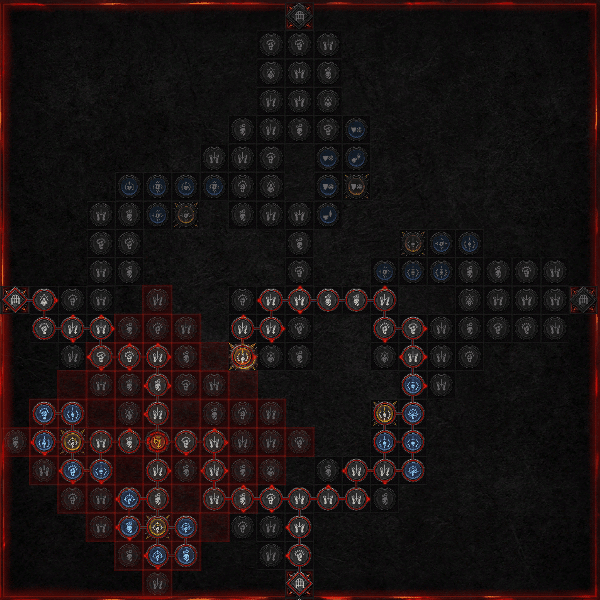
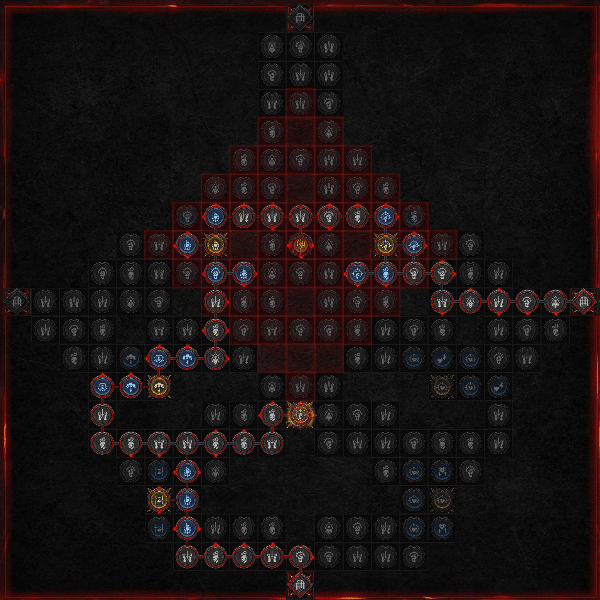
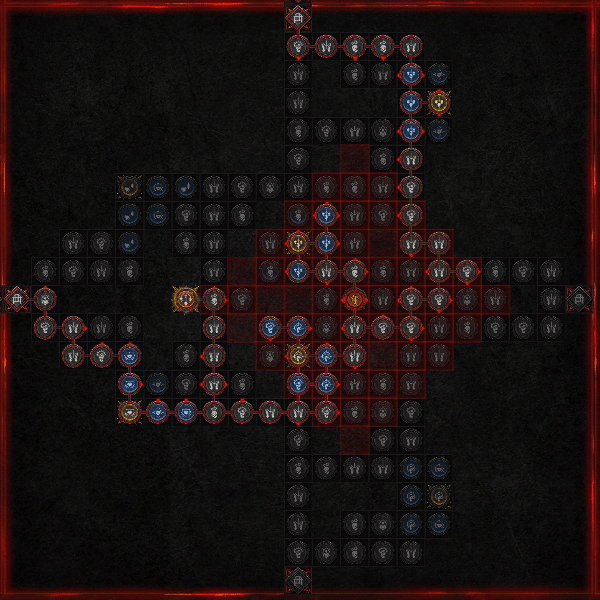
| Paragon Boards |
|---|
| 1. Starting Board (Headhunter) |
 |
| 2. Exploit Weakness (Devious) |
 |
| 3. No Witnesses (Efficacy) |
 |
| 4. Cheap Shot (Turf) |
 |
| 5. Leyrana's Instict (Tracker) |
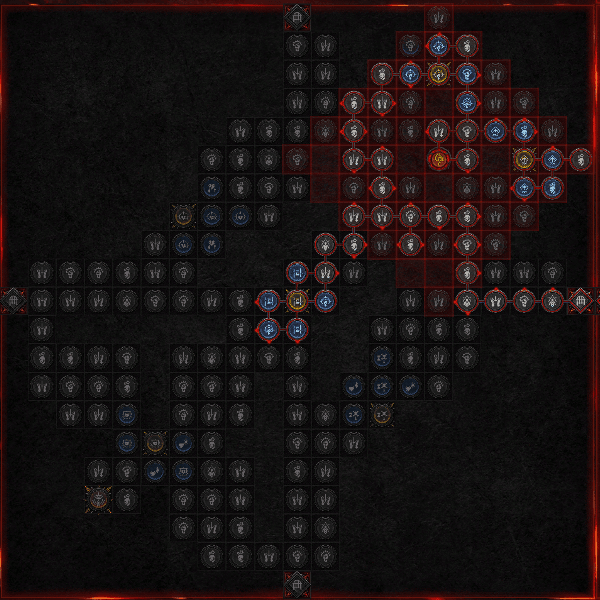 |
Prioritize obtaining the legendary nodes and normal nodes within glyph ranges until you reach the final board. The total points in this build is 252 paragon points, but the majority of players can create this build even with only 243 points if they disregard the Nimble rare node.
For the rare nodes, prioritize taking any nodes that can increase damage to further scale the damage of Andariel's Visage poison novas.
If you happen to have 300 Paragon points, consider obtaining rare nodes that increase your survivability, or use the points to obtain normal nodes within the Headhunter glyph range for more Dexterity.
Build Playstyle and Tips
| Click on a Link to Jump to a Section! | |||||||||||
|---|---|---|---|---|---|---|---|---|---|---|---|
| Back to the top ▲ | |||||||||||
Playing the Andariel's Barrage build is very easy, you just have to stand still while blasting through your enemiy's health to gain damage buffs and boost the poison novas from Andariel's Visage.
The usual rotation is as follows:
- Use Shadow Step on bosses then use Poison Trap and Shadow Clone.
- Cast Barrage while standing still to obtain the buffs from Tam + Mot, Lith + Ohm, and Aspect of Inner Calm.
- Use Dash to resposition fast.
Always Use Shadow Step Against Bosses
Using Shadow Step is extremely useful for building the stagger meter for bosses. Always use it whenever it's not on cooldown to stagger bosses.
Spam Poison Trap
Subverting Poison Trap increases your poison damage against enemies affected by the trap. Always use Poison Trap to increase the efficiency of your Poison Imbued Barrage to make quick work of tougher mobs like Desecrators in the Infernal Horde.
Diablo 4 Related Guides

All Class Builds
| All Classes | |||||
|---|---|---|---|---|---|
All Endgame Builds
| List of Endgame Builds |
|---|
All Leveling Builds
| List of Leveling Builds |
|---|
All Legacy Builds per Season
| Seasons | List of Legacy Builds |
|---|---|
| Season 11 | |
| Season 10 | |
| Season 9 | |
| Season 8 | |
| Season 7 | |
| Season 6 |
|
Comment
Author

Rogue Andariel's Barrage Endgame Build (Season 6)
Rankings
- We could not find the message board you were looking for.

Gaming News


Popular Games

Genshin Impact Walkthrough & Guides Wiki
Umamusume: Pretty Derby Walkthrough & Guides Wiki
Crimson Desert Walkthrough & Guides Wiki
Monster Hunter Stories 3: Twisted Reflection Walkthrough & Guides Wiki
Honkai: Star Rail Walkthrough & Guides Wiki
Pokemon Pokopia Walkthrough & Guides Wiki
The Seven Deadly Sins: Origin Walkthrough & Guides Wiki
Wuthering Waves Walkthrough & Guides Wiki
Zenless Zone Zero Walkthrough & Guides Wiki
Arknights: Endfield Walkthrough & Guides Wiki


Recommended Games
Fire Emblem Heroes (FEH) Walkthrough & Guides Wiki
Diablo 4: Vessel of Hatred Walkthrough & Guides Wiki
Cyberpunk 2077: Ultimate Edition Walkthrough & Guides Wiki
Yu-Gi-Oh! Master Duel Walkthrough & Guides Wiki
Super Smash Bros. Ultimate Walkthrough & Guides Wiki
Pokemon Brilliant Diamond and Shining Pearl (BDSP) Walkthrough & Guides Wiki
Elden Ring Shadow of the Erdtree Walkthrough & Guides Wiki
Monster Hunter World Walkthrough & Guides Wiki
The Legend of Zelda: Tears of the Kingdom Walkthrough & Guides Wiki
Persona 3 Reload Walkthrough & Guides Wiki


All rights reserved
©2022 BLIZZARD ENTERTAINMENT, INC. ALL RIGHTS RESERVED.
All trademarks referenced herein are the properties of their respective owners.
The copyrights of videos of games used in our content and other intellectual property rights belong to the provider of the game.
The contents we provide on this site were created personally by members of the Game8 editorial department.
We refuse the right to reuse or repost content taken without our permission such as data or images to other sites.