Spiritborn Concussive Stomp Endgame Build (Season 6)
★ NEW: Season 12 Guide and New Features
┗ Seasonal Content: New Uniques | Bloodied Sigils | Slaughterhouses
┗ Seasonal Mechanic: Killstreaks and Bloodied Items
★ NEW: Lord of Hatred Expansion Release Date
★ Check out our Vessel of Hatred expansion guide
This is a Spiritborn Concussive Stomp endgame build and guide for Diablo 4: Vessel of Hatred (D4). Read on to learn more about the Concussive Stomp build, including its skills, gear, gems, runes, mercenaries, and paragon boards, as well as how to play the build for Season 6!
 Attention! Attention! |
This build is a Legacy Build that was created from Season 6 (Season of Hatred Rising) and is not updated for the current season. |
|---|
| All Spiritborn Guides | ||
|---|---|---|
List of Contents
Concussive Stomp Build Guide
Concussive Stomp Build Summary
| Click on a Link to Jump to a Section! | |||||||||||
|---|---|---|---|---|---|---|---|---|---|---|---|
This Spiritborn Endgame build is based on a build by P4wnyhof (Youtube). The video includes details on how to gear up to get the build online. You can check P4wnyhof's Twitch Channel for more Diablo 4 content and to ask questions about the build!
| Build Summary | |
|---|---|
 Concussive Stomp Endgame Build Concussive Stomp Endgame Build |
|
| Focus: Endgame, Torment Pushing | |
|
|
|
This build makes use of the Reinforced Concussive Stomp damage buff and spamming it with Crushing Hand using Ring of the Midnight Sun to maintain your Vigor and reach up to 4000% Critical Strike Damage with the Aspect of Redirected Force. Having the Gorilla as both your primary and secondary Spirit Hall specialization will give you better survivability, and increase your stacks on Resolve.
The combination of Ravager and Armored Hide makes this build an offensive tank that can increase its damage based on your Resolve stacks. We recommend this build for those who are reaching endgame as higher Torment difficulties require more defensive stats.
Concussive Stomp Build Skills and Class Mechanic
| Click on a Link to Jump to a Section! | |||||||||||
|---|---|---|---|---|---|---|---|---|---|---|---|
| Back to the top ▲ | |||||||||||
Concussive Stomp Build Skills and Passives
※ More skills can be seen by scrolling vertically.
| Active Skills |
|---|
┗
┗
|
┗
┗
┗
┗
┗
|
┗
┗
┗
┗
┗
┗
┗
|
┗
┗
┗
┗
┗
┗
┗
┗
┗
┗
┗
┗
┗
┗
┗
┗
|
┗
|
┗
┗
┗
┗
┗
┗
|
┗
|
Concussive Stomp Build Spirit Hall
| Primary Spirit |
|---|
(Level 15) Casting a Gorilla Skill deals 100% Thorns to enemies you hit and grants a Barrier for 10% of Maximum Life (X), up to 40%, for 3 seconds. All Skills are now also Gorilla Skills. |
| Secondary Spirit |
(Level 30) Maximum Resolve is increased by 2. When you have at least 5 stacks of Resolve, you are Unstoppable. |
Gorilla is the best specialization for the Primary and Secondary slot in this Concussive Stomp build since it gives you access to increased Resolve and Barriers, which increase block chance and critical strike damage, respectively.
Concussive Stomp Build Aspects and Affixes
| Click on a Link to Jump to a Section! | |||||||||||
|---|---|---|---|---|---|---|---|---|---|---|---|
| Back to the top ▲ | |||||||||||
※ More gear Aspects can be seen by scrolling vertically.
| Gear | Aspect and Affixes |
|---|---|
| Head | Stats: ・Maximum Life ・Cooldown Reduction ・Lucky Hit ・Shadow Resistance Note: If you do not have this yet, you can swap this with the Harmony of Ebewaka to get that damage increase. |
| Chest | Stats: ・Armor ★★★ ・Maximum Life ・Vigor per Second Temper: ・Defensive - Spiritborn Resolve ┗ Maximum Resolve Stacks
・Utility - Gorilla Innovation
┗ Crushing Hand Size |
| Gloves | Stats: ・Attack Speed ・Critical Strike Chance ★★★ ・Ranks to Crushing Hand Temper: ・Utility - Gorilla Innovation ┗ Crushing Hand Size
・Offensive - Worldly Finesse
┗ Critical Strike Damage |
| Pants | Stats: ・Armor ★★★ ・Maximum Life ・Resistance to All Elements Temper: ・Defensive - Spiritborn Resolve ┗ Maximum Resolve Stacks |
| Boots | Stats: ・Armor ★★ ・Resistance to All Elements ★ ・Maximum Life Temper: ・Utility - Worldly Fortune ┗ Lucky Hit: Up to a Chance to Freeze for 2 Seconds
・Mobility - Natural Motion
┗ Movement Speed |
| Amulet | Stats: ・Total Armor ★★★ ・Maximum Life ・Resistance to All Elements Temper: ・Defensive - Worldly Endurance ┗ Total Armor
・Offensive - Worldly Finesse
┗ Critical Strike Damage |
| Ring 1 | Stats: ・Attack Speed ・Critical Strike Chance ★★★ ・Maximum Life Temper: ・Offensive - Worldly Finesse ┗ Critical Strike Damage
・Resource - Eagle Efficiency
┗ The Seeker Charges Note: You can swap this out once you obtain the Ring of Starless Skies to max out your damage. |
| Ring 2 | Stats: ・Dexterity ・Cooldown Reduction ・Critical Strike Damage ★★★ ・Ranks to Mirage |
| Quarterstaff | Stats: ・Critical Strike Damage ★★★ ・Maximum Life ・Dexterity Temper: ・Weapon - Gorilla Augments ┗ Chance for Crushing Hand to Extra Hit
・Offensive - Worldly Finesse
┗ Critical Strike Damage |
Concussive Stomp Build Gems and Runewords
| Click on a Link to Jump to a Section! | |||||||||||
|---|---|---|---|---|---|---|---|---|---|---|---|
| Back to the top ▲ | |||||||||||
Concussive Stomp Build Gems
| Weapon/Armor | Amulet | Rings |
|---|---|---|
 Emerald Emerald
|
 Skull Skull
|
 Diamond Diamond
|
For Gems, it's best to slot in Emerald on your weapon slot for more Critical Strike Damage and Dexterity from your armor slots, a Skull Gem on your amulet slot for more Armor, and Diamond on your ring slots to get more Elemental Resistance.
Diamonds can be replaced with other gems depending on which resistances you need to get 70% or close across the board.
Concussive Stomp Build Runewords
| Runeword 1 | Runeword 2 |
|---|---|
|
|
|
The best runewords for the Concussive Stomp build are Poc + Gar to consistantly grant yourself more Critical Strike Chance, and Zan + Kry to use Vortex whenever you cast your Ultimate twice for some good crowd control.
Make sure to equip these on your Head and Chest Armor as both of these can have 2 gem sockets that are perfect for slotting in Runewords.
Concussive Stomp Build Mercenaries
| Click on a Link to Jump to a Section! | |||||||||||
|---|---|---|---|---|---|---|---|---|---|---|---|
| Back to the top ▲ | |||||||||||
| Mercenary | Reinforcement |
|---|---|
The best mercenaries for the Concussive Stomp Build are Varyana, who can give bonus Attack Speed to cast your Crushing Hand even faster, and Raheir, who can cast Crater whenever you use Crushing Hand for more crowd control.
Concussive Stomp Build Paragon Boards
| Click on a Link to Jump to a Section! | |||||||||||
|---|---|---|---|---|---|---|---|---|---|---|---|
| Back to the top ▲ | |||||||||||
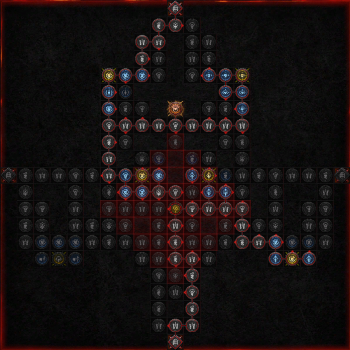
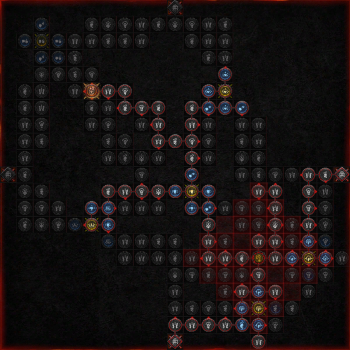
| Paragon Boards |
|---|
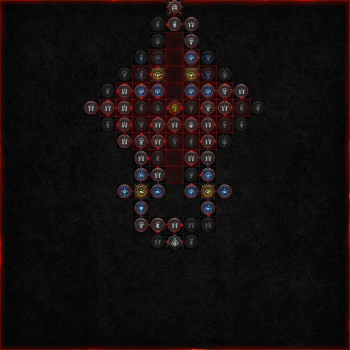
| 1. Starting Board (Spirit) |
 |
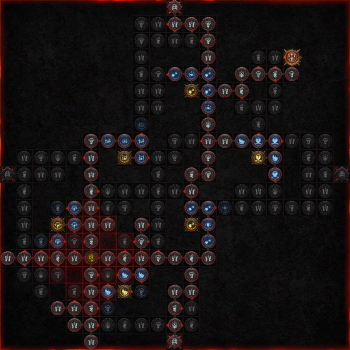
| 2. Sapping (Headhunter) |
 |
| 3. Viscous Shield (Revenge) |
 |
| 4. In-Fighter (Fitness) |
 |
| 5. Convergence (Colossal) |
 |
For Glyphs, your best ones would be Spirit and Fitness, for massively increasing your Critical Strike Damage to keep up in higher Torment difficulties.
We also recommend prioritizing getting the Viscous Shield and Sapping Legendary nodes as these will increase your damage significantly.
Concussive Stomp Build Playstyle and Tips
| Click on a Link to Jump to a Section! | |||||||||||
|---|---|---|---|---|---|---|---|---|---|---|---|
| Back to the top ▲ | |||||||||||
The Concussive Stomp Build playstyle focuses on deal large amounts of critical strike damage while having high defense and barriers to survive. The rotation is as follows:
- Use Crushing Hand 3 times to lower the cooldowns of your skills every time.
- Activate Ravager for the damage buff, then cast The Seeker so you can activate Ravager again.
- Use Armored Hide whenever your Resolve stacks are getting low.
- Cast Concussive Stomp then The Seeker so you can recast Concussive Stomp up to 3 times for free.
Diablo 4 Related Guides

All Class Builds
| All Classes | |||||
|---|---|---|---|---|---|
All Endgame Builds
| List of Endgame Builds |
|---|
All Leveling Builds
| List of Leveling Builds |
|---|
All Legacy Builds per Season
| Seasons | List of Legacy Builds |
|---|---|
| Season 11 | |
| Season 10 | |
| Season 9 | |
| Season 8 | |
| Season 7 | |
| Season 6 |
|
Comment
Author

Spiritborn Concussive Stomp Endgame Build (Season 6)
Rankings
- We could not find the message board you were looking for.

Gaming News

![Star Savior Review [First Impressions] | Engaging, Entertaining, and Expensive](https://img.game8.co/4447603/8f500e9bf666bdb8adb1af478e9dfdbd.png/show)


Popular Games

Genshin Impact Walkthrough & Guides Wiki
Umamusume: Pretty Derby Walkthrough & Guides Wiki
Crimson Desert Walkthrough & Guides Wiki
Monster Hunter Stories 3: Twisted Reflection Walkthrough & Guides Wiki
Honkai: Star Rail Walkthrough & Guides Wiki
Pokemon Pokopia Walkthrough & Guides Wiki
The Seven Deadly Sins: Origin Walkthrough & Guides Wiki
Wuthering Waves Walkthrough & Guides Wiki
Zenless Zone Zero Walkthrough & Guides Wiki
Arknights: Endfield Walkthrough & Guides Wiki


Recommended Games
Fire Emblem Heroes (FEH) Walkthrough & Guides Wiki
Diablo 4: Vessel of Hatred Walkthrough & Guides Wiki
Cyberpunk 2077: Ultimate Edition Walkthrough & Guides Wiki
Yu-Gi-Oh! Master Duel Walkthrough & Guides Wiki
Super Smash Bros. Ultimate Walkthrough & Guides Wiki
Pokemon Brilliant Diamond and Shining Pearl (BDSP) Walkthrough & Guides Wiki
Elden Ring Shadow of the Erdtree Walkthrough & Guides Wiki
Monster Hunter World Walkthrough & Guides Wiki
The Legend of Zelda: Tears of the Kingdom Walkthrough & Guides Wiki
Persona 3 Reload Walkthrough & Guides Wiki


All rights reserved
©2022 BLIZZARD ENTERTAINMENT, INC. ALL RIGHTS RESERVED.
All trademarks referenced herein are the properties of their respective owners.
The copyrights of videos of games used in our content and other intellectual property rights belong to the provider of the game.
The contents we provide on this site were created personally by members of the Game8 editorial department.
We refuse the right to reuse or repost content taken without our permission such as data or images to other sites.