This survey will take about 1 minute.
Your answers will help us to improve our website.
Diablo 4: Vessel of Hatred (D4)
Sorcerer AFK Endgame Build (Season 10)
★ NEW: Season 12 Guide and New Features
┗ Seasonal Content: New Uniques | Bloodied Sigils
┗ Seasonal Mechanic: Killstreak and Bloodied Items
★ NEW: Lord of Hatred Expansion Release Date
★ Check out our Vessel of Hatred expansion guide
This is an AFK Sorcerer endgame build and guide for Season 10 of Diablo 4: Vessel of Hatred (D4). Read on to learn more about the AFK Sorcerer build as well as its playstyle in the Season of Infernal Chaos!
| All Sorcerer Guides | ||
|---|---|---|
List of Contents
AFK Sorcerer Build
AFK Sorcerer Build Summary
| Click on a Link to Jump to a Section! | |||||||||||
|---|---|---|---|---|---|---|---|---|---|---|---|
This AFK Sorcerer Endgame build is based on Slaydra at Slaydra (Youtube). The video above includes details on how to gear up to get the build online. You can check Slaydra's Twitch Channel for more Diablo 4 content and ask questions about the build!
| Build Summary | |
|---|---|
 AFK Sorcerer Endgame Build AFK Sorcerer Endgame Build |
|
| Focus: AoE, Burst, Auto Cast, Endgame | |
|
|
|
This AFK Sorcerer endgame build for Season 10 focuses on auto casting Ice Shards, Fireball and Meteor without the need to press any skill aside from Teleport for mobility.
Do note that if you want to take on Bosses or higher Pit tiers, you will need to manually cast your skills since not all of them can spawn additional mobs for you to proc your auto casts.
Season 10 Guide (Infernal Chaos)
AFK Sorcerer Build Skills and Passives
| Click on a Link to Jump to a Section! | |||||||||||
|---|---|---|---|---|---|---|---|---|---|---|---|
| Back to the top ▲ | |||||||||||
※ More skills can be seen by scrolling vertically.
| Active Skills | |
|---|---|
┗
┗
|
|
┗
┗
┗
┗
┗
┗
┗
┗
|
|
┗
┗
┗
┗
┗
┗
┗
┗
┗
|
|
┗
┗
|
|
┗
┗
┗
┗
┗
┗
┗
|
|
┗
┗
┗
┗
┗
┗
┗
|
|
Ice Hydra Build Enchantment
| Hydra Enchantment Slots | |
|---|---|
|
(Level 15) |
(Level 30) |
Your first enchantment should be Ice Shards to enable auto casting against Frozen enemies. As for your second enchantment, you will need to choose Fireball as this also auto casts whenever you kill an enemy to further enable the AFK build.
AFK Sorcerer Build Chaos Perks
| Click on a Link to Jump to a Section! | |||||||||||
|---|---|---|---|---|---|---|---|---|---|---|---|
| Back to the top ▲ | |||||||||||
| Chaos Perks Setup | |||||
|---|---|---|---|---|---|
|
Mana Shield You have 99% reduced Maximum Life but any damage you would take is dealt to your Mana before your Life. If you have not taken damage in the last 4 seconds, your Mana Regeneration is increased by 5,000%. You gain 200-400% increased Maximum Mana and each point of Intelligence increases your Maximum Mana by 1. |
|||||
|
Advanced Techniques Your base Core skill ranks increase their Mana Cost or Cooldown by 10% and further increase their damage by 10-20%. |
Power Siphon Your Core Skills deal 50-100% increased damage, but also reduce your Maximum Current Resource by 20 for 6 seconds. This reduction stacks but does not refresh. |
Crazy Brew Your Healing Potion is infused with the power of Chaos, granting you 100% Resource Cost Reduction, 40-80% increased Attack Speed and 40-80 increased Movement Speed for 4 seconds. Your Healing Potion has a 10 second Cooldown and you can drink it at full Life. |
|||
The Chaos Perks for the AFK Sorcerer build focus on boosting your Core Skill damage with Advanced Techniques and Power Siphon. This synergizes well with the build since you will be auto casting Ice Shards and Fireball most of the time.
Mana Shield is a defensive perks since it also synergizes well with mana stacking for better survivability. This allows the build to have very low health, but will use the mana pool instead for life with a huge increase to mana regeneration.
AFK Sorcerer Build Aspects and Affixes
| Click on a Link to Jump to a Section! | |||||||||||
|---|---|---|---|---|---|---|---|---|---|---|---|
| Back to the top ▲ | |||||||||||
 Equipment Notes! Equipment Notes! |
Affixes marked with ★ are ones you should aim to upgrade when Masterworking. Chaos Armor does not have to be used on a specific slot and can be interchangeable with other equipment slots. |
|---|
※ More gear Aspects can be seen by scrolling vertically.
| Gear | Aspect and Affixes |
|---|---|
| Head | Stats: ・Critical Strike Chance ・Lucky Hit Chance ・Movement Speed ・Ranks to Core Skills ★★★ |
| Chest (Chaos Armor) |
Stats: ・Resistance to All Elements ・All Stats ・Critical Strike Damage ★★★ ・Maximum Resource |
| Gloves | Stats: ・Ranks to Core Skills ★★★ ・Critical Strike Chance ・Critical Strike Damage Temper: ・Utility - Worldly Fortune ┗ Lucky Hit Chance
・Offensive - Worldly Finesse
┗ Critical Strike Damage |
| Pants | Stats: ・Cold Resistance ・Maximum Life ・Frost Nova Size ★★★ ・Shatter's Damage Echo |
| Boots | Stats: ・Movement Speed ・Chill Slow Potency ★★★ ・Critical Strike Chance Against Chilled Enemies ・Cold Resistance |
| Amulet | Stats: ・Intelligence ★★★ ・Ranks to Inner Flames ・Ranks to Icy Touch Temper: ・Offensive - Worldly Finesse ┗ Critical Strike Damage
・Defensive - Worldly Endurance
┗ Total Armor |
| Ring | Stats: ・Attack Speed ・Critical Hit Chance ・Lucky Hit Chance ・Ranks to Core Skills★★★ |
| Ring | Stats: ・Intelligence ★ ・Attack Speed ・Critical Strike Damage ★★ Temper: ・Offensive - Conjuration Finesse ┗ Critical Strike Damage
・Resource - Worldly Stability
┗ Lucky Hit: Chance to Restore Primary Resource |
| Weapon (Quarterstaff) |
Stats: ・Intelligence ★★★ ・Maximum Life ・Critical Strike Damage Temper: ・Weapon - Frost Augments ┗ Chance for Ice Shards Projectiles to Cast Twice
・Offensive - Worldly Finesse
┗ Critical Strike Damage |
The Locran's Talisman in the AFK Sorcerer build is interchangeable with other available slots as long as you get the right Affixes, Tempering, and Aspects equipped to enable the build.
AFK Sorcerer Build Gems and Runewords
| Click on a Link to Jump to a Section! | |||||||||||
|---|---|---|---|---|---|---|---|---|---|---|---|
| Back to the top ▲ | |||||||||||
| Weapon | Armor | Jewelry |
|---|---|---|
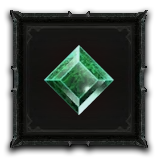 Emerald Emerald
|
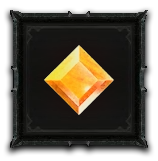 Topaz Topaz
|
 Skull Skull
|
For Gems, it's best to slot in Emerald on your weapon slot for more Critical Strike Damage. Slot in Topaz on the rest of your armor to gain more Intelligence for mana and survivability.
As for your Rings and Amulets, we recommend slotting in Skulls to help you reach the 1000 Armor cap for endgame. If you have already reached the cap, you can slot in Diamonds instead to max out your elemental resistances.
AFK Sorcerer Build Runewords
| Runeword 1 | Runeword 2 |
|---|---|
|
|
|
Lith + Ton is used to auto cast Meteor whenever you stand still for at least 0.3 seconds. On the other hand, Bac + Ceh is used to summon Spirit Wolves to help deal more damage since you will be consistently moving all the time.
AFK Sorcerer Build Mercenaries
| Click on a Link to Jump to a Section! | |||||||||||
|---|---|---|---|---|---|---|---|---|---|---|---|
| Back to the top ▲ | |||||||||||
| Mercenary | Reinforcement |
|---|---|
Although this AFK Sorcerer build does not need any Mercenaries, we do have some personal recommendations if ever you still want to use them. Use Varyana as your main mercenary for the added movement speed and attack speed, while Raheir will be your Reinforcement, which can be set to cast Crater every time you use your Core Skills.
AFK Sorcerer Build Paragon Boards
| Click on a Link to Jump to a Section! | |||||||||||
|---|---|---|---|---|---|---|---|---|---|---|---|
| Back to the top ▲ | |||||||||||
| Paragon Boards |
|---|
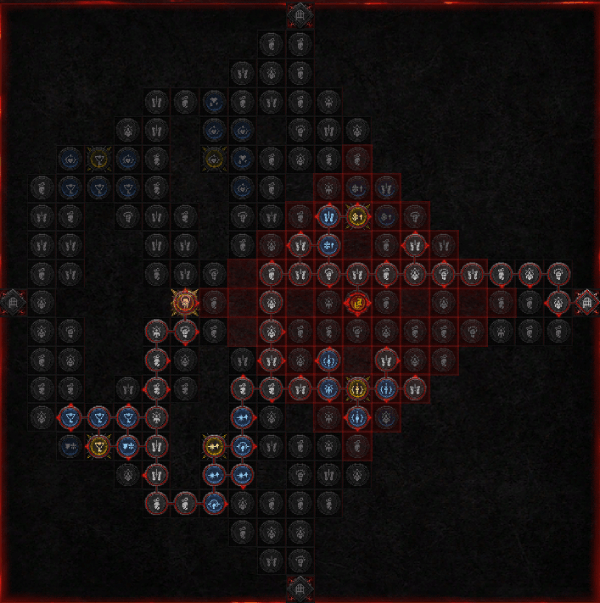
| 1. Starting Board (Destruction) |
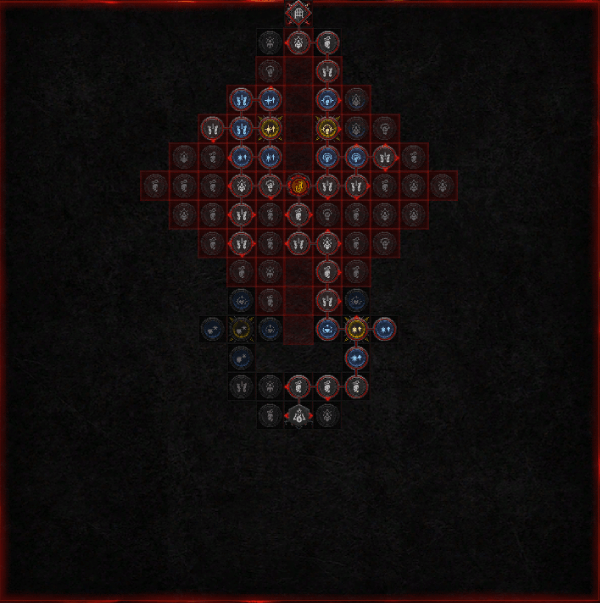 |
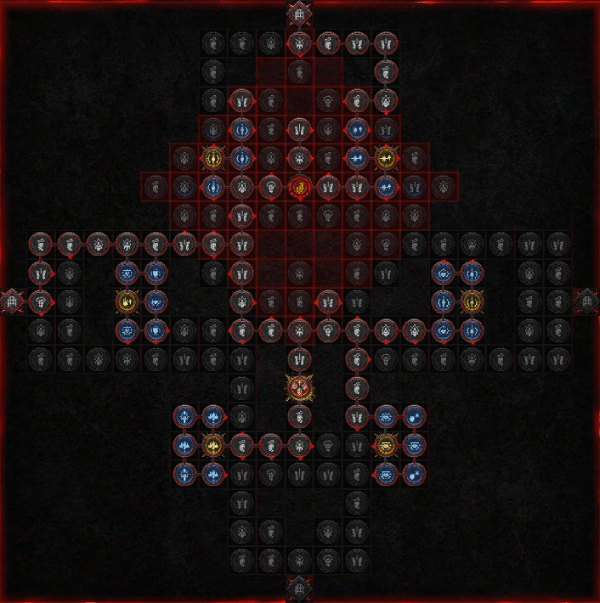
| 2. Frigid Fate (Eliminator) |
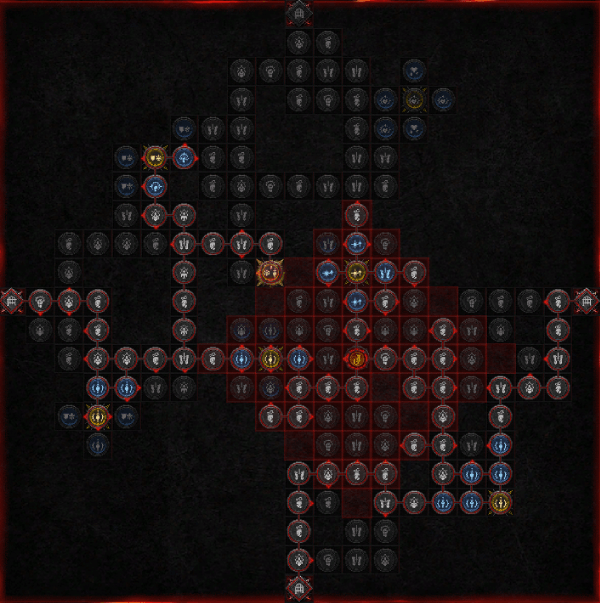 |
| 3. Icefall (Exploit) |
 |
| 4. Fundamental Release (Tactician) |
 |
| 5. Enchantment Master (Elementalist) |
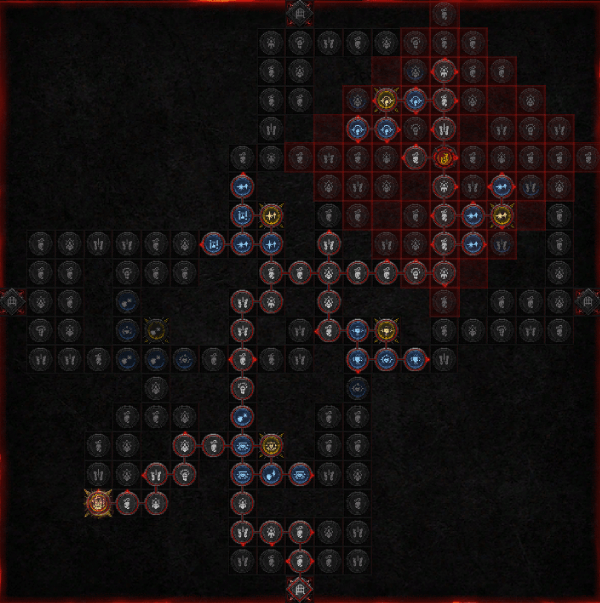 |
The Paragon Boards and Glyphs for the AFK Sorcerer Build focus on amplifying your overall damage with Critical Strikes, Vulnerable Damage, and Elemental Damage with your Core skills. Make sure to keep doing Pit runs to help you max out your Glyph levels and activate all the bonuses they provide.
AFK Sorcerer Build Playstyle and Rotation
| Click on a Link to Jump to a Section! | |||||||||||
|---|---|---|---|---|---|---|---|---|---|---|---|
| Back to the top ▲ | |||||||||||
The Ice Hydra build playstyle does not require any skill input aside from Teleport for faster traversing of maps. The rotation is as follows:
- Start walking around to freeze enemies with Penitent Greaves.
- Fireball, Ice Shards, and Meteor will auto cast against frozen enemies.
- Use Teleport to move around faster.
Diablo 4 Related Guides

All Class Builds
| All Classes | |||||
|---|---|---|---|---|---|
All Endgame Builds
| List of Endgame Builds |
|---|
|
|
All Leveling Builds
| List of Leveling Builds |
|---|
All Legacy Builds per Season
| Seasons | List of Legacy Builds |
|---|---|
| Season 9 | |
| Season 8 | |
| Season 7 | |
| Season 6 |
Comment
Author

Sorcerer AFK Endgame Build (Season 10)
Please participate in our site
improvement survey
03/2026
improvement survey
03/2026
Would you assist in
improving Game8's site?
improving Game8's site?

×
We are listening to our users' valuable opinions and discussing how to act on them.
The information collected through this survey will be used for the purpose of improving our services. In addition, the information will only be disclosed a part of a statistic in a format that will not allow identification of personal information.
Begin Survey
Not Now
×
Please rate each item regarding Game8.co's Advertisements.
Amount of Ads
Very Dissatisfied
Somewhat Dissatisfied
Fine
Somewhat Satisfied
Highly Satisfied
Placement of Ads
Timing of Ad Display
Ad Loading Speed
Safeness of Ads
Content of Ads
×
Please rate each item regarding Game8.co's Quality of Articles.
Amount of information
Very Dissatisfied
Somewhat Dissatisfied
Fine
Somewhat Satisfied
Highly Satisfied
Frequency of updates
Speed of new information
Accuracy of articles
Understandibility of articles
Readability of sentences
×
Please rate each item regarding Game8.co's Usability of the Site.
Ease of finding information
Very Dissatisfied
Somewhat Dissatisfied
Fine
Somewhat Satisfied
Highly Satisfied
Loading Speed
Use of Color
Font Size
Visibility of Images
Easy to Understand Layout
×
Please rate each item regarding Game8.co's Message Boards, Comments.
Ease of Writing
Very Dissatisfied
Somewhat Dissatisfied
Fine
Somewhat Satisfied
Highly Satisfied
Readability
Ease in Finding Information
Comment Quality
Comment Quantity
Admin Response
×
Please rate each item regarding Game8.co's Site's new design.
Please rate our site's new design
Very Dissatisfied
Somewhat Dissatisfied
Fine
Somewhat Satisfied
Highly Satisfied
Do you think that the website's design change makes the site easier to use?
Has the new design made it easier for you to find information on the site?
Has the new design improved the overall visual appeal of the site?
How would you rate your overall satisfaction with the new design of the site?
×
How likely are you to recommend Game8 to someone you know?
Very Unlikely
0
1
2
3
4
5
6
7
8
9
10
Very Likely
If you have other opinions regarding potential improvement to the website, please share them with us. We would appreciate your honest opinion.
Note: This is a free response section, so you can proceed without entering anything.
Note: Please be sure not to enter any kind of personal information into your response.
Note: Please be sure not to enter any kind of personal information into your response.
×
Thank You
×
Thank you for participating in our survey! Your answers will help us to improve the quality of our website and services.
We hope you continue to make use of Game8.
We hope you continue to make use of Game8.
Close
Rankings
- We could not find the message board you were looking for.
Gaming News


Popular Games

Genshin Impact Walkthrough & Guides Wiki
Honkai: Star Rail Walkthrough & Guides Wiki
Umamusume: Pretty Derby Walkthrough & Guides Wiki
Pokemon Pokopia Walkthrough & Guides Wiki
Resident Evil Requiem (RE9) Walkthrough & Guides Wiki
Monster Hunter Wilds Walkthrough & Guides Wiki
Wuthering Waves Walkthrough & Guides Wiki
Arknights: Endfield Walkthrough & Guides Wiki
Pokemon FireRed and LeafGreen (FRLG) Walkthrough & Guides Wiki
Pokemon TCG Pocket (PTCGP) Strategies & Guides Wiki


Recommended Games
Diablo 4: Vessel of Hatred Walkthrough & Guides Wiki
Fire Emblem Heroes (FEH) Walkthrough & Guides Wiki
Yu-Gi-Oh! Master Duel Walkthrough & Guides Wiki
Super Smash Bros. Ultimate Walkthrough & Guides Wiki
Pokemon Brilliant Diamond and Shining Pearl (BDSP) Walkthrough & Guides Wiki
Elden Ring Shadow of the Erdtree Walkthrough & Guides Wiki
Monster Hunter World Walkthrough & Guides Wiki
The Legend of Zelda: Tears of the Kingdom Walkthrough & Guides Wiki
Persona 3 Reload Walkthrough & Guides Wiki
Cyberpunk 2077: Ultimate Edition Walkthrough & Guides Wiki


All rights reserved
©2022 BLIZZARD ENTERTAINMENT, INC. ALL RIGHTS RESERVED.
All trademarks referenced herein are the properties of their respective owners.
The copyrights of videos of games used in our content and other intellectual property rights belong to the provider of the game.
The contents we provide on this site were created personally by members of the Game8 editorial department.
We refuse the right to reuse or repost content taken without our permission such as data or images to other sites.