This survey will take about 1 minute.
Your answers will help us to improve our website.
Diablo 4: Vessel of Hatred (D4)
Necromancer Shadow Bone Storm Build (Season 10)
★ NEW: Season 12 Guide and New Features
┗ Seasonal Content: New Uniques | Bloodied Sigils | Slaughterhouses
┗ Seasonal Mechanic: Killstreaks and Bloodied Items
★ NEW: Lord of Hatred Expansion Release Date
★ Check out our Vessel of Hatred expansion guide
This is the Shadow Bone Storm endgame build and guide for Season 10 of Diablo 4: Vessel of Hatred (D4). Read on to learn more about the Shadow Bone Storm build as well as its playstyle in the Season of Infernal Chaos!
| All Necromancer Guides | ||
|---|---|---|
List of Contents
Necromancer Shadow Bone Storm Build
| Click on a Link to Jump to a Section! | |||||||||||
|---|---|---|---|---|---|---|---|---|---|---|---|
Slaydra's Shadow Bone Storm Build Summary
This Shadow Bone Storm has been crafted by Slaydra. Check out the video for a detailed explanation of the build. You can check Slaydra on Youtube for more content, or catch him and his community live on Twitch!
| Build Summary | |
|---|---|
 Shadow Bone Storm Endgame Build Shadow Bone Storm Endgame Build |
|
| Focus: AoE, Endgame Dungeons, Helltides | |
|
|
|
The build focuses on the skill Bone Storm, which is modified by Alter the Balance to turn it into a core skill that allows for continuous casting. To that end, the build will prioritize increasing Bone Storm's damage and acquiring the necessary essence to maintain continual usage.
Season 10 Guide (Infernal Chaos)
Shadow Bone Storm Build Skills and Passives
| Click on a Link to Jump to a Section! | |||||||||||
|---|---|---|---|---|---|---|---|---|---|---|---|
| Back to the top ▲ | |||||||||||
※ More skills can be seen by scrolling vertically.
| Active Skills | |
|---|---|
┗
┗
|
|
┗
┗
┗
┗
┗
┗
|
|
┗
┗
┗
┗
┗
| |
┗
┗
| |
┗
┗
┗
┗
┗
┗
┗
┗
┗
|
|
┗
┗
┗
┗
┗
┗
┗
|
|
Shadow Bone Storm Build Specialization
| Skeleton Warriors | Skeleton Mages | Golem |
|---|---|---|
 Reaper Reaper Sacrifice |
 Bone BoneSacrifice |
 Blood BloodSacrifice |
We will sacrifice all three minions to increase our shadow, overpower, and critical damage. While the loss of minions wouldn't affect us much, the sacrifice bonuses are substantial and fit nicely with our build.
Shadow Bone Storm Build Chaos Perks
| Click on a Link to Jump to a Section! | |||||||||||
|---|---|---|---|---|---|---|---|---|---|---|---|
| Back to the top ▲ | |||||||||||
| Chaos Perks Setup | |||||
|---|---|---|---|---|---|
|
Alter the Balance Your base Core Skills are now empowered as Ultimate Skills, cost no Essence, but have a 30-20 second Cooldown. Your base Ultimate Skills are now altered to also be Core Skills and have no Cooldown, but cost 70-50 Essence. |
|||||
|
Decimating Desecration Your damage over time effects have a chance equal to your Critical Strike Chance to deal 50-100% increased damage. |
Alternating Alterations Casting a Core Skill empowers your next non-Channeled Cast of a different Core Skill, refunding 50% of its Resource cost and dealing 10-30% increased damage. |
Crazy Brew Your Healing Potion is infused with the power of Chaos, granting you 100% Resource Cost Reduction, 40-80% increased Attack Speed and 40-80 increased Movement Speed for 4 seconds. Your Healing Potion has a 10 second Cooldown and you can drink it at full Life. |
|||
Focus on acquiring the Alter the Balance chaos perk, as it is necessary for this build to function. This effectively turns Bone Storm into a spammable skill that can be used for every encounter.
You should go for Decimating Desecration next, as it increases your damage based on the percentage of your critical hit. This is why we continue to stack critical hit on our gear, even though our runes provide almost guaranteed critical hits on skills.
The last two Chaos Powers are used to fuel the resources needed. Therefore, you may use Crazy Brew and Alter the Balance last, as they are better suited for prolonged endgame encounters, such as Pit pushing.
Shadow Bone Storm Build Aspects and Affixes
| Click on a Link to Jump to a Section! | |||||||||||
|---|---|---|---|---|---|---|---|---|---|---|---|
| Back to the top ▲ | |||||||||||
 Equipment Notes! Equipment Notes! |
Affixes marked with ★ are ones you should aim to upgrade when Masterworking. Chaos Armor does not have to be used on a specific slot and can be interchangeable with other equipment slots. |
|---|
※ More gear Aspects can be seen by scrolling vertically.
| Gear | Aspect and Affixes |
|---|---|
| Head (Chaos Armor) |
Stats: ・Bone Storm Duration ・Chance for Bone Storm to Deal Double Damage ★★★ ・Ranks to Bone Skills ・Cooldown Reduction |
| Chest (Chaos Armor) |
Stats: ・Lucky HIt Chance ・Critical Strike Chance★ ・Attack Speed ★ |
| Gloves (Chaos Armor) |
Stats: ・Maximum Life ・Overpower Damage ★ ・Attack Speed ・Ranks to Core Skills ★★★ |
| Pants (Chaos Armor) |
Stats: ・Ranks to Blight ・Resistance to Gloom ・Ranks to Reaper's Pursuit ★★★ ・Chance for Blight Projectiles To Cast Twice |
| Boots (Chaos Armor) |
Stats: ・Lucky Hit: Up to a 40% chance to deal X Shadow Damage ・Intelligence ・Ranks to Darkness Skills ★★★ ・Lucky Hit: Up to a 15% Chance to Restore X Primary Resource |
| Amulet | Stats: ・Ranks to Coalesced Blood ・Intelligence ★★★ ・Maximum Life Temper: ・Resource - Necromancer Invigoration ┗ Casting Ultimate Skills Restores X Primary Resource
・Offensive - Worldly Finesse
┗ Overpower Damage |
| Ring | Stats: ・Attack Speed ★ ・Intelligence ・Critical Strike Chance ★★★ Temper: ・Resource - Necromancer Invigoration ┗ Casting Macabre Skills Restores X Primary Resource
・Offensive - Worldly Finesse
┗ Overpower Damage |
| Ring | Stats: ・Attack Speed ★ ・Critical Strike Chance ★ ・Lucky Hit Chance ・Levels to Core Skills |
| Weapon (Scythe) |
Stats: ・Critical Strike Damage ・Intelligence ・Maximum Life ・Overpower Damage Temper: ・Offensive - Worldly Finesse ┗ Overpower Damage
・Weapon - Dreadful Augments ┗ Bonus to Finality |
| Offhand (Focus) |
Stats: ・Lucky Hit Chance ★ ・Critical Strike Chance ★ ・Maximum Life ★ ・Maximum Resource Temper: ・Offensive - Worldly Finesse ┗ Overpower Damage
・Weapon - Dreadful Augments
┗ Bonus to Finality |
For this build, we will fully utilize Chaos Armor pieces to boost Bone Storms' capabilities. Thanks to the Banished Lord's Talisman, Bone Storm will consistently overpower, so we will use pieces of gear that empower it. We will also use the Aspect of Ultimate Shadow to convert Bone Storm into shadow damage and Bloodless Scream to take full advantage of it.
Shadow Bone Storm Build Gems and Runewords
| Click on a Link to Jump to a Section! | |||||||||||
|---|---|---|---|---|---|---|---|---|---|---|---|
| Back to the top ▲ | |||||||||||
| Weapon | Armor | Accessories |
|---|---|---|
 Ruby Ruby
|
 Topaz Topaz
|
 Skull Skull
|
For Gems, we will slot a Ruby into our weapon for increased Overpower damage and Topaz into our armor pieces for increased Intelligence.
We will use Skulls on our accessories to increase our healing and sustain.
List of All Gems
Shadow Bone Storm Build Runewords
| Runeword 1 | Runeword 2 |
|---|---|
|
|
|
Zan + Xan guarantees critical hits as you spam Bone Storm. Tam + Qax is used to grant resources when using our other skills, providing the essence needed to spam Bone Storm.
Shadow Bone Storm Build Mercenaries
| Click on a Link to Jump to a Section! | |||||||||||
|---|---|---|---|---|---|---|---|---|---|---|---|
| Back to the top ▲ | |||||||||||
| Mercenary | Reinforcement |
|---|---|
Use Subo as the Main Mercenary
While a Main Mercenary isn't required for this build to function, we recommend taking Subo because he can provide more Critical Strike Damage, which fits well with this build.
Equip Raheir as a Reinforcement
This build doesn't require a reinforcement either, but we recommend Raheir for his increased survivability. Bastion is still a valuable skill, as it allows you to mitigate crowd-controlling effects.
Shadow Bone Storm Build Paragon Boards
| Click on a Link to Jump to a Section! | |||||||||||
|---|---|---|---|---|---|---|---|---|---|---|---|
| Back to the top ▲ | |||||||||||
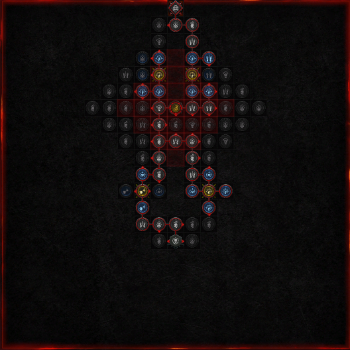
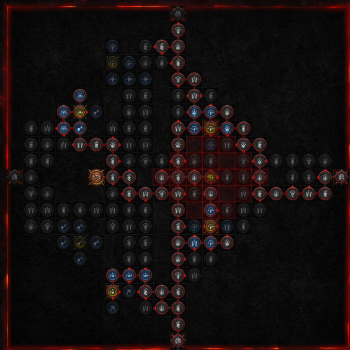
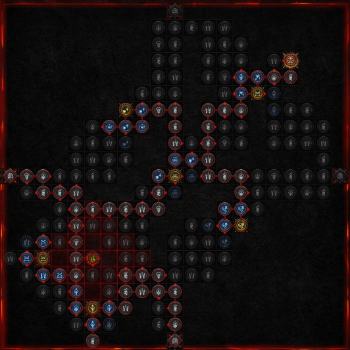
| Paragon Boards |
|---|
| 1. Starting Board (Abyssal) |
 |
| 2. Scent of Death (Dominate) |
 |
| 3. Bloodbath (Essence) |
 |
| 4. Bone Graft (Sacrificial) |
 |
| 5. Wither (Control) |
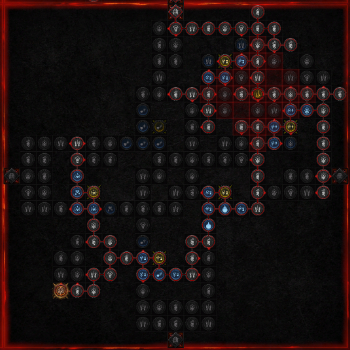 |
We will be getting nodes that boost our DPS, so we will be getting glyphs and nodes that increase critical, overpower, and non-physical damage.
The Paragon Boards and Glyphs for the build focus on enhancing the damage scaling of Flurry as well as Critical Damage. The Paragon setup can be achieved under Paragon 270, with extra nodes you can put into maximum life or armor and resistances.
Shadow Bone Storm Build Playstyle and Rotation
| Click on a Link to Jump to a Section! | |||||||||||
|---|---|---|---|---|---|---|---|---|---|---|---|
| Back to the top ▲ | |||||||||||
The build consists of casting Bone Storm as much as possible while maintaining its uptime. Since Bone Storm has a maximum cap of ten and a maximum duration of two seconds, you will need to recast it often to maintain optimal damage output.
- Cast Bone Storm Until You Reach Ten Stacks.
- Rinse and repeat.
Diablo 4 Related Guides

All Class Builds
| All Classes | |||||
|---|---|---|---|---|---|
All Endgame Builds
| List of Endgame Builds |
|---|
|
|
All Leveling Builds
| List of Leveling Builds |
|---|
All Legacy Builds per Season
| Seasons | List of Legacy Builds |
|---|---|
| Season 11 | |
| Season 10 |
|
| Season 9 | |
| Season 8 | |
| Season 7 | |
| Season 6 |
Comment
Author

Necromancer Shadow Bone Storm Build (Season 10)
Please participate in our site
improvement survey
04/2026
improvement survey
04/2026
Would you assist in
improving Game8's site?
improving Game8's site?

×
We are listening to our users' valuable opinions and discussing how to act on them.
The information collected through this survey will be used for the purpose of improving our services. In addition, the information will only be disclosed a part of a statistic in a format that will not allow identification of personal information.
Begin Survey
Not Now
×
Please rate each item regarding Game8.co's Advertisements.
Amount of Ads
Very Dissatisfied
Somewhat Dissatisfied
Fine
Somewhat Satisfied
Highly Satisfied
Placement of Ads
Timing of Ad Display
Ad Loading Speed
Safeness of Ads
Content of Ads
×
Please rate each item regarding Game8.co's Quality of Articles.
Amount of information
Very Dissatisfied
Somewhat Dissatisfied
Fine
Somewhat Satisfied
Highly Satisfied
Frequency of updates
Speed of new information
Accuracy of articles
Understandibility of articles
Readability of sentences
×
Please rate each item regarding Game8.co's Usability of the Site.
Ease of finding information
Very Dissatisfied
Somewhat Dissatisfied
Fine
Somewhat Satisfied
Highly Satisfied
Loading Speed
Use of Color
Font Size
Visibility of Images
Easy to Understand Layout
×
Please rate each item regarding Game8.co's Message Boards, Comments.
Ease of Writing
Very Dissatisfied
Somewhat Dissatisfied
Fine
Somewhat Satisfied
Highly Satisfied
Readability
Ease in Finding Information
Comment Quality
Comment Quantity
Admin Response
×
Please rate each item regarding Game8.co's Site's new design.
Please rate our site's new design
Very Dissatisfied
Somewhat Dissatisfied
Fine
Somewhat Satisfied
Highly Satisfied
Do you think that the website's design change makes the site easier to use?
Has the new design made it easier for you to find information on the site?
Has the new design improved the overall visual appeal of the site?
How would you rate your overall satisfaction with the new design of the site?
×
How likely are you to recommend Game8 to someone you know?
Very Unlikely
0
1
2
3
4
5
6
7
8
9
10
Very Likely
If you have other opinions regarding potential improvement to the website, please share them with us. We would appreciate your honest opinion.
Note: This is a free response section, so you can proceed without entering anything.
Note: Please be sure not to enter any kind of personal information into your response.
Note: Please be sure not to enter any kind of personal information into your response.
×
Thank You
×
Thank you for participating in our survey! Your answers will help us to improve the quality of our website and services.
We hope you continue to make use of Game8.
We hope you continue to make use of Game8.
Close
Rankings
- We could not find the message board you were looking for.

Gaming News


![Forza Horizon 6 Review [Preview] | Beautiful Roads With a Whole Lot of Oversteer](https://img.game8.co/4460981/a7254c24945c43fbdf6ad9bea52b5ce9.png/thumb)
![Borderlands Mobile Review [Playtest] | The Same Borderlands Made Easy](https://img.game8.co/4465500/aac0c880a39ec5cd46073e49d18f3ed5.png/thumb)
Popular Games

Genshin Impact Walkthrough & Guides Wiki
Crimson Desert Walkthrough & Guides Wiki
Umamusume: Pretty Derby Walkthrough & Guides Wiki
Honkai: Star Rail Walkthrough & Guides Wiki
Monster Hunter Stories 3: Twisted Reflection Walkthrough & Guides Wiki
Wuthering Waves Walkthrough & Guides Wiki
The Seven Deadly Sins: Origin Walkthrough & Guides Wiki
Pokemon TCG Pocket (PTCGP) Strategies & Guides Wiki
Pokemon Pokopia Walkthrough & Guides Wiki
Zenless Zone Zero Walkthrough & Guides Wiki


Recommended Games
Fire Emblem Heroes (FEH) Walkthrough & Guides Wiki
Pokemon Brilliant Diamond and Shining Pearl (BDSP) Walkthrough & Guides Wiki
Super Smash Bros. Ultimate Walkthrough & Guides Wiki
Diablo 4: Vessel of Hatred Walkthrough & Guides Wiki
Cyberpunk 2077: Ultimate Edition Walkthrough & Guides Wiki
Yu-Gi-Oh! Master Duel Walkthrough & Guides Wiki
Elden Ring Shadow of the Erdtree Walkthrough & Guides Wiki
Monster Hunter World Walkthrough & Guides Wiki
The Legend of Zelda: Tears of the Kingdom Walkthrough & Guides Wiki
Persona 3 Reload Walkthrough & Guides Wiki


All rights reserved
©2022 BLIZZARD ENTERTAINMENT, INC. ALL RIGHTS RESERVED.
All trademarks referenced herein are the properties of their respective owners.
The copyrights of videos of games used in our content and other intellectual property rights belong to the provider of the game.
The contents we provide on this site were created personally by members of the Game8 editorial department.
We refuse the right to reuse or repost content taken without our permission such as data or images to other sites.