Spiritborn Evade Eagle Endgame Build (Season 10)
★ NEW: Season 12 Guide and New Features
┗ Seasonal Content: New Uniques | Bloodied Sigils | Slaughterhouses
┗ Seasonal Mechanic: Killstreaks and Bloodied Items
★ NEW: Lord of Hatred Expansion Release Date
★ Check out our Vessel of Hatred expansion guide
This is the Evade Eagle endgame build and guide for Season 10 of Diablo 4: Vessel of Hatred (D4). Read on to learn more about the Evade Eagle Spiritborn build as well as its playstyle in the Season of Infernal Chaos!
| All Spiritborn Guides | ||
|---|---|---|
List of Contents
Evade Eagle Spiritborn Build
Evade Eagle Build Summary
| Click on a Link to Jump to a Section! | |||||||||||
|---|---|---|---|---|---|---|---|---|---|---|---|
This Evade Eagle Spiritborn Endgame build is based on a build by Slaydra over at Slaydra (Youtube). The video includes details on how to gear up to get the build online. You can check Slaydra's Twitch Channel for more Diablo 4 content and ask questions about the build!
| Build Summary | |
|---|---|
 Evade Eagle Endgame Build Evade Eagle Endgame Build |
|
| Focus: Mobility, Lightning, Endgame, XP Farming | |
|
|
|
This Evade Eagle Spiritborn endgame build for Season 10 focuses on spamming Thunderspike through the use of your Evade to consistently send out Storm Feathers and deal huge lightning damage while staying mobile.
Take note that this build requires you to have high Cooldown Reduction to enable you to spam Evade consistently.
Season 10 Guide (Infernal Chaos)
Evade Eagle Build Skills and Passives
| Click on a Link to Jump to a Section! | |||||||||||
|---|---|---|---|---|---|---|---|---|---|---|---|
| Back to the top ▲ | |||||||||||
※ More skills can be seen by scrolling vertically.
| Active Skills |
|---|
┗
┗
┗
|
┗ None |
┗
┗
┗
┗
┗
┗
┗
┗
┗
|
┗
┗
┗
┗
┗
┗
┗
┗
┗
┗
┗
┗
|
┗
┗
┗
┗
|
┗
┗
┗
┗
┗
┗
┗
┗
|
Evade Eagle Spiritborn Class Specialization
| Primary Spirit |
|---|
(Level 15) Casting an Eagle Skill or Evading shoots 6 Storm Feathers, each dealing 396% Lightning damage and applying Vulnerable for 5 seconds. Can only occur once every 0.5 seconds. All Skills are now also Eagle Skills. |
| Secondary Spirit |
(Level 30) Every other Cast is a guaranteed Critical Strike that grants you Vulnerable Damage bonus for 5 seconds. |
The Eagle spirit is the best specialization for both the Primary and Secondary Spirit Hall slot, as it enables the evade feature of the build to shoot Storm Feathers and deal more Vulnerable damage.
Evade Eagle Build Chaos Perks
| Click on a Link to Jump to a Section! | |||||||||||
|---|---|---|---|---|---|---|---|---|---|---|---|
| Back to the top ▲ | |||||||||||
| Chaos Perks Setup | |||||
|---|---|---|---|---|---|
|
A Beast Cornered For every 10% Life you are missing, you gain 10-20% increased damage and 5% damage reduction. Spending Resources also drains a percentage of your Life equal to 30% the Resources spent, refunding those Resources. This cannot reduce you to below 10% Life. |
|||||
|
Alacrity Your Basic Skills gain 10-30% increased Attack Speed, their dash range is increased by 50% and their 3rd attack now happens every 2nd attack. |
Accelerating Chaos Lucky Hit: Damaging an enemy has up to a 10% chance to trigger a Chaotic Burst on the enemy, dealing 200-400% damage. Your Chaotic Bursts that hit an enemy reduce a random active Cooldown by 0.5 seconds. |
Marred Guard You can no longer be healed above 50% Life. You gain 5-10% Maximum Resistance to All Elements, +20-40% Armor, and 50-100% increased Barrier and Fortify Generation. |
|||
The Chaos Perks for the Evade Eagle build focus on boosting your Basic Skill damage with Alacrity. This synergizes well with your Thunderspikes as the effects of Alacrity allow you to proc the 3rd attack much earlier.
Other Chaos Perks like Accelerating Chaos are chosen as a secondary damage boost, and Marred Guard is used for extra defense that works in tandem with A Beast Cornered for the extra damage boost.
Do note that if you do not have the suggested Chaos Perks, we recommend focusing on leveling up and grinding Viz Jaq'taar Veneration reputation until you obtain the Chaos Perks you need for the build.
Evade Eagle Build Aspects and Affixes
| Click on a Link to Jump to a Section! | |||||||||||
|---|---|---|---|---|---|---|---|---|---|---|---|
| Back to the top ▲ | |||||||||||
 Equipment Notes! Equipment Notes! |
Affixes marked with ★ are ones you should aim to upgrade when Masterworking. Chaos Armor does not have to be used on a specific slot and can be interchangeable with other equipment slots. |
|---|
※ More gear Aspects can be seen by scrolling vertically.
| Gear | Aspect and Affixes |
|---|---|
| Head | Stats: ・Cooldown Reduction ★★★ ・Maximum Life ・Maximum Resource ・Armor |
| Chest | Stats: ・All Stats ★ ・Damage on Next Attack After Entering Stealth ・Maximum Life ★★ ・Resource Generation |
| Gloves (Chaos Armor) |
Stats: ・Ultimate Damage ・Dexterity ★★ ・Maximum Life ★ ・Ranks to Supremacy |
| Pants (Chaos Armor) |
Stats: ・All Stats ★ ・Movement Speed ★ ・Damage Reduction ・Ranks to Velocity ★ |
| Boots (Chaos Armor) |
Stats: ・Lucky Hit Chance ★ ・Critical Strike Chance ★ ・Attack Speed ★ |
| Amulet | Stats: ・Critical Strike Chance ・Dexterity ・Total Armor ★ Temper: ・Mobility - Natural Motion ┗ Evade Cooldown Reduction ★★
・Offensive - Eagle Finesse
┗ Storm Feather Potency |
| Ring | Stats: ・Maximum Life ・Dexterity ・Critical Strike Chance Temper: ・Offensive - Eagle Finesse ┗ Storm Feather Potency
・Resource - Eagle Efficiency
┗ The Seeker Charges ★★★ |
| Ring | Stats: ・Dexterity ★ ・Critical Strike Chance ★★ ・Maximum Life Temper: ・Offensive - Eagle Finesse ┗ Storm Feather Potency
・Resource - Eagle Efficiency
┗ The Seeker Charges |
| Weapon (Quarterstaff) |
Stats: ・Dexterity ・Maximum Life ・Critical Strike Damage Temper: ・Weapon - Eagle Finesse ┗ Primary Eagle Spirit Hall Potency ★★★
・Offensive - Natural Motion
┗ Storm Feather Potency |
Evade Eagle Build Gems and Runewords
| Click on a Link to Jump to a Section! | |||||||||||
|---|---|---|---|---|---|---|---|---|---|---|---|
| Back to the top ▲ | |||||||||||
| Weapon | Armor | Jewelry |
|---|---|---|
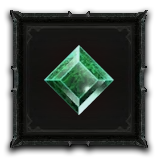 Emerald Emerald
|
 Amethyst Amethyst
|
 Skull Skull
|
For Gems, it's best to slot in Emerald on your weapon slot for more Critical Strike Damage. Slot in Amethysts on the rest of your armor to gain more Barrier Generation to help solve your survivability issues.
As for your Rings and Amulets, we recommend slotting in Skulls to help you reach the 1000 Armor cap for endgame. If you have already reached the cap, you can slot in Diamonds instead to max out your elemental resistances.
Evade Eagle Build Runewords
| Runeword 1 | Runeword 2 |
|---|---|
|
|
|
Bac + Gar is used to gain more Critical Strike Chance as you continue moving while you spam evade. On the other hand, Neo + Vex is used to boost your survivability by casting Earthen Bulwark every time you evade.
Evade Eagle Build Mercenaries
| Click on a Link to Jump to a Section! | |||||||||||
|---|---|---|---|---|---|---|---|---|---|---|---|
| Back to the top ▲ | |||||||||||
| Mercenary | Reinforcement |
|---|---|
Although this Evade Eagle build does not need any Mercenaries, we do have some personal recommendations if ever you still want to use them. Use Varyana as your main mercenary for the added movement speed and attack speed, while Raheir will be your Reinforcement, which can be set to cast Crater every time you use your Ultimate.
Evade Eagle Build Paragon Boards
| Click on a Link to Jump to a Section! | |||||||||||
|---|---|---|---|---|---|---|---|---|---|---|---|
| Back to the top ▲ | |||||||||||
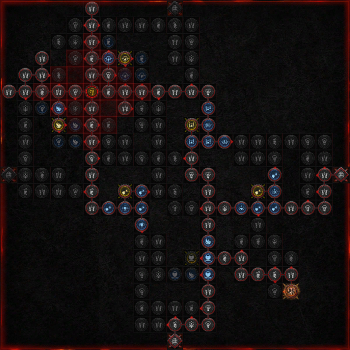
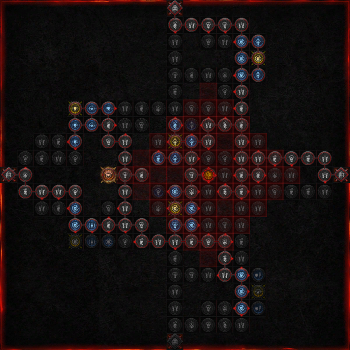
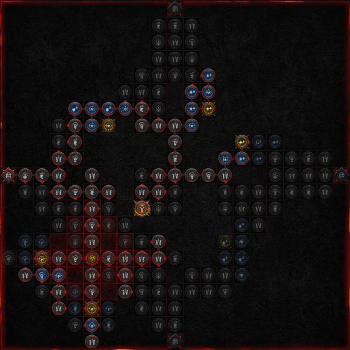
| Paragon Boards |
|---|
| 1. Starting Board (Spirit) |
 |
| 2. Sapping (Jagged Plume) |
 |
| 3. Viscous Shield (Canny) |
 |
| 4. Convergence (Fulminate) |
 |
| 5. Drive (Talon) |
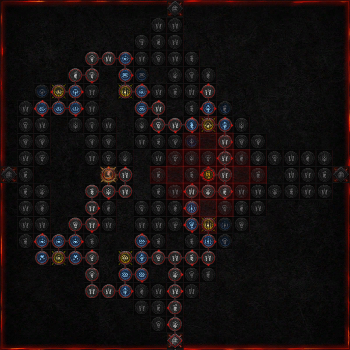 |
The Paragon Boards and Glyphs for the Evade Eagle build focus on enhancing your damage for Critical Strikes, Lightning, Eagle Skills, and Storm Feather Potency. Make sure to keep doing Pit runs to help you max out your Glyph levels and activate all the bonuses they provide.
Evade Eagle Build Playstyle and Rotation
| Click on a Link to Jump to a Section! | |||||||||||
|---|---|---|---|---|---|---|---|---|---|---|---|
| Back to the top ▲ | |||||||||||
The Evade Eagle build playstyle revolves around spamming Evade to trigger Thunderspike and shoot tons of Storm Feathers through the field. The rotation is as follows:
- Activate Ravager, Scourge, and Armored Hide to provide damage buffs and survivability.
- Spam Evade to trigger Thunderspike and start shooting Storm Feathers.
- Use The Seeker whenever you can to inflict Vulnerable and guarantee Critical Strikes.
- Cast Counterattack whenever the duration ends to avoid being one-shotted, especially against Bosses.
- Rinse and Repeat.
Diablo 4 Related Guides

All Class Builds
| All Classes | |||||
|---|---|---|---|---|---|
All Endgame Builds
| List of Endgame Builds |
|---|
|
|
All Leveling Builds
| List of Leveling Builds |
|---|
All Legacy Builds per Season
| Seasons | List of Legacy Builds |
|---|---|
| Season 11 | |
| Season 10 | |
| Season 9 | |
| Season 8 | |
| Season 7 | |
| Season 6 |
Comment
Author

Spiritborn Evade Eagle Endgame Build (Season 10)
Rankings
- We could not find the message board you were looking for.

Gaming News


![Star Savior Review [First Impressions] | Engaging, Entertaining, and Expensive](https://img.game8.co/4447603/8f500e9bf666bdb8adb1af478e9dfdbd.png/thumb)
![Death Stranding 2: On The Beach [PC] Review | A Port That Delivers](https://img.game8.co/4447392/15310a0c9aa1b6843bb713b2ea216930.jpeg/thumb)
Popular Games

Genshin Impact Walkthrough & Guides Wiki
Umamusume: Pretty Derby Walkthrough & Guides Wiki
Pokemon Pokopia Walkthrough & Guides Wiki
Honkai: Star Rail Walkthrough & Guides Wiki
Monster Hunter Stories 3: Twisted Reflection Walkthrough & Guides Wiki
Arknights: Endfield Walkthrough & Guides Wiki
Wuthering Waves Walkthrough & Guides Wiki
Zenless Zone Zero Walkthrough & Guides Wiki
Pokemon TCG Pocket (PTCGP) Strategies & Guides Wiki
Monster Hunter Wilds Walkthrough & Guides Wiki


Recommended Games
Fire Emblem Heroes (FEH) Walkthrough & Guides Wiki
Diablo 4: Vessel of Hatred Walkthrough & Guides Wiki
Cyberpunk 2077: Ultimate Edition Walkthrough & Guides Wiki
Yu-Gi-Oh! Master Duel Walkthrough & Guides Wiki
Super Smash Bros. Ultimate Walkthrough & Guides Wiki
Pokemon Brilliant Diamond and Shining Pearl (BDSP) Walkthrough & Guides Wiki
Elden Ring Shadow of the Erdtree Walkthrough & Guides Wiki
Monster Hunter World Walkthrough & Guides Wiki
The Legend of Zelda: Tears of the Kingdom Walkthrough & Guides Wiki
Persona 3 Reload Walkthrough & Guides Wiki


All rights reserved
©2022 BLIZZARD ENTERTAINMENT, INC. ALL RIGHTS RESERVED.
All trademarks referenced herein are the properties of their respective owners.
The copyrights of videos of games used in our content and other intellectual property rights belong to the provider of the game.
The contents we provide on this site were created personally by members of the Game8 editorial department.
We refuse the right to reuse or repost content taken without our permission such as data or images to other sites.