Depulso Puzzle Room 1 Solution and All Chest Locations
Depulso Puzzle Room 1 is one of the platforming puzzle rooms in Hogwarts Legacy and is found in the Library Wing of Hogwarts Castle. Read on for a guide on how to get to this Depulso Puzzle Room, all chests locations and how to get them, and the solution to the puzzle!
List of Contents
| Depulso Puzzle Room Guides | ||
|---|---|---|
| All Depulso Puzzle Rooms | Depulso Puzzle Room 1 Solution | Depulso Puzzle Room 2 Solution |
Depulso Puzzle Room 1 Location
Library Annex
| Map View | World View |
|---|---|
 |
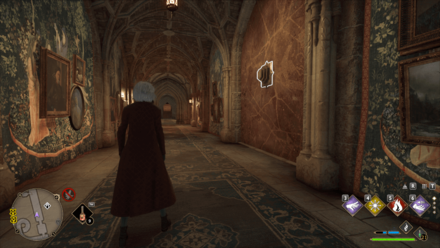 |
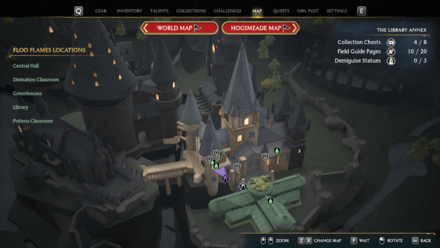
You can find the Depulso Puzzle Room 1 map marker under the Library Annex region of the Hogwarts map.
You can fast travel to the Great Hall Floo Flame, set a waypoint to the room, and follow the map marker.
Do note that you need Alohomora I to reach this Depulso Puzzle Room, which is unlocked after The Caretaker's Lunar Lament main quest.
How to Unlock
Depulso Room 1 will be available at the Library Annex after starting The Hall of Herodiana quest.
Depulso Puzzle Room 1 Video Walkthrough
How to Solve Depulso Puzzle Room 1
| Depulso Puzzle Room 1 Solution |
|---|
|
|
Move Blocks to Reach Treasure A
| Objectives | |
|---|---|
| 1 | 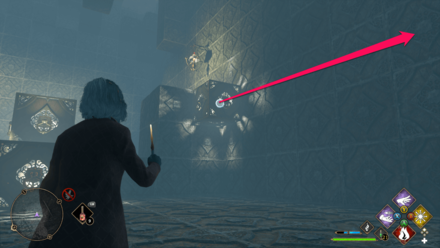 Pull the third level block away from the Treasure A platform. |
| 2 | 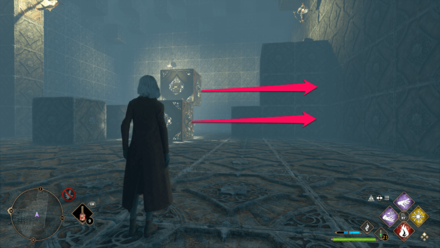 Move the first and second level blocks next to the Treasure A platform. Use the nearby blocks to make a stairway leading to Treasure A. Be careful not to push the first level block directly under the second level block, as this will combine both blocks. |
| 3 | 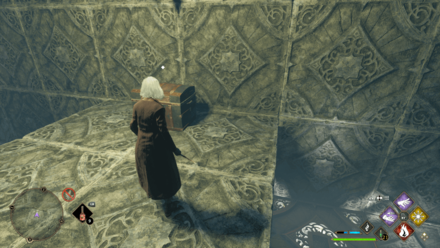 Climb the blocks and open Treasure A. |
Make a Bridge to Reach Treasure B
| Objectives | |
|---|---|
| 1 | 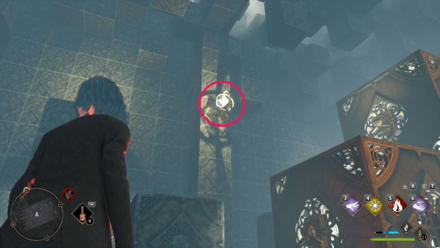 Hit the switch to reset the blocks. |
| 2 | 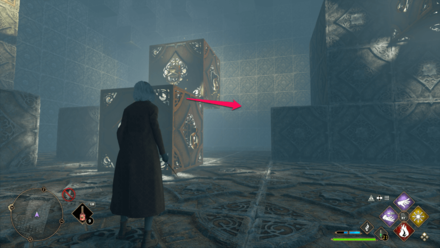 Push the second level block towards the edge of the room. You will scale this block to reach Treasure B later. |
| 3 | Build a bridge using the blocks to cross the gap. To reach Treasure B you need to create a makeshift bridge using the blocks to cross the gap separating Treasure B from the rest of the room. |
| 4 | Move the nearby first level block. You can use the nearby corner to connect the blocks to make the bridge. |
| 5 | Move the combined first level blocks found at the left side of the room. Move the blocks and combine them with the previous block. |
| 6 | Move the first level block behind you with the rest of the blocks. |
| 7 | Move the last first level block with the rest of the blocks. |
| 8 | Move the four combined blocks towards the edge of the room. Once you build the bridge, send it to the other side to combine it with the second level block. |
| 9 | 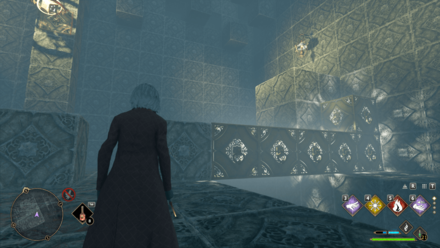 Move the block bridge near the Treasure B platform. |
| 10 | 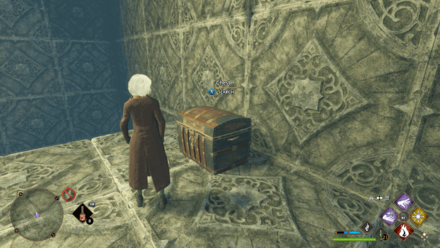 Cross the gap and scale the block to reach Treasure B. |
| 11 | 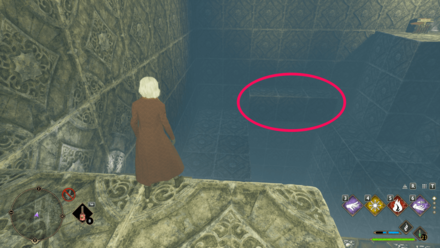 Cross the bridge to go back to the main area. After you get the loot inside Treasure B, a platform will appear at the edge of the gap. You can cross this platform if you accidentally reset the puzzle while you are still on the other side of the room. |
Make a Stairway to Reach Treasure C
| Objectives | |
|---|---|
| 1 |  Hit the switch to reset the blocks. |
| 2 | Move the third level block near the Treasure C platform. |
| 3 | Move the lone block behind you under the third level block. This is important to prevent the block stairway that you will build later to stick to the Treasure C platform. Make sure to remove the combined blocks in place first. |
| 4 | Combine the first and second level blocks together with the two combined blocks. You can use the nearby corner to combine all the blocks. This will serve as the stairway to reach the third level block and the treasure. |
| 5 | Move the block staircase and connect it with the rest of the blocks. |
| 6 | Scale the blocks to reach the treasure. Once you open this third chest, a final chest will appear near the entrance. |
Open All Chests to Spawn Treasure D
| Objectives | |
|---|---|
| 1 |  Go back to the entrance to open the final chest. A new platform will appear after opening Treasure C. You can use this to go back to the entrance and open the final chest of this puzzle room. |
Depulso Puzzle Room 1 All Chest Locations
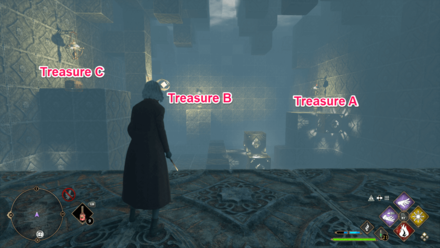
All the treasure chests in Depulso Puzzle Room 1 are found around the area, as this puzzle room is only contained within one room. Treasure D, the last chest, will appear near the entrance after opening the first three chests.
You may get Gear or Collection items from opening these chests.
Hogwarts Legacy Related Guides

Hogwarts Puzzle Guides
Other Puzzle Guides
Author
Depulso Puzzle Room 1 Solution and All Chest Locations
improvement survey
03/2026
improving Game8's site?

Your answers will help us to improve our website.
Note: Please be sure not to enter any kind of personal information into your response.

We hope you continue to make use of Game8.
Rankings
- We could not find the message board you were looking for.
Gaming News
Popular Games

Genshin Impact Walkthrough & Guides Wiki

Honkai: Star Rail Walkthrough & Guides Wiki

Umamusume: Pretty Derby Walkthrough & Guides Wiki

Pokemon Pokopia Walkthrough & Guides Wiki

Resident Evil Requiem (RE9) Walkthrough & Guides Wiki

Monster Hunter Wilds Walkthrough & Guides Wiki

Wuthering Waves Walkthrough & Guides Wiki

Arknights: Endfield Walkthrough & Guides Wiki

Pokemon FireRed and LeafGreen (FRLG) Walkthrough & Guides Wiki

Pokemon TCG Pocket (PTCGP) Strategies & Guides Wiki
Recommended Games

Diablo 4: Vessel of Hatred Walkthrough & Guides Wiki

Fire Emblem Heroes (FEH) Walkthrough & Guides Wiki

Yu-Gi-Oh! Master Duel Walkthrough & Guides Wiki

Super Smash Bros. Ultimate Walkthrough & Guides Wiki

Pokemon Brilliant Diamond and Shining Pearl (BDSP) Walkthrough & Guides Wiki

Elden Ring Shadow of the Erdtree Walkthrough & Guides Wiki

Monster Hunter World Walkthrough & Guides Wiki

The Legend of Zelda: Tears of the Kingdom Walkthrough & Guides Wiki

Persona 3 Reload Walkthrough & Guides Wiki

Cyberpunk 2077: Ultimate Edition Walkthrough & Guides Wiki
All rights reserved
HOGWARTS LEGACY software © 2022 Warner Bros. Entertainment Inc. Developed by Avalanche Software. WIZARDING WORLD and HARRY POTTER Publishing Rights © J.K. Rowling. PORTKEY GAMES, HOGWARTS LEGACY, WIZARDING WORLD AND HARRY POTTER characters, names and related indicia © and ™ Warner Bros. Entertainment Inc.
The copyrights of videos of games used in our content and other intellectual property rights belong to the provider of the game.
The contents we provide on this site were created personally by members of the Game8 editorial department.
We refuse the right to reuse or repost content taken without our permission such as data or images to other sites.


![Monster Hunter Stories 3 Review [First Impressions] | Simply Rejuvenating](https://img.game8.co/4438641/2a31b7702bd70e78ec8efd24661dacda.jpeg/thumb)


