This survey will take about 1 minute.
Your answers will help us to improve our website.
Hogwarts Legacy
Best Spell Loadouts and Combos

Equip spells that serve various purposes to maximize the usage of your spell loadouts in Hogwarts Legacy. Read on for more information on the best spells to equip in your loadouts, how to get more spell loadouts, and the best spell combos to use in the game!
| Best Spells Guides | |
|---|---|
| Best Spells to Use | Best Spell Loadouts |
Best Spell Loadouts
| Best Spell Loadouts |
|---|
Early Game Loadout
| Best Spells for Loadout 1 | |||
|---|---|---|---|
 Accio Accio
|
 Levioso Levioso
|
 Incendio Incendio
|
 Expelliarmus Expelliarmus
|
Early in the game, you will only have a handful of spells to use and have to settle into using a single loadout. You will mostly rely on using basic attacks to deal damage while waiting for the cooldowns of your spells to end.
The first set of spells that you will learn won't do as much damage on their own, but they are sufficient enough to deal with enemies you will encounter. They are also useful for breaking all types of spell charms.
During combat, use Accio to bring enemies from a distance near you then cast Incendio to light them on fire. Once you have used these spells, finish them off with Basic Attacks.
If you are fighting multiple targets and are getting overwhelmed, you can use Levioso or Expelliarmus to immobilize some of them for a few seconds.
Spell Loadout 1: Close-Range Spells
| Best Spells for Loadout 1 | |||
|---|---|---|---|
|
Accio
|
Incendio
|
 Glacius Glacius
|
 Bombarda Bombarda
|
Use your first spell loadout for spells you will almost always use, either when exploring or during combat.
You can include Accio and Incendio in this set as you will frequently use these spells to clear puzzles and obstacles in various dungeons in the game.
Combat-wise, you can group other close-range spells in this loadout. Use Accio to bring enemies close, cast Glacius to freeze them, and finish them off with Incendio. If you get swarmed by multiple enemies, you can use Bombarda to damage them and then run away to recuperate.
You can also purchase Talents for these spells to extend their range and make them area-of-effect attacks!
Spell Loadout 2: Long-Range Spells
| Best Spells for Loadout 2 | |||
|---|---|---|---|
 Diffindo Diffindo
|
 Confringo Confringo
|
Levioso
|
 Depulso Depulso
|
For your second loadout, you can equip long-range spells which you can use to attack opponents from a distance, like Diffindo and Confringo.
You can also add Levioso and Depulso into the mix to perform a combo with all the spells in this loadout. Lift up a target with Levioso, then push them away with Depulso. Finish them off from far away with Diffindo and Confringo.
Spell Loadout 3: Unforgivable Curses
| Best Spells for Loadout 3 | |||
|---|---|---|---|
 Avada Kedavra Avada Kedavra
|
 Crucio Crucio
|
 Imperio Imperio
|
Expelliarmus
|
You can allot your third loadout exclusively for Unforgivable Curses. These spells have long cooldowns, so you can cast these spells and then switch between your first and second loadout while waiting for the cooldowns to end.
If you are facing tough enemies, you can use all three spells on different targets. Cast Imperio on one target and force them to fight with you, use Crucio at another to deal constant damage and stop them from attacking. You can then instantly kill an enemy with the highest level, preferably the boss, with Avada Kedavra, then deal with the rest.
Getting the Talent upgrades for all the Unforgivable Curses will further improve their use in battle, as these will allow you to inflict curses on your opponents.
For the excess slot, you can equip another spell. You can include either a defensive spell to immobilize a target, or another spell to extend your combo.
Spell Loadout 4: Miscellaneous Spells
| Best Spells for Loadout 4 | |||
|---|---|---|---|
 Disillusionment Disillusionment
|
 Lumos Lumos
|
 Conjuring Spell Conjuring Spell
|
 Beast Petting Brush Beast Petting Brush
|
You can use your fourth loadout for spells that you will use during exploration, like Lumos to light up dark areas and solve puzzles or Disillusionment to sneak around.
If you frequently visit your Room of Requirement, you can also use this loadout for Transfiguration Spells, or equip the Utility tools used for Beasts in the Vivarium, like the Petting Brush which you can equip if you have a feeder placed in the field.
You can also include other spells to use in combat here if you need to cast additional offensive spells.
Spell Loadout 5: Puzzle and Exploration
| Best Spells for Loadout 5 | |||
|---|---|---|---|
|
Accio
|
Depulso
|
Levioso
|
Incendio
|
This is a loadout that you can use when looking for Treasure Vaults and other puzzles in the open world.
Accio is frequently used in puzzles as you can use it to lift blocks or pull wall switches. Unlocking Wingardium Leviosa is also recommended as some puzzles involve rotating arrow blocks to open locked gates.
Depulso is used to remove blocked passages or to move blocks in Depulso Puzzle Rooms. You can also use it to open locked metal doors in Treasure Vaults.
Levioso and Incendio are used to activate blocks that open the gate leading to the Treasure Vault. You can replace these with Glacius or Transformation as needed.
Spell Loadout 6: Beast Rescue
| Best Spells for Loadout 6 | |||
|---|---|---|---|
 Nab-Sack Nab-Sack
|
Disillusionment
|
 Arresto Momentum Arresto Momentum
|
Accio
|
This is a spell loadout that you can use when rescuing different types of beasts.
First, use Disillusionment to turn yourself invisible to avoid getting detected by the beasts. Use Accio to pull the beast towards you, then cast Arresto Momentum to stop it in its place.
Using this method allows you to capture the beast using the Nab-Sack before it tries to escape.
Spell Loadout 7: Late Game Spells
| Best Spells for Loadout 7 | |||
|---|---|---|---|
|
Diffindo
|
 Transformation Transformation
|
Confringo
|
Accio
|
This is a loadout that you can use once you have reached the late game. These mostly include late game spells that can deal damage to all enemy types.
Diffindo has a high damage output by default and can be used against all enemy types. Upgrade it with a Diffindo Mastery Talent to enhance its spell effect and add a Concentration Trait to increase its damage further.
Transformation may have a long cooldown time but it allows you to eliminate one enemy from a group by transforming them into an object. Upgrade the spell with the Transformation Mastery Talent so that transformed enemies will turn into an explosive object that you can use Ancient Magic Throw with to defeat another.
Confringo is another damage spell that you can against enemies that are weak to fire such as Inferi and Spiders. Its talent upgrade, Confringo Mastery, burns other nearby enemies when casting the spell, making it useful when dealing with groups of enemies.
Use Accio to start combos or to pull enemies that fight at a long-range such as dark wizard rangers and crossbow-wielding goblins. Unlocking Accio Mastery allows you to pull three enemies at once.
Best Spell Combos

| Best Spell Loadouts |
|---|
Early Game Combo
| Combo String |
|---|
|
>
>
>
>
|
You can use this combo in combat sections early in the game. Make sure to use at least one Basic Cast in between the spells to deal as much damage as possible, extend the combo, and prevent depleting all of your spells early in the fight.
If you are dealing with multiple enemies, you can use Levioso to suspend one in the air and then focus on other targets.
This combo is picked off straight from the last combo string you need to do during the Spell Combination Practice 2 side quest.
Long-Range + Descendo Combo
| Combo String |
|---|
>
>
>
>
|
This basic combo can deal a hefty amount of damage to a single enemy. Cast Levioso on your target then send them away with Depulso. Follow up with Confringo and Diffindo and end with Descendo to send them crashing to the ground.
You can also add basic attacks in between spells to extend the combo.
AoE Combo
| Combo String |
|---|
|
>
>
>
|
Obtaining Talent upgrades for Accio, Glacius, Incendio, and Bombarda will give you the best AoE spells in the game, which is useful against a crowd of enemies.
Curse + Transformation Combo
| Combo String |
|---|
|
>
>
|
This combo utilizes the Talent upgrades for Imperio, Crucio, and Transformation. The Imperio upgrade will allow the enemy under your control to curse other targets while attacking a target who is under the effects of Crucio will release a projectile that curses other enemies.
Finish the combo with an upgraded Transformation Spell, which OHKOs all cursed enemies!
The Unforgivable Combo
| Combo String |
|---|
|
>
>
|
This combo aims to wipe out multiple enemies at once thanks to fully upgraded Unforgivable Curses.
Like with the previous combo, start with casting Imperio to one target, then let them attack to curse other enemies. Meanwhile, you can use Crucio on another target and then attack them to curse another set of enemies.
Deal the killing blow with your upgraded Avada Kedavra and instantly kill every cursed enemy in the field!
List of Talents and Skill Trees
How to Unlock More Spell Loadouts
Get Spell Knowledge Talents
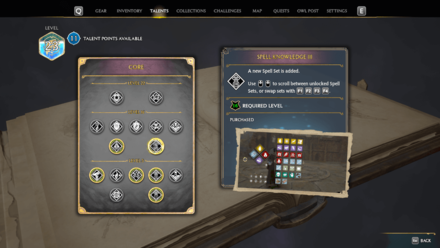
Spend your Talent Points and get Spell Knowledge Talents to unlock three more spell loadouts.
Spell Knowledge Talents are found under Core Talents tree in the Talents menu. The first two expansions are available once you reach Level 5, while the third one is unlocked when you reach Level 16.
Unlocking more spell loadouts will allow you to cast more spells during combat instead of waiting for cooldowns to end!
How to Get More Spell Loadouts
Hogwarts Legacy Related Guides

Early Game Guides
Game Mechanics Guides
Tier Lists
| All Tier Lists | |
|---|---|
| Best Wizard and Witch Names | Best Wand Cores |
| Best Optional Quests | Best Custom Character Designs |
| Best Talents | Best Potions |
| Best Gear | Best Traits |
| Best Recipes and Room of Requirement Conjurations | Best Brooms |
| Best Spell Loadouts and Combos | |
Story Guides
Dueling Feats
Settings Guides
Other Guides
Author

Best Spell Loadouts and Combos
Please participate in our site
improvement survey
03/2026
improvement survey
03/2026
Would you assist in
improving Game8's site?
improving Game8's site?

×
We are listening to our users' valuable opinions and discussing how to act on them.
The information collected through this survey will be used for the purpose of improving our services. In addition, the information will only be disclosed a part of a statistic in a format that will not allow identification of personal information.
Begin Survey
Not Now
×
Please rate each item regarding Game8.co's Advertisements.
Amount of Ads
Very Dissatisfied
Somewhat Dissatisfied
Fine
Somewhat Satisfied
Highly Satisfied
Placement of Ads
Timing of Ad Display
Ad Loading Speed
Safeness of Ads
Content of Ads
×
Please rate each item regarding Game8.co's Quality of Articles.
Amount of information
Very Dissatisfied
Somewhat Dissatisfied
Fine
Somewhat Satisfied
Highly Satisfied
Frequency of updates
Speed of new information
Accuracy of articles
Understandibility of articles
Readability of sentences
×
Please rate each item regarding Game8.co's Usability of the Site.
Ease of finding information
Very Dissatisfied
Somewhat Dissatisfied
Fine
Somewhat Satisfied
Highly Satisfied
Loading Speed
Use of Color
Font Size
Visibility of Images
Easy to Understand Layout
×
Please rate each item regarding Game8.co's Message Boards, Comments.
Ease of Writing
Very Dissatisfied
Somewhat Dissatisfied
Fine
Somewhat Satisfied
Highly Satisfied
Readability
Ease in Finding Information
Comment Quality
Comment Quantity
Admin Response
×
Please rate each item regarding Game8.co's Site's new design.
Please rate our site's new design
Very Dissatisfied
Somewhat Dissatisfied
Fine
Somewhat Satisfied
Highly Satisfied
Do you think that the website's design change makes the site easier to use?
Has the new design made it easier for you to find information on the site?
Has the new design improved the overall visual appeal of the site?
How would you rate your overall satisfaction with the new design of the site?
×
How likely are you to recommend Game8 to someone you know?
Very Unlikely
0
1
2
3
4
5
6
7
8
9
10
Very Likely
If you have other opinions regarding potential improvement to the website, please share them with us. We would appreciate your honest opinion.
Note: This is a free response section, so you can proceed without entering anything.
Note: Please be sure not to enter any kind of personal information into your response.
Note: Please be sure not to enter any kind of personal information into your response.
×
Thank You
×
Thank you for participating in our survey! Your answers will help us to improve the quality of our website and services.
We hope you continue to make use of Game8.
We hope you continue to make use of Game8.
Close
Rankings
- We could not find the message board you were looking for.
Gaming News


![Everwind Review [Early Access] | The Shaky First Step to A Very Long Journey](https://img.game8.co/4440226/ab079b1153298a042633dd1ef51e878e.png/thumb)

![Monster Hunter Stories 3 Review [First Impressions] | Simply Rejuvenating](https://img.game8.co/4438641/2a31b7702bd70e78ec8efd24661dacda.jpeg/thumb)
Popular Games

Genshin Impact Walkthrough & Guides Wiki
Honkai: Star Rail Walkthrough & Guides Wiki
Umamusume: Pretty Derby Walkthrough & Guides Wiki
Pokemon Pokopia Walkthrough & Guides Wiki
Resident Evil Requiem (RE9) Walkthrough & Guides Wiki
Monster Hunter Wilds Walkthrough & Guides Wiki
Wuthering Waves Walkthrough & Guides Wiki
Arknights: Endfield Walkthrough & Guides Wiki
Pokemon FireRed and LeafGreen (FRLG) Walkthrough & Guides Wiki
Pokemon TCG Pocket (PTCGP) Strategies & Guides Wiki


Recommended Games
Diablo 4: Vessel of Hatred Walkthrough & Guides Wiki
Fire Emblem Heroes (FEH) Walkthrough & Guides Wiki
Yu-Gi-Oh! Master Duel Walkthrough & Guides Wiki
Super Smash Bros. Ultimate Walkthrough & Guides Wiki
Pokemon Brilliant Diamond and Shining Pearl (BDSP) Walkthrough & Guides Wiki
Elden Ring Shadow of the Erdtree Walkthrough & Guides Wiki
Monster Hunter World Walkthrough & Guides Wiki
The Legend of Zelda: Tears of the Kingdom Walkthrough & Guides Wiki
Persona 3 Reload Walkthrough & Guides Wiki
Cyberpunk 2077: Ultimate Edition Walkthrough & Guides Wiki


All rights reserved
HOGWARTS LEGACY software © 2022 Warner Bros. Entertainment Inc. Developed by Avalanche Software. WIZARDING WORLD and HARRY POTTER Publishing Rights © J.K. Rowling. PORTKEY GAMES, HOGWARTS LEGACY, WIZARDING WORLD AND HARRY POTTER characters, names and related indicia © and ™ Warner Bros. Entertainment Inc.
The copyrights of videos of games used in our content and other intellectual property rights belong to the provider of the game.
The contents we provide on this site were created personally by members of the Game8 editorial department.
We refuse the right to reuse or repost content taken without our permission such as data or images to other sites.