Depulso Puzzle Room 2 Solution and All Chest Locations
Depulso Puzzle Room 2 is one of the platforming puzzle rooms in Hogwarts Legacy and is found in the Library Wing of Hogwarts Castle. Read on for a guide on how to get to this Depulso Puzzle Room, all chests locations and how to get them, and the solution to the puzzle!
List of Contents
| Depulso Puzzle Room Guides | ||
|---|---|---|
| All Depulso Puzzle Rooms | Depulso Puzzle Room 1 Solution | Depulso Puzzle Room 2 Solution |
Depulso Puzzle Room 2 Location
Bell Tower Wing
| Map View | World View |
|---|---|
 |
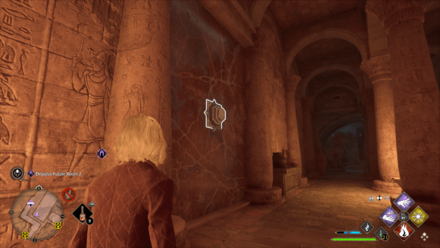 |
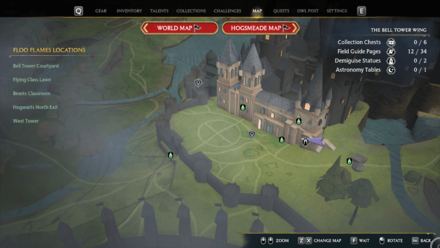
You can find the Depulso Puzzle Room 2 map marker under the Bell Tower Wing region of the Hogwarts map.
Similar to the first Depulso Puzzle Room, you also need Alohomora I to reach this room.
How to Reach Depulso Puzzle Room 2
| How to Reach Depulso Puzzle Room 2 | |
|---|---|
| 1 | 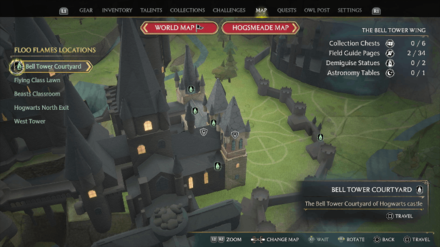 Open the map and switch to the Hogwarts map. Select The Bell Tower Wing and choose the Bell Tower Courtyard Floo Flame. |
| 2 | Head left to the first step of stairs and enter the door in the middle. |
| 3 | Continue heading north inside the open room. Open the locked door at the end of the room using Level 1 Alohomora. |
| 4 | Head to the right side of the area that resembles an ancient Egyptian crypt and use Depulso on the marble wall on the right. Note: The middle block on the marble wall only appears once you start The Hall of Herodiana side quest. |
How to Unlock
Depulso Room 2 will be available at the Bell Tower Wing after starting The Hall of Herodiana quest.
Depulso Puzzle Room 2 Video Walkthrough
How to Solve Depulso Puzzle Room 2
| Depulso Puzzle Room 2 Solution |
|---|
|
|
Move Blocks to Reach Treasure A
| Objectives | |
|---|---|
| 1 | Pull the T-shaped block towards the entrance. You need to get the this stack out of the way to make the platform to reach Treasure A. |
| 2 | Move the lone block at the entrance to the other edge of the room. Once in place, you also need to push it to the corner. |
| 3 | Move the combined blocks found at the right side of the room and bring it under the lone block at the corner. |
| 4 | 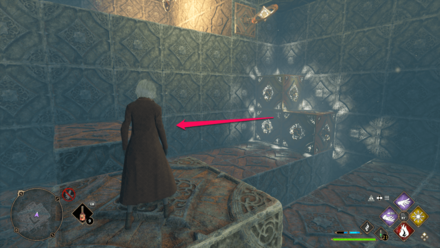 Pull the blocks towards you. The platform will stop the blocks from moving all the way and will create the path for you to jump on and reach the treasure. |
| 5 |  Scale the blocks to reach Treasure A. Once you reach the area where Treasure A is, a cutscene will play and will reveal a door to another room. |
Reach the First Area's Exit
| Objectives | |
|---|---|
| 1 | Move the T-shaped block to the other corner of the room. |
| 2 | Move the second level block to the corner of the room. Bring it at the area where the T-shaped block was. Make sure to push it towards the corner after pulling it. |
| 3 | Combine the combined blocks from the right side of the room with the second level block. |
| 4 | Move the combined blocks and hide it at the space on the right side of the room. |
| 5 | Bring out the new combined block. New blocks will appear near the entrance after reaching the first treasure. Pull it towards the area where the T-shaped block was. |
| 6 | Move the two big set of blocks with one Accio to the right. Make sure to move the T-shaped block first to avoid combining both blocks. |
| 7 | Combine the two smaller set of blocks. Pull the block you hid in the space earlier, then connect the new set of blocks. |
| 8 | Combine the blocks to make the path towards the door. You need to jump above the gap to reach the first block, so be mindful of your positioning! |
Make a Path to Treasure B
| Objectives | |
|---|---|
| 1 | Head to the right side of the area and pull the set of blocks ahead towards the you. |
| 2 | Go to the left side of the area and push the stacked blocks forwards, then pull it towards the left. |
| 3 | Climb on the first set of blocks you move. Walk forward and pull it back to its original position. You need to go to the edge of the blocks to pull it backwards. |
| 4 | Use the blocks to reach Treasure B. You need to move from the blocks you are standing on to the stacked blocks to reach the treasure so be mindful of your jump. |
Use Blocks to Reach Treasure C
This treasure chest is found in a hidden room on the left side of the area.
| Objectives | |
|---|---|
| 1 | 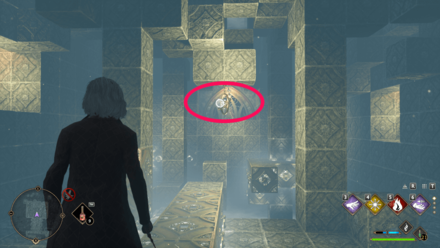 Hit the trigger to reset the puzzle. |
| 2 | Move the long set of blocks towards the left wall. |
| 3 | Combine the long set of blocks with the L-shaped block. Push the long set of blocks forward and pull the L-shaped block at the other side of the area towards you. |
| 4 | Connect the combined set of blocks with the stacked blocks on the right. |
| 5 | Push the combined block forward using Depulso. |
| 6 | Go to the left side of the combined block and use Accio on its left side to pull it to the wall. |
| 7 | Pull the combined block using Accio. Climb on the blocks to reach Treasure C. You need to jump from the blocks to the platform. |
Reach Second Area's Exit to Open Treasure D
| Objectives | |
|---|---|
| 1 |  Hit the trigger to reset the puzzle. |
| 2 | Head to the right side of the area and pull the set of blocks ahead towards the you. |
| 3 | Go to the left side of the area and push the stacked blocks forwards, pull it towards the left side, then push it to the other corner of the area. |
| 4 | Head back to the left side of the area and pull the L-shaped set of blocks on the other side towards you. |
| 5 | Push the long set of blocks near the entrance to the left wall, then push it forward to combine it with the L-shaped set of blocks. |
| 6 | Move the combined set of blocks to reach the other side of the area. Pull the set of blocks until it hits the column in the middle of the area. Hop on the tail end of the blocks, then cast Depulso on the block in front to push the platform forward. |
| 7 | Pull the stacked block towards the platform. Pull the stacked blocks you pushed earlier to the corner of the room towards you. Climb on it to reach the end of this area and open the treasure chest at the end of this puzzle room! |
Depulso Puzzle Room 2 All Chest Locations
You may get Gear or Collection items from opening chests inside Depulso Puzzle Room 2.
Treasure A
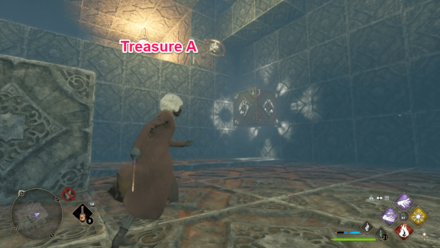
Treasure A is found on the platform at the left side of the room, which is the same place you need to reach to get access to Depulso Puzzle Room 2's second area.
Treasures B, C, and D

Treasures B and C are found at the right and left side, respectively, of Depulso Puzzle Room 2's second area.
Treasure D will appear near the puzzle room's exit once you open all three chests.
Hogwarts Legacy Related Guides

Hogwarts Puzzle Guides
Other Puzzle Guides
Author
Depulso Puzzle Room 2 Solution and All Chest Locations
improvement survey
03/2026
improving Game8's site?

Your answers will help us to improve our website.
Note: Please be sure not to enter any kind of personal information into your response.

We hope you continue to make use of Game8.
Rankings
- We could not find the message board you were looking for.
Gaming News
Popular Games

Genshin Impact Walkthrough & Guides Wiki

Honkai: Star Rail Walkthrough & Guides Wiki

Umamusume: Pretty Derby Walkthrough & Guides Wiki

Pokemon Pokopia Walkthrough & Guides Wiki

Resident Evil Requiem (RE9) Walkthrough & Guides Wiki

Monster Hunter Wilds Walkthrough & Guides Wiki

Wuthering Waves Walkthrough & Guides Wiki

Arknights: Endfield Walkthrough & Guides Wiki

Pokemon FireRed and LeafGreen (FRLG) Walkthrough & Guides Wiki

Pokemon TCG Pocket (PTCGP) Strategies & Guides Wiki
Recommended Games

Diablo 4: Vessel of Hatred Walkthrough & Guides Wiki

Fire Emblem Heroes (FEH) Walkthrough & Guides Wiki

Yu-Gi-Oh! Master Duel Walkthrough & Guides Wiki

Super Smash Bros. Ultimate Walkthrough & Guides Wiki

Pokemon Brilliant Diamond and Shining Pearl (BDSP) Walkthrough & Guides Wiki

Elden Ring Shadow of the Erdtree Walkthrough & Guides Wiki

Monster Hunter World Walkthrough & Guides Wiki

The Legend of Zelda: Tears of the Kingdom Walkthrough & Guides Wiki

Persona 3 Reload Walkthrough & Guides Wiki

Cyberpunk 2077: Ultimate Edition Walkthrough & Guides Wiki
All rights reserved
HOGWARTS LEGACY software © 2022 Warner Bros. Entertainment Inc. Developed by Avalanche Software. WIZARDING WORLD and HARRY POTTER Publishing Rights © J.K. Rowling. PORTKEY GAMES, HOGWARTS LEGACY, WIZARDING WORLD AND HARRY POTTER characters, names and related indicia © and ™ Warner Bros. Entertainment Inc.
The copyrights of videos of games used in our content and other intellectual property rights belong to the provider of the game.
The contents we provide on this site were created personally by members of the Game8 editorial department.
We refuse the right to reuse or repost content taken without our permission such as data or images to other sites.





![Everwind Review [Early Access] | The Shaky First Step to A Very Long Journey](https://img.game8.co/4440226/ab079b1153298a042633dd1ef51e878e.png/thumb)

![Monster Hunter Stories 3 Review [First Impressions] | Simply Rejuvenating](https://img.game8.co/4438641/2a31b7702bd70e78ec8efd24661dacda.jpeg/thumb)


Edit. there is a step missing where you have to combine the stack of 3 blocks, then Push Forward to the back wall, then Pull Left.