Tadarok Shrine Puzzle Solution
▲ Get Pristine Weapons from the depths!
△ All 1000 Koroks | All 4 Great Fairies
▲ 81 Addison Signs | 147 Caves | 58 Wells
△ Tips: Farm Rupees | Starting Armor
▲ Best Weapons | Best Armor | Best Food

Tadarok Shrine (Fire and Water) in The Legend of Zelda: Tears of the Kingdom (TotK) can be found in the River of the Dead Waterfall Cave in the Hyrule Field region. Read on to learn how to reach it, its location, puzzle solution, as well as all treasure chest locations in Tadarok Shrine.
Tadarok Shrine Location
River of the Dead Waterfall Cave, Hyrule Field
Tadarok Shrine can be found inside the River of the Dead Waterfall Cave on the Great Plateau in the Hyrule Field region.
Once you venture into the cave, keep going until you arrive at -1082, -2187, 0129, which is the shrine's exact coordinates. You can head to the Gerudo Canyon Skyview Tower and glide east to reach the waterfall where the cave is.
Take note that you'll need warm clothing like the Snowquill Set to safely reach the area. If you don't have this armor yet, you can cook dishes that can provide cold-resistance instead.
Puzzle Shrine
This is a Puzzle type Shrine, so you need to solve the puzzle to reach the end and get a Light of Blessing.
Try to look around the area to find a way to move forward, and remember to use Link's Ultrahand, Ascend, or Recall abilities!
All Abilities and How to Unlock
How to Reach Tadarok Shrine
1. Glide Through the Waterfall

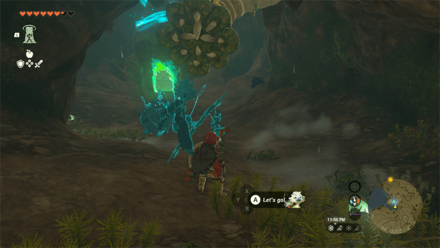
The entrance of the River of the Dead Waterfall Cave is located at -1092, -2163, 0143. Head over there to the top of the mountain where the cave is located, and jump off the cliff.
Afterwards, quickly glide through the waterfall—keep going until you land safely on the ground!
You can also walk to the cave using the side entrance at the base of the waterfall.
2. Defeat the Like Like Inside the Cave

Once inside the cave, you'll come across a Like Like. Defeat it so you can access the shrine safely, or quickly run past it.
Tadarok Shrine Puzzle Solution
- Drop the Giant Stone Cube Into the Water
- Use the Giant Stone Cube to Block the Spewing Fire
- Grab the Chest Using the Giant Ice Cube
- Remove the Chained Metal Ball From the Electrified Pool
- Place the Metal Cube Onto the Elevated Platform
- Stick the Stone Cube and Ice Cube Together
- Place the Stacked Cubes on the Right Edge of the Platform
- Drop the Stacked Cubes Into the Pool
- Stick the Stacked Cubes to the Metal Cube
- Use Ascend Underneath the Stacked Cubes
- Proceed to the Altar
Video Guide
1. Drop the Giant Stone Cube Into the Water
When you enter the area, you will notice a pool being electrified by two large pedestals across from you.
Grab the giant stone cube nearby using Ultrahand, and drop it into the pool. The stone cube will allow you to cross the water without getting electrocuted.
2. Use the Giant Stone Cube to Block the Spewing Fire
After reaching the next area, you will see flames spewing from out the wall to your right. There are giant cubes of ice continuously falling onto the flame's path, only to melt when exposed to the heat.
Grab the giant stone cube you dropped in the pool using Ultrahand, and place it directly in front of the spewing flames. This will stop the falling ice from melting.
3. Grab the Chest Using the Giant Ice Cube
A chest can be found on an elevated platform near you. Grab the giant ice cube with Ultrahand, and place it below the elevated platform. Climb the ice to reach the chest.
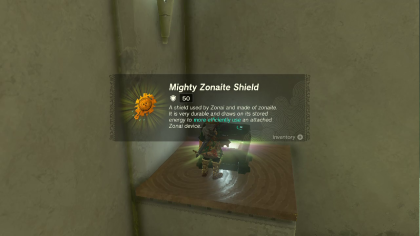
You will receive a Mighty Zonaite Shield after opening the chest.
4. Remove the Chained Metal Ball From the Electrified Pool
There is an electrified pool near your vicinity caused by a metal ball. Remove the submerged metal ball from the pool to prevent the water from being conducted with electricity.
5. Place the Metal Cube Onto the Elevated Platform
You will need to place the metal cube from the pool to the elevated platform. The metal cube should be positioned in a way that it blocks the spewing fire from the left wall.
6. Stick the Stone Cube and Ice Cube Together
Use Ultrahand to stick the ice cube on top of the stone cube.
7. Place the Stacked Cubes to the Right of the Platform
Grab the stacked cubes with Ultrahand, and place them in the space to the right of the platform. Try to raise the stacked cubes high before dropping them.
8. Drop the Stacked Cubes Into the Pool
Climb the stacked cubes before using Recall to reverse their descent towards the pool.
Proceed to the platform when able.
9. Stick the Stacked Cubes to the Metal Cube
You will need to grab the stacked cubes, and stick them on top of the metal cube blocking the flames.
Be sure to place the stacked cubes in a way that you could still be underneath the stone cube, so place the combined cubes on the top edge of the metal cube.
10. Use Ascend Underneath the Stacked Cubes
Use Ascend to rise up to the very top of the stacked cubes.
11. Proceed to the Altar
Continue to the altar and complete the Tadarok Shrine.
Tadarok Shrine Rewards and Chest Locations
Mighty Zonaite Shield
| Chest Location | Chest Contents |
|---|---|
 |
 |
The chest can be found on an elevated platform near the wall where flames are spewing out. Grab the giant ice cube and place it below the platform. Climb the ice to acquire the Mighty Zonaite Shield from inside the chest.
The Legend of Zelda: Tears of the Kingdom Related Guides

Shrines Lists
| Shrines Lists | |
|---|---|
| All Shrines | All Shrine Quests |
All Great Sky Island Shrines
| Great Sky Island Shrines | ||
|---|---|---|
| Ukouh Shrine | In-isa Shrine | Gutanbac Shrine |
| Nachoyah Shrine | - | - |
All Hyrule Field Shrines
All Tabantha Shrines
| Tabantha Shrines | ||
|---|---|---|
| Oromuwak Shrine | Gatakis Shrine | Nouda Shrine |
| Wao-os Shrine | Iun-orok Shrine | Turakawak Shrine |
| Gasas Shrine | Mayausiy Shrine | Ikatak Shrine |
| Ga-ahisas Shrine | Ganos Shrine | Taunhiy Shrine |
All Hebra Shrines
All Great Hyrule Forest Shrines
| Great Hyrule Forest Shrines | ||
|---|---|---|
| Sakunbomar Shrine | Pupunke Shrine | Ninjis Shrine |
| Musanokir Shrine | Kikakin Shrine | Kiuyoyou Shrine |
| Ekochiu Shrine | Mayam Shrine | Simosiwak Shrine |
All Akkala Shrines
All Eldin Shrines
All Lanayru Shrines
All Necluda Shrines
All Faron Shrines
| Faron Shrines | ||
|---|---|---|
| Jiukoum Shrine | Ishokin Shrine | Utsushok Shrine |
| Joku-u Shrine | Joku-usin Shrine | - |
All Gerudo Shrines
Comment
Author
The Legend of Zelda: Tears of the Kingdom Walkthrough & Guides Wiki
Tadarok Shrine Puzzle Solution
improvement survey
03/2026
improving Game8's site?

Your answers will help us to improve our website.
Note: Please be sure not to enter any kind of personal information into your response.

We hope you continue to make use of Game8.
Rankings
- We could not find the message board you were looking for.
Gaming News
Popular Games

Genshin Impact Walkthrough & Guides Wiki

Honkai: Star Rail Walkthrough & Guides Wiki

Umamusume: Pretty Derby Walkthrough & Guides Wiki

Pokemon Pokopia Walkthrough & Guides Wiki

Resident Evil Requiem (RE9) Walkthrough & Guides Wiki

Monster Hunter Wilds Walkthrough & Guides Wiki

Wuthering Waves Walkthrough & Guides Wiki

Arknights: Endfield Walkthrough & Guides Wiki

Pokemon FireRed and LeafGreen (FRLG) Walkthrough & Guides Wiki

Pokemon TCG Pocket (PTCGP) Strategies & Guides Wiki
Recommended Games

Fire Emblem Heroes (FEH) Walkthrough & Guides Wiki

Diablo 4: Vessel of Hatred Walkthrough & Guides Wiki

Yu-Gi-Oh! Master Duel Walkthrough & Guides Wiki

Super Smash Bros. Ultimate Walkthrough & Guides Wiki

Pokemon Brilliant Diamond and Shining Pearl (BDSP) Walkthrough & Guides Wiki

Elden Ring Shadow of the Erdtree Walkthrough & Guides Wiki

Monster Hunter World Walkthrough & Guides Wiki

The Legend of Zelda: Tears of the Kingdom Walkthrough & Guides Wiki

Persona 3 Reload Walkthrough & Guides Wiki

Cyberpunk 2077: Ultimate Edition Walkthrough & Guides Wiki
All rights reserved
© Nintendo. The Legend of Zelda and Nintendo Switch are trademarks of Nintendo.
The copyrights of videos of games used in our content and other intellectual property rights belong to the provider of the game.
The contents we provide on this site were created personally by members of the Game8 editorial department.
We refuse the right to reuse or repost content taken without our permission such as data or images to other sites.


![Slay the Spire 2 Review [Early Access] | Still the Deckbuilder to Beat](https://img.game8.co/4433115/44e19e1fb0b4755466b9e516ec7ffb1e.png/thumb)

![Resident Evil Village Review [Switch 2] | Almost Flawless Port](https://img.game8.co/4432790/e1859f64830960ce4248d898f8cd38d9.jpeg/thumb)


