Gasas Shrine Location and Walkthrough
▲ Get Pristine Weapons from the depths!
△ All 1000 Koroks | All 4 Great Fairies
▲ 81 Addison Signs | 147 Caves | 58 Wells
△ Tips: Farm Rupees | Starting Armor
▲ Best Weapons | Best Armor | Best Food

Gasas Shrine (Well-Timed Cuts) in The Legend of Zelda: Tears of the Kingdom (TotK) can be found southwest of Tanagar Canyon in the Tabantha Frontier region. Read on to learn its location, puzzle solution, as well as all treasure chest locations in Gasas Shrine.
List of Contents
Gasas Shrine Location
Southwest of Tanagar Canyon, Tabantha Frontier
Gasas Shrine can be found southwest of Tanagar Canyon in the Tabantha Frontier Region. The exact coordinates of the shrine is at -4152, 0098, 0040.
The Gasas shrine is surrounded by nothing but land mass, given that it is located beside the Tanagar Canyon.
Travel to Gerudo Highlands Skyview Tower and launch yourself from there to glide north towards Gasas Shrine.
Puzzle Shrine
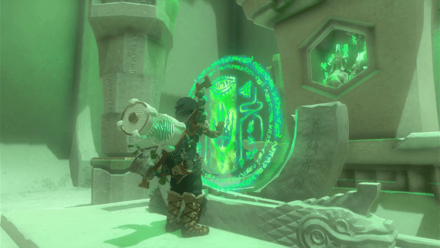
This is a Puzzle type Shrine, so you need to solve the puzzle to reach the end and get a Light of Blessing.
Try to look around the area to find a way to move forward, and remember to use Link's Ultrahand, Ascend, or Recall abilities!
All Abilities and How to Unlock
Gasas Shrine Puzzle Solution
- Cut Down the Box
- Move the Box
- Drop and Raise the Box
- Use Recall to Climb Back Up
- Create a Bridge
- Cross the Bridge
- Create Another Bridge
- Cut Down the Chest
- Move the Box
- Attach the Bridge
- Cut Down the Second Chest
- Open the Chest
- Swing the Ball
- Cut Down the Ball
- Let the Ball Roll
- Examine the Shrine
Video Guide
1. Cut Down the Box
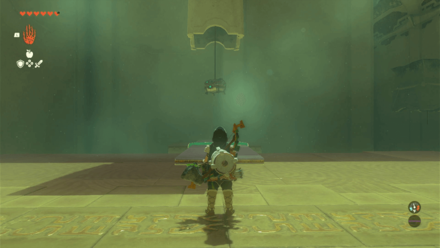
Upon entering the shrine, you'll see a box hanging from the ceiling. Shoot it down with your bow and arrow to cross. There are also arrows in the barrels nearby if you need them!
The objective of the whole shrine puzzle is to create bridges so you could cross areas that need to be reached.
2. Move the Box
Use Ultrahand to move the box over to the next ledge.
3. Drop and Raise the Box
Drop it and lift it up again with Ultrahand . Hop on once you've dropped it again!
4. Use Recall to Climb Back Up
Use Recall to create an elevator to climb up to the next section.
5. Create a Bridge
Using Ultrahand connect the two pieces to create a bridge.
6. Cross the Bridge
Move the two pieces to cross the gap.
7. Create Another Bridge
This time move the bridge you made under the hanging chest with Ultrahand.
8. Cut Down the Chest
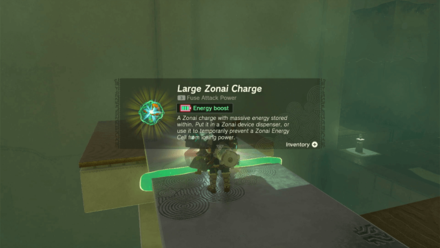
With the bridge in place you can use your bow to cut down the chest and grab the Large Zonai Charge inside.
9. Move the Box
On the other side of the room is a box near another hanging chest. Move the box to align with the chest.
10. Attach the Bridge
Use Ultrahand to attach the bridge to the top of the box.
11. Cut Down the Second Chest
The bridge should be under the chest now, so you can use your bow to cut it down!
12. Open the Chest
Pick the chest up with Ultrahand and drop it down to open it and grab the key!
13. Swing the Ball
With Ultrahand, swing the ball!
14. Cut Down the Ball
As it's swinging back, use your bow to cut down the ball! It should fall onto the platform you're on and roll towards
15. Let the Ball Roll
The Ball should roll into the hole, opening the last door!
16. Examine the Shrine

Examine the shrine to receive your reward!
Gasas Shrine Rewards and Chest Locations
Large Zonai Charge
| Chest Location | Chest Contents |
|---|---|
 |
 |
Using Ultrahand, move the bridge you made to cross the gap and place it under the chest. Cut it down with a bow and arrow and open it to snag a Large Zonai Charge.
The chest can be located at the fourth area throughout your shrine progression.
The Legend of Zelda: Tears of the Kingdom Related Guides

Shrines Lists
| Shrines Lists | |
|---|---|
| All Shrines | All Shrine Quests |
All Great Sky Island Shrines
| Great Sky Island Shrines | ||
|---|---|---|
| Ukouh Shrine | In-isa Shrine | Gutanbac Shrine |
| Nachoyah Shrine | - | - |
All Hyrule Field Shrines
All Tabantha Shrines
| Tabantha Shrines | ||
|---|---|---|
| Oromuwak Shrine | Gatakis Shrine | Nouda Shrine |
| Wao-os Shrine | Iun-orok Shrine | Turakawak Shrine |
| Gasas Shrine | Mayausiy Shrine | Ikatak Shrine |
| Ga-ahisas Shrine | Ganos Shrine | Taunhiy Shrine |
All Hebra Shrines
All Great Hyrule Forest Shrines
| Great Hyrule Forest Shrines | ||
|---|---|---|
| Sakunbomar Shrine | Pupunke Shrine | Ninjis Shrine |
| Musanokir Shrine | Kikakin Shrine | Kiuyoyou Shrine |
| Ekochiu Shrine | Mayam Shrine | Simosiwak Shrine |
All Akkala Shrines
All Eldin Shrines
All Lanayru Shrines
All Necluda Shrines
All Faron Shrines
| Faron Shrines | ||
|---|---|---|
| Jiukoum Shrine | Ishokin Shrine | Utsushok Shrine |
| Joku-u Shrine | Joku-usin Shrine | - |
All Gerudo Shrines
Comment
Author
The Legend of Zelda: Tears of the Kingdom Walkthrough & Guides Wiki
Gasas Shrine Location and Walkthrough
improvement survey
03/2026
improving Game8's site?

Your answers will help us to improve our website.
Note: Please be sure not to enter any kind of personal information into your response.

We hope you continue to make use of Game8.
Rankings
- We could not find the message board you were looking for.
Gaming News
Popular Games

Genshin Impact Walkthrough & Guides Wiki

Honkai: Star Rail Walkthrough & Guides Wiki

Umamusume: Pretty Derby Walkthrough & Guides Wiki

Pokemon Pokopia Walkthrough & Guides Wiki

Resident Evil Requiem (RE9) Walkthrough & Guides Wiki

Monster Hunter Wilds Walkthrough & Guides Wiki

Wuthering Waves Walkthrough & Guides Wiki

Arknights: Endfield Walkthrough & Guides Wiki

Pokemon FireRed and LeafGreen (FRLG) Walkthrough & Guides Wiki

Pokemon TCG Pocket (PTCGP) Strategies & Guides Wiki
Recommended Games

Diablo 4: Vessel of Hatred Walkthrough & Guides Wiki

Cyberpunk 2077: Ultimate Edition Walkthrough & Guides Wiki

Fire Emblem Heroes (FEH) Walkthrough & Guides Wiki

Yu-Gi-Oh! Master Duel Walkthrough & Guides Wiki

Super Smash Bros. Ultimate Walkthrough & Guides Wiki

Pokemon Brilliant Diamond and Shining Pearl (BDSP) Walkthrough & Guides Wiki

Elden Ring Shadow of the Erdtree Walkthrough & Guides Wiki

Monster Hunter World Walkthrough & Guides Wiki

The Legend of Zelda: Tears of the Kingdom Walkthrough & Guides Wiki

Persona 3 Reload Walkthrough & Guides Wiki
All rights reserved
© Nintendo. The Legend of Zelda and Nintendo Switch are trademarks of Nintendo.
The copyrights of videos of games used in our content and other intellectual property rights belong to the provider of the game.
The contents we provide on this site were created personally by members of the Game8 editorial department.
We refuse the right to reuse or repost content taken without our permission such as data or images to other sites.


![Monster Hunter Stories 3 Review [First Impressions] | Simply Rejuvenating](https://img.game8.co/4438641/2a31b7702bd70e78ec8efd24661dacda.jpeg/thumb)


