This survey will take about 1 minute.
Your answers will help us to improve our website.
Zelda: Tears of the Kingdom (TotK)
All 20 Sage's Will Locations and Map
▲ Get Pristine Weapons from the depths!
△ All 1000 Koroks | All 4 Great Fairies
▲ 81 Addison Signs | 147 Caves | 58 Wells
△ Tips: Farm Rupees | Starting Armor
▲ Best Weapons | Best Armor | Best Food

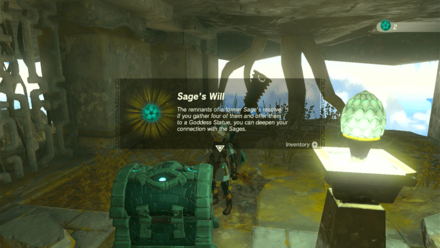
This is a map and guide to all the 20 Sage's Will items used to power up Sage Abilities summoned by Vows in The Legend of Zelda: Tears of the Kingdom (TotK). Learn where to find all the Sage's Wills and tips on how to get them, how to use Sage's Wills to upgrade Sages, and which Sage Abilities are best to upgrade first.
List of Contents
All 20 Sage's Will Locations and Map
Sage's Will Locations
| No. | Map Location | Overworld Location |
|---|---|---|
| 1 |  |
 |
| Region:
Eldin Canyon Sky
Coordinates: 1780, 0973, 1226 How to Get: Teleport to Kadaunar Shrine, then hop to the island south of it. Use a shield to surf on top of the rails descending down to another sky island. Descend the nearby staircase and reach for the inner part of the island. Burn the vines to reach the treasure chest. |
||
| 2 |  |
 |
| Region:
Eldin Canyon Sky
Coordinates: 1764, 2267, 0827 How to Get: Teleport to Mayam Shrine, then glide to the small island east of the sky island. This island is southwest of Death Mountain below. |
||
| 3 |  |
 |
| Region:
Central Hyrule Sky
Coordinates: -0964, -1737, 1018 How to Get: Teleport to Jinodok Shrine, then use the launcher to send Link flying to the island with pools of water found southeast. From there, attach a log to the board blocking the water and raise to drain the water from the pool to reveal the treasure chest. |
||
| 4 |  |
 |
| Region:
Lanayru Great Spring Sky
Coordinates: 2911, 0525, 0929 How to Get: Teleport to Jirutagumac Shrine. Deactivate the Zonai fan and manually rotate the middle cog until the hole of the giant sphere is positioned at the middle. Jump through the lower half of the hole to reach the treasure chest. |
||
| 5 | 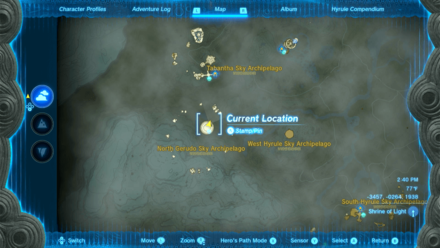 |
 |
| Region:
Gerudo Highlands Sky
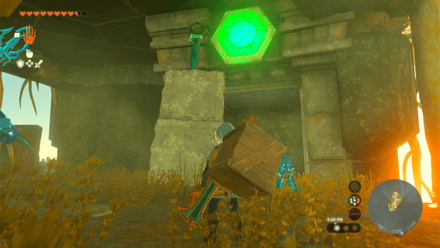
Coordinates: -3459, -0269, 1937 How to Get: Teleport to Ganos Shrine. Use a Zonai hoverbike to reach the large floating sphere and head inside. Arrange the mirrors and follow the beams. Light up the yellow hexagon in front of the cage to reach the treasure chest. |
||
| 6 | 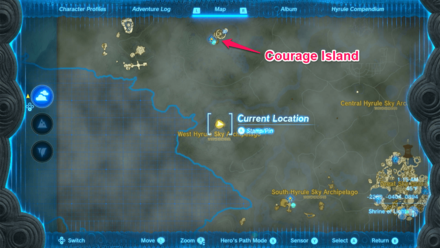 |
 |
| Region:
Hebra Mountains Sky
Coordinates: -2273, -0448, 0894 How to Get: Teleport to Lindor's Brow Skyview Tower and use it to head to the skies and land on the topmost island on Courage Island. Jump and glide down to the round island south of Courage Island. Knock down the Flux Construct III to retrieve the chest. It is possible to get this Sage's Will without defeating the boss. ▶︎ How to Beat Flux Construct III |
||
| 7 | 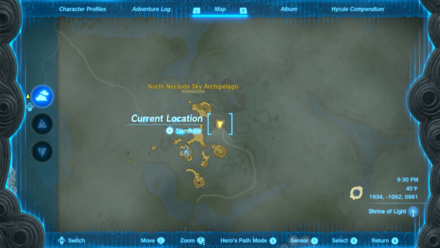 |
 |
| Region:
West Necluda Sky
Coordinates: 1934 -1062, 0961 How to Get: Teleport to Josiu Shrine and head to the Zonai Dispenser north. Use the launcher to send Link flying to the small floating island with ores northeast where the treasure chest is located. |
||
| 8 | 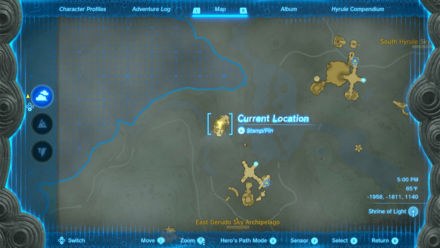 |
 |
| Region:
Gerudo Highlands Sky
Coordinates: -1959, -1812, 1140 How to Get: Teleport to Rakashog Shrine, then use the launcher to send Link to the island northwest. Land at the middle of island and make your way inside. Grab the mirror, stake, and stone plates and attach them together. Bring it to the bottommost part of the island and use the mirror to shine a light on the yellow hexagon at the gate (during daytime) to open it and reach the treasure chest. |
||
| 9 |  |
 |
| Region:
West Necluda Sky
Coordinates: 1309, -3210, 0459 How to Get: Use a Zonai Wing and Rocket from on top of the Great Sky Island's Room of Awakening and fly towards Dragonhead Island southeast. Drop at around 1309, -3210, 0459 to reach the treasure chest. |
||
| 10 |  |
 |
| Region:
West Necluda Sky
Coordinates: 0966, -3306, 0846 How to Get: Use a Zonai Wing and Rocket from on top of the Great Sky Island's Room of Awakening and fly towards Thunderhead Isles southeast. Drop at around 0955, -3307, 0866 to reach the building hiding the chest. |
||
| 11 | 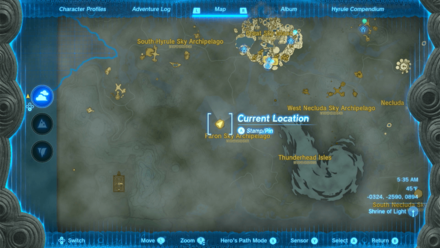 |
 |
| Region:
West Necluda Sky
Coordinates: -0338, -2581, 0894 How to Get: Teleport to In-isa Shrine, climb up the cliff, then jump and glide towards the round island south of the shrine. Knock down the Flux Construct III to retrieve the chest. It is possible to get this Sage's Will without defeating the boss. ▶︎ How to Beat Flux Construct III |
||
| 12 | 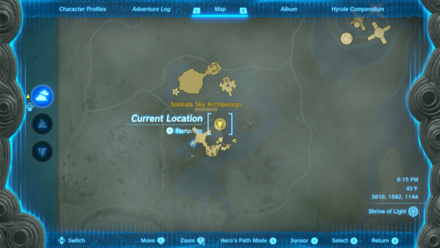 |
 |
| Region:
Akkala Highlands Sky
Coordinates: 3810, 1580, 1144 How to Get: Teleport to Natak Shrine, then use the launcher to send link to the giant sphere next to the island. Enter the hole then move the small orb inside with Ultrahand Reposition the hole that it faces the Zonai Dispenser on the previous island, then jump through the lower half of the hole to reach the treasure chest. |
||
| 13 |  |
 |
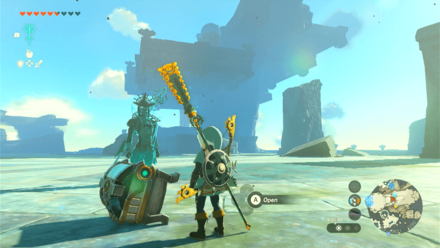
| Region:
Hebra Mountains Sky
Coordinates: -3781, 1571, 1238 How to Get: Equip the Zora Armor, teleport to Rospro Pass Skyview Tower, and use it to head to the skies to glide towards the waterfall in the sky southeast of the tower. Swim up the waterfall and use the minecart and rockets to reach the second island. Use the wing, fan, and rockets to reach the third island and the treasure chest. |
||
| 14 | 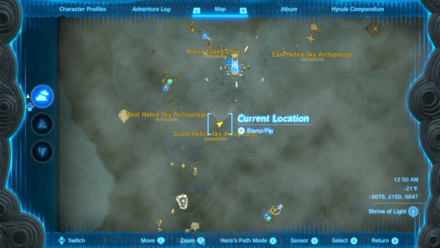 |
 |
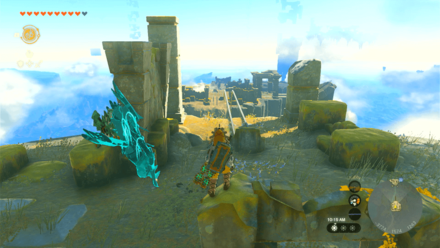
| Region:
Hebra Mountains Sky
Coordinates: -3075, 2150, 0648 How to Get: Teleport to Rospro Pass Skyview Tower, and use it to head to the skies to glide towards the lowermost island of the two conected islands southeast of the tower. Once you land, use the hook, wooden plank, and fan to cross the rail towards the higher island where the treasure chest is. |
||
| 15 | 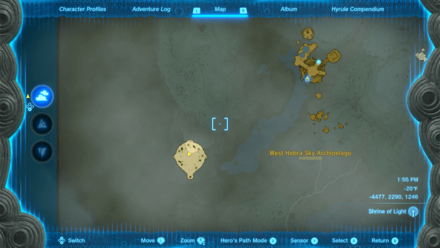 |
 |
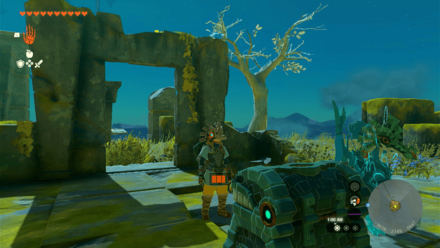
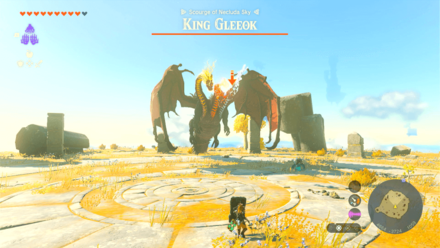
| Region:
Hebra Mountains Sky
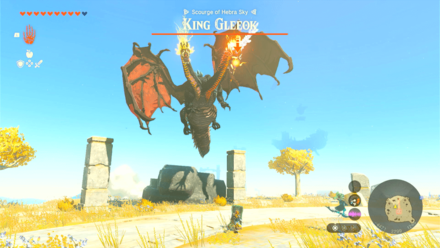
Coordinates: -4466, 2285, 1247 How to Get: Teleport to Ijo-o Shrine and build a Zonai hoverbike to reach the round island southwest of the Shrine. Defeat the King Gleeok to unlock the treasure chest. ▶︎ How to Beat King Gleeok |
||
| 16 | 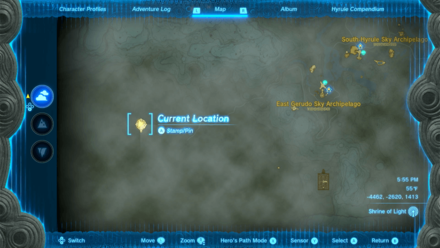 |
 |
| Region:
Gerudo Highlands Sky
Coordinates: -4447, -2731, 1419 How to Get: Teleport to Rakashog Shrine, build a Zonai hoverbike, and head to the round island at the far west of the Shrine. Defeat the King Gleeok to unlock the treasure chest. ▶︎ How to Beat King Gleeok |
||
| 17 |  |
 |
| Region:
Lanayru Great Spring Sky
Coordinates: 3359, 0663, 1295 How to Get: Teleport to Igoshon Shrine and head down to the platform below. Knock down the Flux Construct II to retrieve the chest. It is possible to get this Sage's Will without defeating the boss. ▶︎ How to Beat Flux Construct II |
||
| 18 | 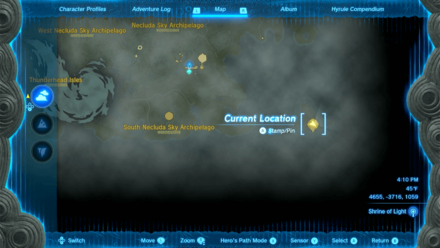 |
 |
| Region:
East Necluda Sky
Coordinates: 4652, -3828, 1065 How to Get: Teleport to Kumamayn Shrine, build a Zonai hoverbike, and head to the round island at the far southeast of the Shrine. Defeat the King Gleeok to unlock the treasure chest. ▶︎ How to Beat King Gleeok |
||
| 19 | 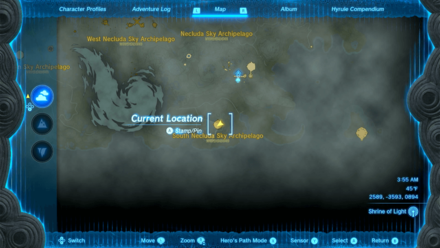 |
 |
| Region:
East Necluda Sky
Coordinates: 2562, -3611, 0794 How to Get: Teleport to Kumamayn Shrine and use the launcher to send Link flying and glide towards the round island southwest. Knock down the Flux Construct III to retrieve the chest. It is possible to get this Sage's Will without defeating the boss. ▶︎ How to Beat Flux Construct III |
||
| 20 | 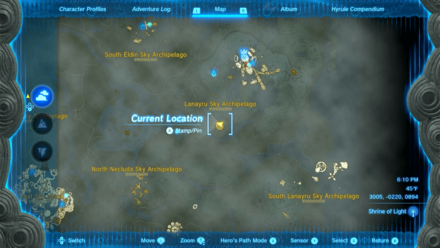 |
 |
| Region:
Lanayru Great Spring Sky
Coordinates: 3014, -0259, 0894 How to Get: Teleport to the Water Temple Entrance, then glide to the round platform southwest of the temple. Knock down the Flux Construct II to retrieve the chest. It is possible to get this Sage's Will without defeating the boss. ▶︎ How to Beat Flux Construct II |
||
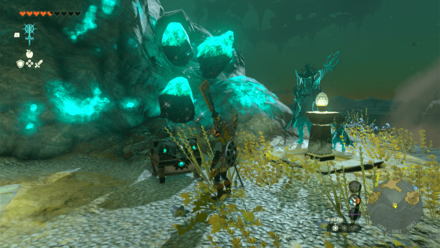
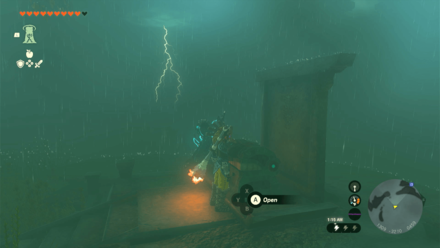
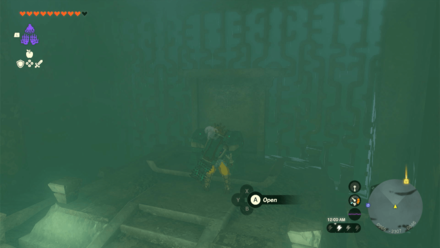
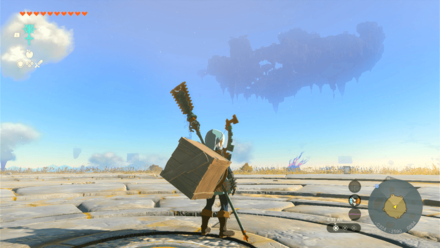
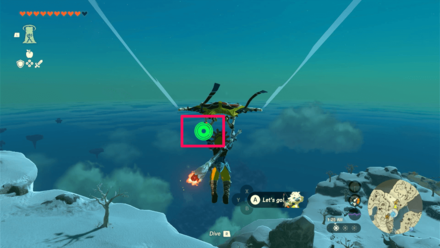
Found in Treasure Chests
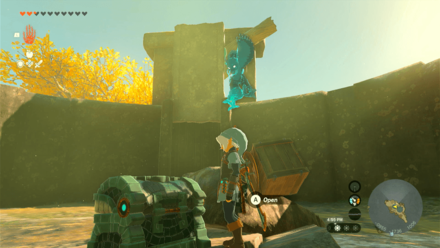
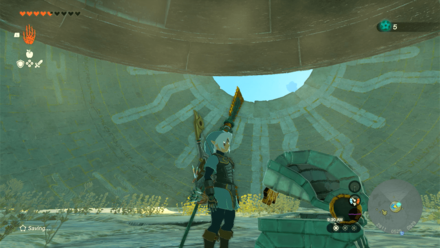
All Sage's Wills are found inside treasure chests. There are some which require an enemy to be defeated first, or a short puzzle to be solved to reach the chest.
Tips to Get All Sage's Wills
Fully Upgrade Link's Stamina
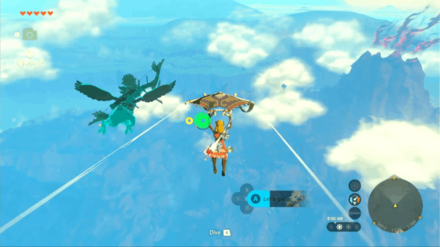
All of the Sage's Wills are found on sky islands across Hyrule, and most of them require gliding from one island to another. Make sure that you have Link's stamina fully upgraded to ensure that you can glide for as long as possible.
How to Increase Maximum Hearts and Stamina
Unlock Vow of Tulin
It is also recommended to clear the Wind Temple first as Tulin's gust ability also comes in handy to boost yourself in the air and cover more distance while gliding.
How to Use Vow of Tulin, Sage of Wind
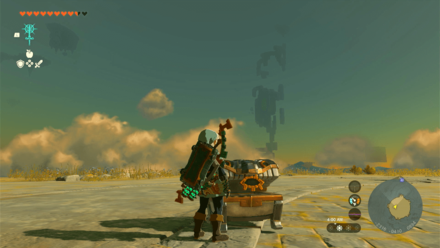
Build a Zonai Hoverbike
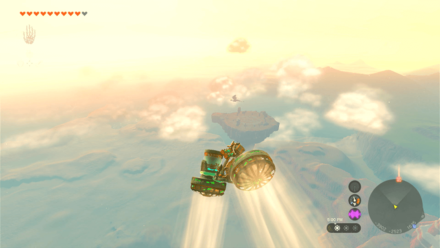
You can save a bit of time gliding around if you build a hoverbike made up of fans and a steering stick provided that you have enough Zonai energy to juice your ride.
If you have Autobuild unlocked, you can save the hoverbike after building it so you don't have to manually construct it anymore.
How to Get More Energy Cells and Increase Energy
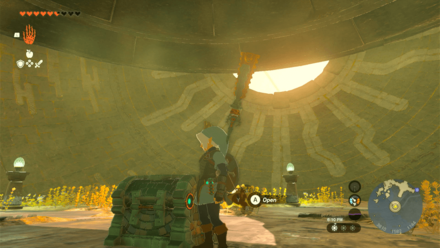
How to Use Sage's Will
Used at Goddess Statues to Power Up Sage Abilities
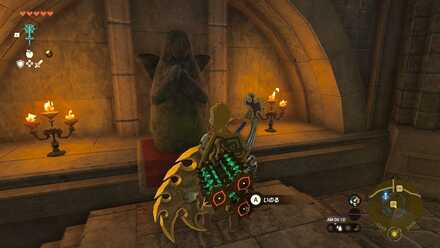
Once you have gathered 4 Sage's Wills, bring them to a Goddess Statue to power up one of your Sage Abilities, which you acquire from completing each of the four Temples.
After being powered up, the Sage's damage output and Skill damage will both increase.
Can You Max Out All the Sages?
It seems that each Sage can only be upgraded one time, so yes, if you get all 20 Sage's Wills, you can upgrade all four confirmed Sages. The remaining four are expected to be used for a fifth Sage unlocked during the story. More details about the fifth Sage will be added once they are known!
Find the Fifth Sage Walkthrough
Sage Tier List: Best Sage Abilities to Upgrade
| Sage | Rating | Reason |
|---|---|---|
 Yunobo Yunobo |
・Good for clearing out mobs ・Wide attack range ・Quick to activate and great for both mobs and bosses |
|
 Riju Riju |
・Can deal heavy damage in a specified area ・Can hit bosses' weak points with high damage ・Area damage is good for mobs ・Skill takes time to activate |
|
 Tulin Tulin |
・Can hit weak points from a specific distance ・Good for dealing damage against weak points ・Skill can only deal damage from a distance |
|
 Sidon Sidon |
・Water slashes have a short reach ・Mostly useful for the shield effect, making a damage upgrade low priority |
Which Sage Do You Find the Most Useful?
Sage's Will Item Overview
Sage's Will Basic Info
| Item | Description |
|---|---|
 Sage's Will Sage's Will
|
The remnants of a former Sage’s resolve. If you gather four of them and offer them to a Goddess Statue, you can deepen your connection with the Sages. |
The Legend of Zelda: Tears of the Kingdom Related Guides

All Abilities and How to Unlock
List of All Abilities
| All Abilities | ||
|---|---|---|
Other Maps
| Collectible and Area Maps | ||
|---|---|---|
| Satori Cherry Blossom Trees | ||
Comment
2  Anonymous almost 3 years
Missing one of the sages, The Sage of Light
Author

The Legend of Zelda: Tears of the Kingdom Walkthrough & Guides Wiki
All 20 Sage's Will Locations and Map
Please participate in our site
improvement survey
03/2026
improvement survey
03/2026
Would you assist in
improving Game8's site?
improving Game8's site?

×
We are listening to our users' valuable opinions and discussing how to act on them.
The information collected through this survey will be used for the purpose of improving our services. In addition, the information will only be disclosed a part of a statistic in a format that will not allow identification of personal information.
Begin Survey
Not Now
×
Please rate each item regarding Game8.co's Advertisements.
Amount of Ads
Very Dissatisfied
Somewhat Dissatisfied
Fine
Somewhat Satisfied
Highly Satisfied
Placement of Ads
Timing of Ad Display
Ad Loading Speed
Safeness of Ads
Content of Ads
×
Please rate each item regarding Game8.co's Quality of Articles.
Amount of information
Very Dissatisfied
Somewhat Dissatisfied
Fine
Somewhat Satisfied
Highly Satisfied
Frequency of updates
Speed of new information
Accuracy of articles
Understandibility of articles
Readability of sentences
×
Please rate each item regarding Game8.co's Usability of the Site.
Ease of finding information
Very Dissatisfied
Somewhat Dissatisfied
Fine
Somewhat Satisfied
Highly Satisfied
Loading Speed
Use of Color
Font Size
Visibility of Images
Easy to Understand Layout
×
Please rate each item regarding Game8.co's Message Boards, Comments.
Ease of Writing
Very Dissatisfied
Somewhat Dissatisfied
Fine
Somewhat Satisfied
Highly Satisfied
Readability
Ease in Finding Information
Comment Quality
Comment Quantity
Admin Response
×
Please rate each item regarding Game8.co's Site's new design.
Please rate our site's new design
Very Dissatisfied
Somewhat Dissatisfied
Fine
Somewhat Satisfied
Highly Satisfied
Do you think that the website's design change makes the site easier to use?
Has the new design made it easier for you to find information on the site?
Has the new design improved the overall visual appeal of the site?
How would you rate your overall satisfaction with the new design of the site?
×
How likely are you to recommend Game8 to someone you know?
Very Unlikely
0
1
2
3
4
5
6
7
8
9
10
Very Likely
If you have other opinions regarding potential improvement to the website, please share them with us. We would appreciate your honest opinion.
Note: This is a free response section, so you can proceed without entering anything.
Note: Please be sure not to enter any kind of personal information into your response.
Note: Please be sure not to enter any kind of personal information into your response.
×
Thank You
×
Thank you for participating in our survey! Your answers will help us to improve the quality of our website and services.
We hope you continue to make use of Game8.
We hope you continue to make use of Game8.
Close
Rankings
- We could not find the message board you were looking for.
Gaming News


![Monster Hunter Stories 3 Review [First Impressions] | Simply Rejuvenating](https://img.game8.co/4438641/2a31b7702bd70e78ec8efd24661dacda.jpeg/thumb)
Popular Games

Genshin Impact Walkthrough & Guides Wiki
Honkai: Star Rail Walkthrough & Guides Wiki
Umamusume: Pretty Derby Walkthrough & Guides Wiki
Pokemon Pokopia Walkthrough & Guides Wiki
Resident Evil Requiem (RE9) Walkthrough & Guides Wiki
Monster Hunter Wilds Walkthrough & Guides Wiki
Wuthering Waves Walkthrough & Guides Wiki
Arknights: Endfield Walkthrough & Guides Wiki
Pokemon FireRed and LeafGreen (FRLG) Walkthrough & Guides Wiki
Pokemon TCG Pocket (PTCGP) Strategies & Guides Wiki


Recommended Games
Diablo 4: Vessel of Hatred Walkthrough & Guides Wiki
Cyberpunk 2077: Ultimate Edition Walkthrough & Guides Wiki
Fire Emblem Heroes (FEH) Walkthrough & Guides Wiki
Yu-Gi-Oh! Master Duel Walkthrough & Guides Wiki
Super Smash Bros. Ultimate Walkthrough & Guides Wiki
Pokemon Brilliant Diamond and Shining Pearl (BDSP) Walkthrough & Guides Wiki
Elden Ring Shadow of the Erdtree Walkthrough & Guides Wiki
Monster Hunter World Walkthrough & Guides Wiki
The Legend of Zelda: Tears of the Kingdom Walkthrough & Guides Wiki
Persona 3 Reload Walkthrough & Guides Wiki


All rights reserved
© Nintendo. The Legend of Zelda and Nintendo Switch are trademarks of Nintendo.
The copyrights of videos of games used in our content and other intellectual property rights belong to the provider of the game.
The contents we provide on this site were created personally by members of the Game8 editorial department.
We refuse the right to reuse or repost content taken without our permission such as data or images to other sites.
Spirit*