Tenbez Shrine Location and Walkthrough
▲ Get Pristine Weapons from the depths!
△ All 1000 Koroks | All 4 Great Fairies
▲ 81 Addison Signs | 147 Caves | 58 Wells
△ Tips: Farm Rupees | Starting Armor
▲ Best Weapons | Best Armor | Best Food

Tenbez Shrine (Gravity and Velocity) in The Legend of Zelda: Tears of the Kingdom (TotK) can be found on North Lomei Castle Top Floor in the Hebra Mountains Sky Region. Read on to learn how to reach it, its location, puzzle solution, as well as all treasure chest locations in Tenbez Shrine.
| All North Lomei Guides | ||
|---|---|---|
| The North Lomei Prophecy | Mayaotaki Shrine | Tenbez Shrine |
Tenbez Shrine Location
North Lomei Castle Top Floor, Hebra Mountains Sky Region
Tenbez Shrine can be found on North Lomei Castle Top Floor in the Hebra Mountains Sky Region. It's one of the big floating labyrinths in the sky. The exact coordinates of the Tenbez Shrine is at -0968, 3535, 1011.
Travel to Pikida Stonegrove Skyview Tower, and launch yourself from there to glide northeast towards one of the islands near Tenbez Shrine.
It is recommended to have two stamina wheels when paragliding towards the nearby islands, so make sure to consume dishes that will increase your stamina wheels.
It is also advisable to pack up on Zonai Charges and Batteries when proceeding towards the Tenbez Shrine, as the trip will require you to travel using Zonai vehicles.
Hebra Mountains Sky Region Map
Puzzle Shrine
This is a Puzzle type Shrine, so you need to solve the puzzle to reach the end and get a Light of Blessing.
Try to look around the area to find a way to move forward, and remember to use Link's Ultrahand, Ascend, or Recall abilities!
All Abilities and How to Unlock
How to Reach Tenbez Shrine
- Gather Zonai Charges and Batteries
- Reach the Skies via Pikida Stonegrove Tower
- Create an Aircraft
- Ride Your Aircraft to the Shrine
1. Gather Zonai Charges and Batteries
Reaching Tenbez Shrine can be a bit long and difficult because of how far it is from other sky islands.
We recommend gathering a couple of Zonai Charges and Batteries first so you'll have enough to power the aircraft you'll be riding to the shrine later on.
Alternatively, you can go to the Crystal Refinery at Nachoyah Shrine to get more Energy Wells.
2. Reach the Skies via Pikida Stonegrove Tower
Once you have enough batteries and Zonai Charges, fast travel to Pikida Stonegrove Skyview Tower in the snowy mountains of the Hebra Region and examine the terminal inside so it launches you to the skies.
Wait until you can take out your paraglider, then start paragliding northeast towards the island indicated on the video above.
The entire trip to the island will take a little more than 2 stamina wheels so make sure you have stamina dishes with you! Alternatively, you can land on one of the nearby islands and use the floating platforms in the area to propel yourself towards your destination.
3. Create an Aircraft
Next thing you need to do is to create an aircraft that you can ride to North Lomei Castle. You have two options for an aircraft here.
First is by grabbing one of the floating platforms in the area, and attaching Zonai Fans and a Steering Stick to it.
On the other hand, you can also use the Zonai Dispenser on the island to create an aircraft using a Zonai Wing, two fans, and a cart.
You can choose whichever you're most comfortable navigating. If you have spare batteries, don't forget to attach them to you aircraft to give it more power!
4. Ride Your Aircraft to the Shrine
Once you're done with your aircraft, it's time to ride it to the shrine.
Position your aircraft so that it's facing the large floating labyrinth, then start navigating towards it.
If your aircraft runs out of power midflight, you can use your Zonai Charges to give it more power.
When you're near the labyrinth, simply glide down towards the shrine. Examine the terminal afterwards to activate it.
Tenbez Shrine Puzzle Solution
- Hit Switch When the Ball is On the Right
- Get the Chest Below the Large Target
- Move to the Next Room
- Let the Ball Fall Into the Enclosure
- Examine the Altar
1. Hit Switch When the Ball is on the Right
Once you enter the room, you'll notice a large ball being tossed back and forth between two moving platforms.
Wait for it to land on the moving platform to your right, then hit the switch in front of you to reverse gravity.
The moment the moving platform to your right moves, it will propel the ball very high up until it hits the big target on the left wall. It will then open the gate to the next section.
2. Get the Chest Below the Large Target
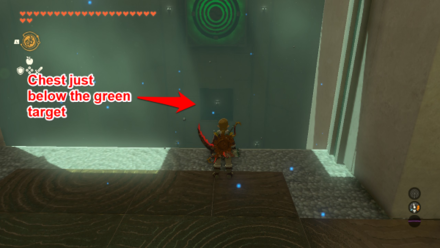
With the gravity still in reverse, go to the moving platform to your right and stand on top of it. Let the platform propel you towards the big target on the wall, then use your paraglide to reach the chest below it.
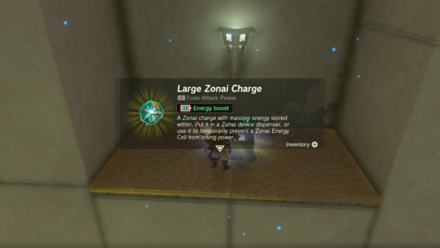
Open the chest below the target to get a Large Zonai Charge.
3. Move to the Next Room
After getting the contents of the chest, drop down to the moving platform below you and let it propel you to the next room.
4. Let the Ball Fall Into the Enclosure
Turn left upon reaching the next room to see a switch similar to that in the first room.
Wait for a ball to reach the room you're in, then watch it closely as it jumps over the enclosure on the opposite side of the room.
Hit the switch when the ball is directly over the enclosure so it falls down into it. The door to the altar chamber will open once it hits the button inside the enclosure.
5. Examine the Altar
Head inside the altar chamber and examine the altar to get a Light of Blessing.
Tenbez Shrine Rewards and Chest Locations
Large Zonai Charge
| Chest Location | Chest Contents |
|---|---|
 |
 |
Hit the switch in the first room to reverse gravity, then stand on top of the moving platform to your right. Wait for it to propel you towards the large target on the wall, then paraglide below it to reach the chest.
Open the chest to receive a Large Zonai Charge.
The Legend of Zelda: Tears of the Kingdom Related Guides

Shrines Lists
| Shrines Lists | |
|---|---|
| All Shrines | All Shrine Quests |
All Great Sky Island Shrines
| Great Sky Island Shrines | ||
|---|---|---|
| Ukouh Shrine | In-isa Shrine | Gutanbac Shrine |
| Nachoyah Shrine | - | - |
All Hyrule Field Shrines
All Tabantha Shrines
| Tabantha Shrines | ||
|---|---|---|
| Oromuwak Shrine | Gatakis Shrine | Nouda Shrine |
| Wao-os Shrine | Iun-orok Shrine | Turakawak Shrine |
| Gasas Shrine | Mayausiy Shrine | Ikatak Shrine |
| Ga-ahisas Shrine | Ganos Shrine | Taunhiy Shrine |
All Hebra Shrines
All Great Hyrule Forest Shrines
| Great Hyrule Forest Shrines | ||
|---|---|---|
| Sakunbomar Shrine | Pupunke Shrine | Ninjis Shrine |
| Musanokir Shrine | Kikakin Shrine | Kiuyoyou Shrine |
| Ekochiu Shrine | Mayam Shrine | Simosiwak Shrine |
All Akkala Shrines
All Eldin Shrines
All Lanayru Shrines
All Necluda Shrines
All Faron Shrines
| Faron Shrines | ||
|---|---|---|
| Jiukoum Shrine | Ishokin Shrine | Utsushok Shrine |
| Joku-u Shrine | Joku-usin Shrine | - |
All Gerudo Shrines
Comment
Author
The Legend of Zelda: Tears of the Kingdom Walkthrough & Guides Wiki
Tenbez Shrine Location and Walkthrough
Rankings
- We could not find the message board you were looking for.
Gaming News
Popular Games

Genshin Impact Walkthrough & Guides Wiki

Honkai: Star Rail Walkthrough & Guides Wiki

Umamusume: Pretty Derby Walkthrough & Guides Wiki

Pokemon Pokopia Walkthrough & Guides Wiki

Resident Evil Requiem (RE9) Walkthrough & Guides Wiki

Monster Hunter Wilds Walkthrough & Guides Wiki

Wuthering Waves Walkthrough & Guides Wiki

Arknights: Endfield Walkthrough & Guides Wiki

Pokemon FireRed and LeafGreen (FRLG) Walkthrough & Guides Wiki

Pokemon TCG Pocket (PTCGP) Strategies & Guides Wiki
Recommended Games

Diablo 4: Vessel of Hatred Walkthrough & Guides Wiki

Cyberpunk 2077: Ultimate Edition Walkthrough & Guides Wiki

Fire Emblem Heroes (FEH) Walkthrough & Guides Wiki

Yu-Gi-Oh! Master Duel Walkthrough & Guides Wiki

Super Smash Bros. Ultimate Walkthrough & Guides Wiki

Pokemon Brilliant Diamond and Shining Pearl (BDSP) Walkthrough & Guides Wiki

Elden Ring Shadow of the Erdtree Walkthrough & Guides Wiki

Monster Hunter World Walkthrough & Guides Wiki

The Legend of Zelda: Tears of the Kingdom Walkthrough & Guides Wiki

Persona 3 Reload Walkthrough & Guides Wiki
All rights reserved
© Nintendo. The Legend of Zelda and Nintendo Switch are trademarks of Nintendo.
The copyrights of videos of games used in our content and other intellectual property rights belong to the provider of the game.
The contents we provide on this site were created personally by members of the Game8 editorial department.
We refuse the right to reuse or repost content taken without our permission such as data or images to other sites.


![Monster Hunter Stories 3 Review [First Impressions] | Simply Rejuvenating](https://img.game8.co/4438641/2a31b7702bd70e78ec8efd24661dacda.jpeg/thumb)


