Jiosin Shrine Location and Walkthrough
▲ Get Pristine Weapons from the depths!
△ All 1000 Koroks | All 4 Great Fairies
▲ 81 Addison Signs | 147 Caves | 58 Wells
△ Tips: Farm Rupees | Starting Armor
▲ Best Weapons | Best Armor | Best Food
Jiosin Shrine (Shape Rotation) in The Legend of Zelda: Tears of the Kingdom (TotK) can be found south of the Hyrule Field Chasm in the Hyrule Field region. Read on to learn its location, puzzle solution, as well as treasure chest locations in Jiosin Shrine.
List of Contents
Jiosin Shrine Location
South of Hyrule Field Chasm, Hyrule Field Region
Jiosin Shrine can be found south of the Hyrule Field Chasm in the Hyrule Field Region. The exact coordinates of the shrine are -0240, -0371, 0027 and it can be reached easily by traveling south of Lookout Landing.
You'll be sure to stumble upon this shrine as you do the Main Quest “Camera Work in the Depths“ which you can get from Josha in Lookout Landing.
Puzzle Shrine
This is a Puzzle type Shrine, so you need to solve the puzzle to reach the end and get a Light of Blessing.
Try to look around the area to find a way to move forward, and remember to use Link's Ultrahand, Ascend, or Recall abilities!
All Abilities and How to Unlock
Jiosin Shrine Puzzle Solution
- Head Inside the Room with the X Mark
- Get the Block Out of the Room
- Rotate the X-Shaped Block to Make a Bridge
- Rotate the Twin Cube Block to Fit Into the Hole
- Get the First Hidden Treasure Chest
- Rotate the Twin Cube Block to Fit Into the Leftmost Room
- Rotate the Twin Cube Block and Use Ascend
- Examine the Shrine
Video Guide
Jiosin Shrine Objective: Block Rotation
To clear this shrine, you'll need to rotate oddly-shaped blocks to reach different sections of the room. Sometimes you need to insert them through holes in the wall while other times you need to use them to reach higher platforms.
The entirety of the shrine will be like this until you reach the altar that will clear Jiosin Shrine.
1. Head Inside the Room with the X Mark

Head inside the room with the X mark[/mid]
At the start of the shrine, enter the room to your left to find an oddly-shaped block.
2. Get the Block Out of the Room
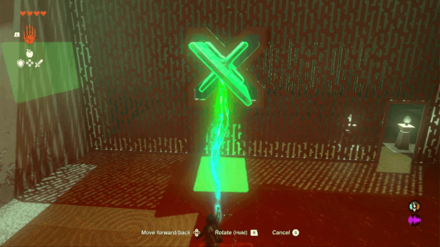
Use Ultrahand to grab the block and rotate it in such a way that it will fit perfectly through the X-shaped hole in the wall. Doing so will move the block out of the room.
3. Rotate the X-Shaped Block to Make a Bridge
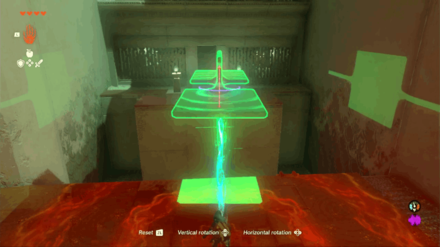
Once it's out of the room, grab it again with Ultrahand and place it over the gap nearby to make a bridge to the next area.
4. Rotate the Twin Cube Block to Fit Into the Hole
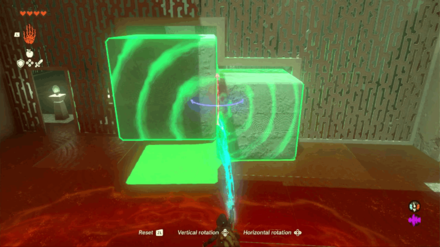
In the next area, head to the room on the right to find two blocks stacked on top of each other. Use Ultrahand to rotate it so they fit in the hole in the wall.
5. Get the First Hidden Treasure Chest

Exit the room where you got the block and look to your right to find a treasure chest atop a higher platform.
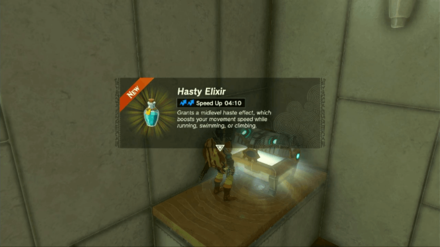
Use the block you just got to create a platform that will let you reach the treasure chest. Use Ascend on the block to reach the treasure chest that contains a Hasty Elixir.
6. Rotate the Twin Cube Block to Fit Into the Leftmost Room
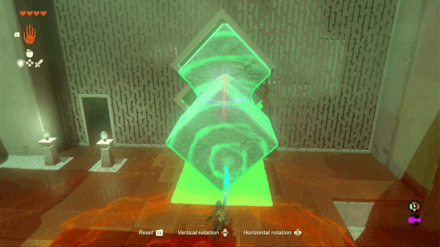
Drop down from the higher platform after getting the contents of the Treasure Chest. Then, use Ultrahand on the block to rotate it so it fits the hole in the wall of the leftmost room.
Fitting is Easier From the Other Side
Try rotating the block using Ultrahand to manipulate it from the other side of the hole. This can make it easier to match the block's silhouette to the hole and pull it through.
7. Rotate the Twin Cube Block and Use Ascend
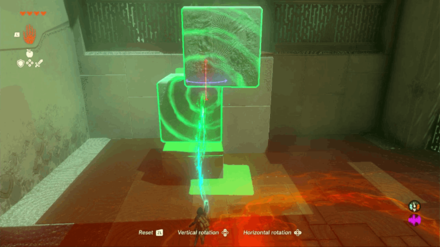
Enter the last room and rotate the block so it's standing vertically. Place it on the elevated platform and use Ascend to get to the top of the block.
8. Examine the Shrine
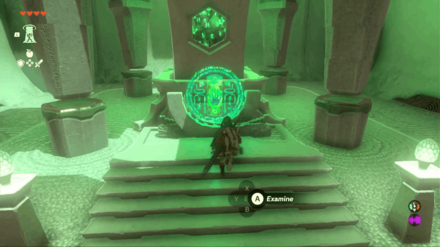
Finally, examine the altar to obtain a Light of Blessing and clear the Jiosin Shrine.
Jiosin Shrine Rewards and Chest Locations
Hasty Elixir
| Chest Location | Chest Contents |
|---|---|
 |
 |
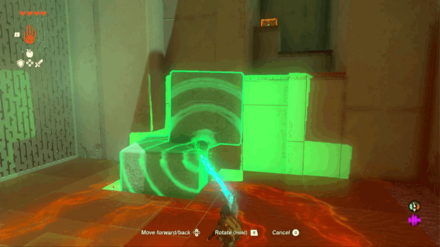
Use the oddly-shaped block you got from the first room to create a bridge to the next section. Then, head for the room to your right and rotate the block inside so that it fits through the hole in the wall.
Exit the room where you got the twin cube block and look to your right to see a treasure chest. Use the block to create a platform that will let you reach the treasure chest. You'll need to use Ascend to reach the chest with a Hasty Elixir in it.
The Legend of Zelda: Tears of the Kingdom Related Guides

Shrines Lists
| Shrines Lists | |
|---|---|
| All Shrines | All Shrine Quests |
All Great Sky Island Shrines
| Great Sky Island Shrines | ||
|---|---|---|
| Ukouh Shrine | In-isa Shrine | Gutanbac Shrine |
| Nachoyah Shrine | - | - |
All Hyrule Field Shrines
All Tabantha Shrines
| Tabantha Shrines | ||
|---|---|---|
| Oromuwak Shrine | Gatakis Shrine | Nouda Shrine |
| Wao-os Shrine | Iun-orok Shrine | Turakawak Shrine |
| Gasas Shrine | Mayausiy Shrine | Ikatak Shrine |
| Ga-ahisas Shrine | Ganos Shrine | Taunhiy Shrine |
All Hebra Shrines
All Great Hyrule Forest Shrines
| Great Hyrule Forest Shrines | ||
|---|---|---|
| Sakunbomar Shrine | Pupunke Shrine | Ninjis Shrine |
| Musanokir Shrine | Kikakin Shrine | Kiuyoyou Shrine |
| Ekochiu Shrine | Mayam Shrine | Simosiwak Shrine |
All Akkala Shrines
All Eldin Shrines
All Lanayru Shrines
All Necluda Shrines
All Faron Shrines
| Faron Shrines | ||
|---|---|---|
| Jiukoum Shrine | Ishokin Shrine | Utsushok Shrine |
| Joku-u Shrine | Joku-usin Shrine | - |
All Gerudo Shrines
Author
The Legend of Zelda: Tears of the Kingdom Walkthrough & Guides Wiki
Jiosin Shrine Location and Walkthrough
improvement survey
03/2026
improving Game8's site?

Your answers will help us to improve our website.
Note: Please be sure not to enter any kind of personal information into your response.

We hope you continue to make use of Game8.
Rankings
- We could not find the message board you were looking for.
Gaming News
Popular Games

Genshin Impact Walkthrough & Guides Wiki

Honkai: Star Rail Walkthrough & Guides Wiki

Umamusume: Pretty Derby Walkthrough & Guides Wiki

Pokemon Pokopia Walkthrough & Guides Wiki

Resident Evil Requiem (RE9) Walkthrough & Guides Wiki

Monster Hunter Wilds Walkthrough & Guides Wiki

Wuthering Waves Walkthrough & Guides Wiki

Arknights: Endfield Walkthrough & Guides Wiki

Pokemon FireRed and LeafGreen (FRLG) Walkthrough & Guides Wiki

Pokemon TCG Pocket (PTCGP) Strategies & Guides Wiki
Recommended Games

Diablo 4: Vessel of Hatred Walkthrough & Guides Wiki

Cyberpunk 2077: Ultimate Edition Walkthrough & Guides Wiki

Fire Emblem Heroes (FEH) Walkthrough & Guides Wiki

Yu-Gi-Oh! Master Duel Walkthrough & Guides Wiki

Super Smash Bros. Ultimate Walkthrough & Guides Wiki

Pokemon Brilliant Diamond and Shining Pearl (BDSP) Walkthrough & Guides Wiki

Elden Ring Shadow of the Erdtree Walkthrough & Guides Wiki

Monster Hunter World Walkthrough & Guides Wiki

The Legend of Zelda: Tears of the Kingdom Walkthrough & Guides Wiki

Persona 3 Reload Walkthrough & Guides Wiki
All rights reserved
© Nintendo. The Legend of Zelda and Nintendo Switch are trademarks of Nintendo.
The copyrights of videos of games used in our content and other intellectual property rights belong to the provider of the game.
The contents we provide on this site were created personally by members of the Game8 editorial department.
We refuse the right to reuse or repost content taken without our permission such as data or images to other sites.


![Monster Hunter Stories 3 Review [First Impressions] | Simply Rejuvenating](https://img.game8.co/4438641/2a31b7702bd70e78ec8efd24661dacda.jpeg/thumb)


