Jonsau Shrine Location and Walkthrough
▲ Get Pristine Weapons from the depths!
△ All 1000 Koroks | All 4 Great Fairies
▲ 81 Addison Signs | 147 Caves | 58 Wells
△ Tips: Farm Rupees | Starting Armor
▲ Best Weapons | Best Armor | Best Food
Jonsau Shrine (Deep Force) in The Legend of Zelda: Tears of the Kingdom (TotK) can be found near the Lanayru Wetlands Chasm in the Lanayru Wetlands region. Read on to learn its location, puzzle solution, as well as all treasure chest locations in Jonsau Shrine.
List of Contents
Jonsau Shrine Location
South of Lanayru Wetlands Chasm, Lanayru Wetlands
Jonsau Shrine is located on the edge of a hill directly south of Lanayru Wetlands Chasm in the Lanayru Wetlands Region. Head over to Upland Zorana Skyview Tower and keep heading west until you arrive at 1744, 0017, 0025 to access the shrine.
Puzzle Shrine
This is a Puzzle type Shrine, so you need to solve the puzzle to reach the end and get a Light of Blessing.
Try to look around the area to find a way to move forward, and remember to use Link's Ultrahand, Ascend, or Recall abilities!
All Abilities and How to Unlock
Jonsau Shrine Puzzle Solution
- Submerge the Ball Into the Water
- Defeat the Soldier Construct in the Next Area
- Attach the Ball on the Chest Located Below the Pool
- Launch the Ball Towards the Mechanism
- Hurl the Ball Towards the Wooden Obstructions Above
- Recall the Movable Platform That Descended
- Proceed Towards the Altar
1. Submerge the Ball Into the Water
When you proceed towards the area, grab the large bouncy ball near your area and submerged it deep into the pool.
The ball should be directly underneath the platform with a circular mechanism below it. After letting the ball go, it would launch itself upwards and hit the mechanism above it.
2. Defeat the Soldier Construct in the Next Area
During your progress, you will encounter a Soldier Construct. Defeat it, and grab the bouncy ball from the previous area.
3. Attach the Ball on the Chest Located Below the Pool
Place the ball on the surface, and detach the chest from it. Open the chest to grab the Strong Construct Bow inside it.
4. Launch the Ball Towards the Mechanism
Submerge the ball below the pool of the next area and let it go to launch it above another circular mechanism.
5. Hurl the Ball Towards the Wooden Obstructions Above
The next area will have a platform that has wooden obstructions placed on its surface. Place the ball below the water, and propel it above the area with the wooden planks.
The ball will hit the wooden obstructions, which will result to a smaller platform descending down the pool.
6. Recall the Movable Platform That Descended
Board the smaller platform, and use Recall to ascend the area.
7. Proceed Towards the Altar
Glide towards the altar below, and continue towards it to complete the Jonsau Shrine.
Jonsau Shrine Rewards and Chest Locations
Strong Construct Bow
| Chest Location | Chest Contents |
|---|---|
 |
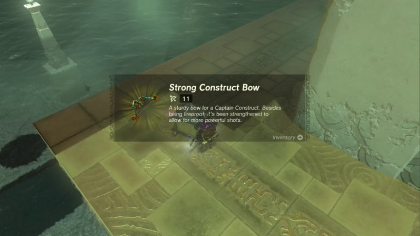 |
After activating the first mechanism, head into the next section and submerge the ball below the pool and attach it on the chest located underneath. From there, drop the ball on the surface and open the chest to acquire the Strong Construct Bow inside it.
The Legend of Zelda: Tears of the Kingdom Related Guides

Shrines Lists
| Shrines Lists | |
|---|---|
| All Shrines | All Shrine Quests |
All Great Sky Island Shrines
| Great Sky Island Shrines | ||
|---|---|---|
| Ukouh Shrine | In-isa Shrine | Gutanbac Shrine |
| Nachoyah Shrine | - | - |
All Hyrule Field Shrines
All Tabantha Shrines
| Tabantha Shrines | ||
|---|---|---|
| Oromuwak Shrine | Gatakis Shrine | Nouda Shrine |
| Wao-os Shrine | Iun-orok Shrine | Turakawak Shrine |
| Gasas Shrine | Mayausiy Shrine | Ikatak Shrine |
| Ga-ahisas Shrine | Ganos Shrine | Taunhiy Shrine |
All Hebra Shrines
All Great Hyrule Forest Shrines
| Great Hyrule Forest Shrines | ||
|---|---|---|
| Sakunbomar Shrine | Pupunke Shrine | Ninjis Shrine |
| Musanokir Shrine | Kikakin Shrine | Kiuyoyou Shrine |
| Ekochiu Shrine | Mayam Shrine | Simosiwak Shrine |
All Akkala Shrines
All Eldin Shrines
All Lanayru Shrines
All Necluda Shrines
All Faron Shrines
| Faron Shrines | ||
|---|---|---|
| Jiukoum Shrine | Ishokin Shrine | Utsushok Shrine |
| Joku-u Shrine | Joku-usin Shrine | - |
All Gerudo Shrines
Comment
Author

The Legend of Zelda: Tears of the Kingdom Walkthrough & Guides Wiki
Jonsau Shrine Location and Walkthrough
Rankings
- We could not find the message board you were looking for.
Gaming News


![Monster Hunter Stories 3 Review [First Impressions] | Simply Rejuvenating](https://img.game8.co/4438641/2a31b7702bd70e78ec8efd24661dacda.jpeg/thumb)
Popular Games

Genshin Impact Walkthrough & Guides Wiki
Honkai: Star Rail Walkthrough & Guides Wiki
Umamusume: Pretty Derby Walkthrough & Guides Wiki
Pokemon Pokopia Walkthrough & Guides Wiki
Resident Evil Requiem (RE9) Walkthrough & Guides Wiki
Monster Hunter Wilds Walkthrough & Guides Wiki
Wuthering Waves Walkthrough & Guides Wiki
Arknights: Endfield Walkthrough & Guides Wiki
Pokemon FireRed and LeafGreen (FRLG) Walkthrough & Guides Wiki
Pokemon TCG Pocket (PTCGP) Strategies & Guides Wiki


Recommended Games
Diablo 4: Vessel of Hatred Walkthrough & Guides Wiki
Cyberpunk 2077: Ultimate Edition Walkthrough & Guides Wiki
Fire Emblem Heroes (FEH) Walkthrough & Guides Wiki
Yu-Gi-Oh! Master Duel Walkthrough & Guides Wiki
Super Smash Bros. Ultimate Walkthrough & Guides Wiki
Pokemon Brilliant Diamond and Shining Pearl (BDSP) Walkthrough & Guides Wiki
Elden Ring Shadow of the Erdtree Walkthrough & Guides Wiki
Monster Hunter World Walkthrough & Guides Wiki
The Legend of Zelda: Tears of the Kingdom Walkthrough & Guides Wiki
Persona 3 Reload Walkthrough & Guides Wiki


All rights reserved
© Nintendo. The Legend of Zelda and Nintendo Switch are trademarks of Nintendo.
The copyrights of videos of games used in our content and other intellectual property rights belong to the provider of the game.
The contents we provide on this site were created personally by members of the Game8 editorial department.
We refuse the right to reuse or repost content taken without our permission such as data or images to other sites.