Ihen-a Shrine Location and Walkthrough
▲ Get Pristine Weapons from the depths!
△ All 1000 Koroks | All 4 Great Fairies
▲ 81 Addison Signs | 147 Caves | 58 Wells
△ Tips: Farm Rupees | Starting Armor
▲ Best Weapons | Best Armor | Best Food

Ihen-a Shrine (Midair Perch) in The Legend of Zelda: Tears of the Kingdom (TotK) can be found in Mipha Court in the Lanayru Great Spring region. Read on to learn its location, puzzle solution, as well as all treasure chest locations in Ihen-a Shrine.
List of Contents
Ihen-a Shrine Location
Mipha Court, Lanayru Great Spring
Ihen-a Shrine is located at Mipha Court, directly east of Zora's Domain in the Lanayru Great Spring Region. The exact coordinates of the shrine is at 3787, 0577, 0486. You can get there by fast traveling to Upland Zorana Skyview Tower and keep gliding eastwards.
The shrine entrance will be blocked off with goop, so be sure to fuse a Splash Fruit with your arrow then shoot it to wipe it off.
Lanayru Great Spring Region Map
Puzzle Shrine
This is a Puzzle type Shrine, so you need to solve the puzzle to reach the end and get a Light of Blessing.
Try to look around the area to find a way to move forward, and remember to use Link's Ultrahand, Ascend, or Recall abilities!
All Abilities and How to Unlock
Ihen-a Shrine Puzzle Solution
- Create a Makeshift Staircase
- Make a Floating Bridge
- Make a Floating Ramp
- Reach Chest by Stacking the Floating Rocks
- Attach Sphere Under the Floating Rock
- Board the Floating Rock
- Activate the Bumper
- Drop the Sphere on the Circular Cavity
- Proceed to the Altar
Video Guide
1. Create a Makeshift Staircase
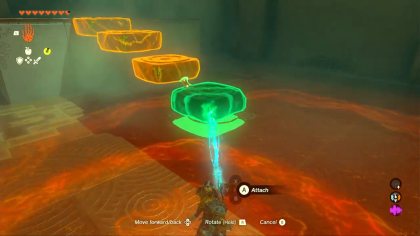
Several floating rocks will be present in this puzzle and you'll have to use them to create makeshift bridges to cross between platforms.
Once you proceed towards the area, you will see large hover stones floating around the vicinity. Grab those hover stones, and form a staircase that would allow you to access the elevated platform ahead.
For you to grab and place hover stones midair, you will need to strike them with a weapon in order for them to float. Otherwise, these stones would stay on the ground.
2. Make a Floating Bridge
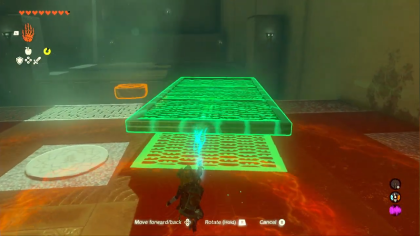
In the next area, you will see a rectangular metal panel and a large rock near you. Strike the stone to make it float, and place it towards the middle of the chasm ahead of you.
From there, place the rectangular panel on the hover stone and stick them together to create a sort of floating bridge for you to cross and reach the next area.
3. Make a Floating Ramp

To reach the elevated platform, simply grab the floating bridge you used earlier and place it in a way that forms a ramp that would enable you to reach the platform ahead.
4. Reach Chest by Stacking the Floating Rocks
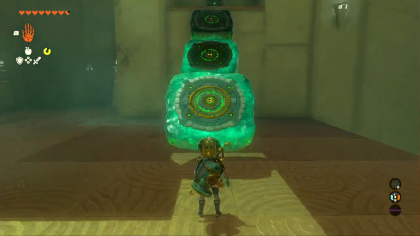
When you reach the next area, the chest will be located on an elevated compartment above you. Stack the hover stones near the area that would allow you to climb your way to the platform.
Opening the chest will reward you with Arrow x5.
5. Attach Sphere Under the Floating Rock
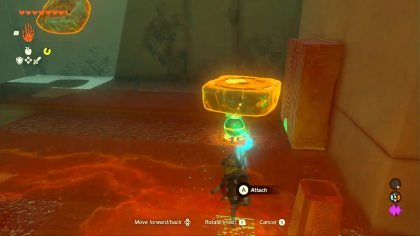
After opening the chest, go down and head to the stone sphere placed on the table. Grab the sphere, and place it under the hover stone near the bumper mechanism.
The bumper mechanism can be recognized by its bronze plating and circular markings.
6. Board the Floating Rock
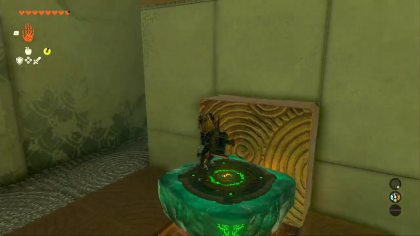
Jump on the hover stone with the stone sphere below it.
7. Activate the Bumper

From there, shoot an arrow to the pedestal that activates the bumper. This will trigger the bumper mechanism, and push the hover stone towards the next area.
8. Drop the Sphere on the Circular Cavity

When you reach the next platform, grab the stone sphere underneath the hover stone and drop it on the circular cavity in the vicinity.
This will open the gate that leads to the altar.
9. Proceed to the Altar

Continue towards the altar and complete the Ihen-a Shrine.
Ihen-a Shrine Rewards and Chest Locations
Arrow x5
| Chest Location | Chest Contents |
|---|---|
 |
 |
After crossing the metal bridge with a floating rock underneath it, you'll come across a platform with an elevated compartment. Stack the nearby hover stones near the platform to reach the chest. Open it to acquire Arrow x5.
The Legend of Zelda: Tears of the Kingdom Related Guides

Shrines Lists
| Shrines Lists | |
|---|---|
| All Shrines | All Shrine Quests |
All Great Sky Island Shrines
| Great Sky Island Shrines | ||
|---|---|---|
| Ukouh Shrine | In-isa Shrine | Gutanbac Shrine |
| Nachoyah Shrine | - | - |
All Hyrule Field Shrines
All Tabantha Shrines
| Tabantha Shrines | ||
|---|---|---|
| Oromuwak Shrine | Gatakis Shrine | Nouda Shrine |
| Wao-os Shrine | Iun-orok Shrine | Turakawak Shrine |
| Gasas Shrine | Mayausiy Shrine | Ikatak Shrine |
| Ga-ahisas Shrine | Ganos Shrine | Taunhiy Shrine |
All Hebra Shrines
All Great Hyrule Forest Shrines
| Great Hyrule Forest Shrines | ||
|---|---|---|
| Sakunbomar Shrine | Pupunke Shrine | Ninjis Shrine |
| Musanokir Shrine | Kikakin Shrine | Kiuyoyou Shrine |
| Ekochiu Shrine | Mayam Shrine | Simosiwak Shrine |
All Akkala Shrines
All Eldin Shrines
All Lanayru Shrines
All Necluda Shrines
All Faron Shrines
| Faron Shrines | ||
|---|---|---|
| Jiukoum Shrine | Ishokin Shrine | Utsushok Shrine |
| Joku-u Shrine | Joku-usin Shrine | - |
All Gerudo Shrines
Comment
Author
The Legend of Zelda: Tears of the Kingdom Walkthrough & Guides Wiki
Ihen-a Shrine Location and Walkthrough
Rankings
- We could not find the message board you were looking for.
Gaming News
Popular Games

Genshin Impact Walkthrough & Guides Wiki

Honkai: Star Rail Walkthrough & Guides Wiki

Arknights: Endfield Walkthrough & Guides Wiki

Umamusume: Pretty Derby Walkthrough & Guides Wiki

Wuthering Waves Walkthrough & Guides Wiki

Pokemon TCG Pocket (PTCGP) Strategies & Guides Wiki

Abyss Walkthrough & Guides Wiki

Zenless Zone Zero Walkthrough & Guides Wiki

Digimon Story: Time Stranger Walkthrough & Guides Wiki

Clair Obscur: Expedition 33 Walkthrough & Guides Wiki
Recommended Games

Fire Emblem Heroes (FEH) Walkthrough & Guides Wiki

Pokemon Brilliant Diamond and Shining Pearl (BDSP) Walkthrough & Guides Wiki

Diablo 4: Vessel of Hatred Walkthrough & Guides Wiki

Super Smash Bros. Ultimate Walkthrough & Guides Wiki

Yu-Gi-Oh! Master Duel Walkthrough & Guides Wiki

Elden Ring Shadow of the Erdtree Walkthrough & Guides Wiki

Monster Hunter World Walkthrough & Guides Wiki

The Legend of Zelda: Tears of the Kingdom Walkthrough & Guides Wiki

Persona 3 Reload Walkthrough & Guides Wiki

Cyberpunk 2077: Ultimate Edition Walkthrough & Guides Wiki
All rights reserved
© Nintendo. The Legend of Zelda and Nintendo Switch are trademarks of Nintendo.
The copyrights of videos of games used in our content and other intellectual property rights belong to the provider of the game.
The contents we provide on this site were created personally by members of the Game8 editorial department.
We refuse the right to reuse or repost content taken without our permission such as data or images to other sites.


![Neverness to Everness (NTE) Review [Beta Co-Ex Test] | Rolling the Dice on Something Special](https://img.game8.co/4414628/dd3192c8f1f074ea788451a11eb862a7.jpeg/show)


