Mayachin Shrine Location and Walkthrough
▲ Get Pristine Weapons from the depths!
△ All 1000 Koroks | All 4 Great Fairies
▲ 81 Addison Signs | 147 Caves | 58 Wells
△ Tips: Farm Rupees | Starting Armor
▲ Best Weapons | Best Armor | Best Food
Mayachin Shrine (A Fixed Device) in The Legend of Zelda: Tears of the Kingdom (TotK) is a puzzle that you can solve by hitting the rolling ball to the left target. Read on for its puzzle solution, walkthrough, location, as well as all treasure chest locations in Mayachin Shrine.
List of Contents
Mayachin Shrine Location
Near Exchange Ruins at Hyrule Field Region
Mayachin Shrine can be found near Exchange Ruins in the Hyrule Field Region. Its exact coordinates are -0705, -0869, 0031 and you can get there easily by heading northeast from Hyrule Field Skyview Tower.
Puzzle Shrine
This is a Puzzle type Shrine, so you need to solve the puzzle to reach the end and get a Light of Blessing.
Try to look around the area to find a way to move forward, and remember to use Link's Ultrahand, Ascend, or Recall abilities!
All Abilities and How to Unlock
Mayachin Shrine Puzzle Solution
- Ride the Moving Platform
- Create a Batting Contraption
- Move the Stake Away from the Contraption
- Step on the Orange Floor Switch
- Hit the Switch to Bat the Ball
- Use the Stakes to Stick the Slab to the Ceiling
- Hit the Switch to Bat the Ball Towards Target
- Get the Hidden Treasure Chest
- Examine the Shrine
Video Guide
Objective: Hit the Left Target with Ball
In order to clear Mayachin Shrine, you need to hit the left target with the rolling ball. To do this, you need to create a bat of some kind that can hit the ball towards the target.
1. Ride the Moving Platform
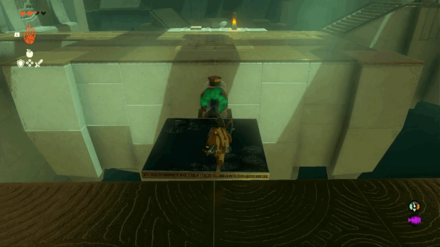
Wait for the platform to move towards your direction and jump on it to reach the next area.
2. Create a Batting Contraption
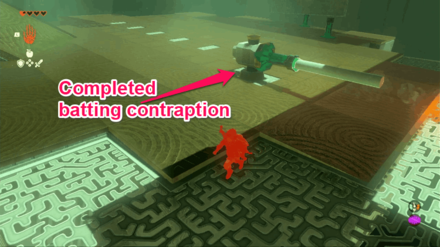
Use Ultrahand to jam one of the Stakes into the black side of the machine. Then, attach one of the wooden poles found to the left and attach it to the back of the Stake to create a batting contraption.
3. Move the Stake Away from the Contraption
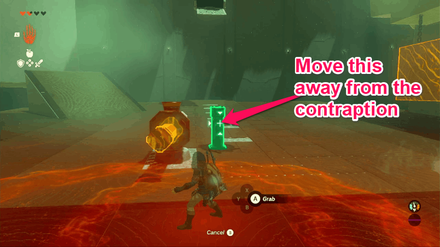
Use Ultrahand to move the Stake jammed into the ground as it prevents the contraption from working.
4. Step On the Orange Floor Switch

Step on the orange floor switch to activate the giant orange target on the left side of the area.
5. Hit the Switch to Bat the Ball to the Target
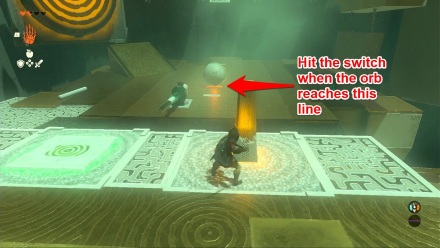
Notice that the horizontal lines on the floor light up as the orb passes through them. Watch this closely and hit the switch when the ball is near the line indicated in the image above.
Doing so causes the locked gate on the left side to open and activate another target on the right side of the room.
6. Use the Stakes to Stick the Slab to the Ceiling
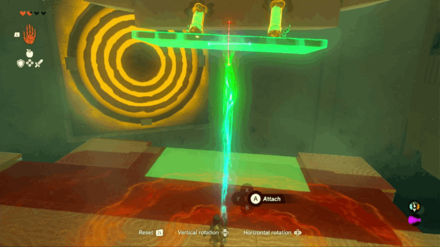
Head to the rolling ball area and use Ultrahand to attach the two remaining Stakes to the back of the slab. Then, use Ultrahand on the front of the slab and rotate it backwards so that the Stakes stab up into the ceiling and stick the slab there.
This will allow you to bat the rolling ball towards the rightmost target.
7. Hit the Switch to Bat the Rolling Ball towards Target
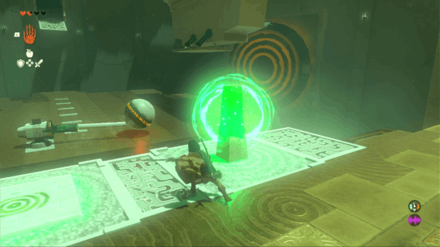
Hit the switch at the right time to bat the rolling ball towards the rightmost target. This opens the locked gate on the right side.
8. Get the Hidden Treasure Chest
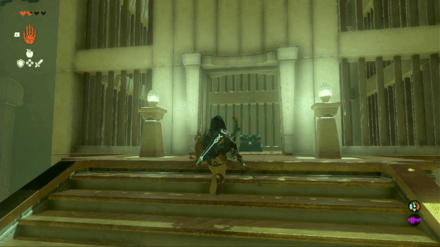
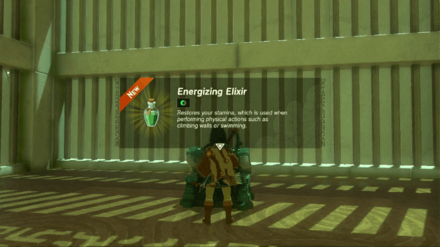
Head to the room on the right side to reach the hidden treasure chest that contains an Energizing Elixir.
9. Examine the Shrine
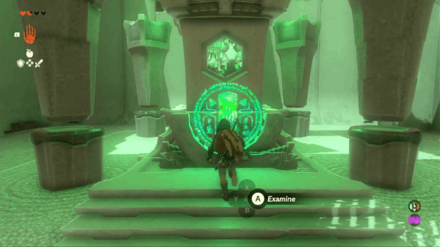
Examine the shrine in the room on the left side to obtain one Light of Blessing.
Mayachin Shrine Rewards and Chest Locations
Energizing Elixir
| Chest Location | Chest Contents |
|---|---|
 |
 |
After hitting the left target and opening the gate to the altar, a new target will show up to your right. Just like what you did a while ago, you'll need to hit this target with the orb using a makeshift bat.
Successfully hitting the target opens the gate to the chest. Open it to receive an Energizing Elixir.
Puzzle Shrine
This is a Puzzle type Shrine, so you need to solve the puzzle to reach the end and get a Light of Blessing.
Try to look around the area to find a way to move forward, and remember to use Link's Ultrahand, Ascend, or Recall abilities!
All Abilities and How to Unlock
The Legend of Zelda: Tears of the Kingdom Related Guides

Shrines Lists
| Shrines Lists | |
|---|---|
| All Shrines | All Shrine Quests |
All Great Sky Island Shrines
| Great Sky Island Shrines | ||
|---|---|---|
| Ukouh Shrine | In-isa Shrine | Gutanbac Shrine |
| Nachoyah Shrine | - | - |
All Hyrule Field Shrines
All Tabantha Shrines
| Tabantha Shrines | ||
|---|---|---|
| Oromuwak Shrine | Gatakis Shrine | Nouda Shrine |
| Wao-os Shrine | Iun-orok Shrine | Turakawak Shrine |
| Gasas Shrine | Mayausiy Shrine | Ikatak Shrine |
| Ga-ahisas Shrine | Ganos Shrine | Taunhiy Shrine |
All Hebra Shrines
All Great Hyrule Forest Shrines
| Great Hyrule Forest Shrines | ||
|---|---|---|
| Sakunbomar Shrine | Pupunke Shrine | Ninjis Shrine |
| Musanokir Shrine | Kikakin Shrine | Kiuyoyou Shrine |
| Ekochiu Shrine | Mayam Shrine | Simosiwak Shrine |
All Akkala Shrines
All Eldin Shrines
All Lanayru Shrines
All Necluda Shrines
All Faron Shrines
| Faron Shrines | ||
|---|---|---|
| Jiukoum Shrine | Ishokin Shrine | Utsushok Shrine |
| Joku-u Shrine | Joku-usin Shrine | - |
All Gerudo Shrines
Comment
Author
The Legend of Zelda: Tears of the Kingdom Walkthrough & Guides Wiki
Mayachin Shrine Location and Walkthrough
improvement survey
03/2026
improving Game8's site?

Your answers will help us to improve our website.
Note: Please be sure not to enter any kind of personal information into your response.

We hope you continue to make use of Game8.
Rankings
- We could not find the message board you were looking for.
Gaming News
Popular Games

Genshin Impact Walkthrough & Guides Wiki

Honkai: Star Rail Walkthrough & Guides Wiki

Umamusume: Pretty Derby Walkthrough & Guides Wiki

Pokemon Pokopia Walkthrough & Guides Wiki

Resident Evil Requiem (RE9) Walkthrough & Guides Wiki

Monster Hunter Wilds Walkthrough & Guides Wiki

Wuthering Waves Walkthrough & Guides Wiki

Arknights: Endfield Walkthrough & Guides Wiki

Pokemon FireRed and LeafGreen (FRLG) Walkthrough & Guides Wiki

Pokemon TCG Pocket (PTCGP) Strategies & Guides Wiki
Recommended Games

Diablo 4: Vessel of Hatred Walkthrough & Guides Wiki

Cyberpunk 2077: Ultimate Edition Walkthrough & Guides Wiki

Fire Emblem Heroes (FEH) Walkthrough & Guides Wiki

Yu-Gi-Oh! Master Duel Walkthrough & Guides Wiki

Super Smash Bros. Ultimate Walkthrough & Guides Wiki

Pokemon Brilliant Diamond and Shining Pearl (BDSP) Walkthrough & Guides Wiki

Elden Ring Shadow of the Erdtree Walkthrough & Guides Wiki

Monster Hunter World Walkthrough & Guides Wiki

The Legend of Zelda: Tears of the Kingdom Walkthrough & Guides Wiki

Persona 3 Reload Walkthrough & Guides Wiki
All rights reserved
© Nintendo. The Legend of Zelda and Nintendo Switch are trademarks of Nintendo.
The copyrights of videos of games used in our content and other intellectual property rights belong to the provider of the game.
The contents we provide on this site were created personally by members of the Game8 editorial department.
We refuse the right to reuse or repost content taken without our permission such as data or images to other sites.


![Monster Hunter Stories 3 Review [First Impressions] | Simply Rejuvenating](https://img.game8.co/4438641/2a31b7702bd70e78ec8efd24661dacda.jpeg/thumb)


