Oromuwak Shrine Location and Walkthrough
▲ Get Pristine Weapons from the depths!
△ All 1000 Koroks | All 4 Great Fairies
▲ 81 Addison Signs | 147 Caves | 58 Wells
△ Tips: Farm Rupees | Starting Armor
▲ Best Weapons | Best Armor | Best Food

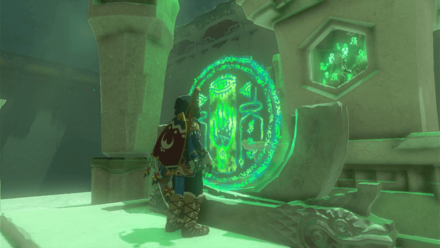
Oromuwak Shrine (A Launching Device) in The Legend of Zelda: Tears of the Kingdom (TotK) can be found southeast of the Lucky Clover Gazette in the Tabantha Frontier region. Read on to learn how to reach it, its location, puzzle solution, as well as all treasure chest locations in Oromuwak Shrine.
Oromuwak Shrine Location
Southeast of the Lucky Clover Gazette, Tabantha Frontier
Oromuwak Shrine is located on top of a mountain, southeast of Lucky Clover Gazette in the Tabantha Frontier region. Its exact coordinates are -3079, 1617, 0243 and you'll need to equip warm clothing like the Snowquill Set or eat dishes that provide cold-resistance to safely venture through the area.
You can quickly reach this shrine by going to the Rospro Pass Skyview Tower and gliding southeast!
Puzzle Shrine
This is a Puzzle type Shrine, so you need to solve the puzzle to reach the end and get a Light of Blessing.
Try to look around the area to find a way to move forward, and remember to use Link's Ultrahand, Ascend, or Recall abilities!
All Abilities and How to Unlock
How to Reach Oromuwak Shrine
1. Burn the Thorns
There are multiple layers of thorns that surround this shrine. You'll need to burn them by striking flint with a metal weapon next to them, or by attaching a burning material to an arrow!
2. Enter the Shrine
Once the thorns have burned away, it's safe to enter the shrine!
Oromuwak Shrine Puzzle Solution
- Take a Rocket
- Position the Rocket
- Hit the Rocket
- Attach the Rocket
- Launch the Rocket
- Attach 2 Rockets to the Cart
- Get in the Cart
- Launch the Cart
- Fly Across the Gap
- Examine the Shrine
Video Guide
1. Take a Rocket
The puzzle requires you to fire off Zonai Rockets in order to get pass through obstacles. When you first enter the shrine, you'll find a ramp on the left and rockets on the right. Take one rocket and bring it over to the ramp!
2. Position the Rocket
Position the rocket on the ramp. Use Ultrahand to be sure it's pointing towards the target!
3. Hit the Rocket
Use a weapon to activate the rocket and send it flying towards the target! This will open the door to the next chamber.
4. Attach the Rocket
Using Ultrahand, bring one rocket from the first chamber into the next one. You should see a cart to your left when you enter. Attach the rocket to the back of it!
5. Launch the Rocket
Hop on in and launch the rocket by striking it! If the cart is placed right, you should go straight up to the next platform!
6. Attach 2 Rockets to the Cart
You'll find more rockets on the ramp to your left. Take 2 of them and attach them to the cart pointing upwards.
7. Get in the Cart
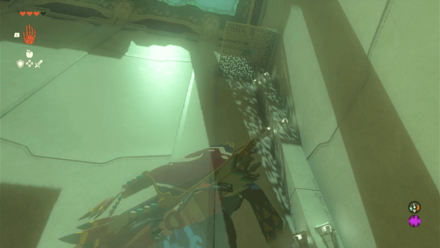
Bring the cart closer to the back wall, look up to be sure you're close to the platform with the chest above. Hop in once you're in place!
8. Launch the Cart
Strike the rockets once you're inside and head straight up. You'll need to hop out of the cart at the top and glide over to the platform. Be careful as you could sustain damage if you don't glide. From here you can open the chest of snag a Ruby!
9. Fly Across the Gap
Create another cart with 2 launchers facing forward and place it on the ramp. Similar to the first cart, you'll be using the rockets to get across but this time there's no rail so place your cart correctly!
10. Examine the Shrine

Examine the Shrine to receive your reward!
Oromuwak Shrine Rewards and Chest Locations
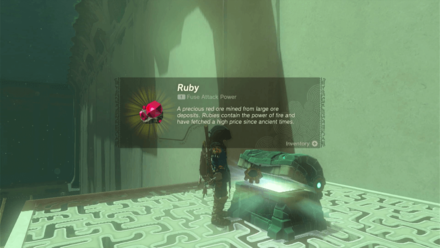
Ruby
| Chest Location | Chest Contents |
|---|---|
 |
 |
Inside the second chamber, you'll need to launch a cart upwards by attaching 2 rockets and riding the cart up! These two rockets must be facing upwards for you to get a lift. Glide down from the top and open the chest to snag a Ruby!
The Legend of Zelda: Tears of the Kingdom Related Guides

Shrines Lists
| Shrines Lists | |
|---|---|
| All Shrines | All Shrine Quests |
All Great Sky Island Shrines
| Great Sky Island Shrines | ||
|---|---|---|
| Ukouh Shrine | In-isa Shrine | Gutanbac Shrine |
| Nachoyah Shrine | - | - |
All Hyrule Field Shrines
All Tabantha Shrines
| Tabantha Shrines | ||
|---|---|---|
| Oromuwak Shrine | Gatakis Shrine | Nouda Shrine |
| Wao-os Shrine | Iun-orok Shrine | Turakawak Shrine |
| Gasas Shrine | Mayausiy Shrine | Ikatak Shrine |
| Ga-ahisas Shrine | Ganos Shrine | Taunhiy Shrine |
All Hebra Shrines
All Great Hyrule Forest Shrines
| Great Hyrule Forest Shrines | ||
|---|---|---|
| Sakunbomar Shrine | Pupunke Shrine | Ninjis Shrine |
| Musanokir Shrine | Kikakin Shrine | Kiuyoyou Shrine |
| Ekochiu Shrine | Mayam Shrine | Simosiwak Shrine |
All Akkala Shrines
All Eldin Shrines
All Lanayru Shrines
All Necluda Shrines
All Faron Shrines
| Faron Shrines | ||
|---|---|---|
| Jiukoum Shrine | Ishokin Shrine | Utsushok Shrine |
| Joku-u Shrine | Joku-usin Shrine | - |
All Gerudo Shrines
Comment
Author
The Legend of Zelda: Tears of the Kingdom Walkthrough & Guides Wiki
Oromuwak Shrine Location and Walkthrough
improvement survey
03/2026
improving Game8's site?

Your answers will help us to improve our website.
Note: Please be sure not to enter any kind of personal information into your response.

We hope you continue to make use of Game8.
Rankings
- We could not find the message board you were looking for.
Gaming News
Popular Games

Genshin Impact Walkthrough & Guides Wiki

Honkai: Star Rail Walkthrough & Guides Wiki

Umamusume: Pretty Derby Walkthrough & Guides Wiki

Pokemon Pokopia Walkthrough & Guides Wiki

Resident Evil Requiem (RE9) Walkthrough & Guides Wiki

Monster Hunter Wilds Walkthrough & Guides Wiki

Wuthering Waves Walkthrough & Guides Wiki

Arknights: Endfield Walkthrough & Guides Wiki

Pokemon FireRed and LeafGreen (FRLG) Walkthrough & Guides Wiki

Pokemon TCG Pocket (PTCGP) Strategies & Guides Wiki
Recommended Games

Diablo 4: Vessel of Hatred Walkthrough & Guides Wiki

Cyberpunk 2077: Ultimate Edition Walkthrough & Guides Wiki

Fire Emblem Heroes (FEH) Walkthrough & Guides Wiki

Yu-Gi-Oh! Master Duel Walkthrough & Guides Wiki

Super Smash Bros. Ultimate Walkthrough & Guides Wiki

Pokemon Brilliant Diamond and Shining Pearl (BDSP) Walkthrough & Guides Wiki

Elden Ring Shadow of the Erdtree Walkthrough & Guides Wiki

Monster Hunter World Walkthrough & Guides Wiki

The Legend of Zelda: Tears of the Kingdom Walkthrough & Guides Wiki

Persona 3 Reload Walkthrough & Guides Wiki
All rights reserved
© Nintendo. The Legend of Zelda and Nintendo Switch are trademarks of Nintendo.
The copyrights of videos of games used in our content and other intellectual property rights belong to the provider of the game.
The contents we provide on this site were created personally by members of the Game8 editorial department.
We refuse the right to reuse or repost content taken without our permission such as data or images to other sites.


![Monster Hunter Stories 3 Review [First Impressions] | Simply Rejuvenating](https://img.game8.co/4438641/2a31b7702bd70e78ec8efd24661dacda.jpeg/thumb)


