Soryotanog Shrine Location and Walkthrough
▲ Get Pristine Weapons from the depths!
△ All 1000 Koroks | All 4 Great Fairies
▲ 81 Addison Signs | 147 Caves | 58 Wells
△ Tips: Farm Rupees | Starting Armor
▲ Best Weapons | Best Armor | Best Food

Soryotanog Shrine (Buried Light) in The Legend of Zelda: Tears of the Kingdom (TotK) can be found atop Gerudo Town in the Gerudo Desert Region. Read on to learn its location, puzzle solution, as well as all treasure chest locations in Soryotanog Shrine.
List of Contents
Soryotanog Shrine Location
Gerudo Town, Gerudo Desert
You can find Soryotanog Shrine at the top of Gerudo Town in the Gerudo Desert Region. The tall structure the shrine is on can be climbed but we recommend using Ascend underneath it to access the shrine much quickly.
The exact coordinates of the Soryotanog Shrine is at -3883, -2963, 0123.
Travel to Gerudo Canyon Skyview Tower, and launch yourself from there to glide southwest towards Gerudo Town.
Puzzle Shrine
This is a Puzzle type Shrine, so you need to solve the puzzle to reach the end and get a Light of Blessing.
Try to look around the area to find a way to move forward, and remember to use Link's Ultrahand, Ascend, or Recall abilities!
All Abilities and How to Unlock
Soryotanog Shrine Puzzle Solution
- Grab the Fan
- Use the Fan to Blow Away the Piles of Sand
- Open the Door
- Blow Away the Pile of Sand in the Right Corner of the Room
- Take a Fan Guster from an Enemy Construct and Use a Fan to Create an Updraft
- Remove the Pile of Sand Near the Gear to Reach the Chest
- Ascend on the Ledge Nearby
- Blow Away the Piles of Sand in the Enclosure
- Reflect Light to the Other Side of the Room
- Go Back to the Previous Room
- Shine the Light on the Mirror on Top of the Altar Door
- Examine the Altar
Video Guide
1. Grab the Fan
In the first room, grab the Zonai Fan sitting on top of the pile of sand near the locked door using Ultrahand.
2. Use the Fan to Blow Away the Piles of Sand
Once you have the Zonai Fan, turn it on and blow away all the piles of sand on the left corner of the room. It will reveal a chest with a Small Key inside.
3. Open the Door
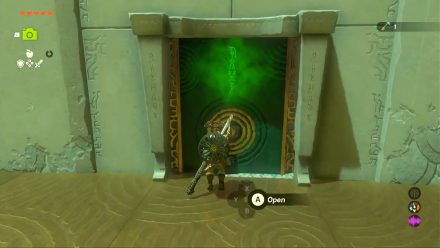
Use the Small Key that you got from the chest to open the locked door. Enter it and make sure you bring the fan with you.
4. Blow Away the Pile of Sand in the Right Corner of the Room
Enter the next room and defeat the enemy Construct inside. Then, turn right and blow away the small pile of sand in the corner. This will reveal a small hole that you can enter to reach a secret room.
5. Take a Fan Guster from an Enemy Construct and Use a Fan to Create an Updraft
Enter the secret room and grab the Zonai Fan from the pile of sand nearby. Use the fan to blow away all the piles of sand in the room.
Hiding underneath a pile of sand is an enemy Construct. Defeat it and take the Fan Guster that it will drop.
Next, place the Zonai Fan on the floor near the far back side corner of the room and turn it on so it creates an updraft. Use this to get to the higher platform.
6. Remove the Pile of Sand Near the Gear to Reach the Chest
Use the Fan Guster you got from the enemy Construct earlier to remove the pile of sand beside the gear. Doing so will make the gear move and open the gate beside it.
Open the chest inside to get Arrow x10.
7. Ascend on the Ledge Nearby
After getting the Arrows from the secret room, go back to the previous room and blow away the pile of sand near the altar chamber to reveal a Zonai Mirror. Leave it in this room for now.
In the meantime, let's head to the next room by using Ascend on the ledge nearby.
8. Blow Away the Piles of Sand in the Enclosure
Drop down to the enclosure and defeat the enemy Construct roaming around. Afterwards, use the fan in one corner of the room to blow away the piles of sand everywhere. This will reveal a big beam of light and a Zonai Mirror.
9. Reflect Light to the Other Side of the Room
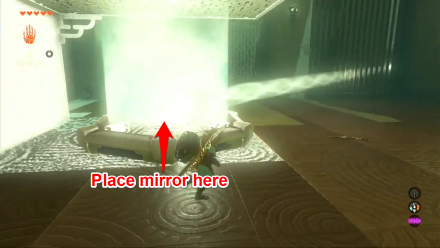
Next, place the Zonai Mirror atop the source of the big beam of light. Position it in a way that it reflects light all the way to the previous room.
10. Go Back to the Previous Room
Go back to the previous room by using Ascend on the ledge nearby.
11. Shine the Light on the Mirror on Top of the Altar Door
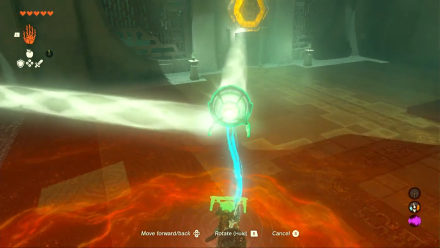
Grab the Zonai Mirror that you left in this room using Ultrahand, then use it to reflect light on the hexagonal shape on top of the altar door.
12. Examine the Altar
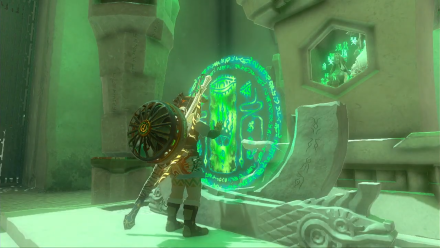
Enter the chamber once the room opens and examine the altar to get a Light of Blessing.
Soryotanog Shrine Rewards and Chest Locations
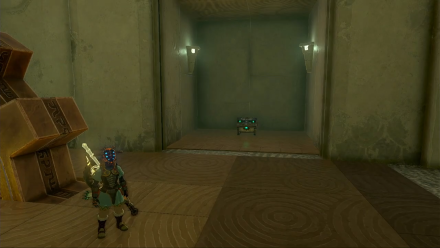
Arrow x10
| Chest Location | Chest Contents |
|---|---|
 |
 |
In the secret room, defeat the enemy Construct hiding underneath a pile of sand and take the Fan Guster that it will drop.
Then, grab the Zonai Fan from another pile of sand and place it on the floor near the far back side corner of the room. Hit the fan with a weapon and ride the updraft it creates to reach the higher platform.
Next, use the Fan Guster on the pile of sand near the big gear. Once the big gear moves, the door beside it will open. Open the chest inside to get Arrow x10.
The Legend of Zelda: Tears of the Kingdom Related Guides

Shrines Lists
| Shrines Lists | |
|---|---|
| All Shrines | All Shrine Quests |
All Great Sky Island Shrines
| Great Sky Island Shrines | ||
|---|---|---|
| Ukouh Shrine | In-isa Shrine | Gutanbac Shrine |
| Nachoyah Shrine | - | - |
All Hyrule Field Shrines
All Tabantha Shrines
| Tabantha Shrines | ||
|---|---|---|
| Oromuwak Shrine | Gatakis Shrine | Nouda Shrine |
| Wao-os Shrine | Iun-orok Shrine | Turakawak Shrine |
| Gasas Shrine | Mayausiy Shrine | Ikatak Shrine |
| Ga-ahisas Shrine | Ganos Shrine | Taunhiy Shrine |
All Hebra Shrines
All Great Hyrule Forest Shrines
| Great Hyrule Forest Shrines | ||
|---|---|---|
| Sakunbomar Shrine | Pupunke Shrine | Ninjis Shrine |
| Musanokir Shrine | Kikakin Shrine | Kiuyoyou Shrine |
| Ekochiu Shrine | Mayam Shrine | Simosiwak Shrine |
All Akkala Shrines
All Eldin Shrines
All Lanayru Shrines
All Necluda Shrines
All Faron Shrines
| Faron Shrines | ||
|---|---|---|
| Jiukoum Shrine | Ishokin Shrine | Utsushok Shrine |
| Joku-u Shrine | Joku-usin Shrine | - |
All Gerudo Shrines
Comment
Author
The Legend of Zelda: Tears of the Kingdom Walkthrough & Guides Wiki
Soryotanog Shrine Location and Walkthrough
improvement survey
03/2026
improving Game8's site?

Your answers will help us to improve our website.
Note: Please be sure not to enter any kind of personal information into your response.

We hope you continue to make use of Game8.
Rankings
- We could not find the message board you were looking for.
Gaming News
Popular Games

Genshin Impact Walkthrough & Guides Wiki

Honkai: Star Rail Walkthrough & Guides Wiki

Umamusume: Pretty Derby Walkthrough & Guides Wiki

Pokemon Pokopia Walkthrough & Guides Wiki

Resident Evil Requiem (RE9) Walkthrough & Guides Wiki

Monster Hunter Wilds Walkthrough & Guides Wiki

Wuthering Waves Walkthrough & Guides Wiki

Arknights: Endfield Walkthrough & Guides Wiki

Pokemon FireRed and LeafGreen (FRLG) Walkthrough & Guides Wiki

Pokemon TCG Pocket (PTCGP) Strategies & Guides Wiki
Recommended Games

Diablo 4: Vessel of Hatred Walkthrough & Guides Wiki

Cyberpunk 2077: Ultimate Edition Walkthrough & Guides Wiki

Fire Emblem Heroes (FEH) Walkthrough & Guides Wiki

Yu-Gi-Oh! Master Duel Walkthrough & Guides Wiki

Super Smash Bros. Ultimate Walkthrough & Guides Wiki

Pokemon Brilliant Diamond and Shining Pearl (BDSP) Walkthrough & Guides Wiki

Elden Ring Shadow of the Erdtree Walkthrough & Guides Wiki

Monster Hunter World Walkthrough & Guides Wiki

The Legend of Zelda: Tears of the Kingdom Walkthrough & Guides Wiki

Persona 3 Reload Walkthrough & Guides Wiki
All rights reserved
© Nintendo. The Legend of Zelda and Nintendo Switch are trademarks of Nintendo.
The copyrights of videos of games used in our content and other intellectual property rights belong to the provider of the game.
The contents we provide on this site were created personally by members of the Game8 editorial department.
We refuse the right to reuse or repost content taken without our permission such as data or images to other sites.


![Monster Hunter Stories 3 Review [First Impressions] | Simply Rejuvenating](https://img.game8.co/4438641/2a31b7702bd70e78ec8efd24661dacda.jpeg/thumb)


