Taninoud Shrine Quest Location and Walkthrough
▲ Get Pristine Weapons from the depths!
△ All 1000 Koroks | All 4 Great Fairies
▲ 81 Addison Signs | 147 Caves | 58 Wells
△ Tips: Farm Rupees | Starting Armor
▲ Best Weapons | Best Armor | Best Food

Taninoud Shrine (Rauru's Blessing) in The Legend of Zelda: Tears of the Kingdom (TotK) can be unlocked by completing The East Hebra Sky Crystal Shrine Quest in the Hebra Mountains Sky Region. Read on to learn how to unlock Taninoud Shrine, its location, puzzle solution, as well as all treasure chest locations in Taninoud Shrine!
List of Contents
Taninoud Shrine Location
East Hebra Sky Archipelago, Hebra Mountains Sky Region
Taninoud Shrine can be found on one of the islands in the East Hebra Sky Archipelago located at the Hebra Mountains Sky Region. The exact coordinates of the Taninoud Shrine is at -1801, 3406, 0949.
The island can easily be reached by launching yourself skyward from Pikida Stonegrove Skyview Tower, then paragliding northeast.
The paragliding trip towards the island will require you to consume two stamina wheels. It is recommended that you eat dishes which will either replenish your stamina wheels or give you a few addtional wheels.
Hebra Mountains Sky Region Map
Rauru's Blessing
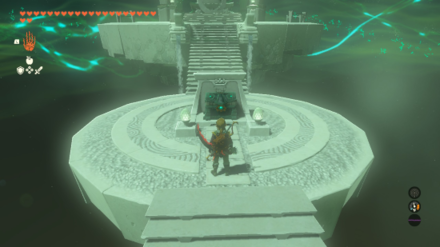
This is a Rauru's Blessing Shrine with a treasure chest inside as well as a Light of Blessing at the altar.
East Hebra Sky Crystal Shrine Quest Walkthrough
- Launch from Pikida Tower and Glide Northeast
- Examine the Shrine
- Follow the Beam to the Larger Sky Island
- Glide Underneath the Floating Platform
- Cut the Vines to Get the Green Crystal
- Attach Fans and Batteries to Floating Platform
- Attach the Green Crystal and a Steering Stick
- Drive the Aircraft to the Shrine
- Bring the Green Crystal to the Shrine
1. Launch from Pikida Stonegrove Tower and Glide Northeast
Fast travel to Pikida Stonegrove Skyview Tower in the snowy mountains of the Hebra Region and examine the terminal so it launches you to the skies.
Wait until you can take out your paraglider, then start paragliding northeast towards the island indicated on the video above.
The entire trip to the island will take a little more than 2 stamina wheels so make sure you have stamina dishes with you! Alternatively, you can land on one of the nearby islands and use the floating platforms in the area to propel yourself towards your destination.
2. Examine the Shrine
Once you're on the island, examine the shrine nearby to start “The East Hebra Sky Crystal“ Shrine Quest.
3. Follow the Beam to the Larger Sky Island
After unlocking the quest, launch yourself towards the larger sky island using the moving platform near the shrine.
4. Glide Underneath the Floating Platform
Upon reaching the larger sky island, look for a floating platform nearby and carefully glide underneath it. You should find a ledge below with a couple of wooden vines.
5. Cut the Vines to Get the Green Crystal
Cut the wooden vines using a sharp weapon to expose a large cavern. Venture deeper into the cavern and past the Zonai devices on the floor to find the Green Crystal hiding behind a curtain of wooden vines.
Cut the wooden vines and take the Green Crystal from its pedestal using Ultrahand.
6. Attach Fans and Batteries to the Floating Platform
Next, you need to create an aircraft using the Zonai devices nearby.
Start by attaching two fans on two opposing sides of the floating platform using Ultrahand. Then, attach the two batteries on it to give your aircraft more power.
7. Attach the Green Crystal and a Steering Stick
Grab the Green Crystal and attach it on the platform so it won't fall off. Then, attach the Steering Stick at the center of your aircraft for easy navigation once you're in the skies.
8. Drive the Aircraft to the Shrine
Once your aircraft is done, cut down a few more wooden vines by the cavern entrance and place your floating platform near the cliff.
Then, climb it and control the Steering Stick to start navigating back to the shrine.
9. Bring the Green Crystal to the Shrine
Finally, bring the Green Crystal to the shrine to unlock Taninoud Shrine.
Taninoud Shrine Walkthrough
Claim Your Rewards
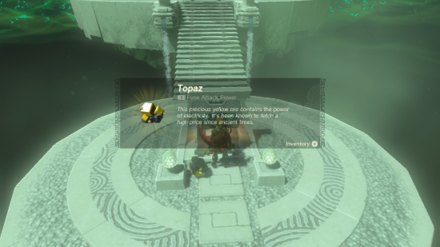
Fortunately, there are no puzzles that need to be done inside the shrine itself. You just need to open the chest inside to get a Topaz and examine the altar to get a Light of Blessing.
Taninoud Shrine Rewards and Chest Locations
Topaz
| Chest Location | Chest Contents |
|---|---|
 |
 |
Open the chest inside the shrine to get a Topaz.
The Legend of Zelda: Tears of the Kingdom Related Guides

Shrines Lists
| Shrines Lists | |
|---|---|
| All Shrines | All Shrine Quests |
All Great Sky Island Shrines
| Great Sky Island Shrines | ||
|---|---|---|
| Ukouh Shrine | In-isa Shrine | Gutanbac Shrine |
| Nachoyah Shrine | - | - |
All Hyrule Field Shrines
All Tabantha Shrines
| Tabantha Shrines | ||
|---|---|---|
| Oromuwak Shrine | Gatakis Shrine | Nouda Shrine |
| Wao-os Shrine | Iun-orok Shrine | Turakawak Shrine |
| Gasas Shrine | Mayausiy Shrine | Ikatak Shrine |
| Ga-ahisas Shrine | Ganos Shrine | Taunhiy Shrine |
All Hebra Shrines
All Great Hyrule Forest Shrines
| Great Hyrule Forest Shrines | ||
|---|---|---|
| Sakunbomar Shrine | Pupunke Shrine | Ninjis Shrine |
| Musanokir Shrine | Kikakin Shrine | Kiuyoyou Shrine |
| Ekochiu Shrine | Mayam Shrine | Simosiwak Shrine |
All Akkala Shrines
All Eldin Shrines
All Lanayru Shrines
All Necluda Shrines
All Faron Shrines
| Faron Shrines | ||
|---|---|---|
| Jiukoum Shrine | Ishokin Shrine | Utsushok Shrine |
| Joku-u Shrine | Joku-usin Shrine | - |
All Gerudo Shrines
Comment
Author
The Legend of Zelda: Tears of the Kingdom Walkthrough & Guides Wiki
Taninoud Shrine Quest Location and Walkthrough
improvement survey
03/2026
improving Game8's site?

Your answers will help us to improve our website.
Note: Please be sure not to enter any kind of personal information into your response.

We hope you continue to make use of Game8.
Rankings
Gaming News
Popular Games

Genshin Impact Walkthrough & Guides Wiki

Honkai: Star Rail Walkthrough & Guides Wiki

Umamusume: Pretty Derby Walkthrough & Guides Wiki

Pokemon Pokopia Walkthrough & Guides Wiki

Resident Evil Requiem (RE9) Walkthrough & Guides Wiki

Monster Hunter Wilds Walkthrough & Guides Wiki

Wuthering Waves Walkthrough & Guides Wiki

Arknights: Endfield Walkthrough & Guides Wiki

Pokemon FireRed and LeafGreen (FRLG) Walkthrough & Guides Wiki

Pokemon TCG Pocket (PTCGP) Strategies & Guides Wiki
Recommended Games

Diablo 4: Vessel of Hatred Walkthrough & Guides Wiki

Cyberpunk 2077: Ultimate Edition Walkthrough & Guides Wiki

Fire Emblem Heroes (FEH) Walkthrough & Guides Wiki

Yu-Gi-Oh! Master Duel Walkthrough & Guides Wiki

Super Smash Bros. Ultimate Walkthrough & Guides Wiki

Pokemon Brilliant Diamond and Shining Pearl (BDSP) Walkthrough & Guides Wiki

Elden Ring Shadow of the Erdtree Walkthrough & Guides Wiki

Monster Hunter World Walkthrough & Guides Wiki

The Legend of Zelda: Tears of the Kingdom Walkthrough & Guides Wiki

Persona 3 Reload Walkthrough & Guides Wiki
All rights reserved
© Nintendo. The Legend of Zelda and Nintendo Switch are trademarks of Nintendo.
The copyrights of videos of games used in our content and other intellectual property rights belong to the provider of the game.
The contents we provide on this site were created personally by members of the Game8 editorial department.
We refuse the right to reuse or repost content taken without our permission such as data or images to other sites.


![Monster Hunter Stories 3 Review [First Impressions] | Simply Rejuvenating](https://img.game8.co/4438641/2a31b7702bd70e78ec8efd24661dacda.jpeg/thumb)


