This survey will take about 1 minute.
Your answers will help us to improve our website.
Zelda: Tears of the Kingdom (TotK)
Joku-usin Shrine Location and Walkthrough
▲ Get Pristine Weapons from the depths!
△ All 1000 Koroks | All 4 Great Fairies
▲ 81 Addison Signs | 147 Caves | 58 Wells
△ Tips: Farm Rupees | Starting Armor
▲ Best Weapons | Best Armor | Best Food
Joku-usin Shrine (Proving Grounds: Short Circuit) in The Legend of Zelda: Tears of the Kingdom (TotK) can be found on Thunderhead Isles in the Faron Grasslands Sky Region. Read on to learn how to reach it, its location, puzzle solution, as well as all treasure chest locations in Joku-usin Shrine.
| Secret of the Ring Ruins Shrines | |
|---|---|
| Joku-usin Shrine | Joku-u Shrine |
Joku-usin Shrine Location
Thunderhead Isles, Faron Grasslands Sky Region
Joku-usin Shrine can be found on Thunderhead Isles in the Faron Grasslands Sky Region. You'll stumble upon this shrine as you do the main quest “Secret of the Ring Ruins”.
The exact coordinates of the Joku-usin Shrine is at 1077, -3349, 0786.
You can also travel to Popla Foothils Skyview Tower and launch yourself from there to glide south towards the Thunderhead Isles.
Faron Grasslands Sky Region Map
Proving Grounds
This is a Proving Grounds Shrine where your combat skills and resourcefulness will be tested.
Use the weapons and items inside the Shrine to defeat enemies and clear the area!
How to Reach Joku-usin Shrine
- Complete all Four Regional Phenomena
- Defeat Phantom Ganon in Hyrule Castle
- Unlock Secret of the Ring Ruins Main Quest
- Find the Charged Set in Dracozu Lake
- Head for Thunderhead Isles
- Find the Chamber that Houses Joku-usin Shrine
- Make a Letter T with Wooden Platforms
- Ride the Rails to the Shrine Chamber
1. Complete all Four Regional Phenomena
After completing all four Regional Phenomena, return to Lookout Landing and talk to Purah.
2. Defeat Phantom Ganon in Hyrule Castle

After talking to Purah in Lookout Landing, head for Hyrule Castle and follow Princess Zelda's tracks. Finally, defeat Phantom Ganon upon reaching the Sanctum.
Return to Purah and talk to her in Lookout Landing after defeating Phantom Ganon to start the main quest “Find the Fifth Sage”.
3. Unlock Secret of the Ring Ruins Main Quest
Once you've unlocked the main quest “Find the Fifth Sage”, head for Kakariko Village and talk to Paya who's standing under one of the ring ruins.
Next, Ascend to the ring ruins and take a picture of the stone slab inside. Then, return to Tauro so he can translate the writings.
4. Find the Charged Set in Dracozu Lake

Next, fast travel to Popla Foothills Skyview Tower and travel southeast to reach Dracozu Lake. Enter the Zonai Ruins nearby and talk to Tauro inside.
With the riddle as a guide, find all pieces of the Charged Set in the area and offer a Zonai Charge at the ruins near the tail of Dracozu Lake.
5. Head for Thunderhead Isles

Return to Popla Foothills Skyview Tower and launch yourself skyward. Glide south until you reach Thunderhead Isles.
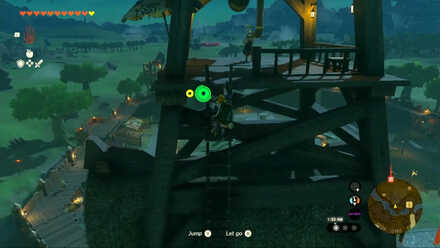
6. Find the Chamber that Houses Joku-usin Shrine
Continue south upon reaching Thunderhead Isles until you find a chamber that houses a shrine.
Once you find the shrine chamber, look for rails underneath it and glide down to the island nearest to the rails.
7. Make a Letter T with Wooden Platforms
Make a big letter “T“ using the wooden platforms nearby and attach a fan to it. Make sure that the fan is facing the opposite direction of the shrine chamber.
Then, place your creation on the rails. Make sure that the vertical part of it is in between the rails.
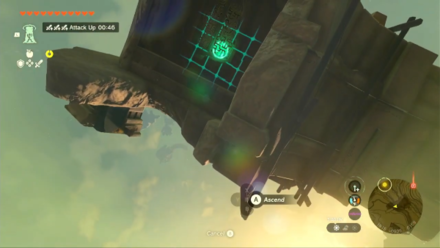
8. Ride the Rails to the Shrine Chamber
Hop on your creation and turn the fan on so it pushes you toward the direction of the shrine chamber. Then, use Ascend once you're directly underneath the shrine chamber.
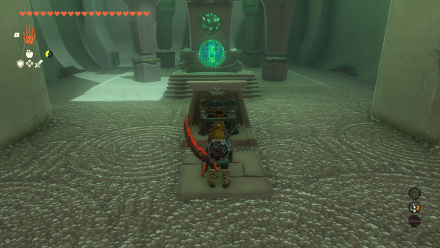
Once you're inside the chamber, examine the shrine to unlock it.
Joku-usin Shrine Walkthrough
- Grab All Equipment by the Entrance
- Fuse a Shock Emitter to a Long Stick
- Lure Constructs to the Central Platform
- Claim Rewards in the Altar Chamber
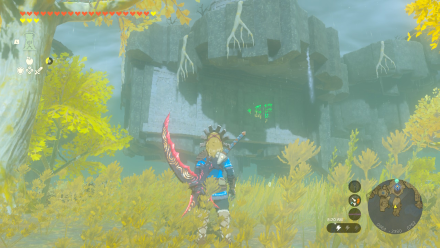
1. Grab All Equipment by the Entrance
Just like other Proving Grounds trials, this shrine will strip you of all your equipment. The only ones you can use are Long Stick and Wooden Stick you can find by the entrance.
Grab these two weapons and brace yourself for the upcoming fight.
2. Fuse a Shock Emitter to a Long Stick
After grabbing the two weapons, quickly run to the backside of the room and Fuse your Long Stick with the Shock Emitter near the altar chamber.
3. Lure Constructs to the Central Platform
Lure as many enemy Constructs as you can to the central platform with the metal floor, then swing your Shock-Emitter Spear at an enemy. The shock your weapon produces will travel through the metal floor and shock every enemy Construct standing on it.
Most enemy Constructs in this room can be taken out with just one shock from your weapon. This will make it easier for you to pick them off one by one.
If your Shock-Emitter Spear breaks, feel free to Fuse your Wooden Stick with any of enemy Constructs' drops.
4. Claim Rewards in the Altar Chamber
After defeating all enemy Constructs in the room, go inside the altar chamber and open the chest inside to get an Electro Elixir. Then, examine the altar to get a Light of Blessing.
Joku-usin Shrine Rewards and Chest Locations
Electro Elixir
| Chest Location | Chest Contents |
|---|---|
 |
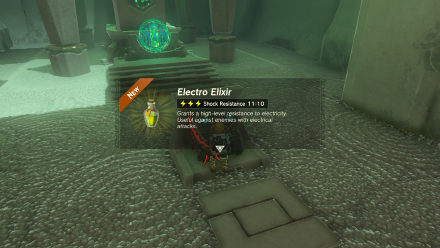 |
Defeat all enemy Constructs in the area and open the chest inside the altar chamber to get an Electro Elixir.
The Legend of Zelda: Tears of the Kingdom Related Guides

Shrines Lists
| Shrines Lists | |
|---|---|
| All Shrines | All Shrine Quests |
All Great Sky Island Shrines
| Great Sky Island Shrines | ||
|---|---|---|
| Ukouh Shrine | In-isa Shrine | Gutanbac Shrine |
| Nachoyah Shrine | - | - |
All Hyrule Field Shrines
All Tabantha Shrines
| Tabantha Shrines | ||
|---|---|---|
| Oromuwak Shrine | Gatakis Shrine | Nouda Shrine |
| Wao-os Shrine | Iun-orok Shrine | Turakawak Shrine |
| Gasas Shrine | Mayausiy Shrine | Ikatak Shrine |
| Ga-ahisas Shrine | Ganos Shrine | Taunhiy Shrine |
All Hebra Shrines
All Great Hyrule Forest Shrines
| Great Hyrule Forest Shrines | ||
|---|---|---|
| Sakunbomar Shrine | Pupunke Shrine | Ninjis Shrine |
| Musanokir Shrine | Kikakin Shrine | Kiuyoyou Shrine |
| Ekochiu Shrine | Mayam Shrine | Simosiwak Shrine |
All Akkala Shrines
All Eldin Shrines
All Lanayru Shrines
All Necluda Shrines
All Faron Shrines
| Faron Shrines | ||
|---|---|---|
| Jiukoum Shrine | Ishokin Shrine | Utsushok Shrine |
| Joku-u Shrine | Joku-usin Shrine | - |
All Gerudo Shrines
Comment
Author

The Legend of Zelda: Tears of the Kingdom Walkthrough & Guides Wiki
Joku-usin Shrine Location and Walkthrough
Please participate in our site
improvement survey
03/2026
improvement survey
03/2026
Would you assist in
improving Game8's site?
improving Game8's site?

×
We are listening to our users' valuable opinions and discussing how to act on them.
The information collected through this survey will be used for the purpose of improving our services. In addition, the information will only be disclosed a part of a statistic in a format that will not allow identification of personal information.
Begin Survey
Not Now
×
Please rate each item regarding Game8.co's Advertisements.
Amount of Ads
Very Dissatisfied
Somewhat Dissatisfied
Fine
Somewhat Satisfied
Highly Satisfied
Placement of Ads
Timing of Ad Display
Ad Loading Speed
Safeness of Ads
Content of Ads
×
Please rate each item regarding Game8.co's Quality of Articles.
Amount of information
Very Dissatisfied
Somewhat Dissatisfied
Fine
Somewhat Satisfied
Highly Satisfied
Frequency of updates
Speed of new information
Accuracy of articles
Understandibility of articles
Readability of sentences
×
Please rate each item regarding Game8.co's Usability of the Site.
Ease of finding information
Very Dissatisfied
Somewhat Dissatisfied
Fine
Somewhat Satisfied
Highly Satisfied
Loading Speed
Use of Color
Font Size
Visibility of Images
Easy to Understand Layout
×
Please rate each item regarding Game8.co's Message Boards, Comments.
Ease of Writing
Very Dissatisfied
Somewhat Dissatisfied
Fine
Somewhat Satisfied
Highly Satisfied
Readability
Ease in Finding Information
Comment Quality
Comment Quantity
Admin Response
×
Please rate each item regarding Game8.co's Site's new design.
Please rate our site's new design
Very Dissatisfied
Somewhat Dissatisfied
Fine
Somewhat Satisfied
Highly Satisfied
Do you think that the website's design change makes the site easier to use?
Has the new design made it easier for you to find information on the site?
Has the new design improved the overall visual appeal of the site?
How would you rate your overall satisfaction with the new design of the site?
×
How likely are you to recommend Game8 to someone you know?
Very Unlikely
0
1
2
3
4
5
6
7
8
9
10
Very Likely
If you have other opinions regarding potential improvement to the website, please share them with us. We would appreciate your honest opinion.
Note: This is a free response section, so you can proceed without entering anything.
Note: Please be sure not to enter any kind of personal information into your response.
Note: Please be sure not to enter any kind of personal information into your response.
×
Thank You
×
Thank you for participating in our survey! Your answers will help us to improve the quality of our website and services.
We hope you continue to make use of Game8.
We hope you continue to make use of Game8.
Close
Rankings
- We could not find the message board you were looking for.
Gaming News


![Monster Hunter Stories 3 Review [First Impressions] | Simply Rejuvenating](https://img.game8.co/4438641/2a31b7702bd70e78ec8efd24661dacda.jpeg/thumb)
Popular Games

Genshin Impact Walkthrough & Guides Wiki
Honkai: Star Rail Walkthrough & Guides Wiki
Umamusume: Pretty Derby Walkthrough & Guides Wiki
Pokemon Pokopia Walkthrough & Guides Wiki
Resident Evil Requiem (RE9) Walkthrough & Guides Wiki
Monster Hunter Wilds Walkthrough & Guides Wiki
Wuthering Waves Walkthrough & Guides Wiki
Arknights: Endfield Walkthrough & Guides Wiki
Pokemon FireRed and LeafGreen (FRLG) Walkthrough & Guides Wiki
Pokemon TCG Pocket (PTCGP) Strategies & Guides Wiki


Recommended Games
Diablo 4: Vessel of Hatred Walkthrough & Guides Wiki
Cyberpunk 2077: Ultimate Edition Walkthrough & Guides Wiki
Fire Emblem Heroes (FEH) Walkthrough & Guides Wiki
Yu-Gi-Oh! Master Duel Walkthrough & Guides Wiki
Super Smash Bros. Ultimate Walkthrough & Guides Wiki
Pokemon Brilliant Diamond and Shining Pearl (BDSP) Walkthrough & Guides Wiki
Elden Ring Shadow of the Erdtree Walkthrough & Guides Wiki
Monster Hunter World Walkthrough & Guides Wiki
The Legend of Zelda: Tears of the Kingdom Walkthrough & Guides Wiki
Persona 3 Reload Walkthrough & Guides Wiki


All rights reserved
© Nintendo. The Legend of Zelda and Nintendo Switch are trademarks of Nintendo.
The copyrights of videos of games used in our content and other intellectual property rights belong to the provider of the game.
The contents we provide on this site were created personally by members of the Game8 editorial department.
We refuse the right to reuse or repost content taken without our permission such as data or images to other sites.