Chichim Shrine Location and Walkthrough
▲ Get Pristine Weapons from the depths!
△ All 1000 Koroks | All 4 Great Fairies
▲ 81 Addison Signs | 147 Caves | 58 Wells
△ Tips: Farm Rupees | Starting Armor
▲ Best Weapons | Best Armor | Best Food
Chichim Shrine (Rauru's Blessing) in The Legend of Zelda: Tears of the Kingdom (TotK) can be found underground in the Ancient Prison Ruins in the Gerudo Desert Region. Read on to learn its location, how to reach its entrance, its puzzle solution, as well as all treasure chest locations in Chichim Shrine.
Chichim Shrine Location
Ancient Prison Ruins, Gerudo Desert
Chichim Shrine can be found underground in the Ancient Prison Ruins in the Gerudo Desert Region. The exact coordinates of the shrine is at -3211, -3007, -0049 but you'll need to go underground through a quicksand first in order to reach it.
You can find the quicksand that leads to the shrine at -3114, -3074, 0015. It's just east of Gerudo Town but you can also get there by traveling southwest from Gerudo Canyon Skyview Tower.
Once underground, you'll need to navigate the ruins until you find a heroine statue. Chichim Shrine can be found beyond the statue but its mechanism is hidden from your sight by two slabs of stone that you can Ultrahand out of the way.
Rauru's Blessing
This is a Rauru's Blessing Shrine with a treasure chest inside as well as a Light of Blessing at the altar.
How to Reach Chichim Shrine Entrance
- Travel to Ancient Prison Ruins
- Dive Into the Quicksand
- Pull the Lever to the Left
- Take a Left, Then Turn Right
- Follow the Direction the Statue is Pointing
- Pull the Lever to the Left and Head Right
- Ascend to the Ceiling Up Ahead
- Crouch to Reach the Next Area
- Go Down With the Crumbling Floor
- Ascend the Platform Above
- Grab the Stone Slabs Above the Lever
- Proceed to the Shrine
Video Guide
1. Travel to Ancient Prison Ruins
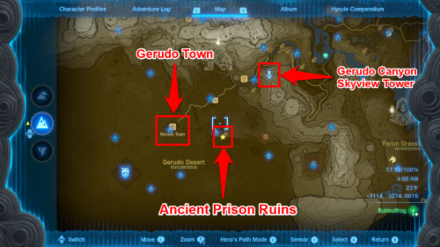
To reach Chichim Shrine, you need to navigate the Ancient Prison Ruins. These ruins can be accessed by diving into a quicksand in the Gerudo Desert.
You can reach the quicksand either by traveling east from Gerudo Town or southwest from Gerudo Canyon Skyview Tower.
2. Dive Into the Quicksand
Once you've found the quicksand, dive into it and wait until it takes you to the Ancient Prison Ruins.
3. Pull the Lever to the Left
Upon reaching the Ancient Prison Ruins, walk towards the two torches in front of you to reach a lever and a gate. Then, pull the lever to the left using Ultrahand to open the gate.
4. Take a Left, Then Turn Right
Before entering the next area, you should know that these ruins is crawling with Gibdos. It's up to you if you're going to fight or ignore them.
Once you're ready, go inside the next area and take a left. Then, turn right once you've reached the end of the path. Keep walking until you reach a statue of a woman holding a sword.
5. Follow the Direction the Statue is Pointing
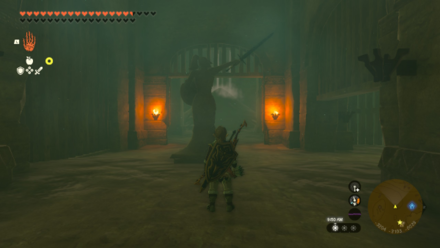
Once you've reached the statue, walk towards the direction its sword is pointing to until you reach another lever.
6. Pull the Lever to the Left and Head Right
Pull the lever to the left using Ultrahand to open the left and right gate. Then, head down to the hole to your right.
7. Ascend to the Ceiling Up Ahead
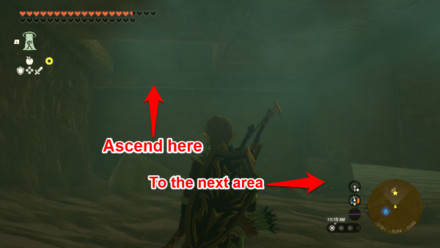
Keep walking forward after dropping down to the hole until you've reached the end of the path. Notice that the ceiling above you is open.
You'll want to use Ascend on this ceiling before going to the next area to get a few arrows, a Bomb Flower, and a Topaz from a chest.
8. Crouch to Reach the Next Area
After looting the small area above you, head back down where you came from and crouch to go through the small hole on the wall nearby.
Press forward, then turn right to reach some rubbles that lead to the upper floor. Be careful of the Gibdo and the Electric Chu Chu lurking nearby!
9. Go Down With the Crumbling Floor
Go down with it, and head to the area on the right. There's also a Bubbulfrog here that you'll want to take down for its Bubbul Gem!
10. Ascend the Platform Above
You will find a hole above as you proceed. Use Ascend on the ceiling to reach the top surface.
11. Grab the Stone Slabs Above the Lever
There is a lever in front of you being blocked by stone slabs.
Remove them using Ultrahand, and pull the lever to the left.
12. Proceed to the Shrine
With the gate to the shrine open, you can go towards Chichim Shrine and examine its terminal to activate it.
Chichim Shrine Walkthrough
1. Collect Your Reward Straight Ahead
Proceed towards the area, and claim the Mighty Zonaite Spear inside the chest straight ahead.
2. Proceed to the Altar
After collecting your reward, continue to the altar, get a Light of Blessing, and complete the Chichim Shrine
Chichim Shrine Rewards and Chest Locations
Mighty Zonaite Spear
| Chest Location | Chest Contents |
|---|---|
 |
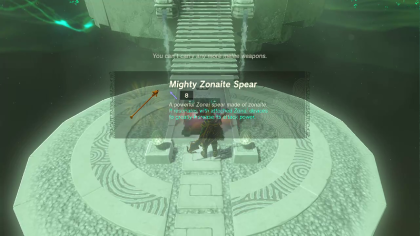 |
Proceed towards the area to open the chest, and claim the Mighty Zonaite Spear inside.
The Legend of Zelda: Tears of the Kingdom Related Guides

Shrines Lists
| Shrines Lists | |
|---|---|
| All Shrines | All Shrine Quests |
All Great Sky Island Shrines
| Great Sky Island Shrines | ||
|---|---|---|
| Ukouh Shrine | In-isa Shrine | Gutanbac Shrine |
| Nachoyah Shrine | - | - |
All Hyrule Field Shrines
All Tabantha Shrines
| Tabantha Shrines | ||
|---|---|---|
| Oromuwak Shrine | Gatakis Shrine | Nouda Shrine |
| Wao-os Shrine | Iun-orok Shrine | Turakawak Shrine |
| Gasas Shrine | Mayausiy Shrine | Ikatak Shrine |
| Ga-ahisas Shrine | Ganos Shrine | Taunhiy Shrine |
All Hebra Shrines
All Great Hyrule Forest Shrines
| Great Hyrule Forest Shrines | ||
|---|---|---|
| Sakunbomar Shrine | Pupunke Shrine | Ninjis Shrine |
| Musanokir Shrine | Kikakin Shrine | Kiuyoyou Shrine |
| Ekochiu Shrine | Mayam Shrine | Simosiwak Shrine |
All Akkala Shrines
All Eldin Shrines
All Lanayru Shrines
All Necluda Shrines
All Faron Shrines
| Faron Shrines | ||
|---|---|---|
| Jiukoum Shrine | Ishokin Shrine | Utsushok Shrine |
| Joku-u Shrine | Joku-usin Shrine | - |
All Gerudo Shrines
Comment
Author
The Legend of Zelda: Tears of the Kingdom Walkthrough & Guides Wiki
Chichim Shrine Location and Walkthrough
improvement survey
03/2026
improving Game8's site?

Your answers will help us to improve our website.
Note: Please be sure not to enter any kind of personal information into your response.

We hope you continue to make use of Game8.
Rankings
Gaming News
Popular Games

Genshin Impact Walkthrough & Guides Wiki

Honkai: Star Rail Walkthrough & Guides Wiki

Umamusume: Pretty Derby Walkthrough & Guides Wiki

Pokemon Pokopia Walkthrough & Guides Wiki

Resident Evil Requiem (RE9) Walkthrough & Guides Wiki

Monster Hunter Wilds Walkthrough & Guides Wiki

Wuthering Waves Walkthrough & Guides Wiki

Arknights: Endfield Walkthrough & Guides Wiki

Pokemon FireRed and LeafGreen (FRLG) Walkthrough & Guides Wiki

Pokemon TCG Pocket (PTCGP) Strategies & Guides Wiki
Recommended Games

Diablo 4: Vessel of Hatred Walkthrough & Guides Wiki

Cyberpunk 2077: Ultimate Edition Walkthrough & Guides Wiki

Fire Emblem Heroes (FEH) Walkthrough & Guides Wiki

Yu-Gi-Oh! Master Duel Walkthrough & Guides Wiki

Super Smash Bros. Ultimate Walkthrough & Guides Wiki

Pokemon Brilliant Diamond and Shining Pearl (BDSP) Walkthrough & Guides Wiki

Elden Ring Shadow of the Erdtree Walkthrough & Guides Wiki

Monster Hunter World Walkthrough & Guides Wiki

The Legend of Zelda: Tears of the Kingdom Walkthrough & Guides Wiki

Persona 3 Reload Walkthrough & Guides Wiki
All rights reserved
© Nintendo. The Legend of Zelda and Nintendo Switch are trademarks of Nintendo.
The copyrights of videos of games used in our content and other intellectual property rights belong to the provider of the game.
The contents we provide on this site were created personally by members of the Game8 editorial department.
We refuse the right to reuse or repost content taken without our permission such as data or images to other sites.


![Monster Hunter Stories 3 Review [First Impressions] | Simply Rejuvenating](https://img.game8.co/4438641/2a31b7702bd70e78ec8efd24661dacda.jpeg/thumb)


