A Mystery in the Depths Walkthrough
▲ Get Pristine Weapons from the depths!
△ All 1000 Koroks | All 4 Great Fairies
▲ 81 Addison Signs | 147 Caves | 58 Wells
△ Tips: Farm Rupees | Starting Armor
▲ Best Weapons | Best Armor | Best Food
A Mystery in the Depths is a Main Quest in The Legend of Zelda: Tears of the Kingdom (TotK) that starts in Lookout Landing. Read on for a detailed walkthrough of A Mystery in the Depths, its location and rewards, as well as other tips and strategies on how to complete this Main Quest!
| ◄ Previous Quest | Next Quest ▶ |
|---|---|
| Tulin of Rito Village | Riju of Gerudo Town |
List of Contents
How to Unlock A Mystery in the Depths
Clear One of the Temples
A Mystery in the Depths is unlocked by talking to Josha in Lookout Landing after clearing one of the temples in Regional Phenomena. Since the questline suggests you go to the Sky Temple first, A Mystery in the Depths is likely available after you complete Tulin of Rito Village.
Hyrule Field - Lookout Landing

The exact coordinates for this quest on the map are -0255, 0138, 0019.
Rewards
| Rewards |
|---|
|
・Schema Stone
・Large Zonaite |
A Mystery in the Depths Walkthrough Guide
| A Mystery in the Depths Walkthrough |
|---|
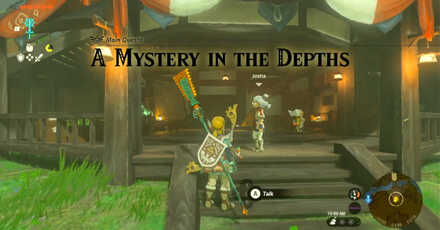
Follow Josha
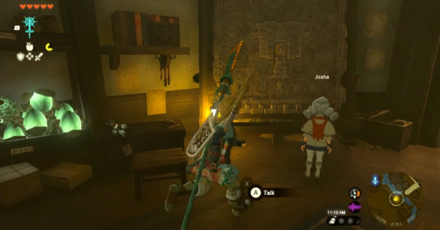
Wait for Josha at the mural next to the double doors and talk to her. She will give you 10 Giant Brightbloom Seeds and 10 Arrows after the briefing.
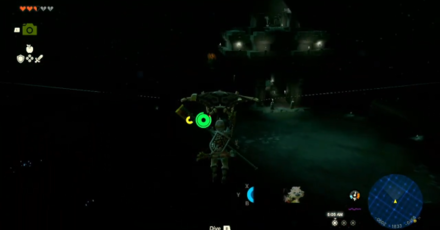
Follow the Statues in the Depths
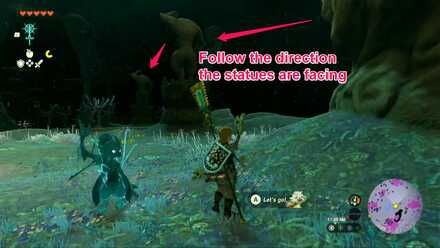
Open your map and switch to the Depths layer. Fast travel to Iayusus Lightroot as this is the closest Lightroot to the first of the statues.
Turn southwest to find the first statue next to Robbie's campfire and start following the direction each of the statues are facing.
Don't forget to light up your path with Brightbloom Seed-fused arrows!
Activate Nihcayam Lightroot
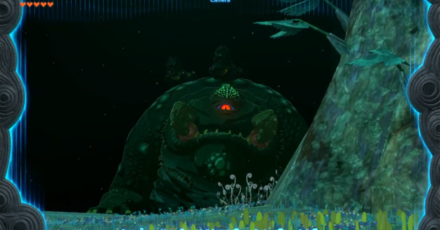
Make sure to activate Nihcayam Lightroot when you pass by it after the first few statues. A little further south and you will run into a Frox, which is like a frog talus.
Reach The Great Abandoned Central Mine
Continue following the statues' direction and you will end up in the Great Abandoned Central Mine.
Press on and examine the mark next to the suspicious researchers
to gain the Autobuild ability! You can be like some sort of technomancer now.
Use Autobuild
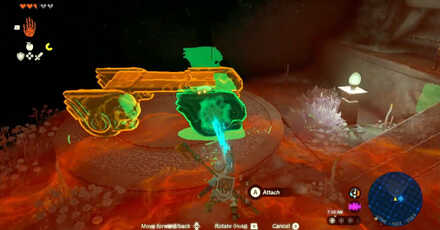
The researchers
will now ask you to demonstrate the ancient power on the dismantled vehicles behind.
First, reattach the wheel on the first vehicle so that its fixed state registers in your Autobuild history. Next, move to the vehicle on the other pedestal and use Autobuild to recreate the first vehicle.
Fight Master Kohga
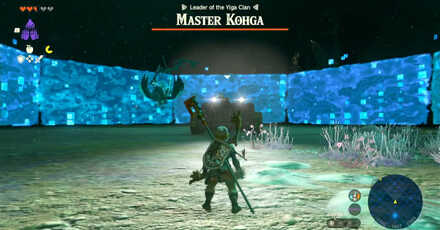
Oh, it's the banana guys! What a surprise. After revealing themselves, Master Kohga will trap you into an arena where you have to defeat him and his own contraption (Nope. You can't use Ultrahand to disassemble his vehicle).
Report back to Josha
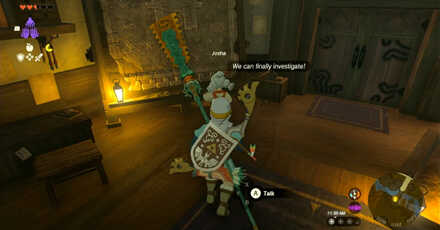
Whaddayaknow, he's actually good at crafting stuff. Anyway, open the chest for a Huge Crystallized Charge and before you leave, talk to the Steward Construct south of the travel point for the Fanplane Schema Stone.
When you're ready, fast travel to Lookout Landing and find Josha to receive the Hot-Air Balloon Schema Stone.
Demonstrate Autobuild to Josha
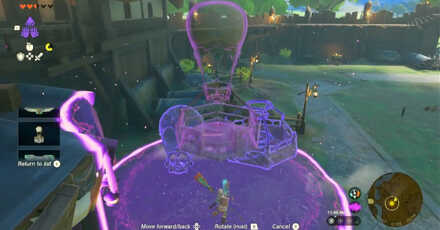
Head outside and repair the broken balloon using the schema Josha gave you. Activate Autobuild, select the Hot-Air Balloon schematic, and select the parts on the ground to repair it.
Do so and you will be rewarded with a Large Zonaite as well as the quest's completion.
Now to continue investigating the strange phenomena. Next stop: the Gerudo Desert!
| ◄ Previous Quest | Next Quest ▶ |
|---|---|
| Tulin of Rito Village | Riju of Gerudo Town |
How to Beat a Frox
Throw a Bomb Flower at Its Mouth

Try not to get too close to a Frox as you might get inhaled or body slammed. Keep your distance while waiting for it to inhale or charge at you with its mouth wide open before throwing a Bomb Flower at its mouth. You can also use Bomb Flower-fused arrows for this.
It will chow down on your explosive treat until it blows inside its mouth and get the Frox stunned.
Attack Its Deposits With Hammers
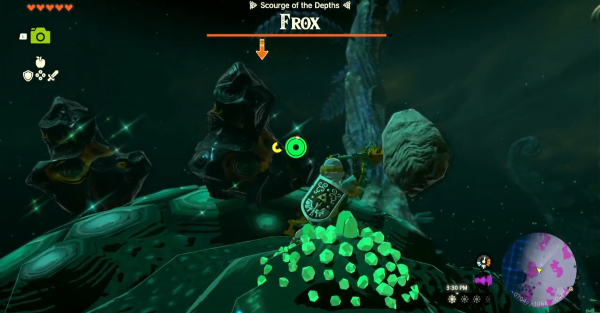
A Frox will be incapacitated for a while after successfully doing the step above. During this time, climb on its back and attack the ore deposits with a hammer. Hammer-type weapons (or any weapon fused with a rock) deal way more damage than bladed ones like sword and spears.
Another tip is to perform a charged attack with a hammer between two ore deposits to maximize damage.
Using the Autobuild Ability
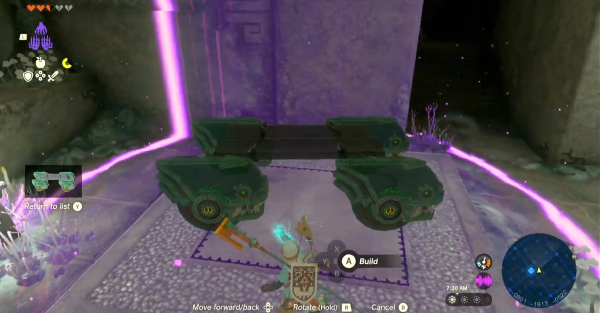
The Autobuild ability allows you to instantly recreate vehicles, machines, and other makeshift objects you crafted with the Ultrahand ability.
Anything you craft with Ultrahand will now be stored in the Autobuild history. Activate Autobuild and select a project from the list to recreate it, as long as you have the necessary materials lying around (devices pulled out from Zonai Capsules work too) and enough Zonaite.
How to Beat Master Kohga
Snipe Him Off His Ride
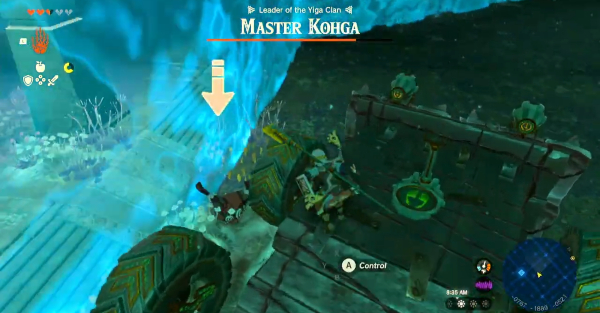
Since you can't dismantle his vehicle or damage it, the only way to defeat Master Kohga is to attack him directly. Nock an arrow and shoot Master Kohga as you avoid getting run over to stun him for a while. Scoring a headshot will even knock him off his ride completely!
Attack him with all you got before he recovers and teleports back to his vehicle. Rinse and repeat until his health bar is depleted.
The Legend of Zelda: Tears of the Kingdom Related Guides
List of All Walkthroughs
| All Quest Types | ||
|---|---|---|
 Main Quests Main Quests |
 Side Quests Side Quests |
 Side Adventures Side Adventures |
List of All Main Quests
| Recommended Main Quest Order | |
|---|---|
| 0 | Prologue |
| 1 | Find Princess Zelda |
| 2 | The Closed Door |
| 3 | Find Princess Zelda (Part 2) |
| 4 | To the Kingdom of Hyrule |
| 5 | Find Princess Zelda (Part 3) |
| 6 | Crisis at Hyrule Castle |
| 7 | Regional Phenomena |
| 8 | Camera Work in the Depths |
| 9 | Impa and the Geoglyphs |
| 10 | Tulin of Rito Village |
| 11 | A Mystery in the Depths |
| 12 | Riju of Gerudo Town |
| 13 | Yunobo of Goron City |
| 14 | The Sludge-Covered Statue |
| 15 | Sidon of the Zora |
| 16 | The Broken Slate |
| 17 | Clues to the Sky |
| 18 | Sidon of the Zora (Part 2) |
| 19 | Restoring the Zora Armor |
| 20 | Sidon of the Zora (Part 3) |
| 21 | Regional Phenomena (Part 2) |
| 22 | Crisis at Hyrule Castle (Part 2) |
| 23 | The Dragon's Tears |
| 24 | Find the Fifth Sage |
| 25 | Secret of the Ring Ruins |
| 26 | Guidance from Ages Past |
| 27 | Trail of the Master Sword |
| 28 | Recovering the Hero's Sword |
| 29 | Find the Fifth Sage (Part 2) |
| 30 | Destroy Ganondorf |
Comment
Author

The Legend of Zelda: Tears of the Kingdom Walkthrough & Guides Wiki
A Mystery in the Depths Walkthrough
Rankings
- We could not find the message board you were looking for.
Gaming News
![Animal Crossing: New Horizons Review [Switch 2] | Needlessly Crossing Over to a New Generation](https://img.game8.co/4391759/47d0408b0b8a892e453a0b90f54beb8a.png/show)


Popular Games

Genshin Impact Walkthrough & Guides Wiki
Honkai: Star Rail Walkthrough & Guides Wiki
Arknights: Endfield Walkthrough & Guides Wiki
Umamusume: Pretty Derby Walkthrough & Guides Wiki
Wuthering Waves Walkthrough & Guides Wiki
Pokemon TCG Pocket (PTCGP) Strategies & Guides Wiki
Abyss Walkthrough & Guides Wiki
Zenless Zone Zero Walkthrough & Guides Wiki
Digimon Story: Time Stranger Walkthrough & Guides Wiki
Clair Obscur: Expedition 33 Walkthrough & Guides Wiki


Recommended Games
Fire Emblem Heroes (FEH) Walkthrough & Guides Wiki
Pokemon Brilliant Diamond and Shining Pearl (BDSP) Walkthrough & Guides Wiki
Diablo 4: Vessel of Hatred Walkthrough & Guides Wiki
Super Smash Bros. Ultimate Walkthrough & Guides Wiki
Yu-Gi-Oh! Master Duel Walkthrough & Guides Wiki
Elden Ring Shadow of the Erdtree Walkthrough & Guides Wiki
Monster Hunter World Walkthrough & Guides Wiki
The Legend of Zelda: Tears of the Kingdom Walkthrough & Guides Wiki
Persona 3 Reload Walkthrough & Guides Wiki
Cyberpunk 2077: Ultimate Edition Walkthrough & Guides Wiki


All rights reserved
© Nintendo. The Legend of Zelda and Nintendo Switch are trademarks of Nintendo.
The copyrights of videos of games used in our content and other intellectual property rights belong to the provider of the game.
The contents we provide on this site were created personally by members of the Game8 editorial department.
We refuse the right to reuse or repost content taken without our permission such as data or images to other sites.