 Robbie Side Adventures
 Hateno Side Adventures
 Lurelin Side Adventures
 Lucky Clover Gazette Side Adventures
 Great Fairy Side Adventures
 Monster-Control Crew Side Adventures
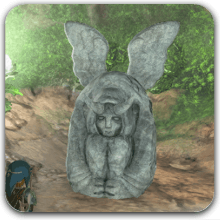 Lookout Landing Side Adventures
 Koltin Side Adventures
 Tarrey Town Side Adventures
 Thyphlo Ruins Side Adventures
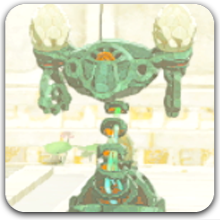 Sky and Depths Side Adventures
 Yiga Side Adventures
This survey will take about 1 minute.
Your answers will help us to improve our website.
Zelda: Tears of the Kingdom (TotK)
A Call from the Depths Walkthrough: Temple of Time Statue Location
▲ Get Pristine Weapons from the depths!
△ All 1000 Koroks | All 4 Great Fairies
▲ 81 Addison Signs | 147 Caves | 58 Wells
△ Tips: Farm Rupees | Starting Armor
▲ Best Weapons | Best Armor | Best Food
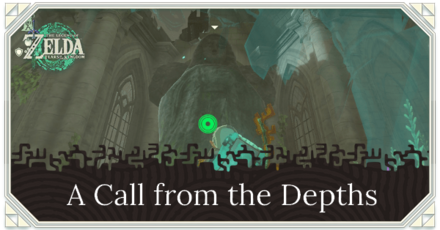
A Call from the Depths is a Side Adventure in The Legend of Zelda: Tears of the Kingdom (TotK) that is found in Temple of Time Ruins. Read on to learn how to unlock A Call from the Depths, its location and rewards, as well as how to get all the Eye Stones and where to find the Temple of Time statue.
List of Contents
How to Unlock A Call from the Depths
Drain the Reservoir near Temple of Time Ruins

Drain the water in the reservoir near the Temple of Time Ruins. Once done, talk to the buried statue near the gate and it will tell you to meet in the Temple of Time Ruins. Talk to the Goddess Statue once you reach the temple to start the quest.
Part of Sky and Depths Side Adventure Arc
| Sky and Depths Side Adventures | ||
|---|---|---|
| Legend of the Great Sky Island | Messages from an Ancient Era | A Call from the Depths |
A Call from the Depths is a part of the Sky and Depths Side Adventure Arc. This Side Adventure requires you to go to the surface and depths and deliver important stones to a statue!
Sky and Depths Side Adventures
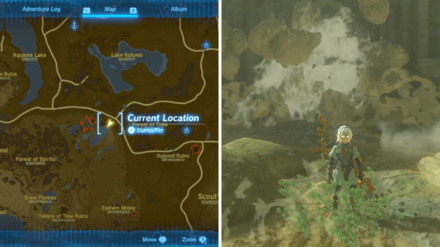
Temple of Time Buried Statue Location
At the Reservoir West of Forest of Time
 Coordinates: -0586, -1540, 0028 |
You can find the Reservoir to the west of the Forest of Time, in front of the road intersection. The best way to reach this area is to either drop from In-Isa Shrine or use the Hyrule Field Skyview Tower and glide south.
From here, you will immediately see the front gate with its entrance blocked with cracked rocks. You can use either a hammer or the Vow of Yunobo to break this and release the water to reveal the Buried Statue.
A Call from the Depths Location and Rewards
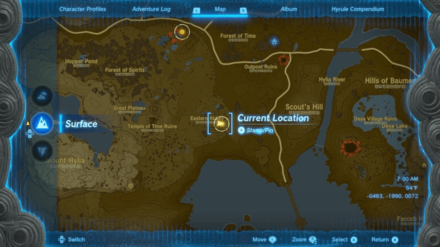
Hyrule Field - Temple of Time Ruins

The exact coordinates for this quest on the map are -822, -2026, 0119.
Rewards
| Rewards |
|---|
|
・Heart Container or Stamina Vessel (Can only choose one)
・Unlocks Poe Trading in the Great Abandoned Central Mine |
How to Complete A Call from the Depths
How to Unlock
| A Call from the Depths Walkthrough Guide |
|---|
Visit the Goddess Statue in the Temple of Time Ruins
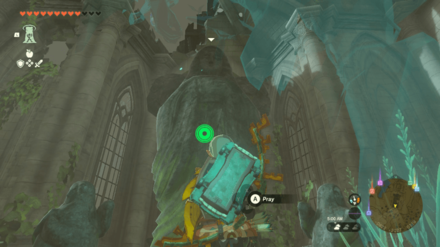
Pray to the Goddess Statue in Temple of Time Ruins. You will find out that whoever's using the statue is trapped somewhere in the nearby reservoir.
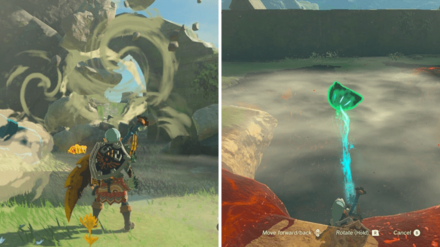
Drain the Resevoir
After talking to the mysterious voice from the Goddess Statue, go down the reservoir and head to the gate blocked by boulders. Destroy the boulders to drain the water.
Common items you can use to clear the boulders are Bomb Flowers and Boulder Hammer!
Talk to the Buried Statue
You will see a buried statue near the gates. Talk to it and it will tell you to go back to the Goddess Statue.
Return to the Goddess Statue
Follow the voice's instructions and return to the Goddess Statue. Talk to it once more to accept the quest.
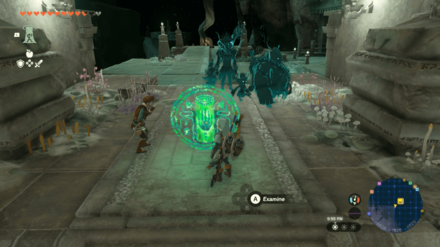
Find All the Eye Stones

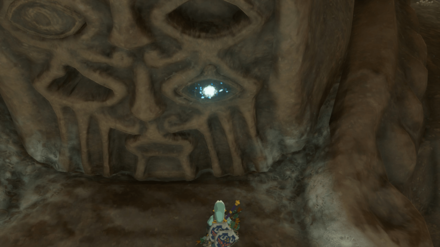
The main objective of this quest is to obtain all Eye Stones and place them on a statue with four eyes in the Depths.
Note: It's possible to do them in any order, but we'll do it the order indicated in the image!
First Eye Stone: West Chasm
| A Call from the Depths Objectives | |||
|---|---|---|---|
| First Eye Stone |
Second Eye Stone | Third Eye Stone | Fourth Eye Stone |
Go To Great Plateau West Chasm
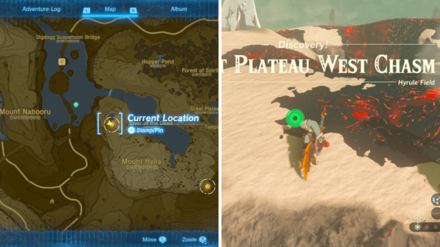
Head west and go to the Great Plateau West Chasm's entrance. You can find it near the River of the Dead when looking at the map at coordinates -1441, -1987, 0231.
Make sure to bring items that will keep you warm, like holding a fire-infused weapon or shield, equipping cold resistance armor, or eating food with cold resistance.
Melt the Ice

After reaching the entrance to the chasm, melt the ice containing the Eye Stone. You should see it on the north side of the chasm.
Throw it Down the Chasm
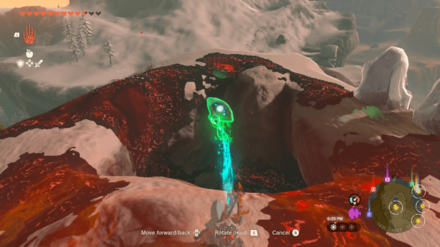
Throw the Eye Stone in the chasm and follow it. It should not bounce off somewhere, as long as you drop it in the middle!
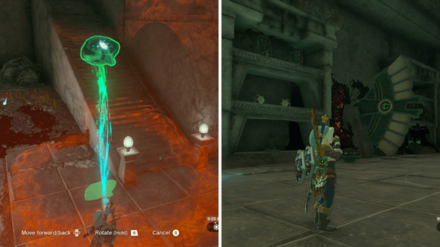
Put the Stone on the Elevator

You will see an elevator (metal platform with fans) at the bottom. Put the Eye Stone there and ride it to go up.
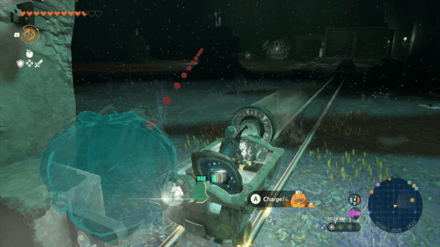
Use the Rail Track on the Left
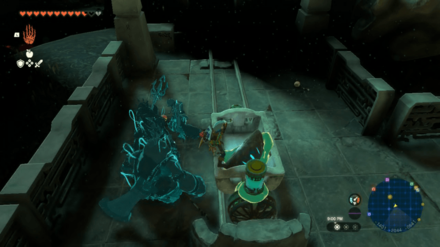
Grab the pre-made cart and put it on the rail track on the left. Activate it to reach the end of the track.
You will encounter a few enemies on the rail track. Kill them first so you can progress smoothly through this part.
Take the Cart to the Next Track
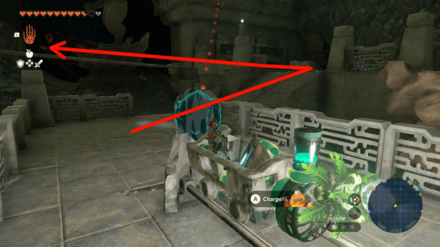
After reaching the end of the track, bring your cart to the next track above. Reach the end of the track to get to the statue in the Great Abandoned Central Mine.
You can attach Rockets on the floor to travel faster!
Use the Elevator to Go Up
There will be an elevator at the end. Use it to go up to the highest floor and reach the statue.
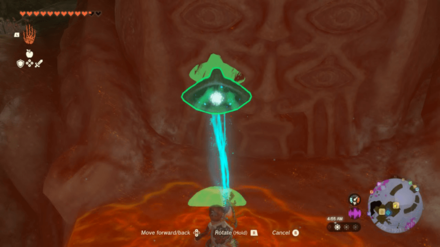
Place the Eye Stone
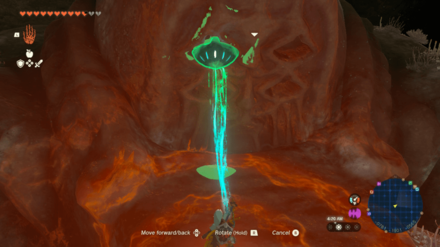
You should be able to spot the statue after using the elevator. Grab the Eye Stone, and place it into one of the slots!
Second Eye Stone: South Chasm
| A Call from the Depths Objectives | |||
|---|---|---|---|
| First Eye Stone |
Second Eye Stone | Third Eye Stone | Fourth Eye Stone |
Go to the Great Plateau South Chasm
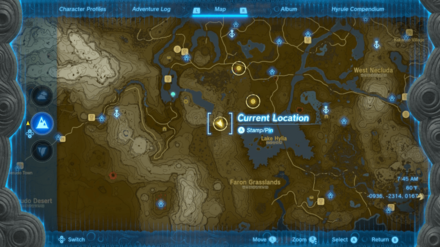
Go to the Great Plateau South Chasm and find the next stone at the coordinates -0936, -2314, 0167.
Get the Eye Stone and Drop it Down
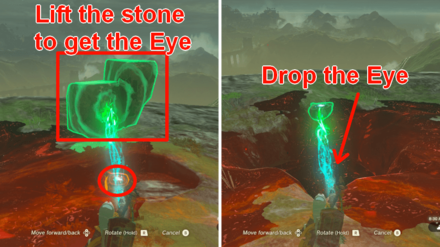
Lift a boulder to see the Eye Stone. Grab it, throw it into the depths, and follow it.
Try to throw it right in the middle to avoid making it bounce off the walls and go somewhere unreachable!
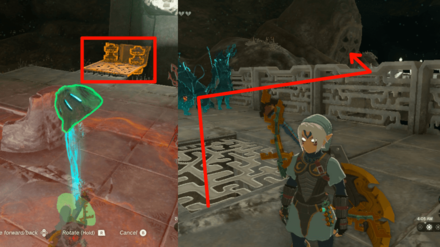
Go Up the Stairs
Pick up the Eye and head up using the closest stairs. You should be able to see some Zonai Devices at the top.
Light Up the Place

Before doing anything, light up the place first so you can navigate better in the Depths.
You can unlock the Koradat Lightroot at coordinates -1079, -2187, 0561 or just use Brightbloom Seeds to light up the area!
Build a Plane
Build a plane using the flying device, fans, rockets, batteries, and steering wheel! It's highly recommended to add a steering wheel to the plane so it's easier to fly.
Fly to the Great Abandoned Central Mine
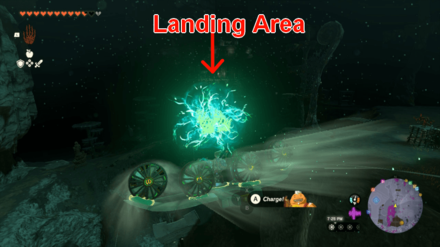
Once everything is set, activate the plane and fly to the location of the statue, slightly northeast. Drop on the platform above instead, as it will be hard to push through the gap leading to the statue using the plane.
If you missed the area or bumped into something, you can always use Recall to reset the plane and start again!
Get the Autobuild Ability (Optional)
On the landing area, you will see a person standing next to a Zonai Terminal. You can activate the terminal and get the Autobuild ability so you can create a vehicle in a blink of an eye!
Important Note: You don't have to show the ability to the people inside as it will trigger a fight, related to a specific quest (spoiler alert!). You can just leave and continue on with this quest!
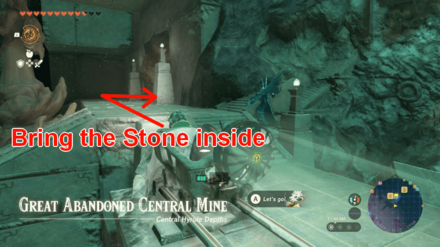
Bring the Stone and Head Inside

Go inside after landing the plane. You should be able to get there by going down, just be careful not to drop the stone somewhere!
Place the Eye Stone
Once inside, simply grab the Eye Stone and put it on any of the slots.
Third Eye Stone: East Chasm
| A Call from the Depths Objectives | |||
|---|---|---|---|
| First Eye Stone |
Second Eye Stone | Third Eye Stone | Fourth Eye Stone |
Go to Great Plateau East Chasm
Proceed to the Great Plateau East Chasm as marked by the quest. It should be in the Eastern Abbey if you look at the map at coordinates -0463, -1990, 0072.
Destroy the Rock and Drop the Eye
The Eye Stone is hiding beneath a destroyable rock. Destroy it with an explosive or by using hammer weapons.
Throw the Eye Stone and then follow it in the Depths. Once you arrive below, light up the area with Brightbloom Seeds to see and navigate better!
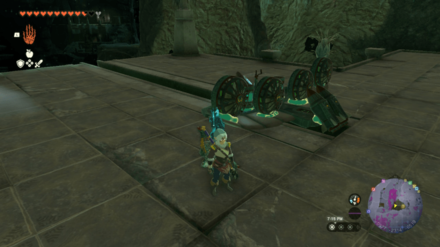
Attach a Fan to a Cart
After the area is lit up, you should be able to see a rail track and a bunch of Zonai Devices somewhere southwest. Use the cart and attach a fan to it to make it to the end of the track.
Take the Eye Stone to the Statue
The end of the track should take you directly to the entrance where the statue is located. Take the Eye Stone from the cart and head inside.
Place the Eye Stone

Choose any available slot and place the Eye Stone there. It doesn't matter which slot you use!
Fourth Eye Stone: North Chasm
| A Call from the Depths Objectives | |||
|---|---|---|---|
| First Eye Stone |
Second Eye Stone | Third Eye Stone | Fourth Eye Stone |
Go to Great Plateau North Chasm
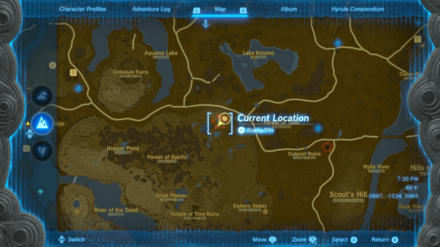
Head to Great Plateau North Chasm, near a small pond and the reservoir you drained at coordinates -0687, -1534, 0064.
Get the Eye from the Pond

Use Ultrahand and grab the Eye Stone from the pond. Once you have it, drop it into the Depths and follow it. It should lead you down to an area with Zonai Devices where you can build vehicles.
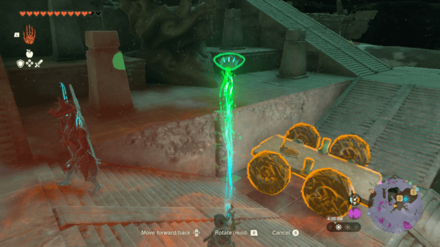
Build a 4x4 Vehicle
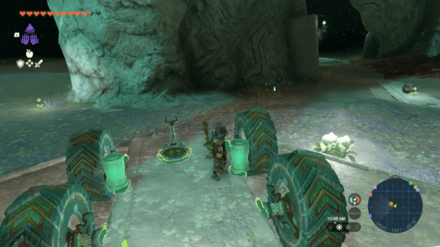
You can build a plane or a 4x4 vehicle based on the current materials in the area. However, it's best to assemble a 4x4 vehicle as it's easier to travel by land than in the air.
Activate the Nogukoyk Lightroot

Light up the area by activating the Nogukoyk Lightroot located southwest from the chasm where you entered to help you navigate the area better. The exact coordinates of the lightroot are -0707, -1550, -0517.
Follow the Road
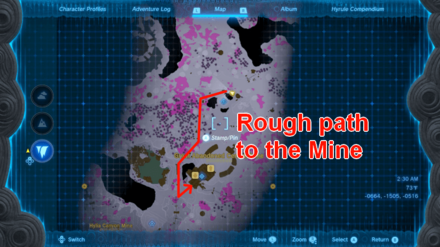
There are broken ruin roads near where you assembled a vehicle. Follow them until you reach the Great Abandoned Central Mine.
Head to the Statue
Bring the Eye Stone up the stairs once you reach the mine. You can leave your vehicle outside as it will be hard to fit it inside the entrance.
Place the Eye Stone
Put the stone into an available slot once you reach the statue.
Choose a Reward
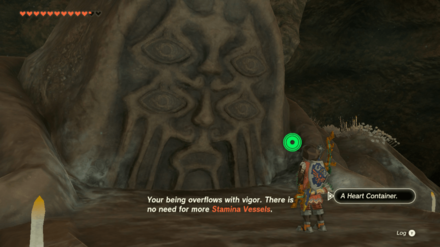
After collecting all the Eye Stones and putting them into the statue, the mysterious voice will now reward you with a Heart Container or Stamina Vessel. Note that you can only choose one from the choices!
It also unlocks the Poe Trading from the statue!
The Legend of Zelda: Tears of the Kingdom Related Guides
List of All Walkthroughs
| All Quest Types | ||
|---|---|---|
 Main Quests Main Quests |
 Side Quests Side Quests |
 Side Adventures Side Adventures |
List of All Side Adventures
Comment
Author

The Legend of Zelda: Tears of the Kingdom Walkthrough & Guides Wiki
A Call from the Depths Walkthrough: Temple of Time Statue Location
Please participate in our site
improvement survey
03/2026
improvement survey
03/2026
Would you assist in
improving Game8's site?
improving Game8's site?

×
We are listening to our users' valuable opinions and discussing how to act on them.
The information collected through this survey will be used for the purpose of improving our services. In addition, the information will only be disclosed a part of a statistic in a format that will not allow identification of personal information.
Begin Survey
Not Now
×
Please rate each item regarding Game8.co's Advertisements.
Amount of Ads
Very Dissatisfied
Somewhat Dissatisfied
Fine
Somewhat Satisfied
Highly Satisfied
Placement of Ads
Timing of Ad Display
Ad Loading Speed
Safeness of Ads
Content of Ads
×
Please rate each item regarding Game8.co's Quality of Articles.
Amount of information
Very Dissatisfied
Somewhat Dissatisfied
Fine
Somewhat Satisfied
Highly Satisfied
Frequency of updates
Speed of new information
Accuracy of articles
Understandibility of articles
Readability of sentences
×
Please rate each item regarding Game8.co's Usability of the Site.
Ease of finding information
Very Dissatisfied
Somewhat Dissatisfied
Fine
Somewhat Satisfied
Highly Satisfied
Loading Speed
Use of Color
Font Size
Visibility of Images
Easy to Understand Layout
×
Please rate each item regarding Game8.co's Message Boards, Comments.
Ease of Writing
Very Dissatisfied
Somewhat Dissatisfied
Fine
Somewhat Satisfied
Highly Satisfied
Readability
Ease in Finding Information
Comment Quality
Comment Quantity
Admin Response
×
Please rate each item regarding Game8.co's Site's new design.
Please rate our site's new design
Very Dissatisfied
Somewhat Dissatisfied
Fine
Somewhat Satisfied
Highly Satisfied
Do you think that the website's design change makes the site easier to use?
Has the new design made it easier for you to find information on the site?
Has the new design improved the overall visual appeal of the site?
How would you rate your overall satisfaction with the new design of the site?
×
How likely are you to recommend Game8 to someone you know?
Very Unlikely
0
1
2
3
4
5
6
7
8
9
10
Very Likely
If you have other opinions regarding potential improvement to the website, please share them with us. We would appreciate your honest opinion.
Note: This is a free response section, so you can proceed without entering anything.
Note: Please be sure not to enter any kind of personal information into your response.
Note: Please be sure not to enter any kind of personal information into your response.
×
Thank You
×
Thank you for participating in our survey! Your answers will help us to improve the quality of our website and services.
We hope you continue to make use of Game8.
We hope you continue to make use of Game8.
Close
Rankings
- We could not find the message board you were looking for.
Gaming News


Popular Games

Genshin Impact Walkthrough & Guides Wiki
Honkai: Star Rail Walkthrough & Guides Wiki
Umamusume: Pretty Derby Walkthrough & Guides Wiki
Pokemon Pokopia Walkthrough & Guides Wiki
Resident Evil Requiem (RE9) Walkthrough & Guides Wiki
Monster Hunter Wilds Walkthrough & Guides Wiki
Wuthering Waves Walkthrough & Guides Wiki
Arknights: Endfield Walkthrough & Guides Wiki
Pokemon FireRed and LeafGreen (FRLG) Walkthrough & Guides Wiki
Pokemon TCG Pocket (PTCGP) Strategies & Guides Wiki


Recommended Games
Diablo 4: Vessel of Hatred Walkthrough & Guides Wiki
Fire Emblem Heroes (FEH) Walkthrough & Guides Wiki
Yu-Gi-Oh! Master Duel Walkthrough & Guides Wiki
Super Smash Bros. Ultimate Walkthrough & Guides Wiki
Pokemon Brilliant Diamond and Shining Pearl (BDSP) Walkthrough & Guides Wiki
Elden Ring Shadow of the Erdtree Walkthrough & Guides Wiki
Monster Hunter World Walkthrough & Guides Wiki
The Legend of Zelda: Tears of the Kingdom Walkthrough & Guides Wiki
Persona 3 Reload Walkthrough & Guides Wiki
Cyberpunk 2077: Ultimate Edition Walkthrough & Guides Wiki


All rights reserved
© Nintendo. The Legend of Zelda and Nintendo Switch are trademarks of Nintendo.
The copyrights of videos of games used in our content and other intellectual property rights belong to the provider of the game.
The contents we provide on this site were created personally by members of the Game8 editorial department.
We refuse the right to reuse or repost content taken without our permission such as data or images to other sites.