This survey will take about 1 minute.
Your answers will help us to improve our website.
Zelda: Tears of the Kingdom (TotK)
West Necluda Region Map: Korok Seed Locations, Shrines, and Quests
▲ Get Pristine Weapons from the depths!
△ All 1000 Koroks | All 4 Great Fairies
▲ 81 Addison Signs | 147 Caves | 58 Wells
△ Tips: Farm Rupees | Starting Armor
▲ Best Weapons | Best Armor | Best Food
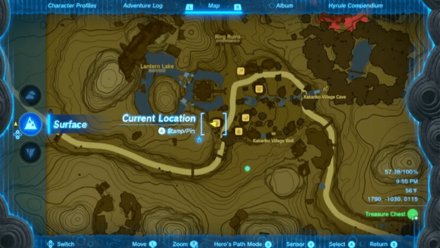
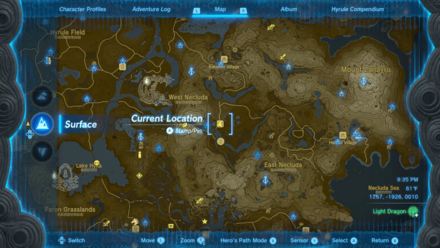
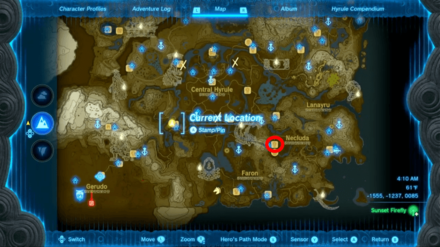
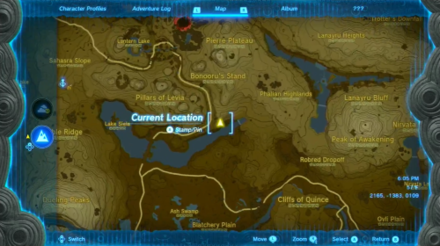
West Necluda is a region found in the Surface of Hyrule in The Legend of Zelda: Tears of the Kingdom (TotK). Read on to see the full West Necluda region map, as well as locations for Korok Seeds, Shrines, Quests, and other points of interest found within the West Necluda!
List of Contents
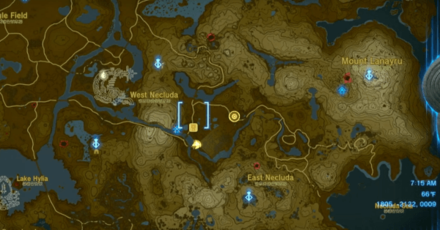
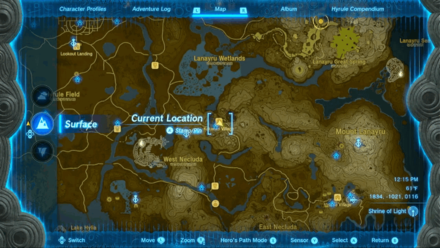
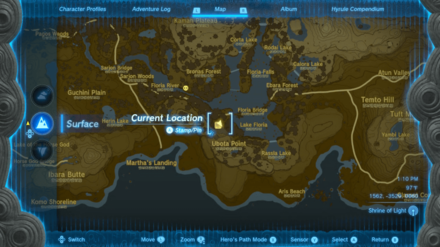
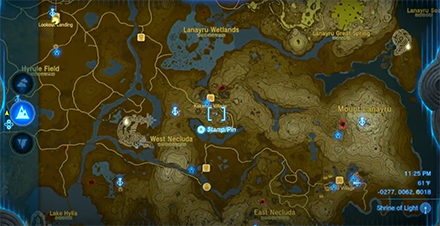
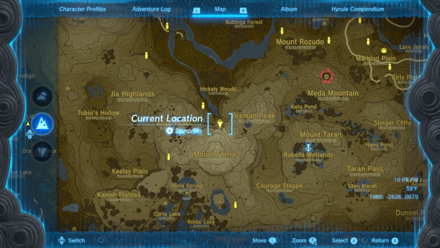
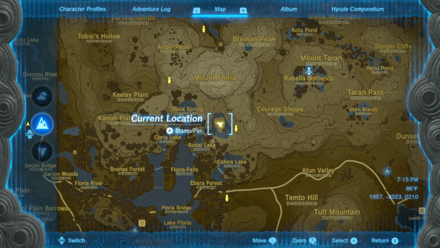
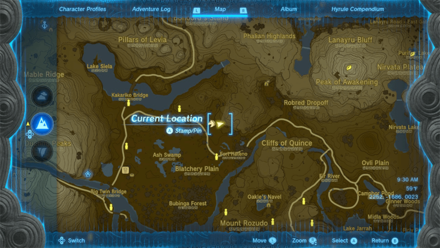
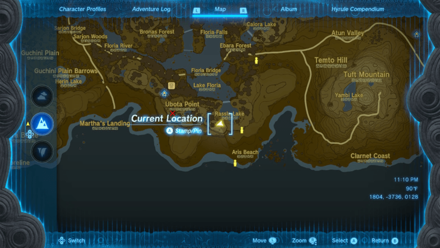
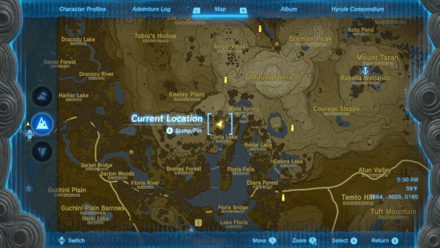
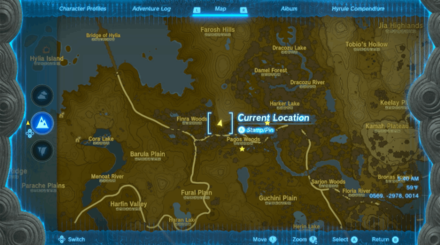
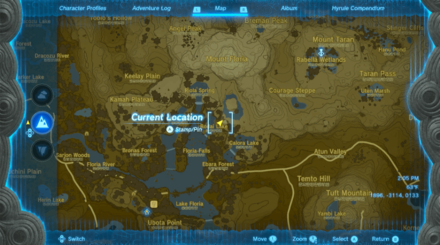
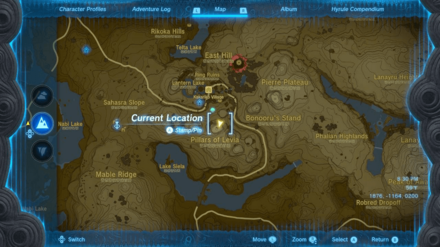
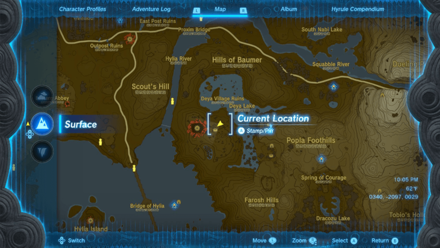
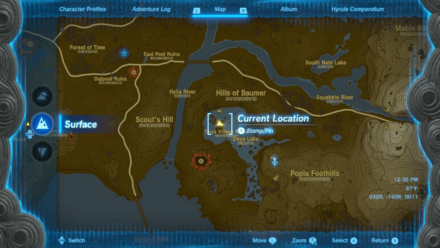
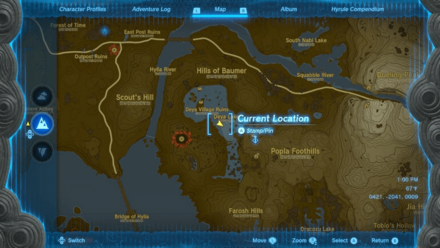
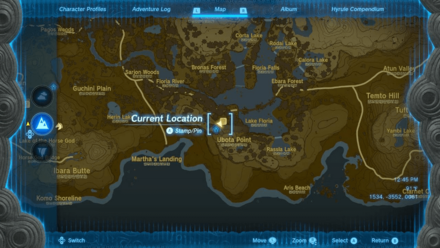
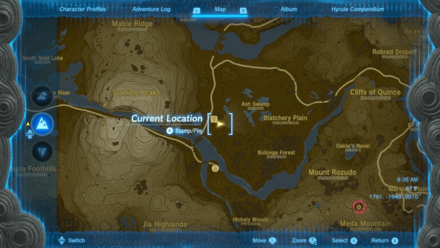
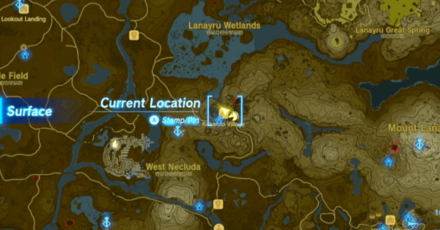
West Necluda Region Map
West Necluda Full Map
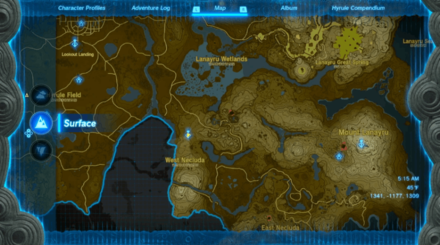 View Full Image |
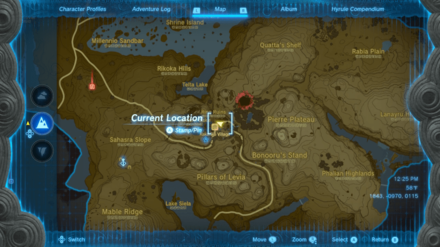
West Necluda Tower Map Location
Map and Coordinates
| Overworld Location | Coordinates |
|---|---|
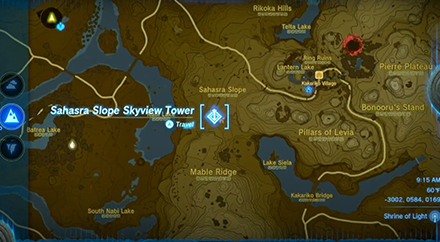 Sahasra Slope Skyview Tower |
1341, -1176, 0166 |
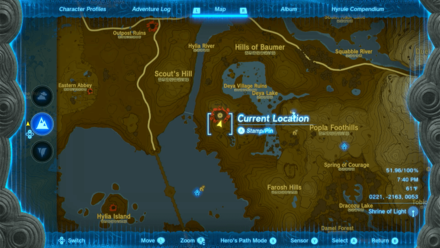
 Popla Foothills Skyview Tower |
0604, -2126, 0941 |
Skyview Tower Guide: All Tower Locations
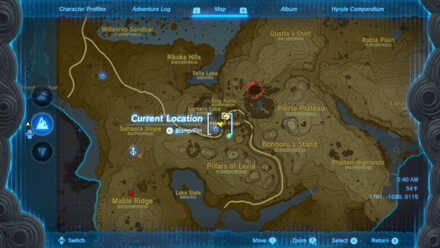
West Necluda Great Fairy Fountain Location
Map and Coordinates
| Overworld Location | Coordinates |
|---|---|
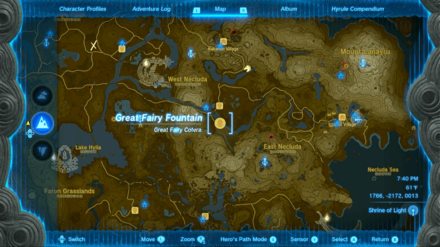 Cotera's Great Fairy Fountain |
1766, -2172, 0013 |
Great Fairy Locations and How to Upgrade Armor
West Necluda Shrine Locations
Shrine Map Locations and Coordinates
| Location | Coordinates |
|---|---|
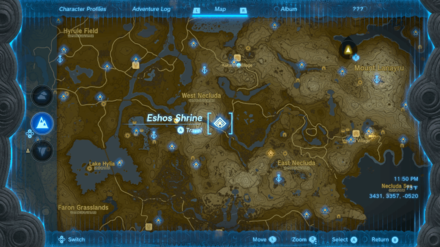 Eshos Shrine (Combat Training: Shields) |
Video Guide 1564, -1943, 0157 |
 Makasura Shrine (An Upright Device) |
Video Guide 1770, -1051, 0166 |
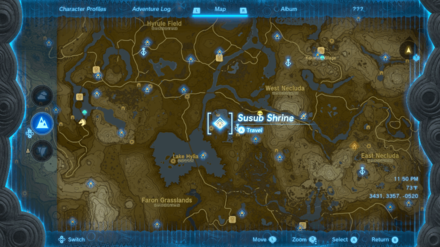 Susub Shrine (Rauru's Blessing) |
0348, -2050, -0026 |
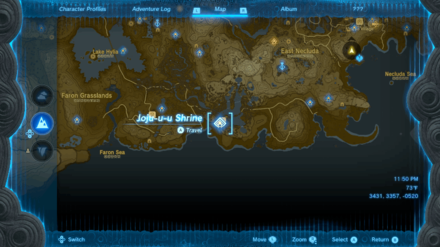 Joju-u-u Shrine (Building Bridges) |
Video Guide 1513, -3577, 0142 |
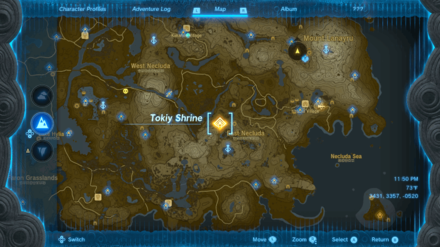 Tokiy Shrine (Rauru's Blessing) |
2304, -2377, -0028 |
 Jochisiu Shrine (Rauru's Blessing) |
0931, -1902, 0030 |
West Necluda Korok Seed Locations
Korok Seed Locations and Coordinates
| Overworld | Location Details |
|---|---|
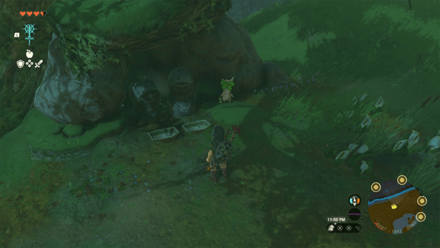
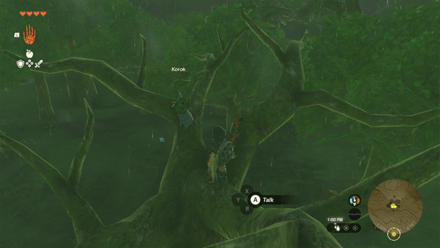
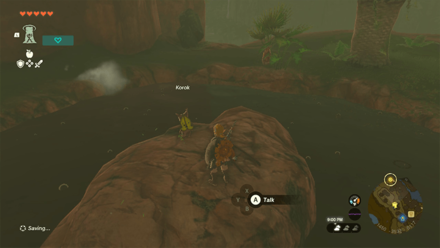
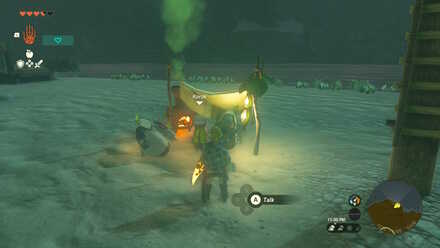
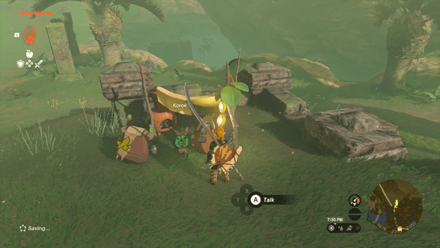
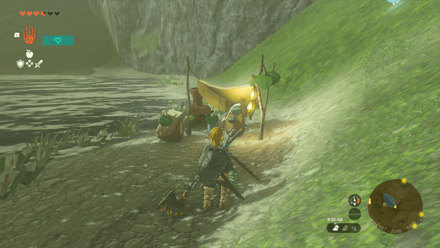
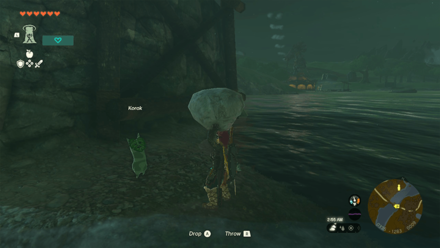
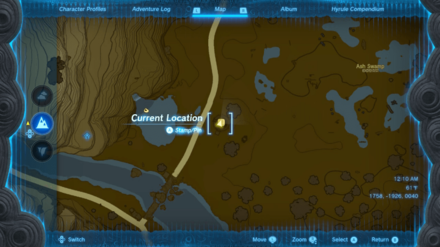
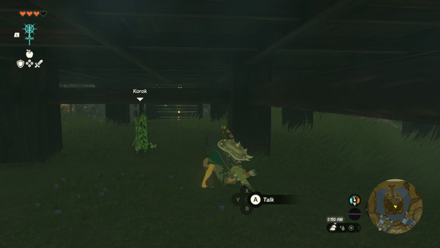 Korok Seed |
Start Coordinates 1774, -0985, 0119 Chase the moving sparkles underneath the house and interact with it to reveal the Korok. |
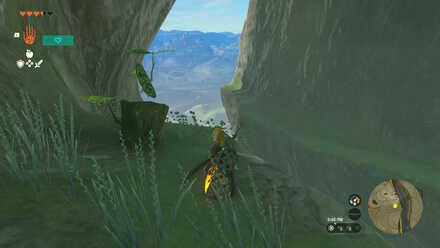
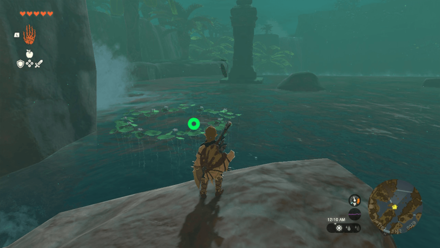
 Korok Seed |
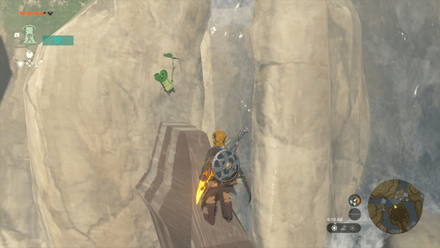
Start Coordinates 2197, -1372, 0056 Chase the moving sparkles circling around on the side of the cliff and interact with it to reveal the Korok. |
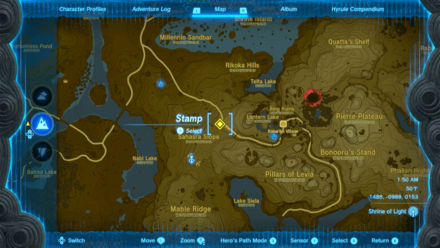
 Korok Seed |
Start Coordinates 1651, -1909, 0008 Using the Ultrahand ability, plunge the cork deep into the water, then immediately let go to pull the cork out. |
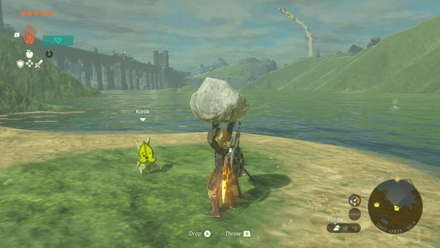
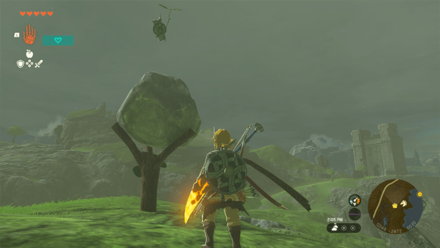
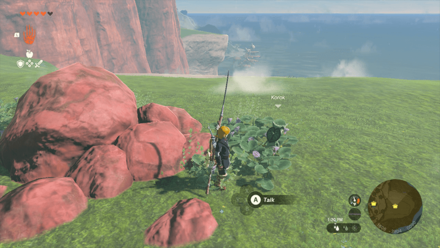
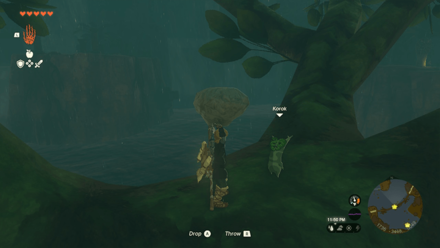
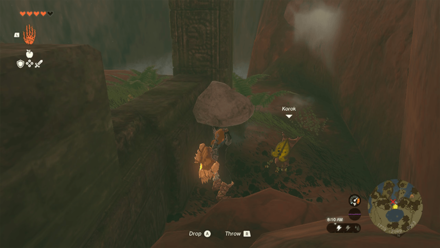
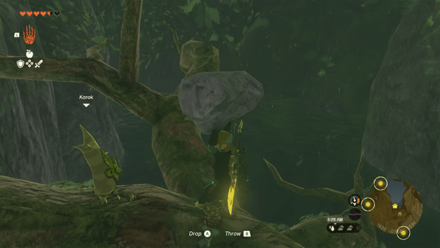
 Korok Seed |
Start Coordinates 0647, -1778, 0010 Place the nearby boulder ontop of the wooden pedestal to reveal the Korok. |
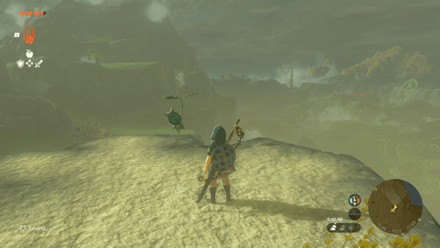
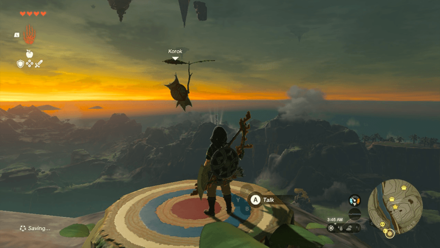
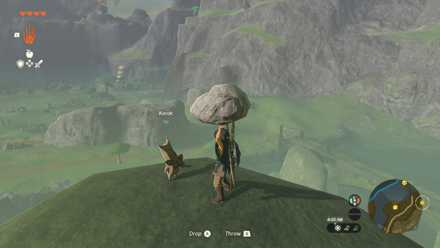
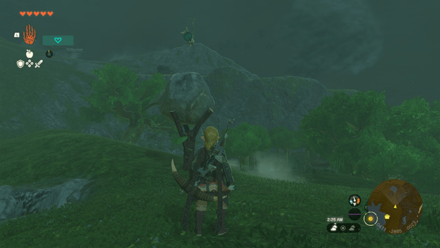
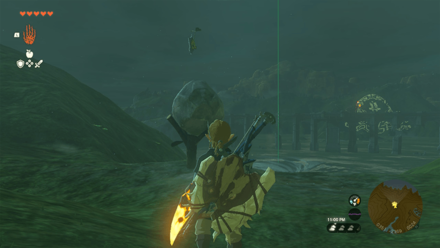
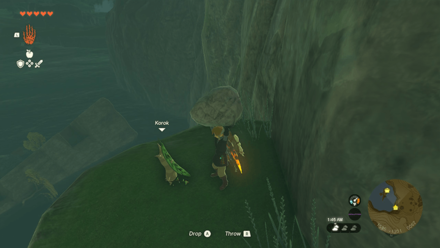
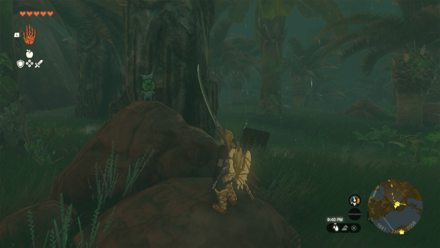
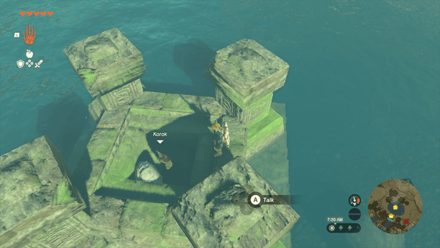
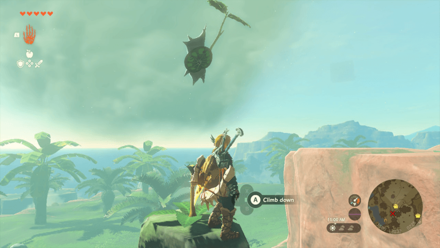
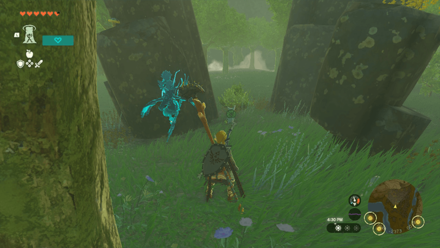
 Korok Seed |
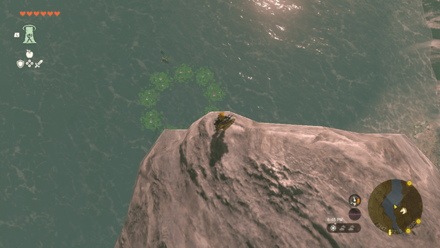
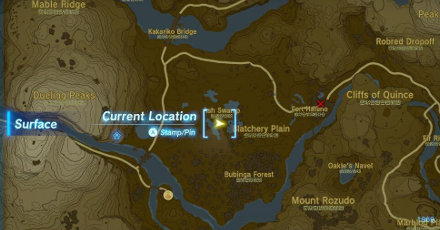
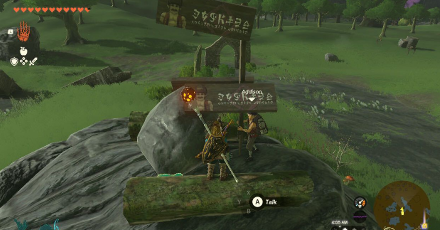
Start Coordinates 1693, -0928, 0310 Pick up the lone rock located at the highest point of the destroyed ring-shaped structure. |
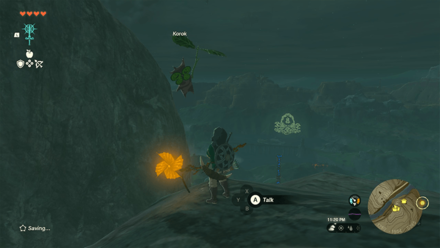
 Korok Seed |
Start Coordinates 1255, -1014, 0151 End Coordinates 1244, -1032, 0145 Follow the yellow disappearing flowers until you reach the white flower. |
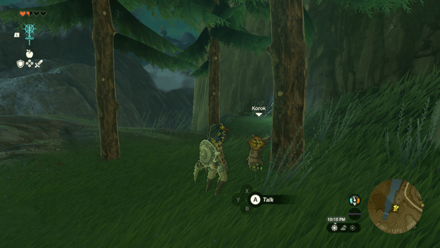
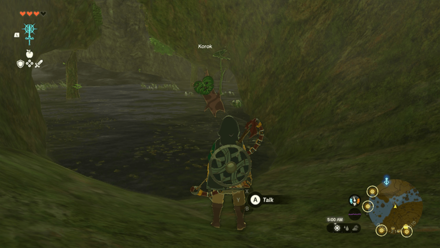
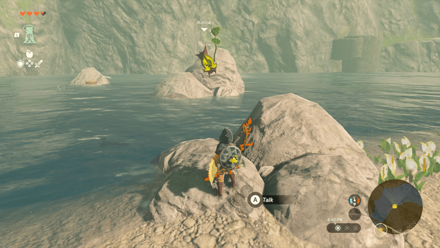
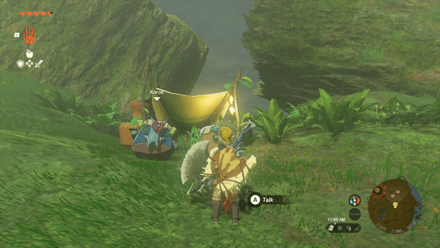
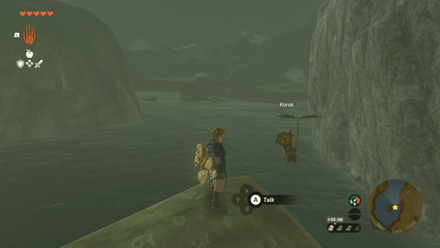
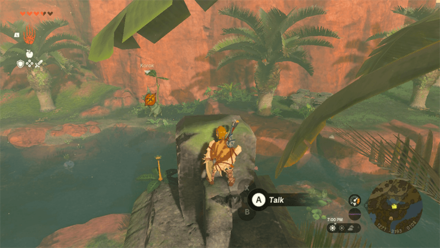
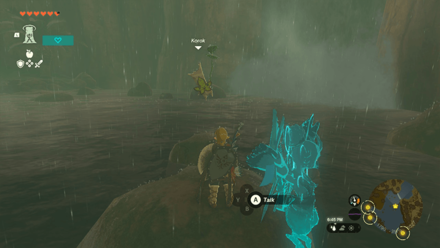
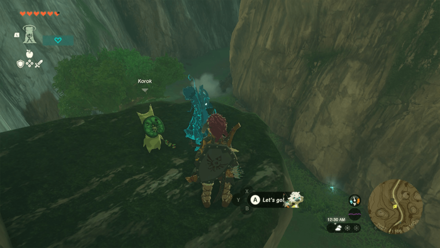
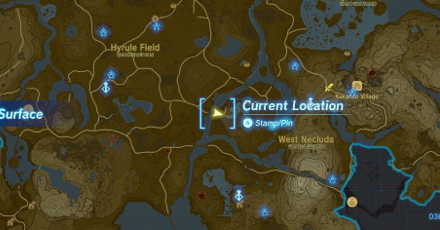
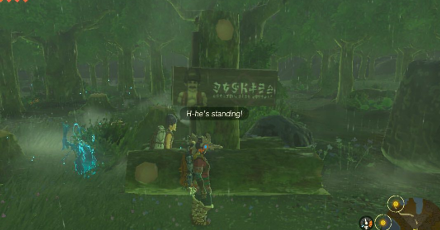
 Korok Seed x2 |
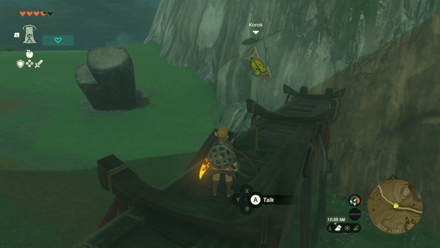
Start Coordinates 1770, -1865, 0015 End Coordinates 2190, -1699, 0023 Reunite the Korok with his friend across the valley. |
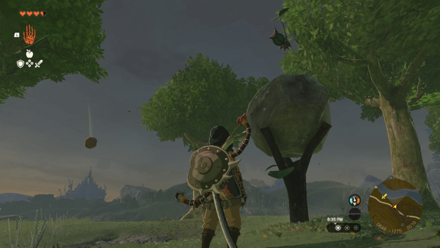
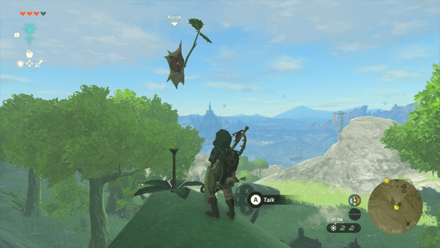
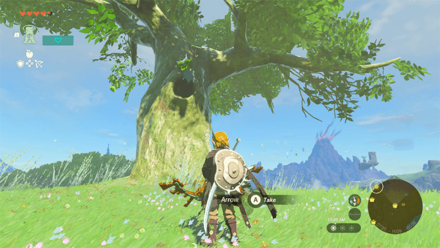
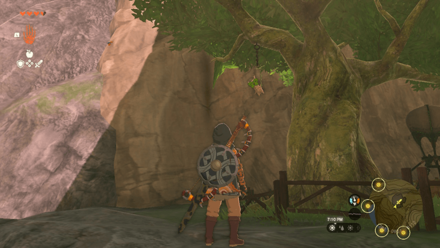 Korok Seed |
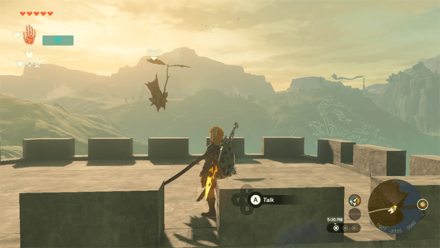
Start Coordinates 1781, -0851, 0112 Shoot the acorn hanging on the tree branch behind Ring Ruins. |
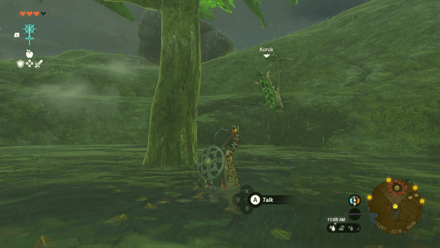
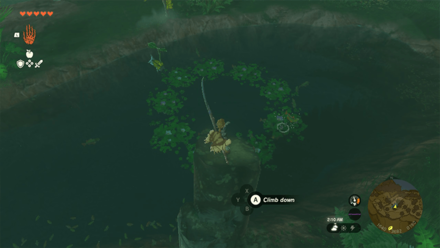
 Korok Seed |
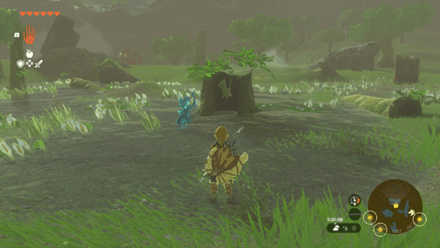
Start Coordinates 0352, -1998, 0008 Chase the moving sparkles circling around the giant destroyed tree trunk and interact with it to reveal the Korok. |
 Korok Seed |
Start Coordinates 0167, -1942, 0045 Place an apple on the empty bowl in front of the prayer statue. |
 Korok Seed |
Start Coordinates 0350, -2159, 0062 End Coordinates 0456, -2142, 0010 Step on the tree stump and race towards the ring before time runs out. |
 Korok Seed |
Start Coordinates 0280, -2239, 0036 End Coordinates 0267, -2214, 0036 Follow the yellow disappearing flowers until you reach the white flower. |
 Korok Seed |
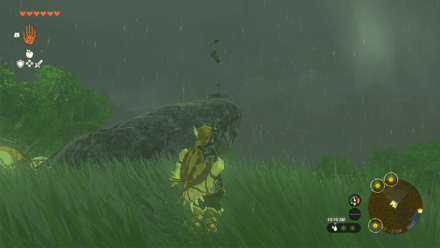
Start Coordinates 0294, -1834, 0017 Destroy the bush and lift the rock to reveal the Korok. |
 Korok Seed |
Start Coordinates 0315, -1764, 0072 Hit the dandelion and interact with it before it lands on the ground. |
 Korok Seed |
Start Coordinates 0514, -1795, 0062 End Coordinates 0464, -1698, 0037 Follow the yellow disappearing flowers until you reach the white flower. |
 Korok Seed |
Start Coordinates 0893, -2214, 0147 Place the nearby boulder ontop of the wooden pedestal to reveal the Korok. |
 Korok Seed |
Start Coordinates 0634, -2312, 0056 Place an apple on the empty bowl in front of the prayer statue. |
 Korok Seed |
Start Coordinates 1375, -1680, 0229 Hit the dandelion and interact with it before it lands on the ground. |
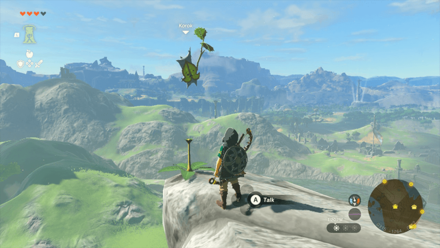
 Korok Seed |
Start Coordinates 1252, -1854, 0385 Shoot the floating balloons near the edge of the summit. |
 Korok Seed |
Start Coordinates 1155, -1701, 0151 Shoot the floating balloon on top of the tree. |
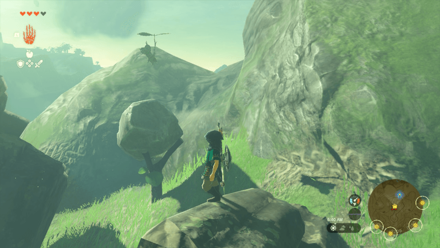
 Korok Seed |
Start Coordinates 1523, -1857, 0289 Shoot the floating balloons circling around the tree. |
 Korok Seed |
Start Coordinates 1243, -1941, 0436 End Coordinates 1279, -1963, 0421 Jump from the initial platform and glide towards the target platform. |
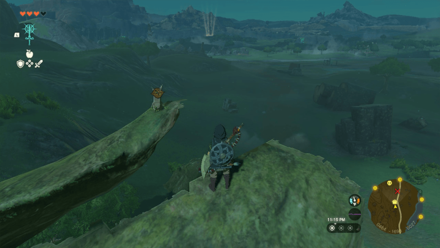
 Korok Seed |
Start Coordinates 1366, -2272, 0187 Interact with the sparkles on top of the tree trunk to reveal the Korok. |
 Korok Seed |
Start Coordinates 1924, -1487, 0081 Climb up the hill and lift the rock to reveal the Korok. |
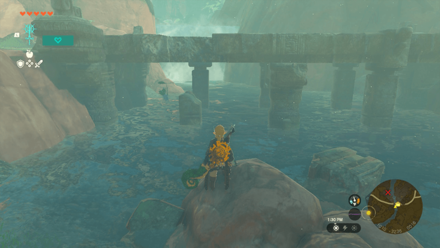
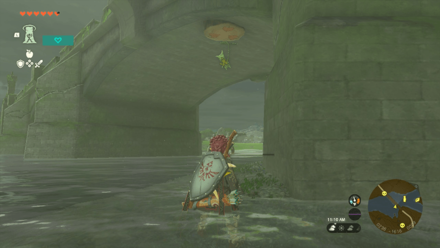
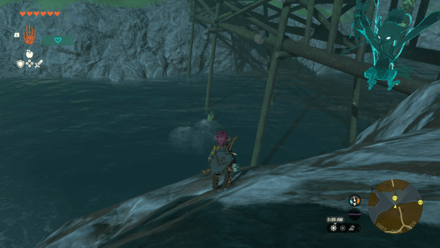
 Korok Seed |
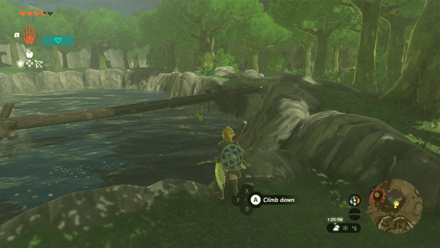
Start Coordinates 1786, -1553, 0010 Go under the bridge and lift the rock to reveal the Korok. |
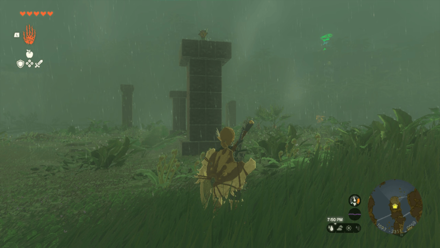
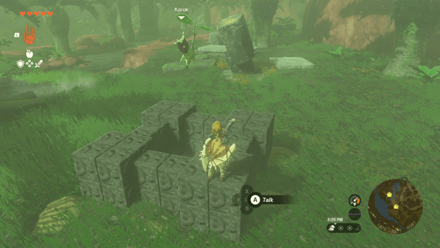
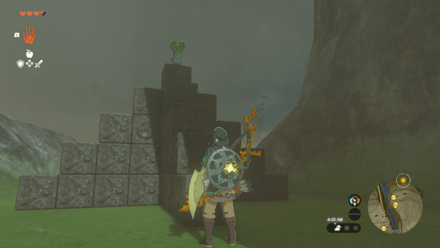 Korok Seed |
Start Coordinates 1242, -1849, 0335 Insert the Metal Box in the third layer to form a tower-shaped structure. |
 Korok Seed |
Start Coordinates 1087, -1050, 0009 End Coordinates 1036, -1068, 0010 Swim back to the shore before the time expires. |
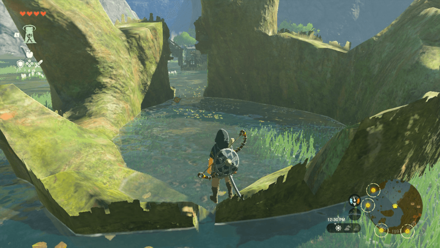
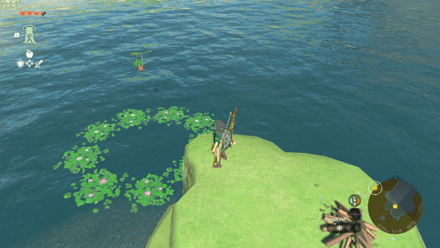 Korok Seed |
Start Coordinates 1039, -1318, 0015 Jump into the middle of the ring of water lilies in the water. |
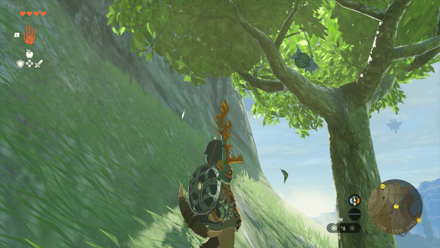
 Korok Seed |
Start Coordinates 1289, -1330, 0160 Shoot the acorn hiding in the tree hallow. |
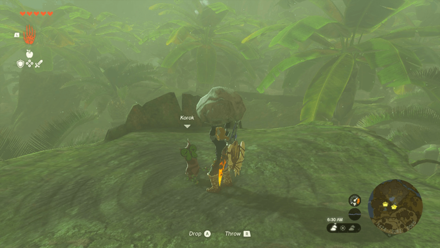
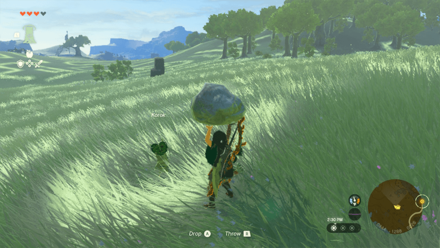 Korok Seed |
Start Coordinates 0843, -1289, 0026 Lift the lone rock in the middle of the field to reveal the Korok. |
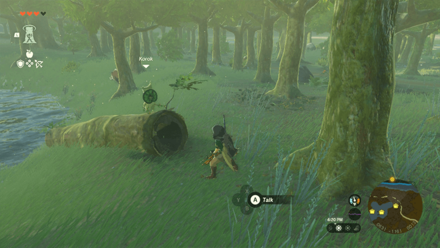 Korok Seed |
Start Coordinates 0631, -1161, 0013 Shoot the acorn hiding inside the log. |
 Korok Seed |
Start Coordinates 0607, -1466, 0048 Place the nearby boulder ontop of the wooden pedestal to reveal the Korok. |
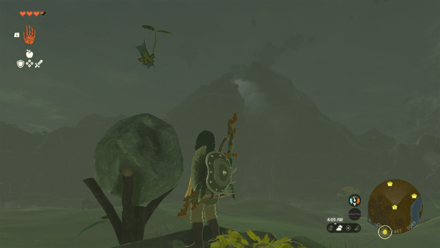
 Korok Seed |
Start Coordinates 0734, -1503, 0038 Shoot the acorn hiding in the tree hallow. |
 Korok Seed |
Start Coordinates 0589, -1234, 0008 Fill in the Metal Box to get the Korok Seed. |
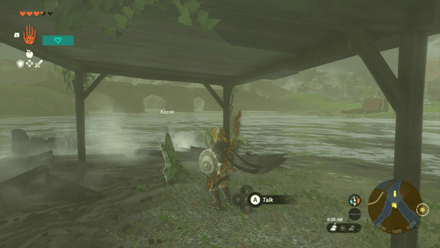 Korok Seed |
Start Coordinates 0295, -1493, 0009 Place the missing wooden platform on the roof of the small shed. |
 Korok Seed |
Start Coordinates 1021, -3228, 0019 Shoot the balloon beneath the bridge. |
 Korok Seed |
Start Coordinates 1375, -3505, 0169 Hit the dandelion and interact with it before it lands on the ground. |
 Korok Seed |
Start Coordinates 1450, -3532, 0117 Interact with the Sparkles to reveal the Korok. |
 Korok Seed |
Start Coordinates 0421, -2883, 0023 Place the nearby boulder ontop of the wooden pedestal to reveal the Korok. |
 Korok Seed |
Start Coordinates 0343, -2833, -0014 Pick up the rock down by the shore near Lake Hylia. |
 Korok Seed |
Start Coordinates 0243, -2873, 0029 Place the nearby boulder ontop of the wooden pedestal to reveal the Korok. |
 Korok Seed |
Start Coordinates 0051, -2721, 0080 End Coordinates 0025, -2728, 0080 Step on the tree stump and race towards the ring found on the opposite castle tower before time runs out. |
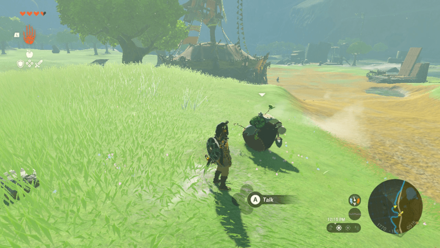
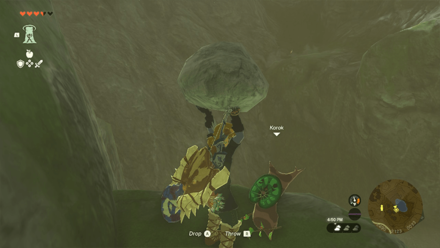
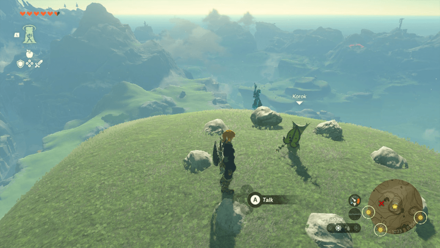
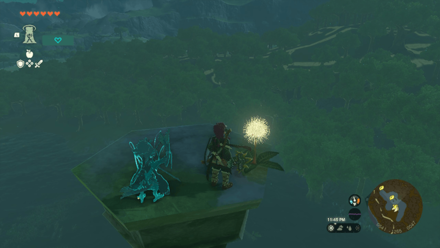
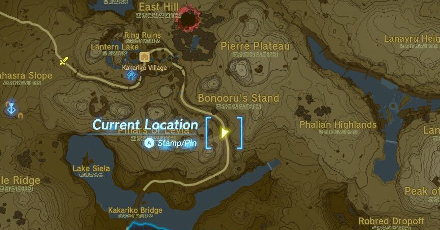
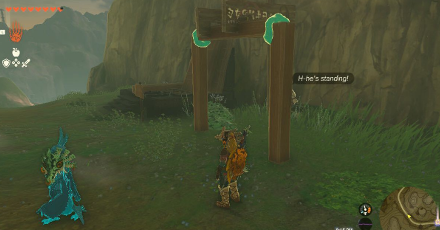
 Korok Seed x2 |
Start Coordinates 0769, -2141, 0135 End Coordinates 1148, -2283, 0209 Take the Korok to his friend located south of Dueling Peaks. |
 Korok Seed x2 |
Start Coordinates 1173, -1854, 0009 End Coordinates 1197, -1843, 0011 Using Ultrahand, stick the giant rock and platform together. Place them in the middle of the river and use that to cross the Korok to the other side. |
 Korok Seed x2 |
Start Coordinates 0033, -1696, 0058 End Coordinates 0586, -1583, 0011 Bring the Korok with you and cross Owlan Bridge. Keep following the river until you reach his friend. |
 Korok Seed x2 |
Start Coordinates 0289, -1203, 0027 End Coordinates 0342, -1661, 0018 Take the Korok to his friend near Proxim Bridge. |
 Korok Seed |
Start Coordinates 1759, -0984, 0140 Examine the sparkles on the roof of the house. |
 Korok Seed |
Start Coordinates 1997, -0958, 0178 Shoot the hanging acorn beneath the bridge. |
 Korok Seed |
Start Coordinates 1574, -1045, 0151 Hit the dandelion and catch it before it hits the ground to get a Korok Seed. |
 Korok Seed x2 |
Start Coordinates 0629, -0965, 0012 End Coordinates 1018, -1185, 0009 Bring the Korok with you and cross Horwell Bridge. Keep going east until you reach his friend by the shore. |
 Korok Seed |
Start Coordinates 1327, -1962, 0185 Using Ultrahand, attach the two boulders to the cork and throw it off the cliff to pull the opposite cork out. |
 Korok Seed x2 |
Start Coordinates 0522, -2196, 0055 End Coordinates 0344, -2182, 0057 Reunite the Korok with his friend to the east of the Hills of Baumer Chasm. |
 Korok Seed |
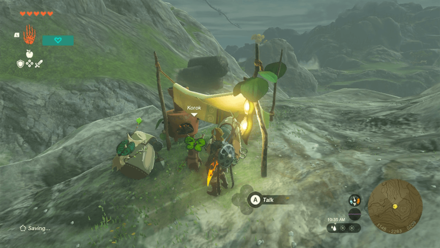
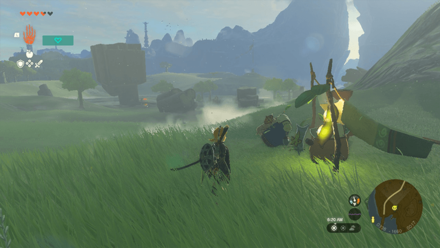
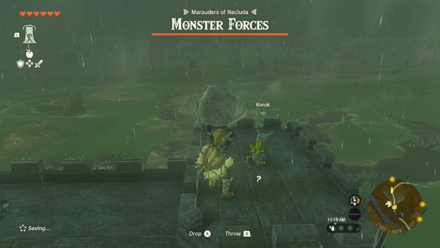
Start Coordinates 0566, -2383, 0112 Pick up the rock on top of the prisoner cells inside the enemy encampment. |
 Korok Seed |
Start Coordinates 0343, -2379, 0023 Place the nearby boulder ontop of the wooden pedestal to reveal the Korok. |
 Korok Seed |
Start Coordinates 1536, -1301, 0062 Pick up the rock on a cliff west of Lake Siela. |
 Korok Seed |
Start Coordinates 1627, -1361, 0012 End Coordinates 1597, -1391, 0025 Follow the yellow flowers until you reach the white flower at the tip of the structure. |
 Korok Seed |
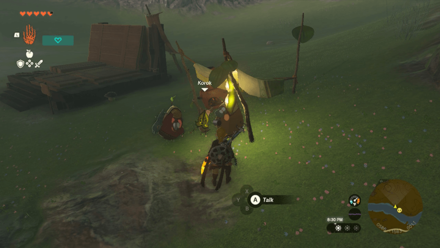
Start Coordinates 1609, -3804, 0090 Chase the moving sparkles and interact with it to reveal the Korok. |
 Korok Seed |
Start Coordinates 1641, -3676, 0173 Jump into the middle of the ring of water lilies in the water. |
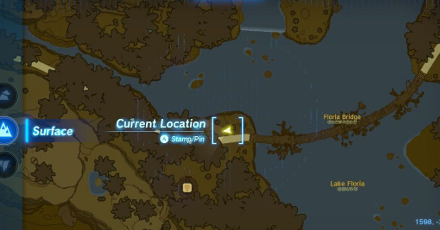
 Korok Seed x2 |
Start Coordinates 1611, -3491, 0059 End Coordinates 1979, -3389, 0049 Take the Korok to its friend on the other side of Floria Bridge. |
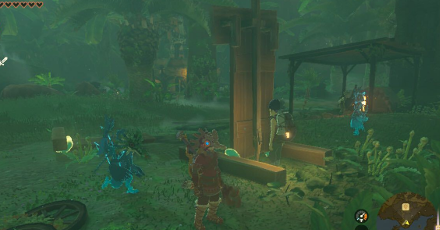
 Korok Seed |
Start Coordinates 1847, -3347, 0055 Place a banana on the empty leaf bowl in front of the prayer statue. |
 Korok Seed |
Start Coordinates 1736, -3468, 0049 Pick up the rock under Floria Bridge. |
 Korok Seed |
Start Coordinates 1775, -2933, 0239 Remove the boulder covering the platform and pick up the rock underneath it to reveal the Korok. |
 Korok Seed |
Start Coordinates 1779, -2989, 0083 Remove the leaves right beside the cave entrance and pick up the rock to reveal the Korok. |
 Korok Seed |
Start Coordinates 1474, -3262, 0086 Pick up the rock on top of the giant tree. |
 Korok Seed |
Start Coordinates 1539, -3239, 0094 End Coordinates 1532, -3265, 0096 Follow the yellow flowers until you reach the white flower hiding under the destroyed tree bark. |
 Korok Seed |
Start Coordinates 1580, -3032, 0225 Hit the dandelion on top of the pillar and interact with it before it lands on the ground. |
 Korok Seed |
Start Coordinates 1692, -3322, 0059 Place the missing block on the top layer to form a tower-shaped metal structure. |
 Korok Seed |
Start Coordinates 1797, -3178, 0075 Dive into the middle of the lilypad circle in the water. |
 Korok Seed |
Start Coordinates 1236, -3217, 0044 Locate the Korok sign underneath the small rock cavern and use Ascend to pass through it. |
 Korok Seed |
Start Coordinates 1327, -3275, 0089 Place the missing piece on one of the corners of the metal structure. |
 Korok Seed |
Start Coordinates 1271, -3193, 0102 Hit the dandelion on top of the pillar and interact with it before it lands on the ground. |
 Korok Seed |
Start Coordinates 2490, -2123, 0033 Pick up the rock found on a platform above the cave. |
 Korok Seed |
Start Coordinates 1939, -2564, 0026 Using Ultrahand, plunge the cork deep into the water and then let go to pull the opposite cork out. |
 Korok Seed |
Start Coordinates 2011, -1895, 0015 Interact with the sparkles inside the hollow tree stump. |
 Korok Seed |
Start Coordinates 2052, -2092, 0046 Hit the dandelion and interact with it before it lands on the ground. |
 Korok Seed |
Start Coordinates 2326, -1828, 0027 Pick up the rock on top of the Fort Hateno entrance. |
 Korok Seed |
Start Coordinates 2141, -2219, 0006 Jump into the middle of the ring of water lilies in the water. |
 Korok Seed |
Start Coordinates 1999, -2282, 0010 Shoot the acorn hiding inside the log. |
 Korok Seed x2 |
Start Coordinates 2645, -2118, 0127 End Coordinates 2482, -2048, 0009 Take the Korok to its friend just outside of Oakle's Navel Cave. |
 Korok Seed |
Start Coordinates 1885, -2418, 0040 End Coordinates 1945, -2382, 0039 Follow the yellow flowers starting at the broken tree stump until you reach the white flower in the middle of the rock formation. |
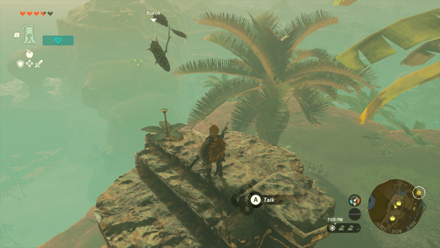
 Korok Seed |
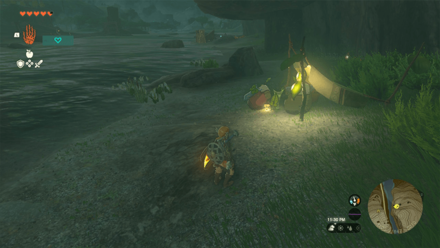
Start Coordinates 1792, -3580, 0027 Swim to the small rock near the waterfall and interact with the sparkles. |
 Korok Seed |
Start Coordinates 2163, -1036, 0355 Pick up the nearby rock and place it in the gap of the rock circle. |
 Korok Seed |
Start Coordinates 1626, -0782, 0039 Pick up the lone rock on top of the tree. |
 Korok Seed |
Start Coordinates 0229, -1608, 0011 Look for the Korok target underneath the bridge then ascend through it. |
 Korok Seed |
Start Coordinates 2028, -1165, 0160 Climb up on the edge of the cliff and lift the lone rock. |
 Korok Seed |
Start Coordinates 0541, -1265, 0047 Hit the dandelion on top of the pillar and interact with it before it lands on the ground. |
 Korok Seed |
Start Coordinates 0333, -1282, 0009 Pick up the lone rock underneath Owlan Bridge. |
 Korok Seed |
Start Coordinates 0958, -0943, 0010 Using Ultrahand, plunge the cork deep into the water and then let go to pull the other cork out. |
Korok Seed Map: All Korok Seed Locations
West Necluda Stables
All Stable Locations
| Overworld Location | Coordinates |
|---|---|
 Dueling Peaks Stable |
1751, -1889, 0013 |
 Lakeside Stable |
1541, -3523, 0072 |
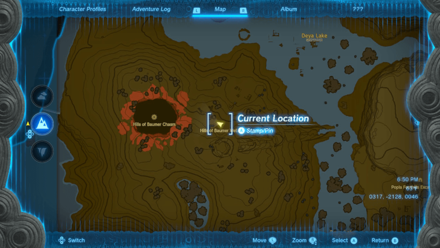
West Necluda Chasm Locations
Chasm Map Locations and Coordinates
| Location | Coordinates |
|---|---|
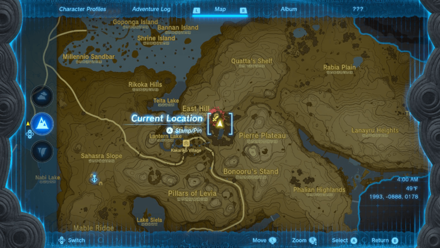 East Hill Chasm |
1993, -0888, 0178 |
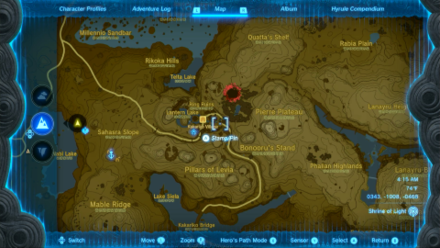
 Hills of Baumer Chasm |
0221, -2163, 0053 |
West Necluda Quests
Main Quests
| Quest | Coordinates |
|---|---|
 Secret of the Ring Ruins |
1814, -0951, 0113 |
Side Quests
| Quest | Coordinates |
|---|---|
 Gloom-Borne Illness |
1908, -0999, 0127 |
 A Trip through History |
1843, -0970, 0115 |
 Follow the Cuccos |
1790, -1030, 0115 |
 Out of the Inn |
1836, -1022, 0116 |
 Ousting the Giants |
1562 , -3529, 0060 |
 Codgers' Quarrel |
1790, -1030, 0115 |
 A Picture for Dueling Peaks Stable |
1756, -1929, 0010 |
Side Adventures
| Quest | Coordinates |
|---|---|
 Serenade to Cotera |
1755, -1956, 0010 |
 Honey, Bee Mine |
2162, -1383, 0111 |
 Princess Zelda Kidnapped |
1758, -1925, 0039 |
West Necluda Settlements
All Towns and Settlement Locations
| Overworld Location | Coordinates |
|---|---|
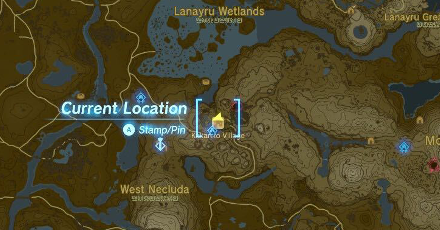
 Kakariko Village |
1838, -0983, 0132 |
West Necluda Zonai Dispensers
Location and Available Devices
| Zonai Dispenser Location | Zonai Devices Available |
|---|---|
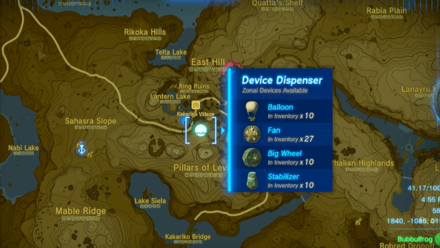 Makasura Shrine Device Dispenser -0250, -0131, 0018 |
・
・
|
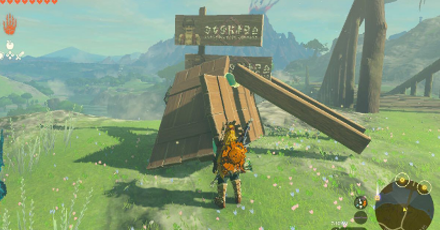
West Necluda Hudson Signs
Addison Sign Locations
| Location | Solution |
|---|---|
 |
 |
| Coordinates: 0923, -0996, 0036 Solution: Slot in the plank from the bottom of the sign. |
|
 |
 |
| Coordinates: 0389, -1276, 0014 Solution: Use logs to prop the sign up. |
|
 |
 |
| Coordinates: 2101, -1260, 0132 Solution: Use the wooden legs to slot it in the open spaces. |
|
 |
 |
| Coordinates: 1594, -3470, 0060 Solution: Put a plank inside the slot to use as a base for the sign. |
|
 |
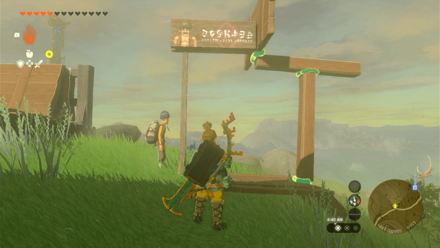 |
| Coordinates: 1488, -0988, 0153 Solution: Use the wooden beams and boards nearby and make a stand for the Hudson sign to lean on. Place the stand on the ramp to hold it steady. |
|
 |
 |
| Coordinates: 1970, -1897, 0023 Solution: Use a boulder as a stopper while attaching logs that act as legs. |
|
All Hudson Sign Locations: How to Help Addison's Signs Stand
West Necluda Points of Interest
Cave Locations and Coordinates
| Overworld Location | Coordinates |
|---|---|
 Sahasra Slope Cave |
1327, -1155, 0138 |
 Popla Foothills Excavation Site |
0608, -2215, 0052 |
 Dueling Peaks North Cave |
1191, -1859, 0158 |
 Dueling Peaks South Cave |
1184, -1944, 0246 |
 Mount Floria Cave |
1951, -2598, 0072 |
 Calora Lake Cave |
1962, -3043, 0208 |
 Fort Hateno Cave |
2237, -1694, 0027 |
 Rassla Lake Cave |
1825, -3737, 0125 |
 Corta Lake Cave |
1674, -3038, 0165 |
 Finra Woods Excavation Site |
0569, -2982, 0014 |
 Ubota Point Cave |
1452, -3483, 0077 |
 Rodai Lakefront Tunnel |
1894, -3117, 0133 |
 Oakle's Navel Cave |
2507, -2119, 0009 |
 Byroad to Lanayru Wetlands |
1624, -0789, 0016 |
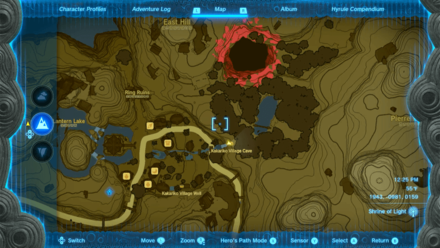 Kakariko Village Cave |
1944, -0983, 0159 |
 Cucco Hideaway |
1878, -1155, 0199 |
Well Locations and Coordinates
| Overworld Location | Coordinates |
|---|---|
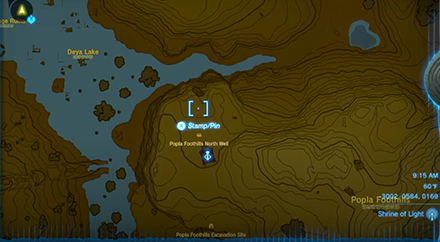 Popla Foothills North Well |
0594, -2102, 0093 |
 Hills of Baumer Well |
0317, -2128, 0046 |
 Kakariko Village Well |
1874, -1041, 0122 |
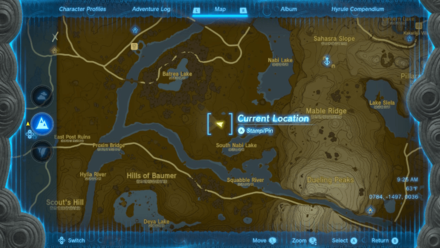 South Nabi Lake Well |
0784, -1497, 0036 |
 Deya Village Ruins South Well |
0340, -2097, 0029 |
 Deya Village Ruins North Well |
0314, -1855, 0009 |
 Deya Village Ruins Well |
0320, -1929, 0011 |
 Deya Village Ruins East Well |
0421, -2041, 0009 |
 Popla Foothills South Well |
0603, -2261, 0051 |
 Lakeside Stable Well |
1534, -3552, 0061 |
 Dueling Peaks Stable Well |
1791, -1949, 0010 |
Notable Map Locations
| Overworld Location | Coordinates |
|---|---|
 Ring Ruins |
1829, -0955, 0116 |
 Kakariko Bridge |
1765, -1575, 0027 |
The Legend of Zelda: Tears of the Kingdom Related Guides

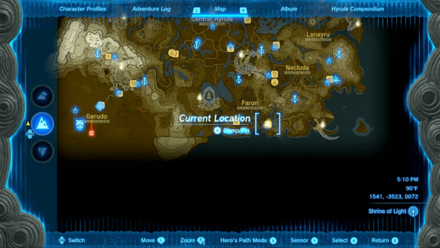
Interactive Map of Hyrule:
All Locations and Map Icons
All Area Maps and Locations
| Hyrule Map Locations | |||||
|---|---|---|---|---|---|
Other Maps
List of Surface Regions
Comment
Author

The Legend of Zelda: Tears of the Kingdom Walkthrough & Guides Wiki
West Necluda Region Map: Korok Seed Locations, Shrines, and Quests
Please participate in our site
improvement survey
03/2026
improvement survey
03/2026
Would you assist in
improving Game8's site?
improving Game8's site?

×
We are listening to our users' valuable opinions and discussing how to act on them.
The information collected through this survey will be used for the purpose of improving our services. In addition, the information will only be disclosed a part of a statistic in a format that will not allow identification of personal information.
Begin Survey
Not Now
×
Please rate each item regarding Game8.co's Advertisements.
Amount of Ads
Very Dissatisfied
Somewhat Dissatisfied
Fine
Somewhat Satisfied
Highly Satisfied
Placement of Ads
Timing of Ad Display
Ad Loading Speed
Safeness of Ads
Content of Ads
×
Please rate each item regarding Game8.co's Quality of Articles.
Amount of information
Very Dissatisfied
Somewhat Dissatisfied
Fine
Somewhat Satisfied
Highly Satisfied
Frequency of updates
Speed of new information
Accuracy of articles
Understandibility of articles
Readability of sentences
×
Please rate each item regarding Game8.co's Usability of the Site.
Ease of finding information
Very Dissatisfied
Somewhat Dissatisfied
Fine
Somewhat Satisfied
Highly Satisfied
Loading Speed
Use of Color
Font Size
Visibility of Images
Easy to Understand Layout
×
Please rate each item regarding Game8.co's Message Boards, Comments.
Ease of Writing
Very Dissatisfied
Somewhat Dissatisfied
Fine
Somewhat Satisfied
Highly Satisfied
Readability
Ease in Finding Information
Comment Quality
Comment Quantity
Admin Response
×
Please rate each item regarding Game8.co's Site's new design.
Please rate our site's new design
Very Dissatisfied
Somewhat Dissatisfied
Fine
Somewhat Satisfied
Highly Satisfied
Do you think that the website's design change makes the site easier to use?
Has the new design made it easier for you to find information on the site?
Has the new design improved the overall visual appeal of the site?
How would you rate your overall satisfaction with the new design of the site?
×
How likely are you to recommend Game8 to someone you know?
Very Unlikely
0
1
2
3
4
5
6
7
8
9
10
Very Likely
If you have other opinions regarding potential improvement to the website, please share them with us. We would appreciate your honest opinion.
Note: This is a free response section, so you can proceed without entering anything.
Note: Please be sure not to enter any kind of personal information into your response.
Note: Please be sure not to enter any kind of personal information into your response.
×
Thank You
×
Thank you for participating in our survey! Your answers will help us to improve the quality of our website and services.
We hope you continue to make use of Game8.
We hope you continue to make use of Game8.
Close
Rankings
Gaming News


![Everwind Review [Early Access] | The Shaky First Step to A Very Long Journey](https://img.game8.co/4440226/ab079b1153298a042633dd1ef51e878e.png/thumb)

![Monster Hunter Stories 3 Review [First Impressions] | Simply Rejuvenating](https://img.game8.co/4438641/2a31b7702bd70e78ec8efd24661dacda.jpeg/thumb)
Popular Games

Genshin Impact Walkthrough & Guides Wiki
Honkai: Star Rail Walkthrough & Guides Wiki
Umamusume: Pretty Derby Walkthrough & Guides Wiki
Pokemon Pokopia Walkthrough & Guides Wiki
Resident Evil Requiem (RE9) Walkthrough & Guides Wiki
Monster Hunter Wilds Walkthrough & Guides Wiki
Wuthering Waves Walkthrough & Guides Wiki
Arknights: Endfield Walkthrough & Guides Wiki
Pokemon FireRed and LeafGreen (FRLG) Walkthrough & Guides Wiki
Pokemon TCG Pocket (PTCGP) Strategies & Guides Wiki


Recommended Games
Diablo 4: Vessel of Hatred Walkthrough & Guides Wiki
Fire Emblem Heroes (FEH) Walkthrough & Guides Wiki
Yu-Gi-Oh! Master Duel Walkthrough & Guides Wiki
Super Smash Bros. Ultimate Walkthrough & Guides Wiki
Pokemon Brilliant Diamond and Shining Pearl (BDSP) Walkthrough & Guides Wiki
Elden Ring Shadow of the Erdtree Walkthrough & Guides Wiki
Monster Hunter World Walkthrough & Guides Wiki
The Legend of Zelda: Tears of the Kingdom Walkthrough & Guides Wiki
Persona 3 Reload Walkthrough & Guides Wiki
Cyberpunk 2077: Ultimate Edition Walkthrough & Guides Wiki


All rights reserved
© Nintendo. The Legend of Zelda and Nintendo Switch are trademarks of Nintendo.
The copyrights of videos of games used in our content and other intellectual property rights belong to the provider of the game.
The contents we provide on this site were created personally by members of the Game8 editorial department.
We refuse the right to reuse or repost content taken without our permission such as data or images to other sites.