Whirly Swirly Things Walkthrough and How to Unlock
▲ Get Pristine Weapons from the depths!
△ All 1000 Koroks | All 4 Great Fairies
▲ 81 Addison Signs | 147 Caves | 58 Wells
△ Tips: Farm Rupees | Starting Armor
▲ Best Weapons | Best Armor | Best Food

Whirly Swirly Things is a Side Quest in The Legend of Zelda: Tears of the Kingdom (TotK) that can be found in Korok Forest. Read on to learn how to unlock Whirly Swirly Things, its location and rewards, walkthrough, as well as how to complete it.
List of Contents
How to Unlock Whirly Swirly Things
Talk to Kula After Curing the Deku Tree
Speak with Kula in Korok Forest to begin the Whirly Swirly Things quest. You will first have to cure the Deku Tree and restore Korok Forest to its original state before being able to talk to her.
How to Get Through the Lost Woods and Cure Deku Tree
Whirly Swirly Things Location and Rewards
Great Hyrule Forest - Korok Forest
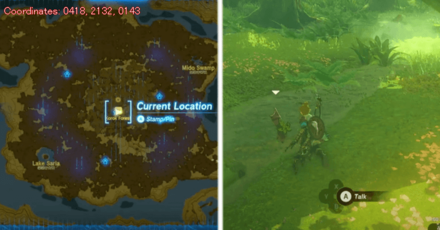
Korok Forest is situated in the middle of the Great Hyrule Forest region which is located directly north of Hyrule Field.
The exact coordinates for this quest on the map are 0418, 2132, 0143.
Great Hyrule Forest Region Map
Rewards
| Rewards |
|---|
| ・Endura Carrot x5 |
Whirly Swirly Things Walkthrough Guide
| How to Complete Whirly Swirly Things |
1. Talk to Kula 2. First Whirlpool Location 3. Show the Picture to Kula 4. Second Whirlpool Location 5. Show the Last Picture to Kula |
|---|
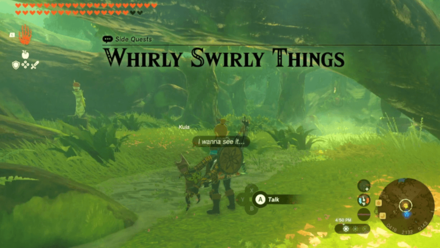
Talk to Kula
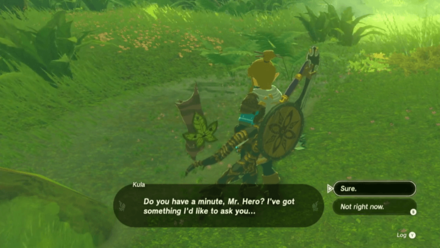
Talk to Kula in Korok Forest; she will tell you that one of her friends saw a big swirly circle in an area with water and that she'd like to see it for herself but can't leave the forest just yet.
These whirling circles are actually whirlpools and you'll have to take pictures of them to show Kula later on.
First Whirlpool Location
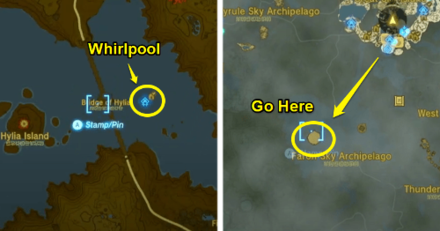
The first whirlpool is located in Lake Hylia. Travel to the Great Sky Island region by teleporting to the Nachoyah Shrine. Then use Autobuild to build a plane and fly over to the floating island platform above the lake.
Defeat the Flux Construct
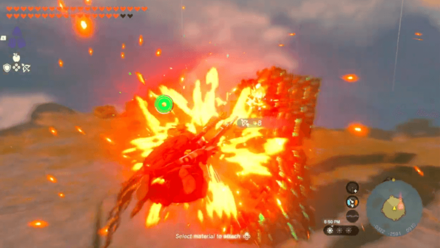
Defeat the Flux Construct III guarding the island. Use your bow and attach Fire Keese Eyeballs to deal massive damage!
How to Beat Flux Construct III
Take a Picture of the Whirlpool Below
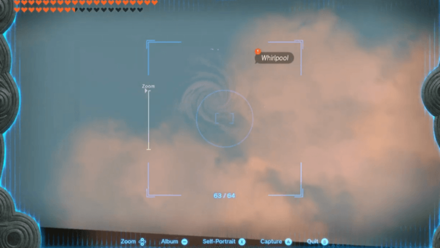
Go over to the side of the sky island and use your Camera to take a clear picture of the whirlpool below.
Show the Picture to Kula
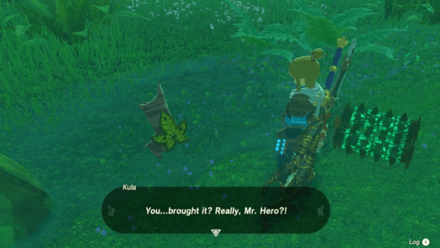
Head back to Korok Forest and show Kula the picture of the whirlpool. She will tell you that there's another swirly thing in the desert.
Second Whirlpool Location

Travel to East Barrens in the eastern area of the Gerudo Desert region. If you have the Siwakama Shrine unlocked, you can fast travel there and walk south to easily get there.
Elevate to a High Position Using a Balloon
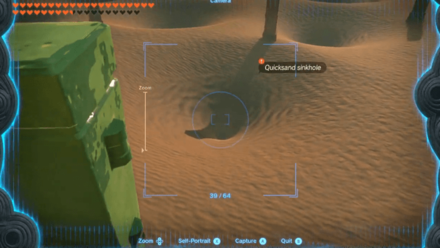
Once you find the whirlpool (or whirlsand), take out a Balloon using Autobuild. Elevate to a position where you have a clear view of the swirling sand and take a picture of it.
Show the Last Picture to Kula

Show the picture of the second whirlpool to Kula and she'll be delighted to see that there are indeed ”whirlsands” in the desert.
She will then reward you with five Endura Carrots for your efforts.
The Legend of Zelda: Tears of the Kingdom Related Guides
List of All Walkthroughs
| All Quest Types | ||
|---|---|---|
 Main Quests Main Quests |
 Side Quests Side Quests |
 Side Adventures Side Adventures |
List of All Side Quests
Comment
Author

The Legend of Zelda: Tears of the Kingdom Walkthrough & Guides Wiki
Whirly Swirly Things Walkthrough and How to Unlock
Rankings
- We could not find the message board you were looking for.
Gaming News
![Animal Crossing: New Horizons Review [Switch 2] | Needlessly Crossing Over to a New Generation](https://img.game8.co/4391759/47d0408b0b8a892e453a0b90f54beb8a.png/show)


Popular Games

Genshin Impact Walkthrough & Guides Wiki
Honkai: Star Rail Walkthrough & Guides Wiki
Arknights: Endfield Walkthrough & Guides Wiki
Umamusume: Pretty Derby Walkthrough & Guides Wiki
Wuthering Waves Walkthrough & Guides Wiki
Pokemon TCG Pocket (PTCGP) Strategies & Guides Wiki
Abyss Walkthrough & Guides Wiki
Zenless Zone Zero Walkthrough & Guides Wiki
Digimon Story: Time Stranger Walkthrough & Guides Wiki
Clair Obscur: Expedition 33 Walkthrough & Guides Wiki


Recommended Games
Fire Emblem Heroes (FEH) Walkthrough & Guides Wiki
Pokemon Brilliant Diamond and Shining Pearl (BDSP) Walkthrough & Guides Wiki
Diablo 4: Vessel of Hatred Walkthrough & Guides Wiki
Super Smash Bros. Ultimate Walkthrough & Guides Wiki
Yu-Gi-Oh! Master Duel Walkthrough & Guides Wiki
Elden Ring Shadow of the Erdtree Walkthrough & Guides Wiki
Monster Hunter World Walkthrough & Guides Wiki
The Legend of Zelda: Tears of the Kingdom Walkthrough & Guides Wiki
Persona 3 Reload Walkthrough & Guides Wiki
Cyberpunk 2077: Ultimate Edition Walkthrough & Guides Wiki


All rights reserved
© Nintendo. The Legend of Zelda and Nintendo Switch are trademarks of Nintendo.
The copyrights of videos of games used in our content and other intellectual property rights belong to the provider of the game.
The contents we provide on this site were created personally by members of the Game8 editorial department.
We refuse the right to reuse or repost content taken without our permission such as data or images to other sites.