This survey will take about 1 minute.
Your answers will help us to improve our website.
Zelda: Tears of the Kingdom (TotK)
East Necluda Region Map: Korok Seed Locations, Shrines, and Quests
▲ Get Pristine Weapons from the depths!
△ All 1000 Koroks | All 4 Great Fairies
▲ 81 Addison Signs | 147 Caves | 58 Wells
△ Tips: Farm Rupees | Starting Armor
▲ Best Weapons | Best Armor | Best Food
East Necluda is a region found in the Surface of Hyrule in The Legend of Zelda: Tears of the Kingdom (TotK). Read on to see the full East Necluda region map, as well as locations for Korok Seeds, Shrines, Quests, and other points of interest found within the East Necluda!
List of Contents
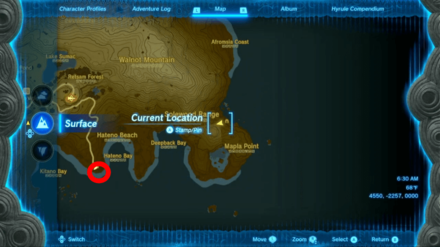
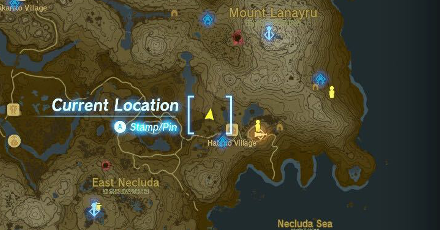
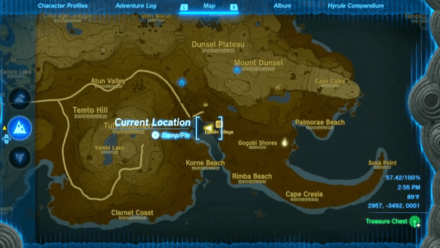
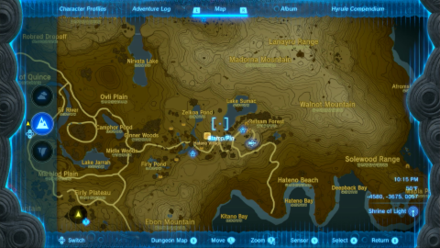
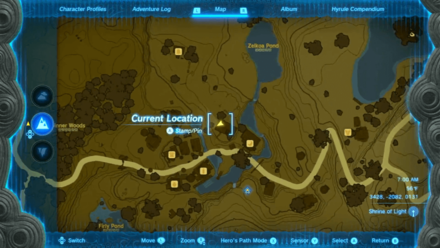
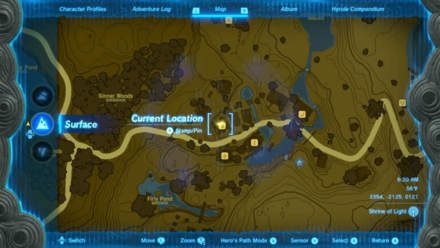
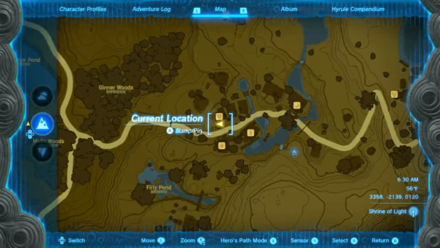
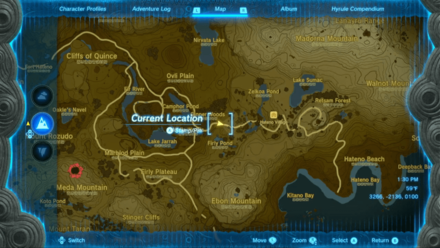
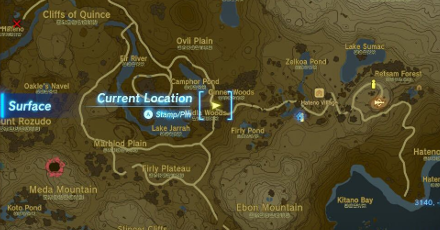
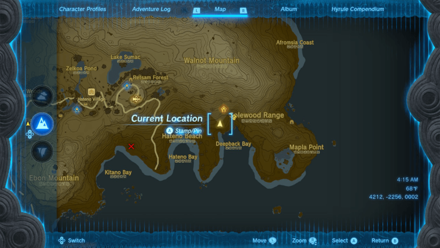
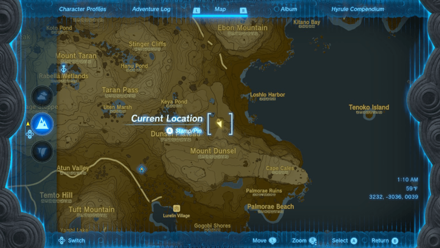
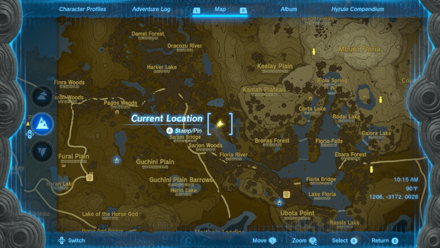
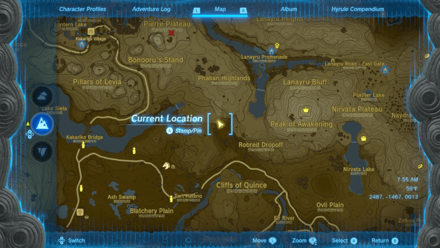
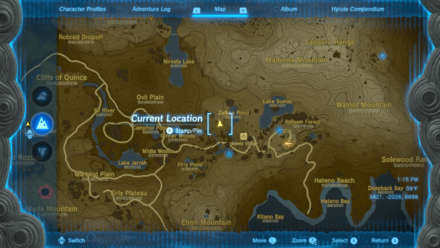
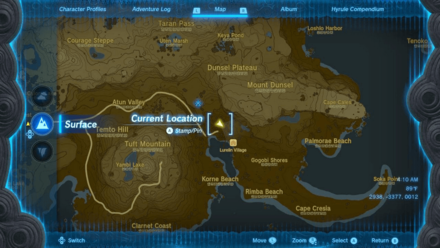
East Necluda Region Map
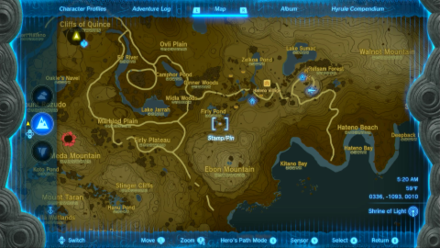
East Necluda Full Map
 Enlarge EnlargeView Full Image |
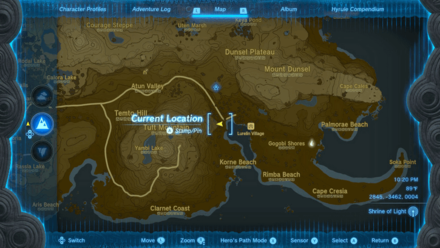
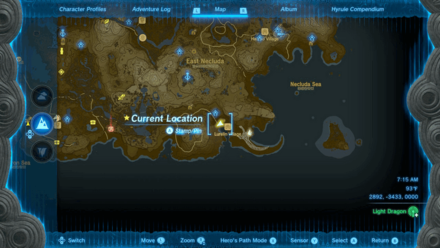
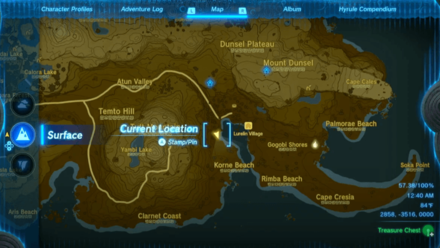
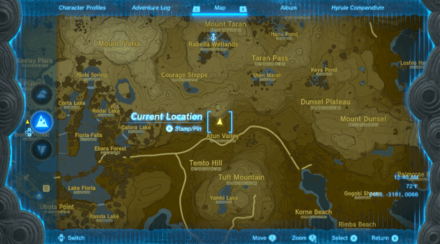
East Necluda Tower Map Location
Map and Coordinates
| Overworld Location | Coordinates |
|---|---|
 Enlarge EnlargeRabella Wetlands Skyview Tower |
2419, -2755, 0222 |
Skyview Tower Guide: All Tower Locations
East Necluda Shrine Locations
Shrine Map Locations and Coordinates
| Location | Coordinates |
|---|---|
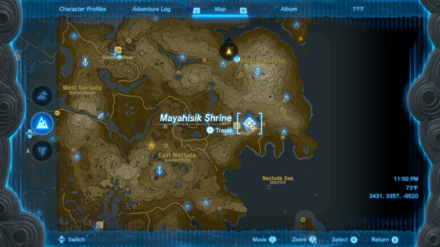 Enlarge EnlargeMayahisik Shrine (Rauru's Blessing) |
3727, -2058, 0189 |
 Enlarge EnlargeZanmik Shrine (Scoop It Out) |
Video Guide 3469, -2179, 0148 |
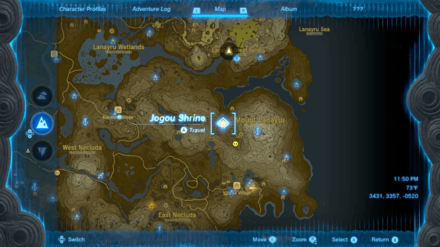 Enlarge EnlargeJogou Shrine (Rauru's Blessing) |
3346, -1187, 0057 |
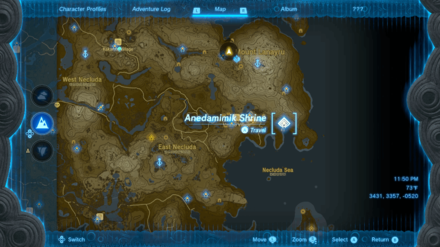 Enlarge EnlargeAnedamimik Shrine (A Retraced Path) |
Video Guide 4231, -2178, -0012 |
 Enlarge EnlargeUtojis Shrine (Rauru's Blessing) |
Video Guide 1217, -2542, 0096 |
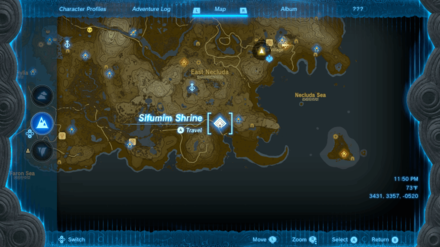 Enlarge EnlargeSifumim Shrine (Proving Grounds: Flow) |
2826, -3271, 0078 |
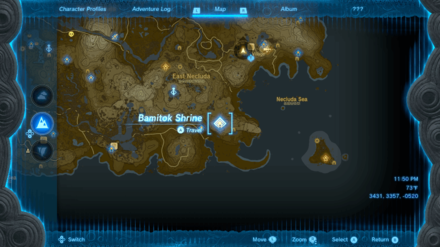 Enlarge EnlargeBamitok Shrine (Rauru's Blessing) |
Video Guide 3094, -3209, 0082 |
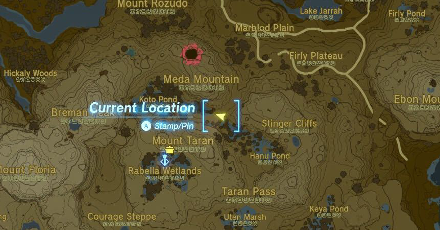
East Necluda Korok Seed Locations
Korok Seed Locations and Coordinates
| Overworld | Location Details |
|---|---|
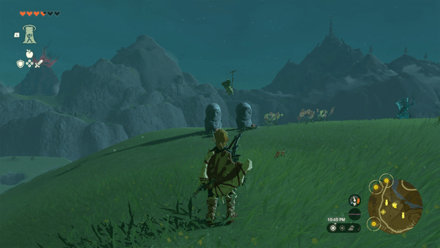
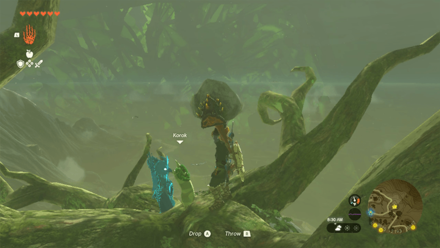
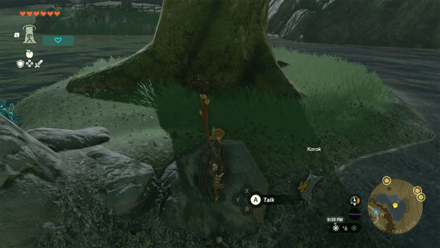
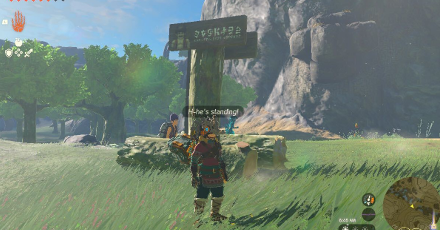
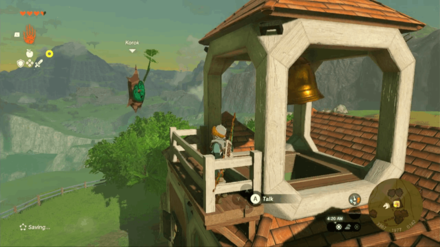 Enlarge EnlargeKorok Seed |
Start Coordinates 3367, -1977, 0142 Ring the bell 5 times to reveal the Korok. |
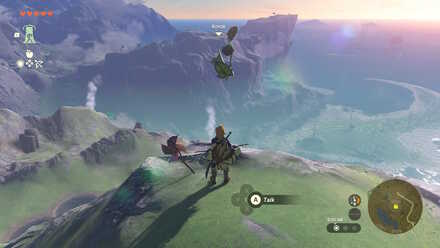
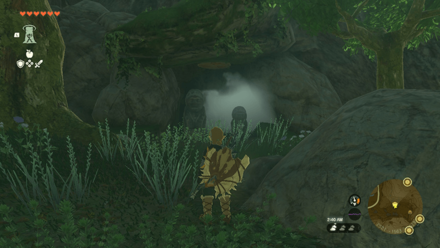
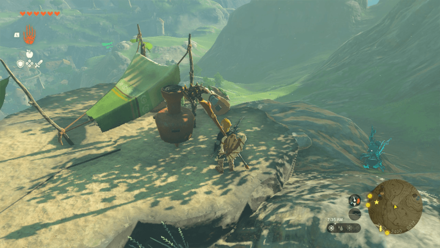
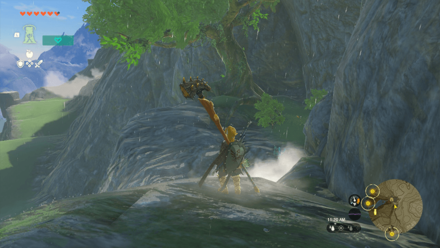
 Enlarge EnlargeKorok Seed |
Start Coordinates 3914, -2102, 0130 Shoot the floating balloon near the waterfall with an arrow. |
 Enlarge EnlargeKorok Seed |
Start Coordinates 4514, -2306, 0113 Pick up the lone rock to reveal the Korok. |
 Enlarge EnlargeKorok Seed |
Start Coordinates 2300, -1355, 0129 Shoot the floating balloon near the waterfall with an arrow. |
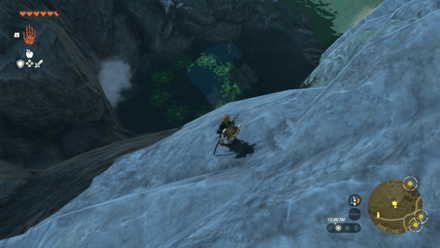
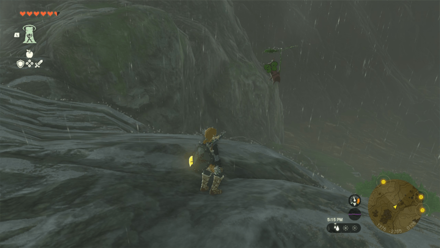
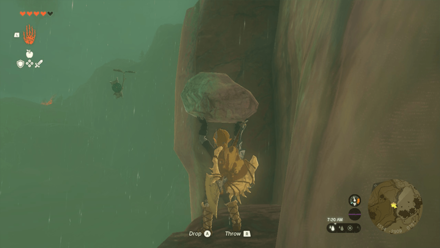 Enlarge EnlargeKorok Seed |
Start Coordinates 1554, -2909, 0181 Pick up the lone rock on the side of the cliff. |
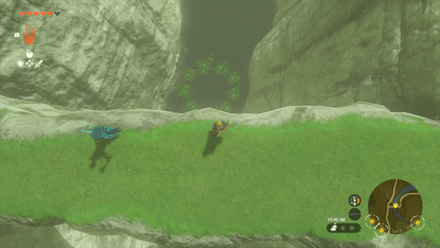
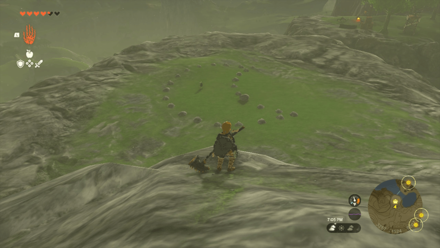
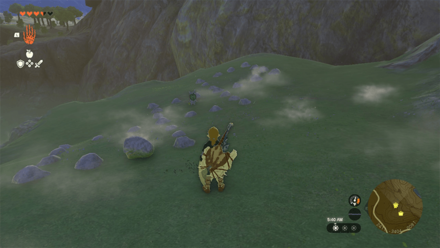 Enlarge EnlargeKorok Seed |
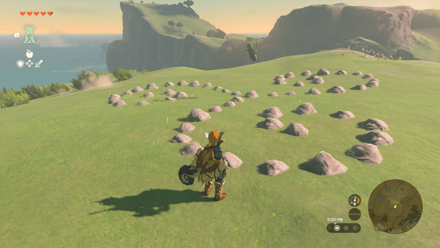
Start Coordinates 2424, -3403, 0079 Pick up the nearby rock and place it in the gap of the rock circle. |
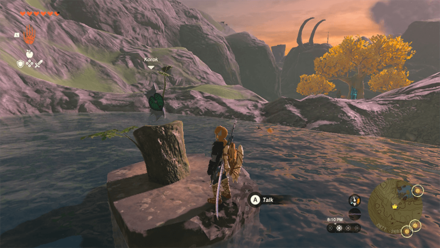
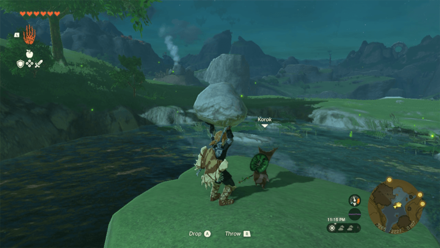
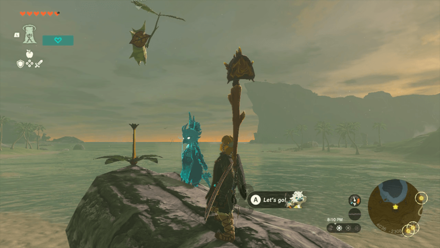
 Enlarge EnlargeKorok Seed x2 |
Start Coordinates 2242, -3467, 0029 End Coordinates 2226, -3833, 0001 Bring the Korok to its friend near the beach. |
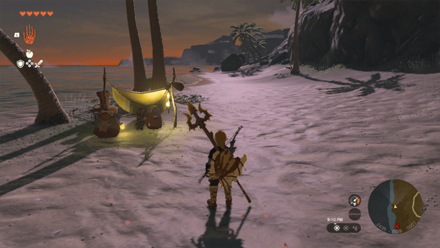 Enlarge EnlargeKorok Seed x2 |
Start Coordinates 2827, -3883, 0001 End Coordinates 2428, -3944, 0000 Bring the Korok to its friend down the shoreline. |
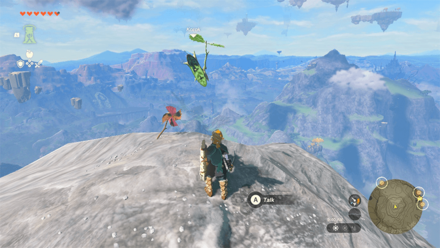
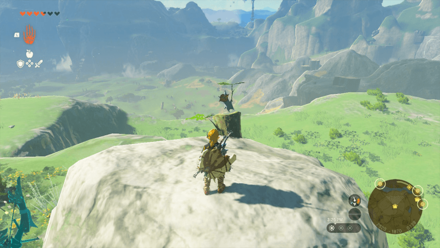
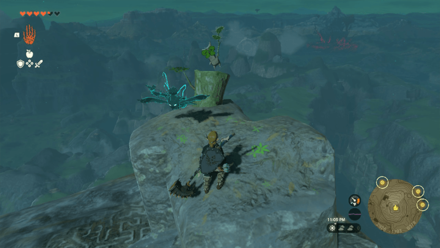
 Enlarge EnlargeKorok Seed |
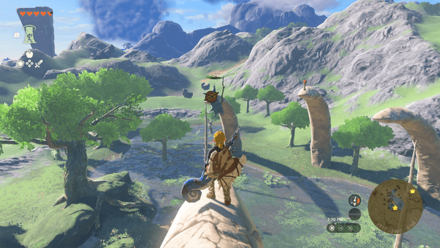
Start Coordinates 2561, -3599, 0238 Climb up the highest point of Tuft Mountain. Stand by the pinwheel and shoot the three moving balloons. |
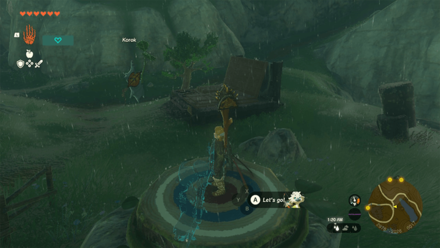
 Enlarge EnlargeKorok Seed |
Start Coordinates 3081, -3389, 0049 End Coordinates 3063, -3395, 0017 Step on the tree stump and race towards the ring located down the waterfall before time runs out. |
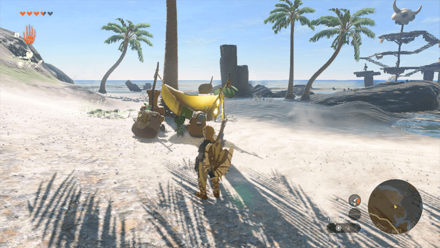
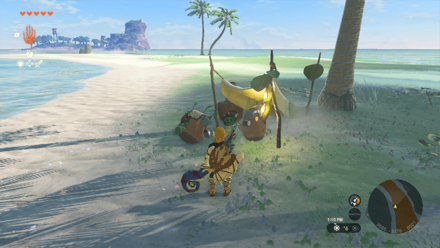
 Enlarge EnlargeKorok Seed |
Start Coordinates 3119, -3719, 0001 Remove the bush on the beach and pick up the rock hiding underneath it. |
 Enlarge EnlargeKorok Seed |
Start Coordinates 3432, -3327, 0020 Climb on top of the pillar and interact with the sparkles to reveal the Korok. |
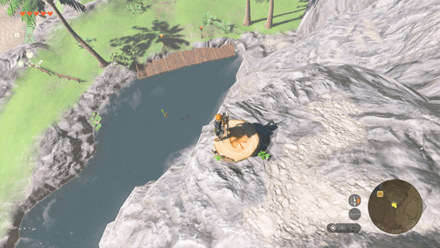
 Enlarge EnlargeKorok Seed x2 |
Start Coordinates 3542, -3457, 0000 End Coordinates 3599, -3779, 0001 Build a boat using the construction materials nearby, then sail towards the peninsula. |
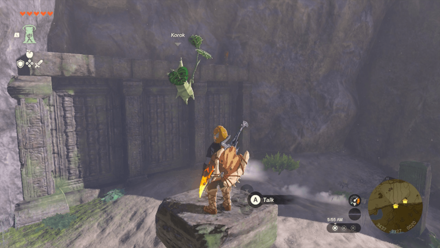
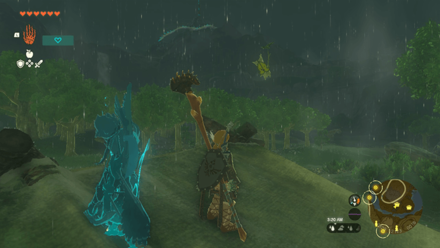
 Enlarge EnlargeKorok Seed |
Start Coordinates 3495, -3311, 0223 Shoot the acorn hiding in the hollow of the tree. |
 Enlarge EnlargeKorok Seed |
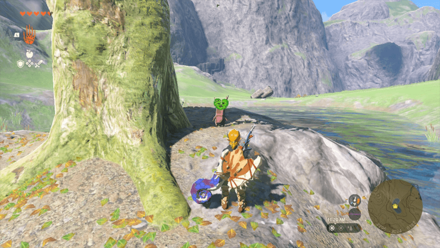
Start Coordinates 3668, -3279, 0205 Pick up the rock on a small platform on the side of Cape Cales. |
 Enlarge EnlargeKorok Seed |
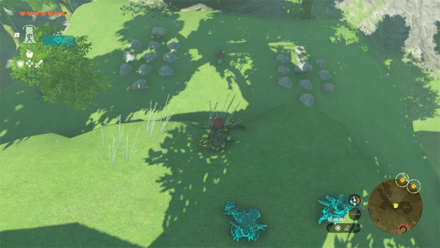
Start Coordinates 3099, -2952, 0182 Pick up the nearby rocks and place them in the gaps of the rock circles. |
 Enlarge EnlargeKorok Seed |
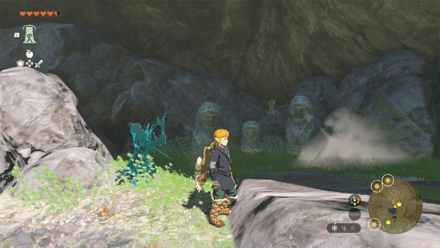
Start Coordinates 2715, -2960, 0189 Interact with the sparkles floating on top of the bone pillar. |
 Enlarge EnlargeKorok Seed |
Start Coordinates 2632, -2856, 0228 Climb up the dead tree and interact with the sparkles. |
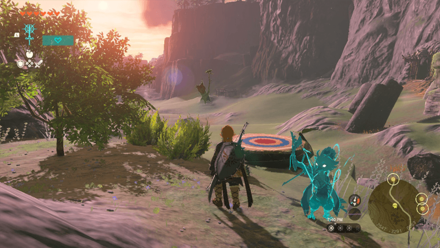
 Enlarge EnlargeKorok Seed |
Start Coordinates 2410, -2670, 0258 End Coordinates 2579, -2729, 0260 Step on the tree stump and race towards the ring before time runs out. |
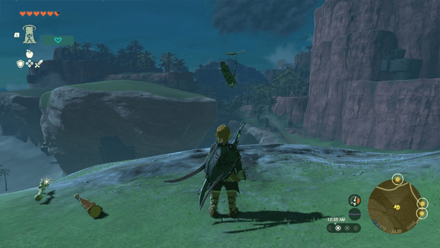
 Enlarge EnlargeKorok Seed |
Start Coordinates 2282, -2657, 0182 Stand by the pinwheel located under the giant tree and shoot the moving balloon. |
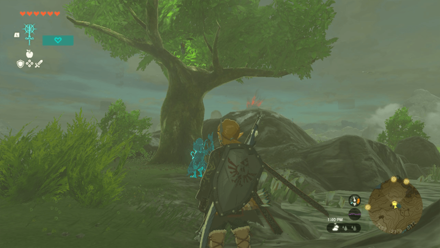
 Enlarge EnlargeKorok Seed |
Start Coordinates 2293, -3020, 0183 Chase the moving sparkles circling around the tree and interact with it to reveal the Korok. |
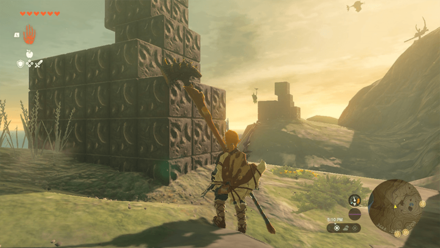
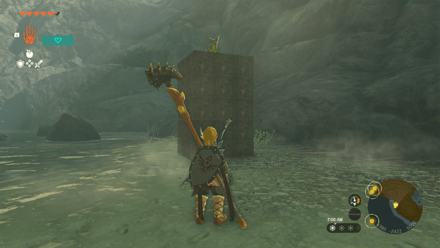
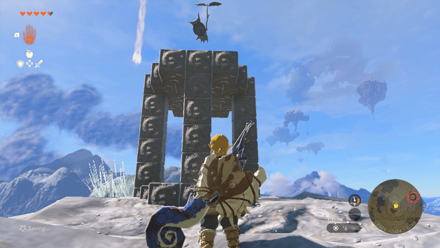 Enlarge EnlargeKorok Seed |
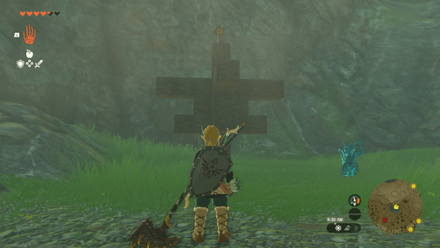
Start Coordinates 2556, -2485, 0253 Place the missing block on the eastern side of the metal structure. |
 Enlarge EnlargeKorok Seed |
Start Coordinates 2877, -2685, 0192 Using Ultrahand, plunge the cork deep into the water and then let go to pull the opposite cork out. |
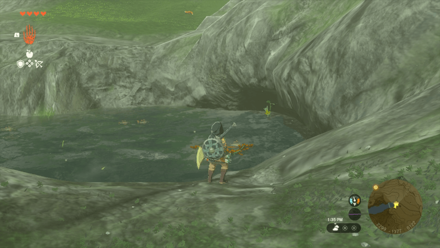
 Enlarge EnlargeKorok Seed |
Start Coordinates 3016, -2538, 0123 Jump into the middle of the ring of water lilies in the water. |
 Enlarge EnlargeKorok Seed |
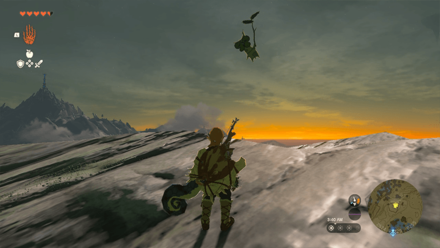
Start Coordinates 1936, -2777, 0387 Stand by the pinwheel located at the highest point of Mount Floria and shoot the moving balloons. |
 Enlarge EnlargeKorok Seed |
Start Coordinates 2141, -2602, 0259 Place three apples on the empty bowls in front of the prayer statues. |
 Enlarge EnlargeKorok Seed |
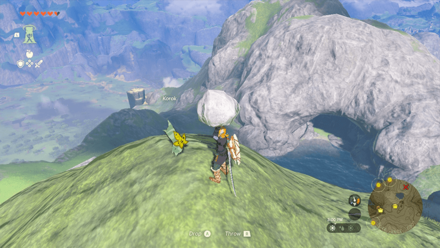
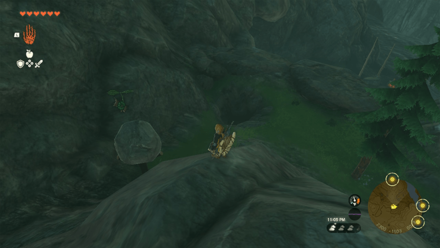
Start Coordinates 2044, -2661, 0307 Pick up the rock found on top of the hill to reveal the Korok. |
 Enlarge EnlargeKorok Seed |
Start Coordinates 1775, -2769, 0316 Climb on top of the tree and interact with the sparkles to reveal the Korok. |
 Enlarge EnlargeKorok Seed |
Start Coordinates 2293, -1510, 0067 Place the nearby boulder ontop of the wooden pedestal to reveal the Korok. |
 Enlarge EnlargeKorok Seed |
Start Coordinates 2509, -1569, 0025 Locate the Korok sign underneath the small rock cavern with ritual statues and use Ascend to pass through it. |
 Enlarge EnlargeKorok Seed x2 |
Start Coordinates 2476, -1741, 0010 End Coordinates 2612, -1868, 0019 Bring the Korok to its friend on the other side of the river. |
 Enlarge EnlargeKorok Seed |
Start Coordinates 2801, -1847, 0008 Jump into the middle of the ring of water lilies in the water. |
 Enlarge EnlargeKorok Seed |
Start Coordinates 2513, -1866, 0138 Attach the platforms to the cork and then throw it off the cliff to uncork the hole and get the Korok Seed. |
 Enlarge EnlargeKorok Seed |
Start Coordinates 2530, -1748, 0045 Shoot the balloon underneath the Cliffs of Quince. |
 Enlarge EnlargeKorok Seed |
Start Coordinates 2725, -2122, 0150 Place an apple on the empty bowl in front of the prayer statue. |
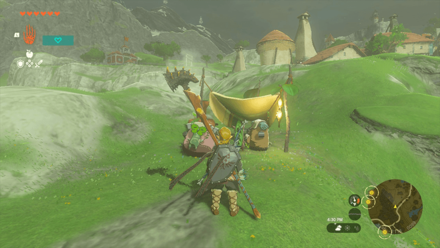
 Enlarge EnlargeKorok Seed x2 |
Start Coordinates 2452, -2912, 0220 End Coordinates 2919, -3082, 0146 Take the Korok to its friend in Dunsel Plateau. |
 Enlarge EnlargeKorok Seed |
Start Coordinates 3288, -2179, 0169 Interact with the sparkles on top of the flag pole. |
 Enlarge EnlargeKorok Seed |
Start Coordinates 3264, -2226, 0107 Pick up the rock found on a small isle in the middle of Firly Pond. |
 Enlarge EnlargeKorok Seed x2 |
Start Coordinates 3245, -2283, 0130 End Coordinates 3261, -2396, 0217 Take the Korok to its friend up on the hillside of Ebon Mountain. |
 Enlarge EnlargeKorok Seed |
Start Coordinates 3418, -2384, 0234 Climb on top of the rocky outcrop in Ebon Mountain and shoot the three balloons near it. |
 Enlarge EnlargeKorok Seed |
Start Coordinates 3445, -2500, 0209 Place the missing piece in the second layer. A copy of the finished product is located south of it for your reference. |
 Enlarge EnlargeKorok Seed |
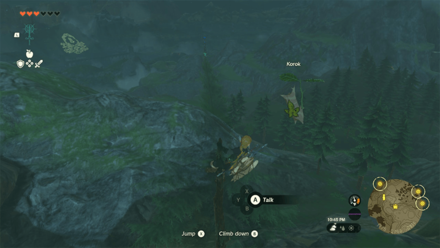
Start Coordinates 3676, -2193, 0217 Pick up the rock on top of the tree. |
 Enlarge EnlargeKorok Seed |
Start Coordinates 3783, -2124, 0285 Interact with the sparkles on top of Hateno Ancient Tech Lab. |
 Enlarge EnlargeKorok Seed |
Start Coordinates 3018, -2033, 0050 End Coordinates 2978, -2026, 0017 Jump from the initial platform and glide towards the target platform. |
 Enlarge EnlargeKorok Seed |
Start Coordinates 2835, -2120, 0020 Interact with the sparkles on the roof of the small shack. |
 Enlarge EnlargeKorok Seed |
Start Coordinates 2868, -2186, 0034 Chase the moving sparkles circling around the tree and interact with it to reveal the Korok. |
 Enlarge EnlargeKorok Seed x2 |
Start Coordinates 2859, -1913, 0040 End Coordinates 3250, -2114, 0099 Take the Korok to its friend on a hill near Ginner Woods. |
 Enlarge EnlargeKorok Seed |
Start Coordinates 3710, -1943, 0176 Chase the moving sparkles circling around the tree and interact with it to reveal the Korok. |
 Enlarge EnlargeKorok Seed |
Start Coordinates 4038, -2309, 0007 Hit the dandelion and interact with it before it lands on the ground. |
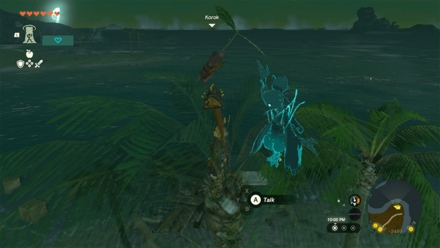 Enlarge EnlargeKorok Seed |
Start Coordinates 3932, -2480, 0018 Climb on top of the palm tree and interact with the sparkles. |
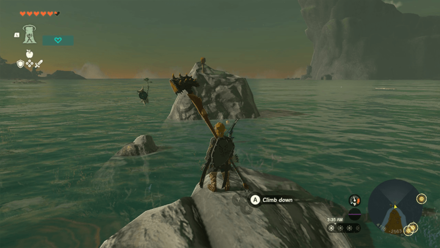 Enlarge EnlargeKorok Seed |
Start Coordinates 4118, -2573, 0000 Examine the sparkles on top of the rock near Hateno Beach. |
 Enlarge EnlargeKorok Seed |
Start Coordinates 4394, -2413, 0005 Place the missing block in the second layer to form a rectangular-shaped structure. |
 Enlarge EnlargeKorok Seed |
Start Coordinates 2278, -2360, 0180 Shoot the floating balloon on top of the tree with an arrow. |
 Enlarge EnlargeKorok Seed |
Start Coordinates 2548, -3206, 0092 End Coordinates 2540, -3288, 0063 Jump from the initial platform located on the cliff and glide towards the target platform. |
 Enlarge EnlargeKorok Seed |
Start Coordinates 2197, -3493, 0083 End Coordinates 2365, -3437, 0086 Step on the tree stump and race towards the ring before time runs out. |
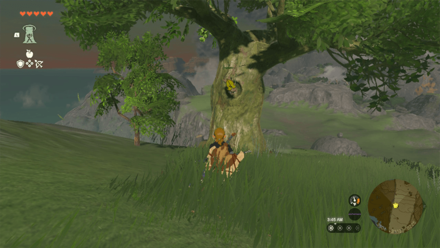
 Enlarge EnlargeKorok Seed |
Start Coordinates 1962, -2629, 0258 Shoot the acorn hanging under the tree to reveal the Korok. |
 Enlarge EnlargeKorok Seed |
Start Coordinates 2810, -2247, 0125 Pick up the lone rock on a curved stone platform above the encampment's prison cells. |
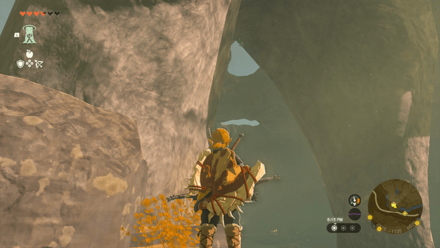
 Enlarge EnlargeKorok Seed |
Start Coordinates 1372, -2762, 0125 Go through the underpass in Tobio's Hollow. Look up and ascend through the target. |
 Enlarge EnlargeKorok Seed |
Start Coordinates 3236, -1544, 0197 Pick up the nearby rock and place it in the gap of the rock circle. |
 Enlarge EnlargeKorok Seed |
Start Coordinates 2922, -1392, 0379 Attach the stone platforms to the cork and then throw it off the cliff to uncork the hole and get the Korok Seed. |
 Enlarge EnlargeKorok Seed |
Start Coordinates 3250, -1334, 0163 Place the L-shaped block on the eastern side of the main block. |
 Enlarge EnlargeKorok Seed |
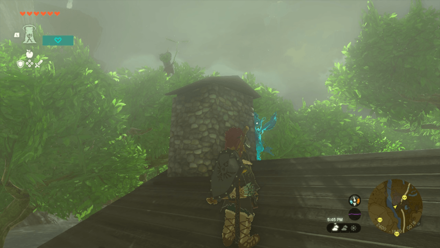
Start Coordinates 2397, -1844, 0022 Examine the sparkles on top of the chimney. |
 Enlarge EnlargeKorok Seed |
Start Coordinates 2414, -2270, 0113 Place the rock in the middle gap of the right pattern, then place the second one at the top of the left pattern. |
Korok Seed Map: All Korok Seed Locations
East Necluda Quests
Side Quests
| Quest | Coordinates |
|---|---|
 Enlarge EnlargeA New Champion's Tunic |
3306, -2297, 0112 |
 Enlarge EnlargeDantz's Prize Cows |
3626, -2075, 0178 |
 Enlarge EnlargeA Bottled Cry for Help |
3945, -2508, 0000 |
 Enlarge EnlargeHomegrown in Hateno |
3298, -2123, 0109 |
 Enlarge EnlargeManny's Beloved |
3375, -2131, 0129 |
 Enlarge EnlargePhotographing a Chuchu |
3409, -2150, 0121 |
 Enlarge EnlargeTeach Me a Lesson |
3361, -1969, 0129 |
 Enlarge EnlargeRattled Ralera |
2845, -3462, 0004 |
|
Uma's Garden |
3335, -2036, 0117 |
 Enlarge EnlargeDad's Blue Shirt |
2892, -3433, 0000 |
 Enlarge EnlargeLurelin Resort Project |
2858, -3516, 0000 |
 Enlarge EnlargeA Way to Trade, Washed Away |
2957, -3492, 0001 |
Side Adventures
| Quest | Coordinates |
|---|---|
 Enlarge EnlargeBring Peace to Necluda |
2205, -1791, 0016 |
 Enlarge EnlargePresenting: The Travel Medallion |
3780, -2123, 0251 |
|
Enlarge Presenting: Hero's Path Mode |
3780, -2123, 0251 |
|
Enlarge Presenting: Sensor + |
3780, -2123, 0251 |
 Enlarge EnlargeA Letter to Koyin |
3630, -2045, 0175 |
|
Enlarge Filling Out the Compendium |
3773, -2128, 0250 |
 Enlarge EnlargeA New Signature Food |
3430, -2082, 0131 |
 Enlarge EnlargeReede's Secret |
3445, -2091, 0131 |
 Enlarge EnlargeTeam Cece or Team Reede |
3354, -2125, 0121 |
 Enlarge EnlargeCece's Secret |
3358, -2139, 0120 |
 Enlarge EnlargeThe Mayoral Election |
- |
 Enlarge EnlargeRuffian-Infested Village |
2785, -3270, 0083 |
 Enlarge EnlargeLurelin Village Restoration Project |
2874, -3443, 0000 |
East Necluda Settlements
All Towns and Settlement Locations
| Overworld Location | Coordinates |
|---|---|
 Enlarge EnlargeHateno Village |
3266, -2136, 0100 |
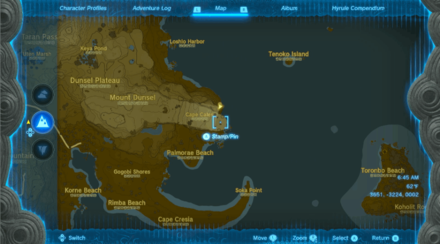
 Enlarge EnlargeLurelin Village |
3035, -3463, 0000 |
East Necluda Hudson Signs
Addison Sign Locations
| Location | Solution |
|---|---|
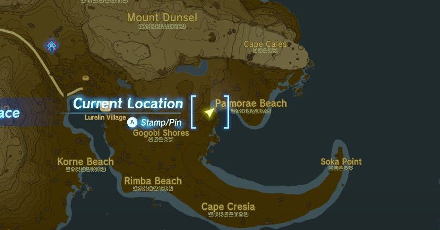
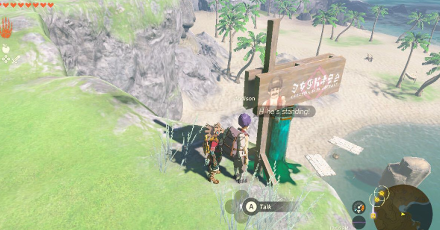
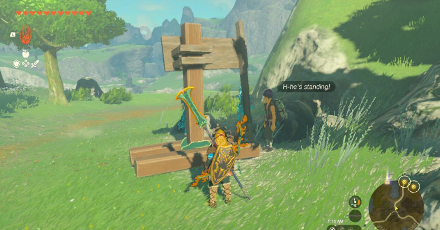
 Enlarge Enlarge |
 Enlarge Enlarge |
| Coordinates: 2626, -2595, 0153 Solution: Make a stand for the sign using logs by cutting down trees. |
|
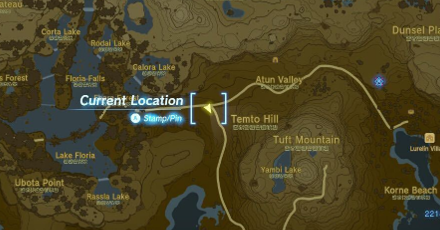
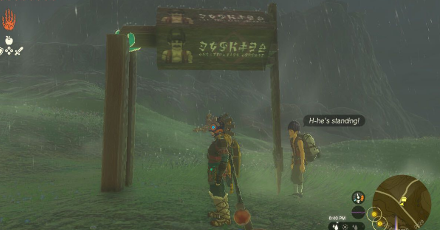
 Enlarge Enlarge |
 Enlarge Enlarge |
| Coordinates: 3358, -3493, 0037 Solution: Use the Zonai Stake to prop up the sign. |
|
 Enlarge Enlarge |
 Enlarge Enlarge |
| Coordinates: 2214, -3367, 0029 Solution: Slide in the wooden leg inside the slot to use it as a base for the sign. |
|
 Enlarge Enlarge |
 Enlarge Enlarge |
| Coordinates: 3141, -2139, 0063 Solution: Slot in a wooden leg to act body to make a base for the sign. |
|
All Hudson Sign Locations: How to Help Addison's Signs Stand
East Necluda Points of Interest
Cave Locations and Coordinates
| Overworld Location | Coordinates |
|---|---|
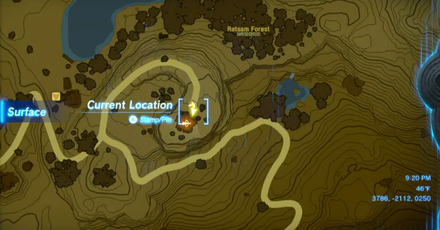
 Enlarge EnlargeRetsam Forest Cave |
3760, -2060, 0212 |
 Enlarge EnlargeMapla Point Cave |
4556, -2254, 0000 |
 Enlarge EnlargeDeepback Bay Cave |
4212, -2556, 0002 |
 Enlarge EnlargeMount Dunsel Cave |
3232, -3036, 0039 |
 Enlarge EnlargeSarjon Woods Cave |
1206, -3172, 0028 |
 Enlarge EnlargeRobred Dropoff Cave |
2487, -1467, 0013 |
 Enlarge EnlargeLanayru Road East Cave |
3072, -1139, 0094 |
 Enlarge EnlargeLanayru Road South Cave |
2697, -1315, 0114 |
 Enlarge EnlargeAtun Valley Cave |
2453, -3191, 0066 |
 Enlarge EnlargeCape Cales Cliffbase Cave |
3651, -3224, 0002 |
 Enlarge EnlargeTobio's Hollow Cave |
1168, -2444, 0167 |
Well Locations and Coordinates
| Overworld Location | Coordinates |
|---|---|
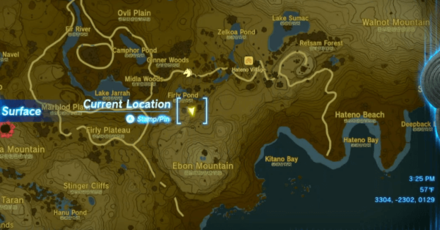 Enlarge EnlargeZelda's Secret Well |
3304, -2302, 0129 |
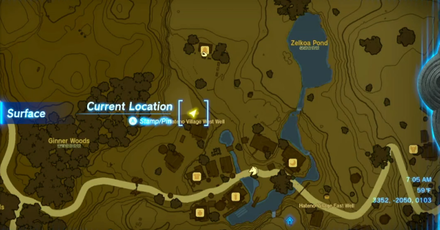
 Enlarge EnlargeHateno Village East Well |
3512, -2153, 0129 |
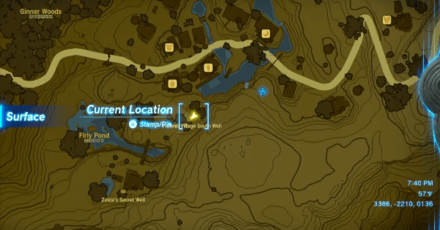 Enlarge EnlargeHateno Village South Well |
3386, -2210, 0136 |
 Enlarge EnlargeHateno Village West Well |
3352, -2050, 0133 |
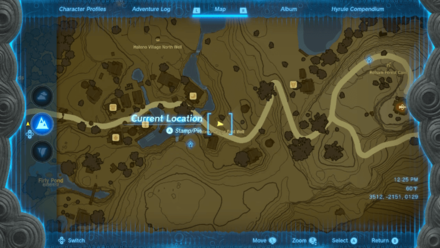
 Enlarge EnlargeHateno Village North Well |
3420, -2030, -0137 |
 Enlarge EnlargeLurelin Village Well |
2938, -3377, 0012 |
Notable Map Locations
| Overworld Location | Coordinates |
|---|---|
 Enlarge EnlargeHateno Ancient Tech Lab |
3786, -2112, 0250 |
Hateno Village Research Lab Walkthrough and How to Unlock the Sensor
The Legend of Zelda: Tears of the Kingdom Related Guides

Interactive Map of Hyrule:
All Locations and Map Icons
All Area Maps and Locations
| Hyrule Map Locations | |||||
|---|---|---|---|---|---|
Other Maps
List of Surface Regions
Comment
Author

The Legend of Zelda: Tears of the Kingdom Walkthrough & Guides Wiki
East Necluda Region Map: Korok Seed Locations, Shrines, and Quests
Please participate in our site
improvement survey
03/2026
improvement survey
03/2026
Would you assist in
improving Game8's site?
improving Game8's site?

×
We are listening to our users' valuable opinions and discussing how to act on them.
The information collected through this survey will be used for the purpose of improving our services. In addition, the information will only be disclosed a part of a statistic in a format that will not allow identification of personal information.
Begin Survey
Not Now
×
Please rate each item regarding Game8.co's Advertisements.
Amount of Ads
Very Dissatisfied
Somewhat Dissatisfied
Fine
Somewhat Satisfied
Highly Satisfied
Placement of Ads
Timing of Ad Display
Ad Loading Speed
Safeness of Ads
Content of Ads
×
Please rate each item regarding Game8.co's Quality of Articles.
Amount of information
Very Dissatisfied
Somewhat Dissatisfied
Fine
Somewhat Satisfied
Highly Satisfied
Frequency of updates
Speed of new information
Accuracy of articles
Understandibility of articles
Readability of sentences
×
Please rate each item regarding Game8.co's Usability of the Site.
Ease of finding information
Very Dissatisfied
Somewhat Dissatisfied
Fine
Somewhat Satisfied
Highly Satisfied
Loading Speed
Use of Color
Font Size
Visibility of Images
Easy to Understand Layout
×
Please rate each item regarding Game8.co's Message Boards, Comments.
Ease of Writing
Very Dissatisfied
Somewhat Dissatisfied
Fine
Somewhat Satisfied
Highly Satisfied
Readability
Ease in Finding Information
Comment Quality
Comment Quantity
Admin Response
×
Please rate each item regarding Game8.co's Site's new design.
Please rate our site's new design
Very Dissatisfied
Somewhat Dissatisfied
Fine
Somewhat Satisfied
Highly Satisfied
Do you think that the website's design change makes the site easier to use?
Has the new design made it easier for you to find information on the site?
Has the new design improved the overall visual appeal of the site?
How would you rate your overall satisfaction with the new design of the site?
×
How likely are you to recommend Game8 to someone you know?
Very Unlikely
0
1
2
3
4
5
6
7
8
9
10
Very Likely
If you have other opinions regarding potential improvement to the website, please share them with us. We would appreciate your honest opinion.
Note: This is a free response section, so you can proceed without entering anything.
Note: Please be sure not to enter any kind of personal information into your response.
Note: Please be sure not to enter any kind of personal information into your response.
×
Thank You
×
Thank you for participating in our survey! Your answers will help us to improve the quality of our website and services.
We hope you continue to make use of Game8.
We hope you continue to make use of Game8.
Close
Rankings
- We could not find the message board you were looking for.
Gaming News


Popular Games

Genshin Impact Walkthrough & Guides Wiki
Honkai: Star Rail Walkthrough & Guides Wiki
Umamusume: Pretty Derby Walkthrough & Guides Wiki
Pokemon Pokopia Walkthrough & Guides Wiki
Resident Evil Requiem (RE9) Walkthrough & Guides Wiki
Monster Hunter Wilds Walkthrough & Guides Wiki
Wuthering Waves Walkthrough & Guides Wiki
Arknights: Endfield Walkthrough & Guides Wiki
Pokemon FireRed and LeafGreen (FRLG) Walkthrough & Guides Wiki
Pokemon TCG Pocket (PTCGP) Strategies & Guides Wiki


Recommended Games
Diablo 4: Vessel of Hatred Walkthrough & Guides Wiki
Fire Emblem Heroes (FEH) Walkthrough & Guides Wiki
Yu-Gi-Oh! Master Duel Walkthrough & Guides Wiki
Super Smash Bros. Ultimate Walkthrough & Guides Wiki
Pokemon Brilliant Diamond and Shining Pearl (BDSP) Walkthrough & Guides Wiki
Elden Ring Shadow of the Erdtree Walkthrough & Guides Wiki
Monster Hunter World Walkthrough & Guides Wiki
The Legend of Zelda: Tears of the Kingdom Walkthrough & Guides Wiki
Persona 3 Reload Walkthrough & Guides Wiki
Cyberpunk 2077: Ultimate Edition Walkthrough & Guides Wiki


All rights reserved
© Nintendo. The Legend of Zelda and Nintendo Switch are trademarks of Nintendo.
The copyrights of videos of games used in our content and other intellectual property rights belong to the provider of the game.
The contents we provide on this site were created personally by members of the Game8 editorial department.
We refuse the right to reuse or repost content taken without our permission such as data or images to other sites.