This survey will take about 1 minute.
Your answers will help us to improve our website.
Zelda: Tears of the Kingdom (TotK)
Gerudo Highlands Region Map: Korok Seed Locations, Shrines, and Quests
▲ Get Pristine Weapons from the depths!
△ All 1000 Koroks | All 4 Great Fairies
▲ 81 Addison Signs | 147 Caves | 58 Wells
△ Tips: Farm Rupees | Starting Armor
▲ Best Weapons | Best Armor | Best Food
Gerudo Highlands is a region found in the Surface of Hyrule in The Legend of Zelda: Tears of the Kingdom (TotK). Read on to see the full Gerudo Highlands region map, as well as locations for Korok Seeds, Shrines, Quests, and other points of interest found within the Gerudo Highlands!
List of Contents
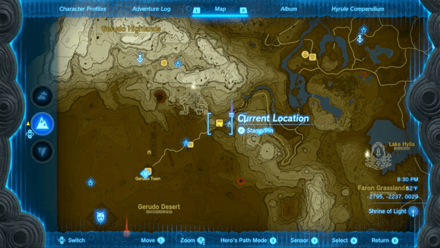
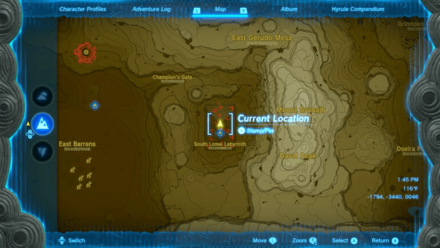
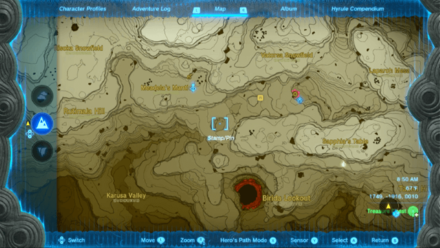
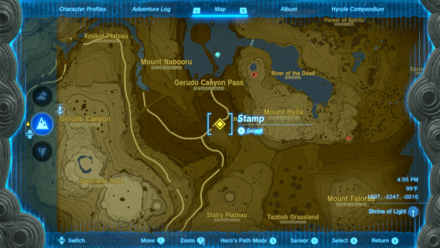
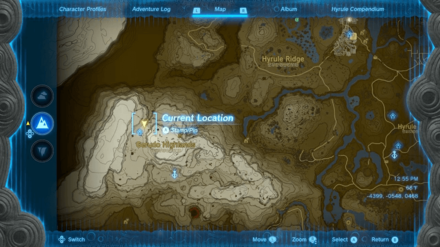
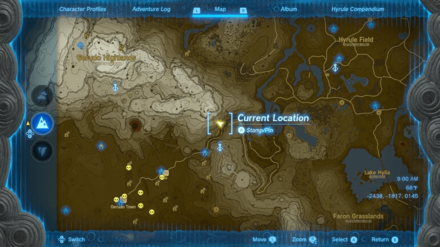
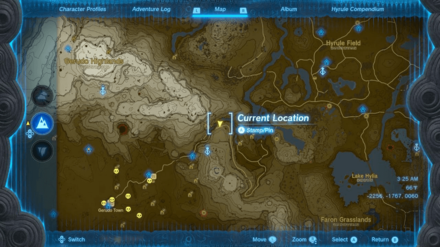
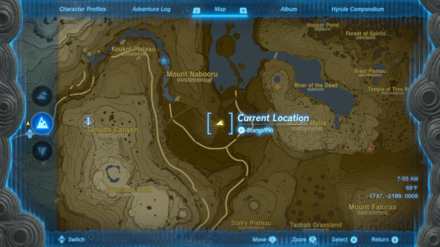
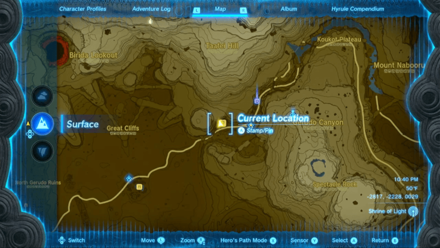
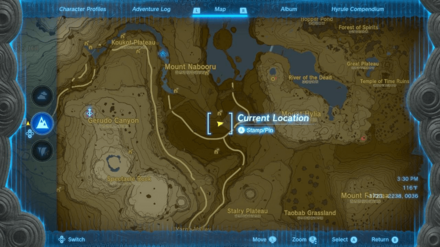
Gerudo Highlands Region Map
Gerudo Highlands Full Map
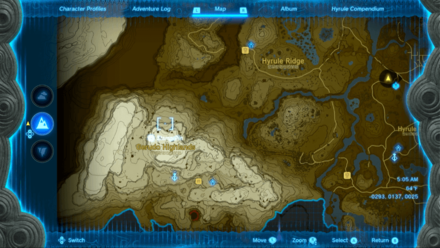 Enlarge EnlargeView Full Image |
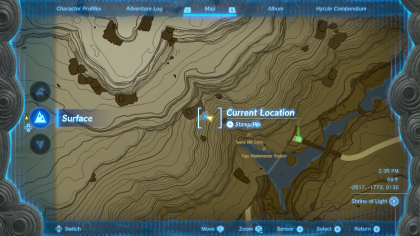
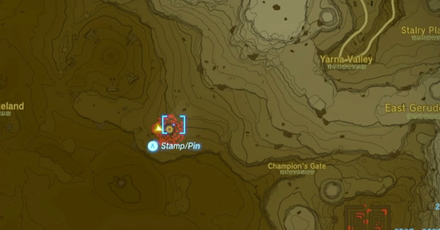
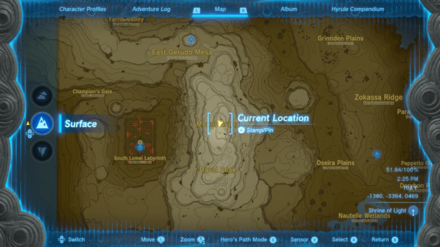
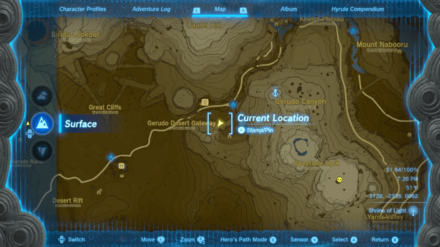
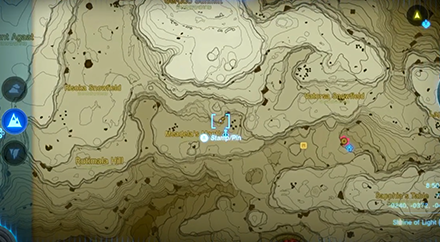
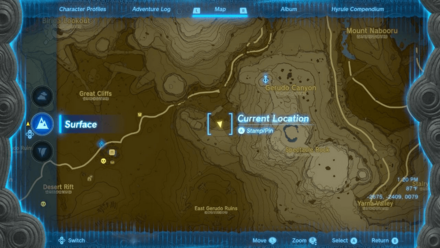
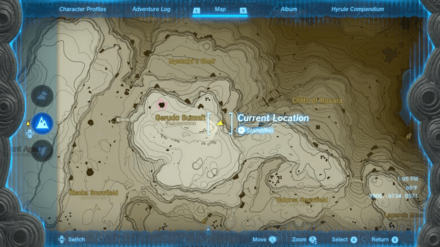
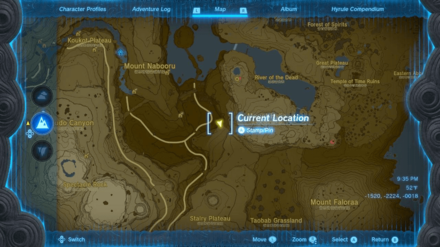
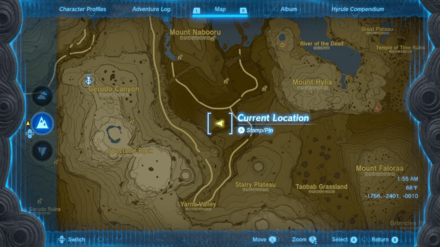
Gerudo Highlands Tower Map Location
Map and Coordinates
| Overworld Location | Coordinates |
|---|---|
 Enlarge EnlargeGerudo Highlands Skyview Tower |
-3959, -1313, 0422 |
 Enlarge EnlargeGerudo Canyon Skyview Tower |
-2459, -2178, 0301 |
Skyview Tower Guide: All Tower Locations
Gerudo Highlands Shrine Locations
Shrine Map Locations and Coordinates
| Location | Coordinates |
|---|---|
 Enlarge EnlargeRotsumamu Shrine (A Balanced Plan) |
-3406, -1364, 0335 |
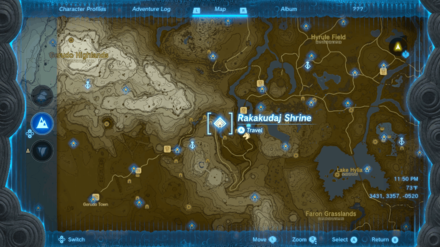 Enlarge EnlargeRakakudaj Shrine (Rauru's Blessing) |
-2037, -1851, 0064 |
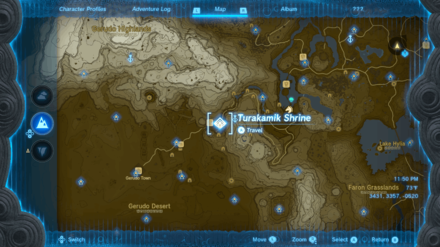 Enlarge EnlargeTurakamik Shrine (Hidden Metal) |
-2658, -2236, 0067 |
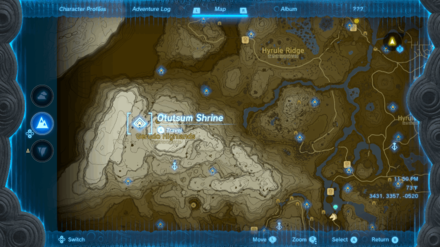 Enlarge EnlargeOtutsum Shrine (Rauru's Blessing) |
-4468, -0670, 0509 |
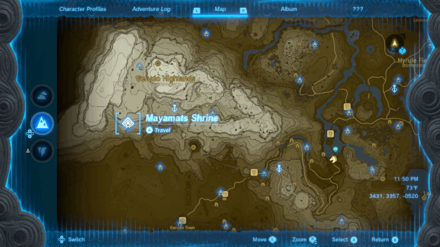 Enlarge EnlargeMayamats Shrine (A Route For a Ball) |
-4637, -1514, 0452 |
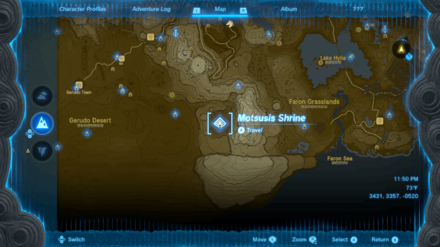 Enlarge EnlargeMotsusis Shrine (Rauru's Blessing) |
-1795, -3485, 0045 |
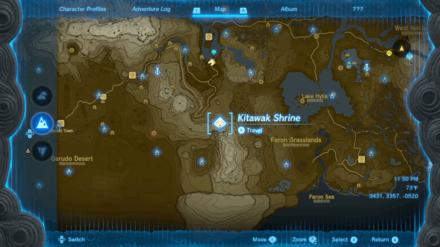 Enlarge EnlargeKitawak Shrine (Upward and Forward) |
-1529, -2928, 0321 |
 Enlarge EnlargeSuariwak Shrine (Rauru's Blessing) |
-2323, -1770, 0131 |
Gerudo Highlands Korok Seed Locations
Korok Seed Locations and Coordinates
| Overworld | Location Details |
|---|---|
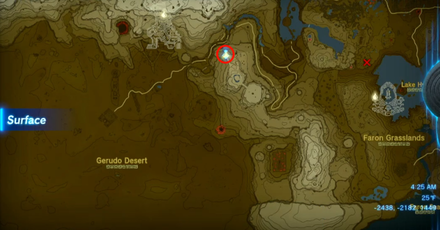
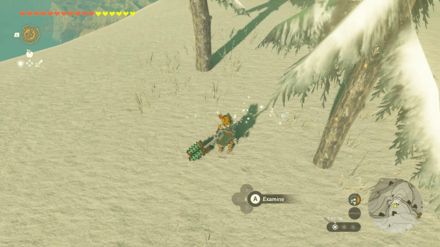
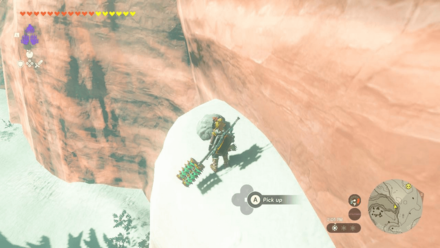
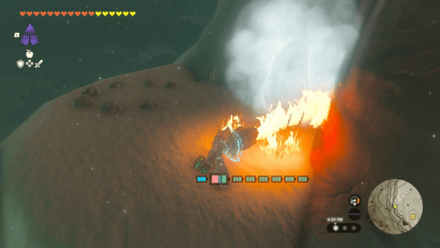
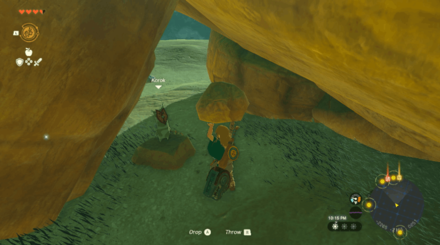 Enlarge EnlargeKorok Seed |
Start Coordinates -2265, -2165, 0251 Burn the pile of leaves and pick up the rock hidden beneath. |
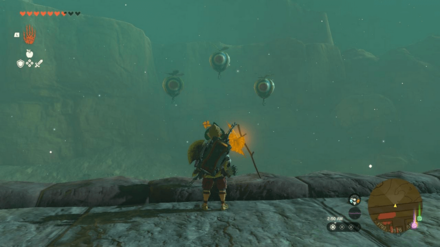 Enlarge EnlargeKorok Seed |
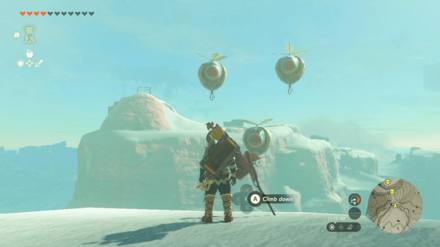
Start Coordinates -1792, -3576, 0121 Stand by the pinwheel on top of the South Lomei Labyrinth and shoot the three balloons. |
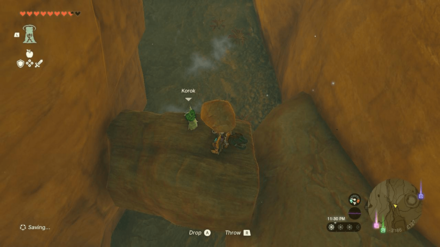 Enlarge EnlargeKorok Seed |
Start Coordinates -1945, -3186, 0127 Pick up the rock on top of the hanging boulder. |
 Enlarge EnlargeKorok Seed |
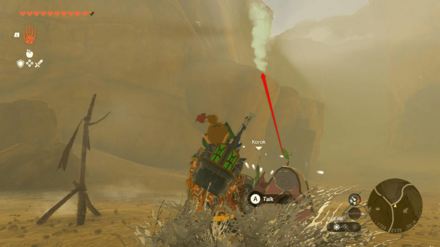
Start Coordinates -2734, -2373, 0127 Shoot the acorn hanging under the rock bridge to reveal the Korok. |
 Enlarge EnlargeKorok Seed |
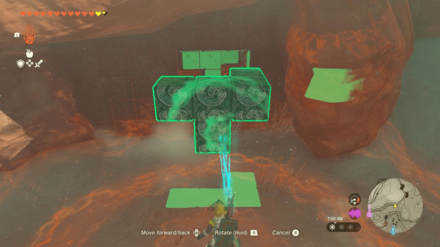
Start Coordinates -3214, -1858, 0074 Place the missing piece on the structure to form a symmetrical cross shape. |
 Enlarge EnlargeKorok Seed |
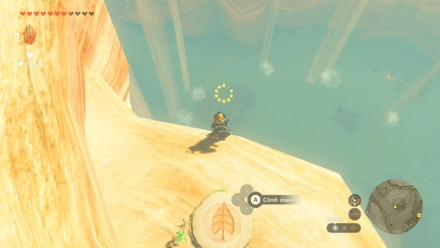
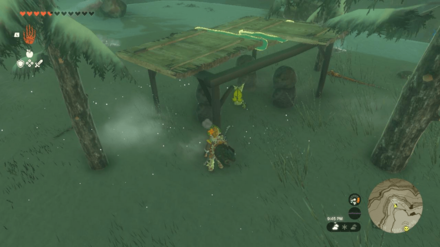
Start Coordinates -1428, -2976, 0271 Ascend through the tree stump to get the Korok Seed. |
 Enlarge EnlargeKorok Seed |
Start Coordinates -1145, -3301, 0268 Place the missing piece on the structure to form a symmetrical shape. |
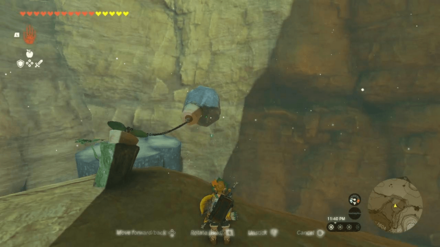 Enlarge EnlargeKorok Seed |
Start Coordinates -1604, -3086, 0201 Pull the cork out with any type of force (such as attaching a nearby boulder and letting it fall over the ledge) to get the Korok Seed |
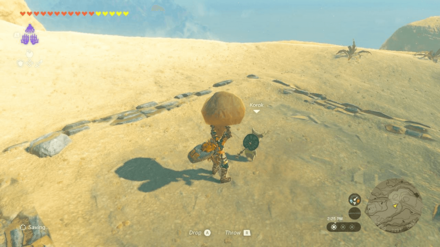 Enlarge EnlargeKorok Seed |
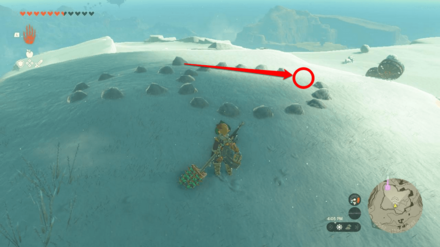
Start Coordinates -1385, -3491, 0434 Pick up the lone rock in the middle of the square. |
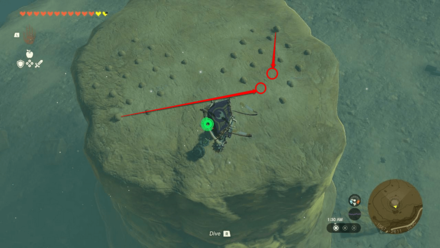
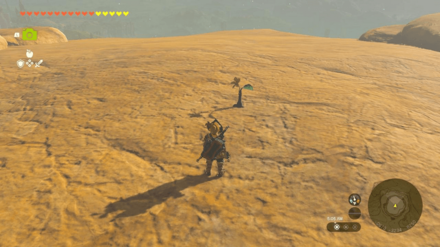 Enlarge EnlargeKorok Seed |
Start Coordinates -0970, -3234, 0250 End Coordinates -0996, -3253, 0252 Follow the yellow disappearing flowers until you reach the white flower. |
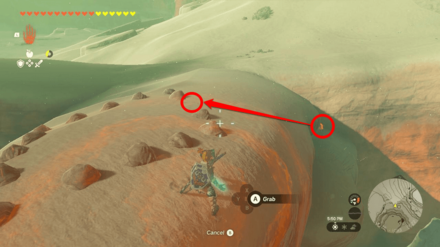
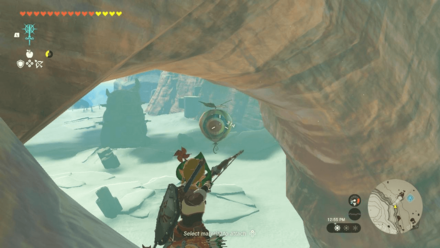
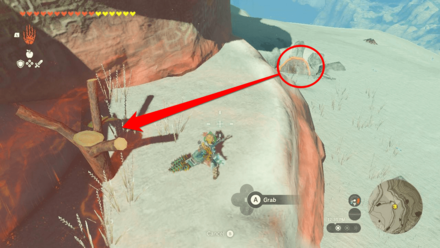
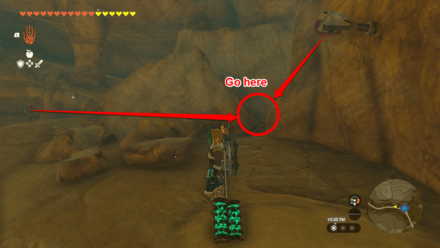
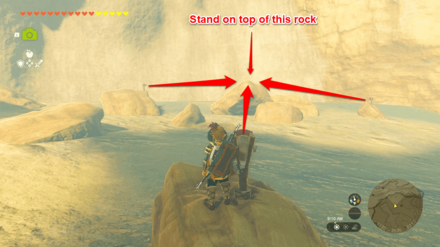 Enlarge EnlargeKorok Seed |
Start Coordinates -1179, -3509, 0217 Go on the top of the rock that is being pointed at by the three arrow signposts in the area, then examine the sparkles when they appear. |
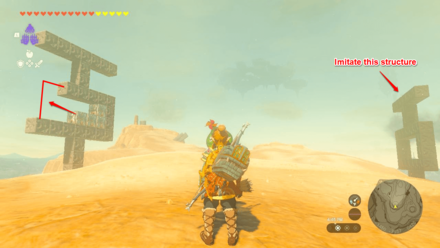 Enlarge EnlargeKorok Seed |
Start Coordinates -1450, -3657, 0426 Place the movable piece on the structure such that it is identical to the other metal structure in the area. |
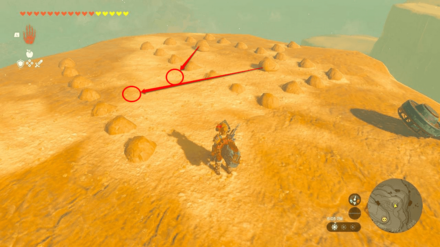 Enlarge EnlargeKorok Seed |
Start Coordinates -1380, -3721, 0395 Pick up the two rocks inside the rectangle pattern and put them in the space in the middle so that all the rocks are connected. |
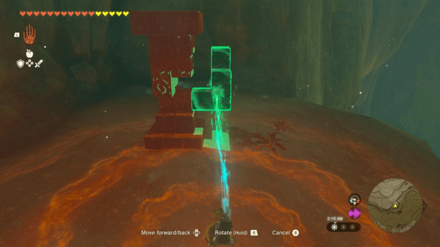
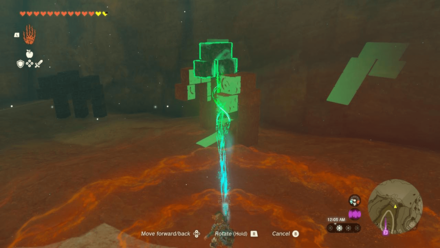 Enlarge EnlargeKorok Seed |
Start Coordinates -1932, -2815, 0151 Place the movable piece on the structure such that it is identical to the other metal structure in the area. |
 Enlarge EnlargeKorok Seed |
Start Coordinates -1566, -2628, 0230 Pick up the two rocks outside the two square patterns and drop them such that two 4x4 square patterns are formed. |
 Enlarge EnlargeKorok Seed x2 |
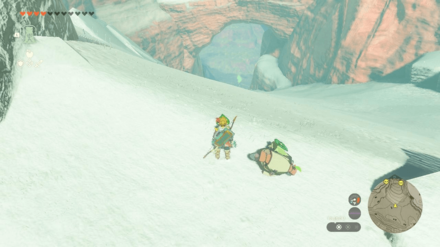
Start Coordinates -1709, -2339, -0014 End Coordinates -1643, -2359, 0007 Reunite the Korok with his friend at the higher ground to the east. |
 Enlarge EnlargeKorok Seed |
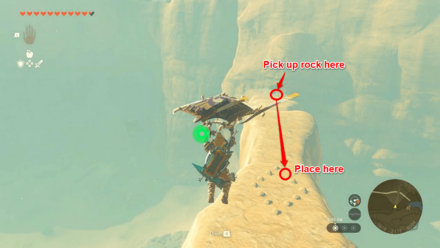
Start Coordinates -1943, -2130, 0081 Pick up the rock at the end of the bridge and place it to complete the diamond rock pattern. |
 Enlarge EnlargeKorok Seed x2 |
Start Coordinates -1984, -2080, 0033 End Coordinates -2040, -1995, 0041 Reunite the Korok with his friend up the river nearby. There is a Zonai contraption nearby that you can complete and use. |
 Enlarge EnlargeKorok Seed |
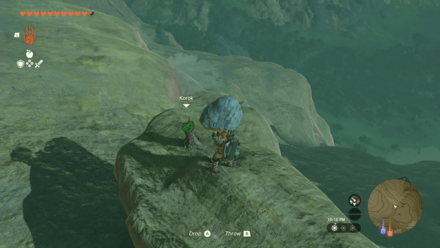
Start Coordinates -2138, -1486, 0280 Pick up the lone rock on top of the rock formation to reveal the Korok. |
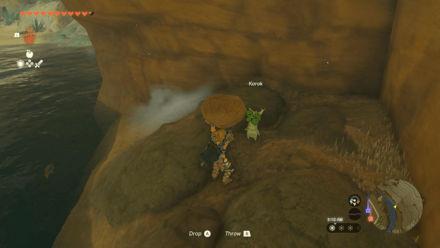 Enlarge EnlargeKorok Seed |
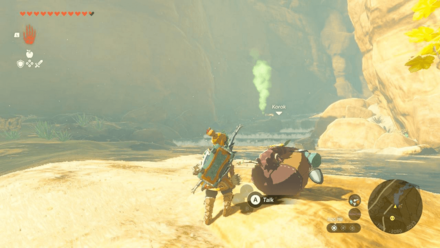
Start Coordinates -2197, -1681, 0061 Pick up the lone rock at the side of the river to reveal the Korok. |
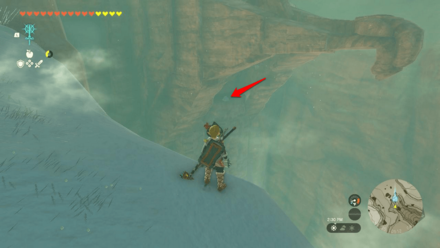
 Enlarge EnlargeKorok Seed |
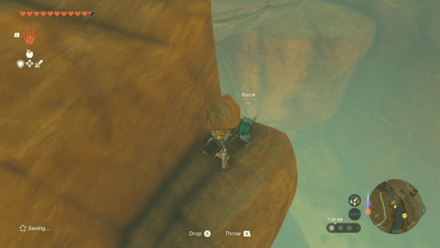
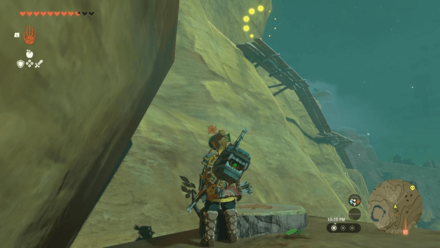
Start Coordinates -2242, -1740, 0105 Pick up the lone rock at the bump on the side of the cliff to reveal the Korok. |
 Enlarge EnlargeKorok Seed |
Start Coordinates -2329, -1824, 0137 Shoot the acorn hanging below the small bridge to reveal the Korok. |
 Enlarge EnlargeKorok Seed |
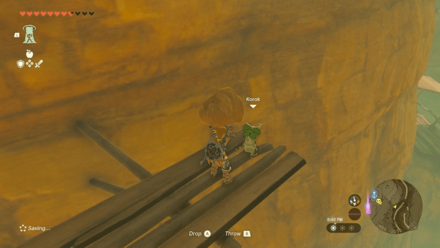
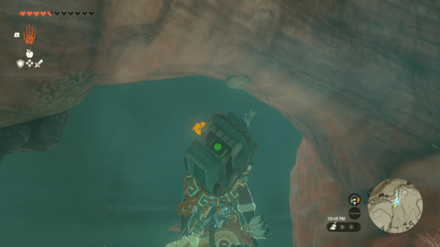
Start Coordinates -2484, -2054, 0121 Pick up the lone rock on the narrow wooden structure at the side of the cliff. |
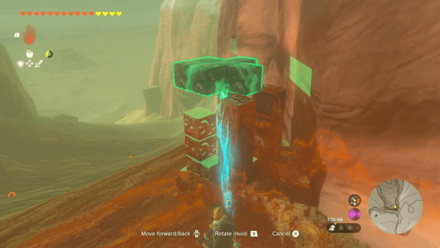
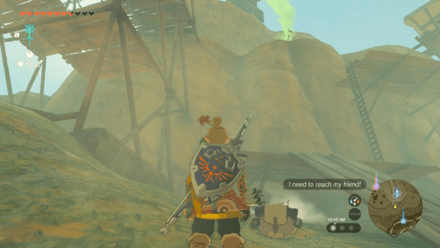 Enlarge EnlargeKorok Seed x2 |
Start Coordinates -2431, -2112, 0233 End Coordinates -2436, -2144, 0265 Reunite the Korok with its friend up the cliff. There is an elevator mechanism nearby that you can use. |
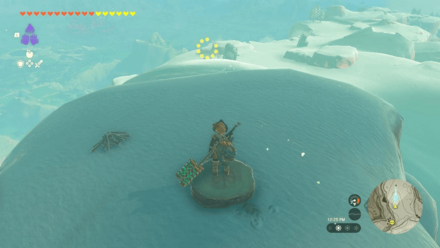
 Enlarge EnlargeKorok Seed |
Start Coordinates -2259, -2216, 0252 Place the nearby boulder on top of the wooden pedestal to reveal the Korok. |
 Enlarge EnlargeKorok Seed |
Start Coordinates -2251, -2358, 0275 End Coordinates -2263, -2340, 0290 Step on the tree stump and race towards the ring before time runs out. |
 Enlarge EnlargeKorok Seed |
Start Coordinates -2010, -2470, 0222 Shoot or strike the acorn hanging below the boulder to reveal the Korok. |
 Enlarge EnlargeKorok Seed |
Start Coordinates -3844, -1895, 0306 Hit the dandelion and catch it before it lands on the ground. |
 Enlarge EnlargeKorok Seed |
Start Coordinates -3896, -1641, 0289 Place the missing piece on the structure such that it forms a symmetrical shape. |
 Enlarge EnlargeKorok Seed |
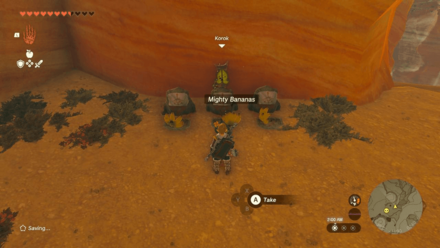
Start Coordinates -3919, -1590, 0240 Place a Mighty Banana on each empty bowl in front of the three Yiga Statues. |
 Enlarge EnlargeKorok Seed |
Start Coordinates -3842, -1466, 0364 End Coordinates -3806, -1475, 0314 Step on the tree stump and glide below towards the ring before time runs out. |
 Enlarge EnlargeKorok Seed |
Start Coordinates -3664, -1561, 0465 Place the nearby boulder on top of the wooden pedestal to reveal the Korok. |
 Enlarge EnlargeKorok Seed |
Start Coordinates -3562, -1559, 0452 Pick up the nearby rocks and place them on the gaps in the spiral rock pattern to reveal the Korok. |
 Enlarge EnlargeKorok Seed |
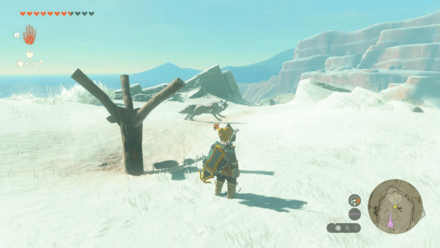
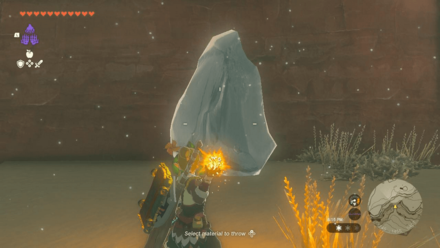
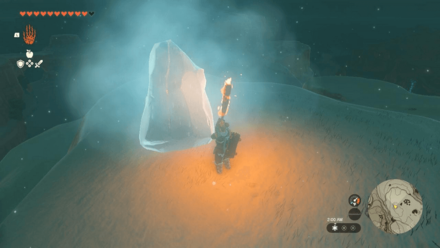
Start Coordinates -3246, -1458, 0401 Melt the ice block to reveal the lone rock, then pick it up to reveal the Korok. |
 Enlarge EnlargeKorok Seed |
Start Coordinates -3013, -1502, 0577 Melt the ice block to reveal the lone rock, then pick it up to reveal the Korok. |
 Enlarge EnlargeKorok Seed |
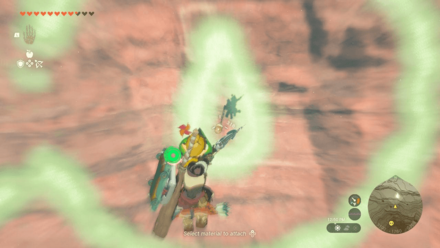
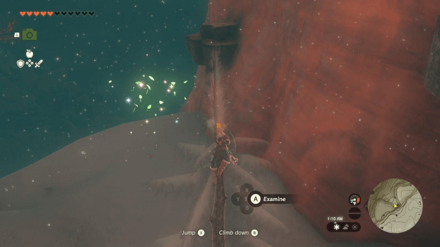
Start Coordinates -3192, -1744, 0351 Shoot the acorn hanging in the middle of the Tear of the Dragon marking at the side of the mountain. |
 Enlarge EnlargeKorok Seed |
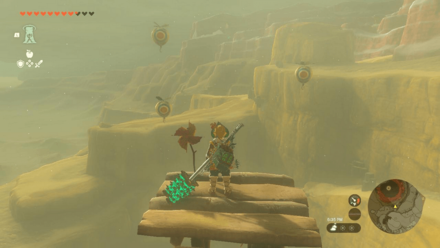
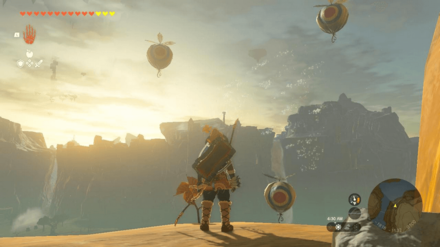
Start Coordinates -3572, -1853, 0358 Approach the pinwheel at the edge of the observatory beside the Chasm and shoot the three balloons that appear. |
 Enlarge EnlargeKorok Seed |
Start Coordinates -3584, -1986, 0245 Pull the cork out with force (such as attaching one of the nearby crates then letting it fall over the ledge) to get the Korok Seed. |
 Enlarge EnlargeKorok Seed |
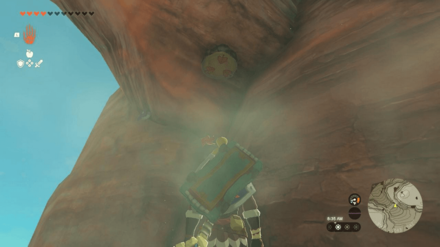
Start Coordinates -3584, -1985, 0205 Shoot the acorn hanging below the rock formation to reveal the Korok. |
 Enlarge EnlargeKorok Seed |
Start Coordinates -2811, -1549, 0472 Pull the cork out with force (such as attaching the nearby boulder then letting it fall over the ledge) to get the Korok Seed. |
 Enlarge EnlargeKorok Seed |
Start Coordinates -2648, -1541, 0582 Pick up the nearby rock and place it on the gap in the 8-shaped pattern to reveal the Korok. |
 Enlarge EnlargeKorok Seed |
Start Coordinates -2506, -1589, 0536 Make a roof out of the nearby wooden planks such that all three statues are covered above. |
 Enlarge EnlargeKorok Seed |
Start Coordinates -2672, -1355, 0516 Ascend through the tree stump under the rock bridge to get the Korok Seed. |
 Enlarge EnlargeKorok Seed |
Start Coordinates -2870, -1125, 0411 Climb to the top of the tree on the mountainside and examine the sparkling leaves that appear. |
 Enlarge EnlargeKorok Seed |
Start Coordinates -3162, -1036, 0428 Ascend through the tree stump under the rock bridge to get the Korok Seed. |
 Enlarge EnlargeKorok Seed |
Start Coordinates -3101, -1031, 0596 Make a roof out of at least two of the nearby wooden planks such that the statue is covered above. |
 Enlarge EnlargeKorok Seed |
Start Coordinates -3247, -1027, 0570 Approach the pinwheel and shoot the three balloons that appear. |
 Enlarge EnlargeKorok Seed x2 |
Start Coordinates -3197, -1169, 0479 End Coordinates -3142, -0620, 0199 Reunite the Korok with its friend at the bottom of the slope. There are a bunch of Zonaite items nearby that you can use. |
 Enlarge EnlargeKorok Seed |
Start Coordinates -1818, -1532, 0100 Approach the pinwheel at the edge of the mountainside and shoot the three balloons that appear. |
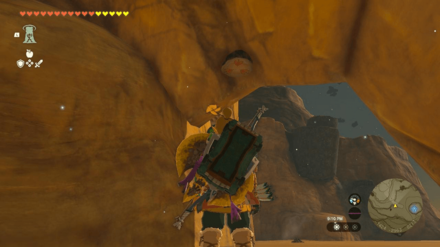
 Enlarge EnlargeKorok Seed |
Start Coordinates -3870, -1175, 0493 Place the missing piece into the gap in the metal structure. |
 Enlarge EnlargeKorok Seed |
Start Coordinates -4323, -1090, 0523 Pick up a rock and place it at the gap in the diamond pattern. The nearest tiny rock is located at the corner of the cliff nearby to the northeast. |
 Enlarge EnlargeKorok Seed |
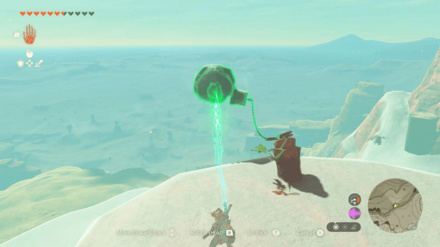
Start Coordinates -3060, -1283, 0498 Pull the cork out with any type of force (such as attaching the three panels nearby then letting it fall over the ledge) to get the Korok Seed. |
 Enlarge EnlargeKorok Seed |
Start Coordinates -2695, -1445, 0643 End Coordinates -2967, -1398, 0441 Step on the stump at the top of the slope then shield surf towards the ring at the bottom of the slope. |
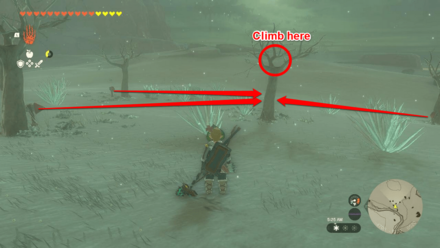 Enlarge EnlargeKorok Seed |
Start Coordinates -4691, -1235, 0522 Climb the tree that is being pointed at by the three arrow signposts in the area, then examine the sparkles when they appear. |
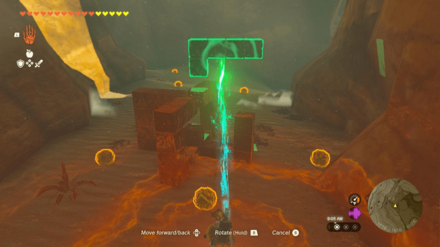
 Enlarge EnlargeKorok Seed |
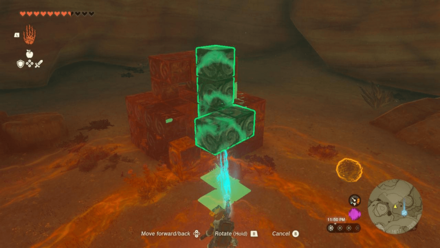
Start Coordinates -4910, -1242, 0453 Remove the movable piece from inside the metal structure, then rotate and place it on top such that it forms a symmetrical shape. |
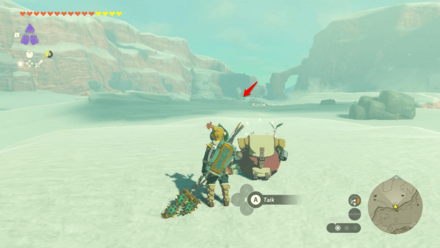 Enlarge EnlargeKorok Seed x2 |
Start Coordinates -4538, -1344, 0528 End Coordinates -4508, -0589, 0511 Reunite the Korok with its friend across Risoka Snowfield, to the north. There are a bunch of Zonaite items nearby to the west that you can use. |
 Enlarge EnlargeKorok Seed |
Start Coordinates -4388, -0714, 0561 Shoot the balloon floating underneath the rock bridge. |
 Enlarge EnlargeKorok Seed |
Start Coordinates -4376, -0525, 0451 Pick up the lone rock located underneath the statue to reveal the Korok. |
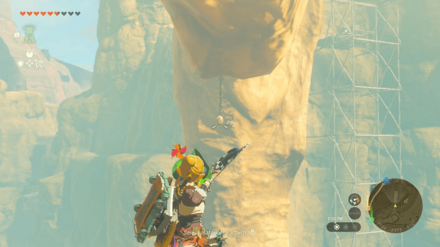
 Enlarge EnlargeKorok Seed |
Start Coordinates -4004, -0968, 0713 Pick up the lone rock at the top of the giant sword. Be careful of the Frost Gleeok nearby. |
 Enlarge EnlargeKorok Seed |
Start Coordinates -3974, -0610, 0657 Chase the moving sparkles circling around the trees and interact with it to reveal the Korok. |
 Enlarge EnlargeKorok Seed |
Start Coordinates -3968, -0324, 0446 Make a roof out of the nearby wooden planks nearby such that the two statues are covered above. |
 Enlarge EnlargeKorok Seed |
Start Coordinates -3620, -0403, 0239 End Coordinates -3653, -0391, 0273 Step on the stump at the edge of the wooden platform, then go up towards the ring above the roof of the higher platform. |
 Enlarge EnlargeKorok Seed |
Start Coordinates -3813, -0788, 0548 Melt the ice block to reveal the lone rock, then pick it up to reveal the Korok. |
 Enlarge EnlargeKorok Seed |
Start Coordinates -3721, -0803, 0641 End Coordinates -3674, -0798, 0632 Step on the stump, then shield surf towards the ring at the bottom of the slope. |
 Enlarge EnlargeKorok Seed |
Start Coordinates -3598, -0916, 0506 Pick up the lone rock at the side of the cliff. |
 Enlarge EnlargeKorok Seed |
Start Coordinates -3751, -1083, 0523 End Coordinates -3737, -0997, 0535 Follow the disappearing yellow flowers across the snow until you reach a white flower. |
 Enlarge EnlargeKorok Seed |
Start Coordinates -3490, -0983, 0615 Climb the tree and examine the sparkles at the top. |
 Enlarge EnlargeKorok Seed |
Start Coordinates -3565, -0733, 0556 Melt the ice block to reveal a rock, then pick up the rock and place it on the gap in the circle pattern. |
 Enlarge EnlargeKorok Seed |
Start Coordinates -4419, -0350, 0515 Place the nearby boulder on top of the wooden pedestal to reveal the Korok. |
 Enlarge EnlargeKorok Seed |
Start Coordinates -2621, -2197, 0065 Go to the corner being pointed at by the two arrow signposts in the area, then examine the sparkles when they appear. |
 Enlarge EnlargeKorok Seed x2 |
Start Coordinates -1017, -2634, 0199 End Coordinates -1373, -2443, 0105 Reunite the Korok with its friend across the valley. |
Korok Seed Map: All Korok Seed Locations
Gerudo Highlands Stables
All Stable Locations
| Overworld Location | Coordinates |
|---|---|
 Enlarge EnlargeGerudo Canyon Stable |
-2795, -2237, 0029 |
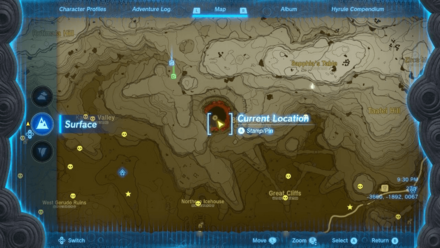
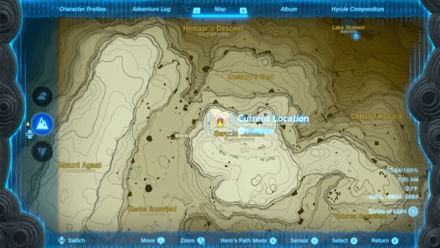
Gerudo Highlands Chasm Locations
Chasm Map Locations and Coordinates
| Location | Coordinates |
|---|---|
 Enlarge EnlargeEast Gerudo Chasm |
-2527, -3066, 0081 |
 Enlarge EnlargeBirida Lookout Chasm |
-3658, -1890, 0076 |
 Enlarge EnlargeSouth Lomei Chasm |
-1796, -3461, 0046 |
 Enlarge EnlargeYiga Clan Hideout Chasm |
-3427, -1351, 0335 |
 Enlarge EnlargeGerudo Summit Chasm |
-4204, -0654, 0682 |
Gerudo Highlands Quests
Side Quests
| Quest | Coordinates |
|---|---|
 Enlarge EnlargeThe South Lomei Prophecy |
-1794, -3440, 0046 |
 Enlarge EnlargeDisaster in Gerudo Canyon |
-1660, -2013, -0015 |
 Enlarge EnlargeCold-Endurance Contest |
-1380, -3364, 0469 |
|
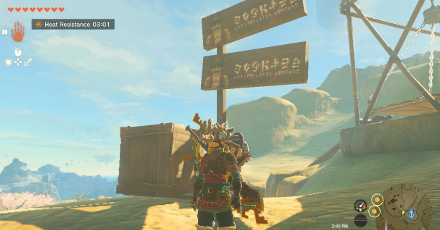
Enlarge Heat-Endurance Contest |
-1380, -3364, 0469 |
 Enlarge EnlargeGleeok Guts |
-2726, -2336, 0062 |
 Enlarge EnlargeThe Great Tumbleweed Purge |
-1005, -3582, 0219 |
Side Adventures
| Quest | Coordinates |
|---|---|
 Enlarge EnlargeThe Blocked Well |
-2813, -2237, 0029 |
 Enlarge EnlargeInfiltrating the Yiga Clan |
-3688. -1365, 0331 |
Gerudo Highlands Settlements
All Towns and Settlement Locations
| Overworld Location | Coordinates |
|---|---|
 Enlarge EnlargeYiga Clan Hideout |
-3497, -1312, 0335 |
Gerudo Highlands Hudson Signs
Addison Sign Locations
| Location | Solution |
|---|---|
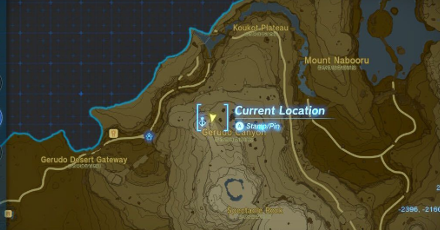 Enlarge Enlarge |
 Enlarge Enlarge |
| Coordinates: -2396, -2159, 0268 Solution: Place a box on the plank to act as counterweight for the sign. |
|
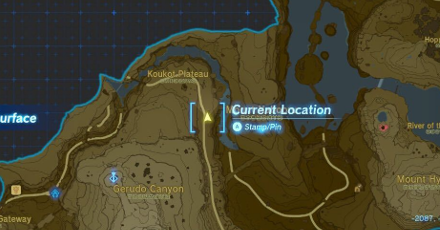 Enlarge Enlarge |
 Enlarge Enlarge |
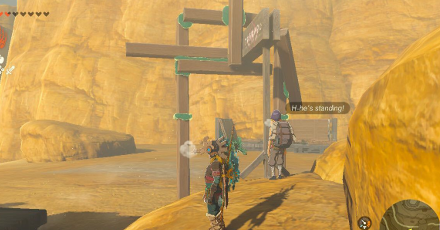
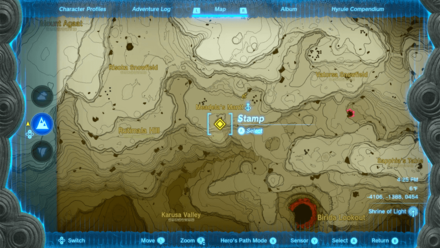
| Coordinates: -2088, -1951, 0139 Solution: Use a leg to slide it on the slot to the side of the sign. |
|
 Enlarge Enlarge |
 Enlarge Enlarge |
| Coordinates: -1799, -2616, 0159 Solution: Squish both sides of the sign using the wooden legs. |
|
 Enlarge Enlarge |
 Enlarge Enlarge |
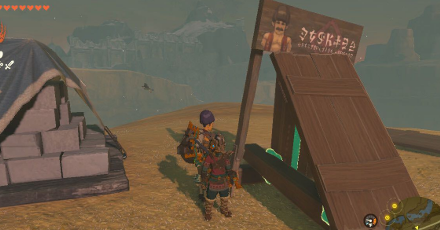
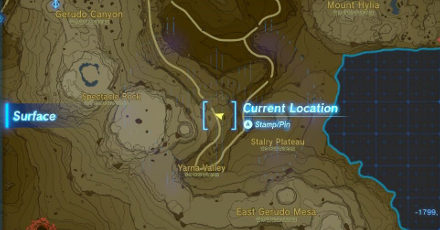
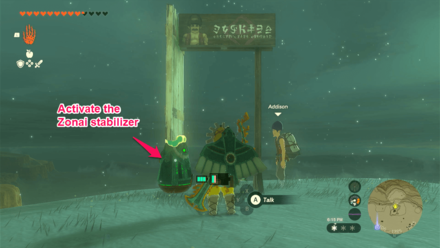
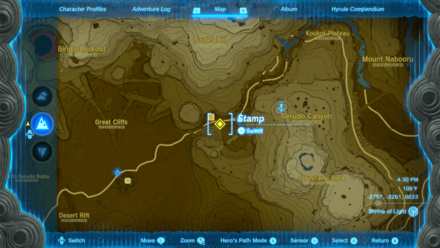
| Coordinates: -4106, -1388, 0454 Solution: Attach the wooden board to the Zonai stabilizer and place it in front of the Hudson sign. Activate it and ask Addison to let the sign go. |
|
 Enlarge Enlarge |
 Enlarge Enlarge |
| Coordinates: -2757, -2261, 0033 Solution: Use the boulder to hold the Hudson sign steady. Place small rocks at the bottom of the boulder to keep it stable. |
|
 Enlarge Enlarge |
 Enlarge Enlarge |
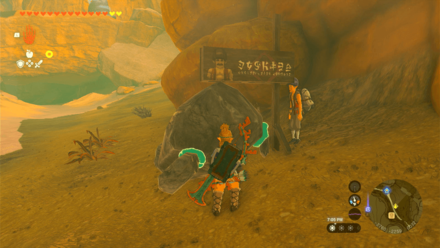
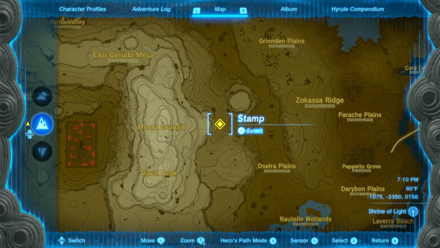
| Coordinates: -1075, -3350, 0156 Solution: Attach a wooden board on the Zonai stabilizer and activate it to hold the Hudson sign steady. Place the other wooden board under the stabilizer so it can stand on a flat surface. |
|
 Enlarge Enlarge |
 Enlarge Enlarge |
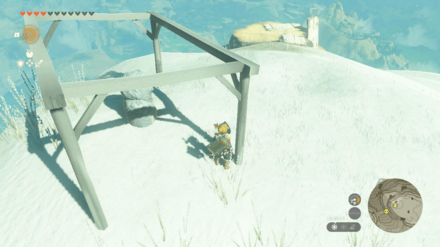
| Coordinates: -1607, -2247, -0016 Solution: Use the wooden ramp and beams to craft a makeshift stand for the Hudson sign to lean on. |
|
All Hudson Sign Locations: How to Help Addison's Signs Stand
Gerudo Highlands Points of Interest
Cave Locations and Coordinates
| Overworld Location | Coordinates |
|---|---|
 Enlarge EnlargeMeadela's Mantle Cave |
-3982, -1246, 0429 |
 Enlarge EnlargeGerudo Canyon Mine |
-2675, -2409, 0079 |
 Enlarge EnlargeMystathi's Shelf Cave |
-3900, -0734, 0571 |
 Enlarge EnlargeStatue of the Eighth Heroine Cave |
-4399, -0548, 0468 |
 Enlarge EnlargeTaafei Hill Cave |
-2476, -1813, 0172 |
 Enlarge EnlargeYiga Blademaster Station |
-2438, -1817, 0145 |
 Enlarge EnlargeMount Nabooru Cave |
-1805, -1966, 0031 |
 Enlarge EnlargeKoukot Plateau Cave |
-2256, -1787, 0060 |
 Enlarge EnlargeSpectacle Rock Cave |
-2223, -2410, 0248 |
 Enlarge EnlargeMount Nabooru South Cave |
-1737, -2189, 0008 |
 Enlarge EnlargeStalry Plateau Cave |
-1520, -2224, -0018 |
 Enlarge EnlargeLower Spectacle Rock Cave |
-1756, -2401, -0010 |
Well Locations and Coordinates
| Overworld Location | Coordinates |
|---|---|
 Enlarge EnlargeGerudo Canyon Well |
-2817, -2228, 0029 |
 Enlarge EnlargeMount Nabooru Well |
-1723, -2238, 0036 |
Notable Map Locations
| Overworld Location | Coordinates |
|---|---|
|
Enlarge Statue of the Eighth Heroine |
-4369, -0504, 0475 |
The Legend of Zelda: Tears of the Kingdom Related Guides

Interactive Map of Hyrule:
All Locations and Map Icons
All Area Maps and Locations
| Hyrule Map Locations | |||||
|---|---|---|---|---|---|
Other Maps
List of Surface Regions
Comment
Author

The Legend of Zelda: Tears of the Kingdom Walkthrough & Guides Wiki
Gerudo Highlands Region Map: Korok Seed Locations, Shrines, and Quests
Please participate in our site
improvement survey
03/2026
improvement survey
03/2026
Would you assist in
improving Game8's site?
improving Game8's site?

×
We are listening to our users' valuable opinions and discussing how to act on them.
The information collected through this survey will be used for the purpose of improving our services. In addition, the information will only be disclosed a part of a statistic in a format that will not allow identification of personal information.
Begin Survey
Not Now
×
Please rate each item regarding Game8.co's Advertisements.
Amount of Ads
Very Dissatisfied
Somewhat Dissatisfied
Fine
Somewhat Satisfied
Highly Satisfied
Placement of Ads
Timing of Ad Display
Ad Loading Speed
Safeness of Ads
Content of Ads
×
Please rate each item regarding Game8.co's Quality of Articles.
Amount of information
Very Dissatisfied
Somewhat Dissatisfied
Fine
Somewhat Satisfied
Highly Satisfied
Frequency of updates
Speed of new information
Accuracy of articles
Understandibility of articles
Readability of sentences
×
Please rate each item regarding Game8.co's Usability of the Site.
Ease of finding information
Very Dissatisfied
Somewhat Dissatisfied
Fine
Somewhat Satisfied
Highly Satisfied
Loading Speed
Use of Color
Font Size
Visibility of Images
Easy to Understand Layout
×
Please rate each item regarding Game8.co's Message Boards, Comments.
Ease of Writing
Very Dissatisfied
Somewhat Dissatisfied
Fine
Somewhat Satisfied
Highly Satisfied
Readability
Ease in Finding Information
Comment Quality
Comment Quantity
Admin Response
×
Please rate each item regarding Game8.co's Site's new design.
Please rate our site's new design
Very Dissatisfied
Somewhat Dissatisfied
Fine
Somewhat Satisfied
Highly Satisfied
Do you think that the website's design change makes the site easier to use?
Has the new design made it easier for you to find information on the site?
Has the new design improved the overall visual appeal of the site?
How would you rate your overall satisfaction with the new design of the site?
×
How likely are you to recommend Game8 to someone you know?
Very Unlikely
0
1
2
3
4
5
6
7
8
9
10
Very Likely
If you have other opinions regarding potential improvement to the website, please share them with us. We would appreciate your honest opinion.
Note: This is a free response section, so you can proceed without entering anything.
Note: Please be sure not to enter any kind of personal information into your response.
Note: Please be sure not to enter any kind of personal information into your response.
×
Thank You
×
Thank you for participating in our survey! Your answers will help us to improve the quality of our website and services.
We hope you continue to make use of Game8.
We hope you continue to make use of Game8.
Close
Rankings
- We could not find the message board you were looking for.
Gaming News


![Slay the Spire 2 Review [Early Access] | Still the Deckbuilder to Beat](https://img.game8.co/4433115/44e19e1fb0b4755466b9e516ec7ffb1e.png/thumb)

![Resident Evil Village Review [Switch 2] | Almost Flawless Port](https://img.game8.co/4432790/e1859f64830960ce4248d898f8cd38d9.jpeg/thumb)
Popular Games

Genshin Impact Walkthrough & Guides Wiki
Honkai: Star Rail Walkthrough & Guides Wiki
Umamusume: Pretty Derby Walkthrough & Guides Wiki
Pokemon Pokopia Walkthrough & Guides Wiki
Resident Evil Requiem (RE9) Walkthrough & Guides Wiki
Monster Hunter Wilds Walkthrough & Guides Wiki
Wuthering Waves Walkthrough & Guides Wiki
Arknights: Endfield Walkthrough & Guides Wiki
Pokemon FireRed and LeafGreen (FRLG) Walkthrough & Guides Wiki
Pokemon TCG Pocket (PTCGP) Strategies & Guides Wiki


Recommended Games
Fire Emblem Heroes (FEH) Walkthrough & Guides Wiki
Diablo 4: Vessel of Hatred Walkthrough & Guides Wiki
Yu-Gi-Oh! Master Duel Walkthrough & Guides Wiki
Super Smash Bros. Ultimate Walkthrough & Guides Wiki
Pokemon Brilliant Diamond and Shining Pearl (BDSP) Walkthrough & Guides Wiki
Elden Ring Shadow of the Erdtree Walkthrough & Guides Wiki
Monster Hunter World Walkthrough & Guides Wiki
The Legend of Zelda: Tears of the Kingdom Walkthrough & Guides Wiki
Persona 3 Reload Walkthrough & Guides Wiki
Cyberpunk 2077: Ultimate Edition Walkthrough & Guides Wiki


All rights reserved
© Nintendo. The Legend of Zelda and Nintendo Switch are trademarks of Nintendo.
The copyrights of videos of games used in our content and other intellectual property rights belong to the provider of the game.
The contents we provide on this site were created personally by members of the Game8 editorial department.
We refuse the right to reuse or repost content taken without our permission such as data or images to other sites.