Seeking the Pirate Hideout Walkthrough and How to Unlock
▲ Get Pristine Weapons from the depths!
△ All 1000 Koroks | All 4 Great Fairies
▲ 81 Addison Signs | 147 Caves | 58 Wells
△ Tips: Farm Rupees | Starting Armor
▲ Best Weapons | Best Armor | Best Food

Seeking the Pirate Hideout is a Side Quest in The Legend of Zelda: Tears of the Kingdom (TotK) that can be found in Eventide Island. Read on to learn how to unlock Seeking the Pirate Hideout, its location and rewards, walkthrough, as well as how to complete it.
List of Contents
How to Unlock Seeking the Pirate Hideout
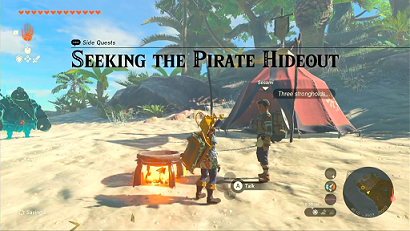
Talk to Sesami in Eventide Island

Seeking the Pirate Hideout starts by talking to Sesami at the northern point of Eventide Island.
Though optional, this Side Quest can also lead to the discovery of Marari-in Shrine.
Seeking the Pirate Hideout Location and Rewards
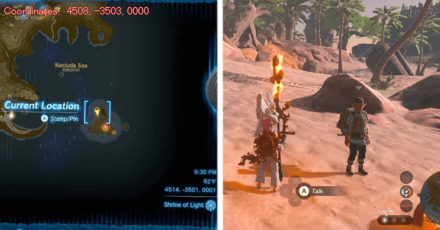
Necluda Sea - Eventide Island

The exact coordinates for this quest on the map are 4508, -3503, 0000.
Rewards
| Rewards |
|---|
| ・Blue-Maned Lynel Saber Horn |
Seeking the Pirate Hideout Walkthrough Guide
| How to Complete Seeking the Pirate Hideout |
|---|
Clear Out the Three Strongholds
You will need to take out the Monster Forces, composed of Moblins and Bokoblins, stationed in the three strongholds in the island.
You can either use Ascend on the towers for the high ground or directly storm the front.
A Bomb Flower could come in handy to take out groups of enemies or a Muddle Bud to turn them against each other.
Return to Sesami
After wiping out the monster forces, return to Sesami for your next task. He will tell you that a pirate ship just arrived and disappeared at the rear side of the island.
Find the Pirate Ship
Construct a Hover Bike using two fans and a steering stick and fly towards the southeast corner of the island. You'll find out that the pirate ship docked on a cave beneath the cliff.
Defeat All Monster Forces
More Monster Forces! Defeat all the enemies here to proceed.
If you want to make things easier with the Boss Bokoblin, just try to hit him towards the edge of the pirate ship until he falls (or hit him with a Muddle Bud and let the other monsters take him out).
Unlock Marari-in Shrine
The Marari-in Shrine is in a room just behind the ship. You can reach it by using Ultrahand to create a makeshift bridge with the wooden planks near the back of the ship.
Report Back to Sesami
When you're ready to go, return to Sesami and tell him you finished the job for him to receive a Blue-Maned Lynel Saber Horn, completing the quest.
The Legend of Zelda: Tears of the Kingdom Related Guides

List of All Walkthroughs
| All Quest Types | ||
|---|---|---|
 Main Quests Main Quests |
 Side Quests Side Quests |
 Side Adventures Side Adventures |
List of All Side Quests
Comment
Author
The Legend of Zelda: Tears of the Kingdom Walkthrough & Guides Wiki
Seeking the Pirate Hideout Walkthrough and How to Unlock
improvement survey
03/2026
improving Game8's site?

Your answers will help us to improve our website.
Note: Please be sure not to enter any kind of personal information into your response.

We hope you continue to make use of Game8.
Rankings
- We could not find the message board you were looking for.
Gaming News
Popular Games

Genshin Impact Walkthrough & Guides Wiki

Honkai: Star Rail Walkthrough & Guides Wiki

Umamusume: Pretty Derby Walkthrough & Guides Wiki

Pokemon Pokopia Walkthrough & Guides Wiki

Resident Evil Requiem (RE9) Walkthrough & Guides Wiki

Monster Hunter Wilds Walkthrough & Guides Wiki

Wuthering Waves Walkthrough & Guides Wiki

Arknights: Endfield Walkthrough & Guides Wiki

Pokemon FireRed and LeafGreen (FRLG) Walkthrough & Guides Wiki

Pokemon TCG Pocket (PTCGP) Strategies & Guides Wiki
Recommended Games

Diablo 4: Vessel of Hatred Walkthrough & Guides Wiki

Fire Emblem Heroes (FEH) Walkthrough & Guides Wiki

Yu-Gi-Oh! Master Duel Walkthrough & Guides Wiki

Super Smash Bros. Ultimate Walkthrough & Guides Wiki

Pokemon Brilliant Diamond and Shining Pearl (BDSP) Walkthrough & Guides Wiki

Elden Ring Shadow of the Erdtree Walkthrough & Guides Wiki

Monster Hunter World Walkthrough & Guides Wiki

The Legend of Zelda: Tears of the Kingdom Walkthrough & Guides Wiki

Persona 3 Reload Walkthrough & Guides Wiki

Cyberpunk 2077: Ultimate Edition Walkthrough & Guides Wiki
All rights reserved
© Nintendo. The Legend of Zelda and Nintendo Switch are trademarks of Nintendo.
The copyrights of videos of games used in our content and other intellectual property rights belong to the provider of the game.
The contents we provide on this site were created personally by members of the Game8 editorial department.
We refuse the right to reuse or repost content taken without our permission such as data or images to other sites.


