This survey will take about 1 minute.
Your answers will help us to improve our website.
Zelda: Tears of the Kingdom (TotK)
Hebra Mountains Region Map: Korok Seed Locations, Shrines, and Quests
▲ Get Pristine Weapons from the depths!
△ All 1000 Koroks | All 4 Great Fairies
▲ 81 Addison Signs | 147 Caves | 58 Wells
△ Tips: Farm Rupees | Starting Armor
▲ Best Weapons | Best Armor | Best Food
Hebra Mountains is a region found in the Surface of Hyrule in The Legend of Zelda: Tears of the Kingdom (TotK). Read on to see the full Hebra Mountains region map, as well as locations for Korok Seeds, Shrines, Quests, and other points of interest found within the Hebra Mountains!
List of Contents
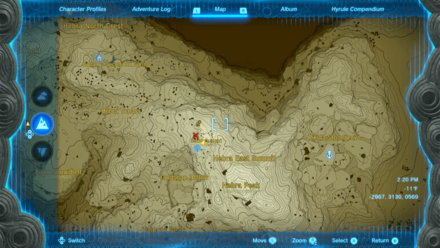
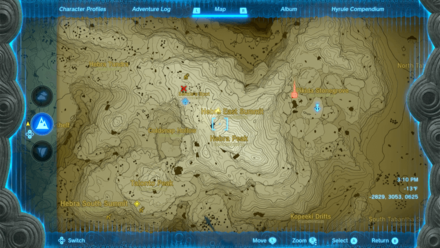
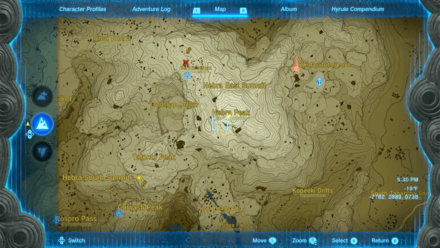
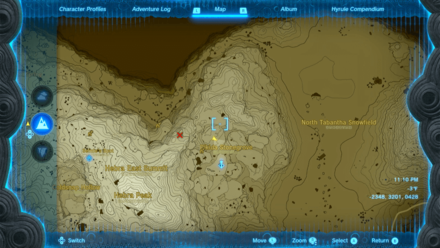
Hebra Mountains Region Map
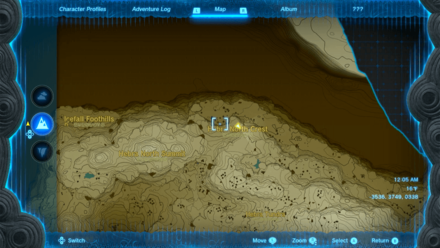
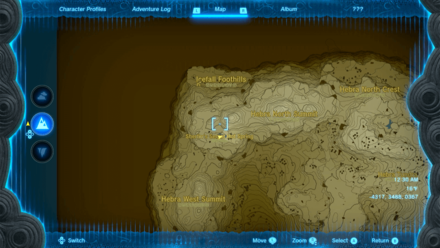
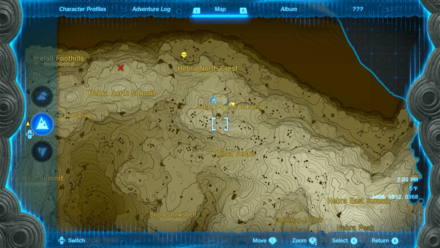
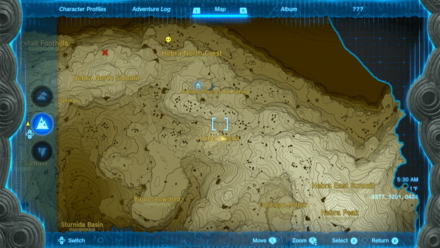
Hebra Mountains Full Map
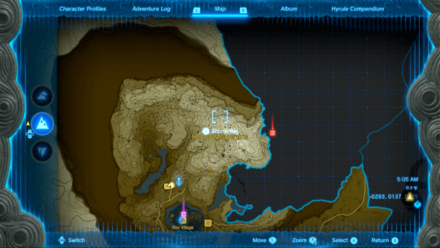 Enlarge EnlargeView Full Image |
Hebra Mountains Tower Map Location
Map and Coordinates
| Overworld Location | Coordinates |
|---|---|
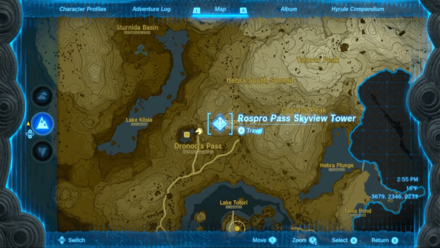 Enlarge EnlargeRospro Pass Skyview Tower |
-3679, 2346, 0233 |
Shared Tower between Tabantha Frontier.
Map and Coordinates
| Overworld Location | Coordinates |
|---|---|
 Enlarge EnlargePikida Stonegrove Skyview Tower |
-2312, 3064, 0536 |
Skyview Tower Guide: All Tower Locations
Hebra Mountains Great Fairy Fountain Location
Map and Coordinates
| Overworld Location | Coordinates |
|---|---|
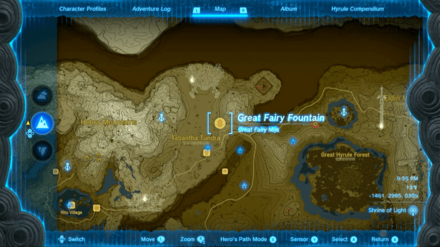 Enlarge EnlargeMija's Great Fairy Fountain |
-1461, 2995, 0305 |
Great Fairy Locations and How to Upgrade Armor
Hebra Mountains Shrine Locations
Shrine Map Locations and Coordinates
| Location | Coordinates |
|---|---|
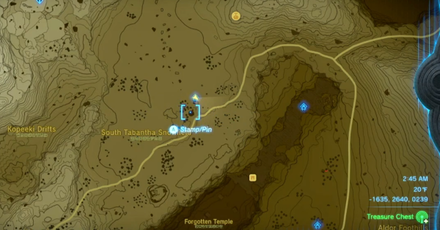
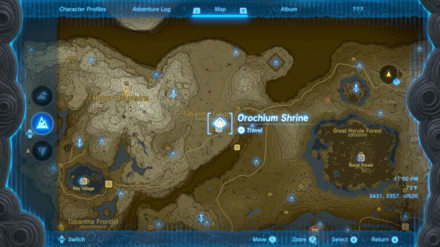 Enlarge EnlargeOrochium Shrine (Courage to Fall) |
Video Guide -1635, 2640, 0239 |
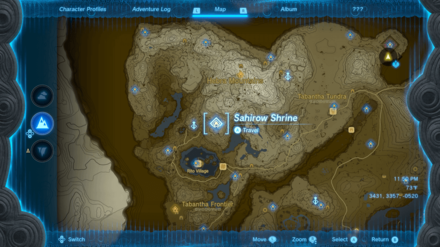 Enlarge EnlargeSahirow Shrine (Aid From Above) |
-3358, 2392, 0359 |
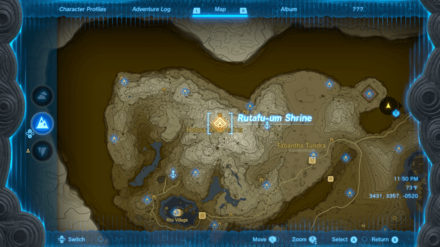 Enlarge EnlargeRutafu-um Shrine (Rauru's Blessing) |
Video Guide -2998, 3105, 0514 |
 Enlarge EnlargeOtak Shrine (Proving Grounds: Traps) |
-4391, 3714, 0212 |
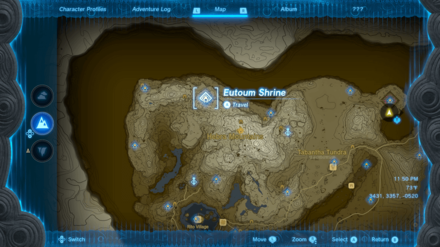 Enlarge EnlargeEutoum Shrine (Proving Grounds: Infiltration) |
-3506, 3570, 0387 |
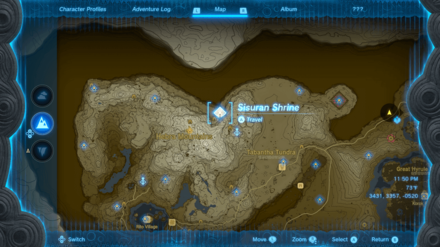 Enlarge EnlargeSisuran Shrine (Rauru's Blessing) |
Video Guide -2556, 3354, 0245 |
 Enlarge EnlargeOshozan-u Shrine (Mallet Smash) |
-1405, 3677, 0288 |
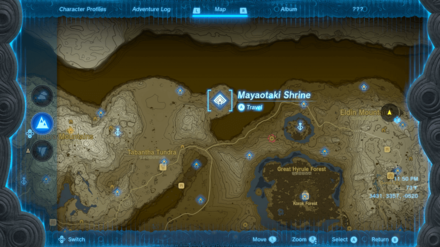 Enlarge EnlargeMayaotaki Shrine (Rauru's Blessing) |
-0823, 3535, 0235 |
Hebra Mountains Korok Seed Locations
Korok Seed Locations and Coordinates
| Overworld | Location Details |
|---|---|
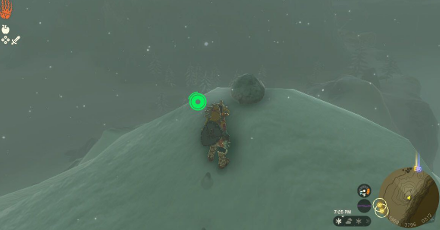
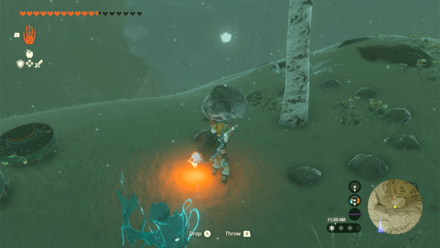
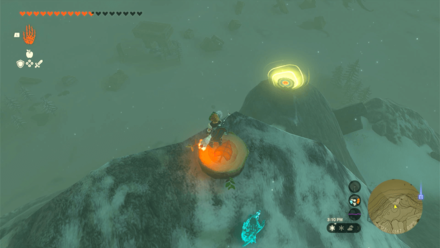
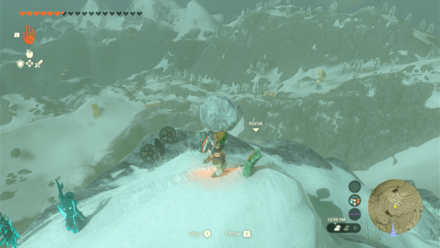
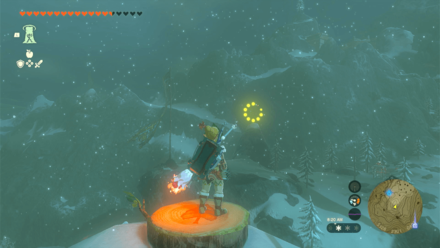
 Enlarge EnlargeKorok Seed |
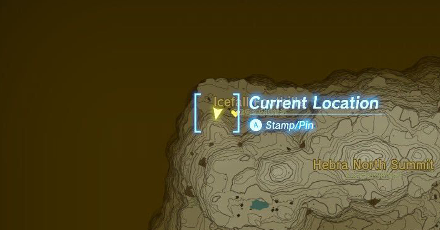
Start Coordinates -4005, 3623, 0524 Melt the ice at the summit of the mountain and lift the rock to reveal the Korok. |
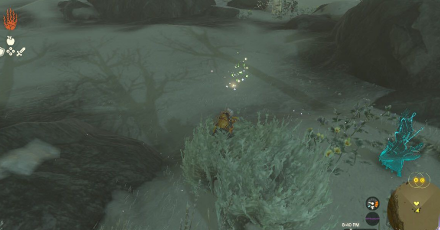
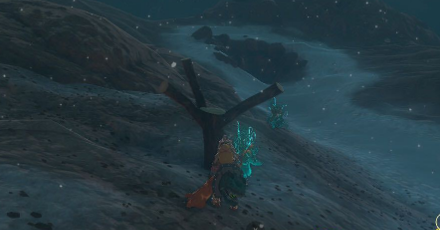
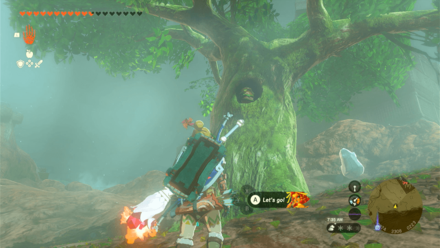
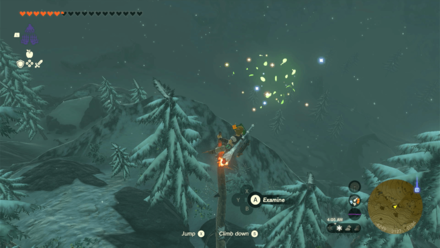
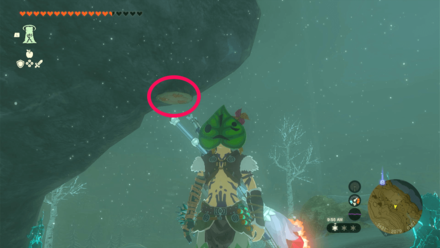
 Enlarge EnlargeKorok Seed |
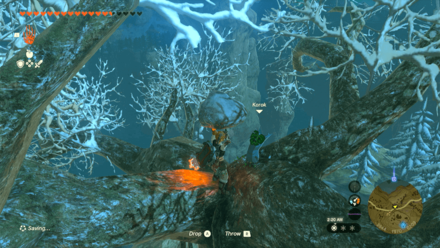
Start Coordinates -3157, 2691, 0594 Examine the sparkles at the top of the lone cedar tree. |
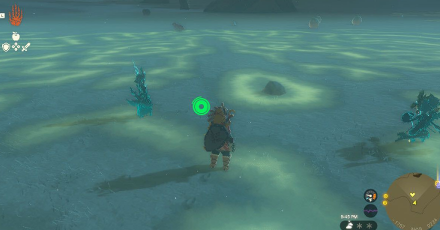
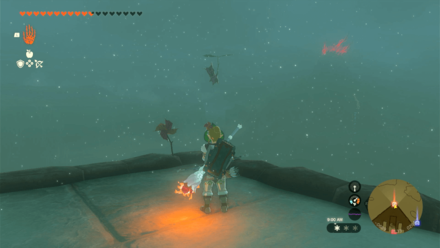
 Enlarge EnlargeKorok Seed |
Start Coordinates -3755, 3851, 0270 Chase the moving sparkles circling and interact with it to reveal the Korok. |
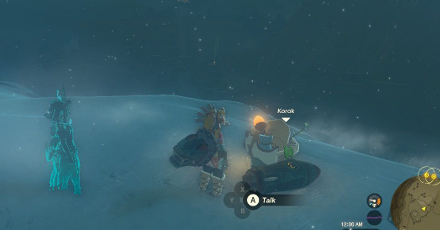
 Enlarge EnlargeKorok Seed |
Start Coordinates -3414, 3508, 0436 Examine the sparkles at the top of the tree. |
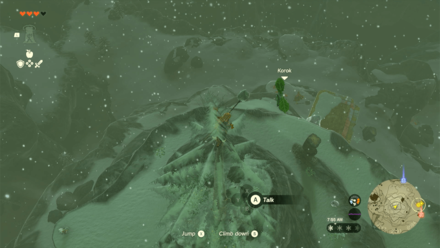
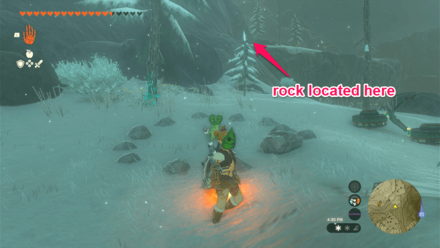
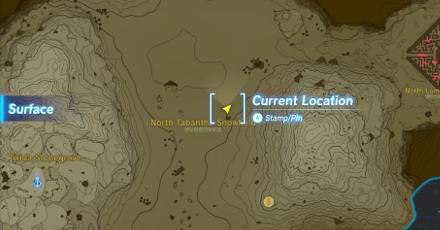
 Enlarge EnlargeKorok Seed |
Start Coordinates -1969, 3796, 0312 Pick up the rock on top of the hill to get the Korok Seed. |
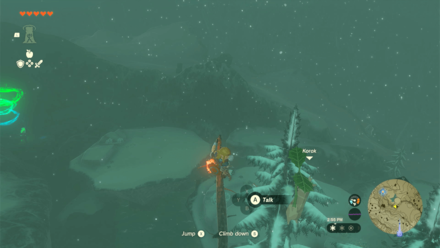
 Enlarge EnlargeKorok Seed |
Start Coordinates -1672, 3759, 0239 Chase the floating sparkles and examine it to get the Korok Seed. |
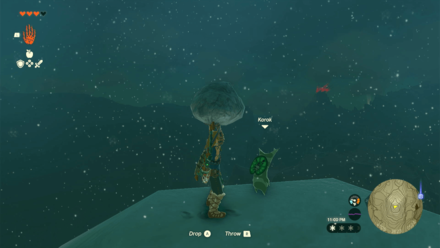
 Enlarge EnlargeKorok Seed |
Start Coordinates -1762, 3554, 0234 Pick up the rock in the middle of the mural to get the Korok Seed. |
 Enlarge EnlargeKorok Seed x2 |
Start Coordinates -1385, 3630, 0256 End Coordinates -1032, 3519, 0229 Strap a rocket to the Korok to get it to the other side. |
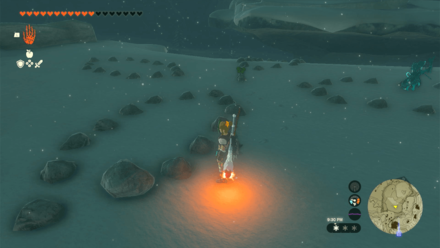
 Enlarge EnlargeKorok Seed |
Start Coordinates -1039, 3400, 0305 Use surrounding rocks to fill the gaps and make the correct pattern. |
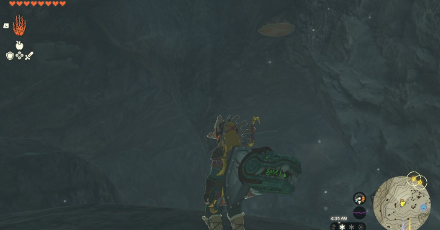
 Enlarge EnlargeKorok Seed |
Start Coordinates -1720, 2556, 0229 Ascend through the tree stump by the cliff to get the Korok Seed. |
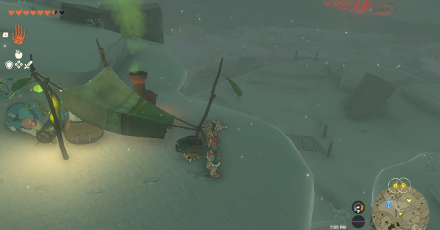
 Enlarge EnlargeKorok Seed |
Start Coordinates -1811, 2196, 0273 Pick up the rock from the top of the enemy camp to get the Korok Seed. |
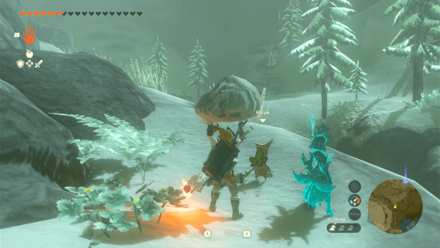
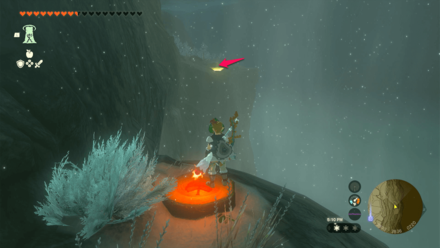
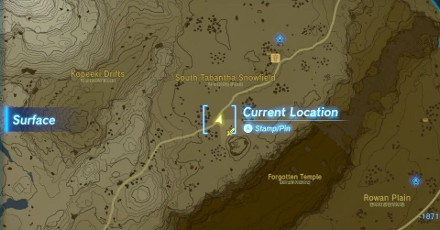
 Enlarge EnlargeKorok Seed |
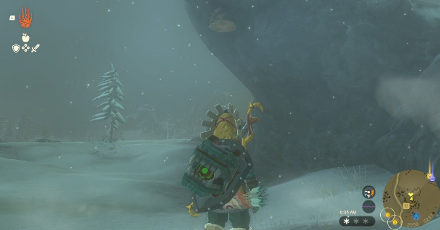
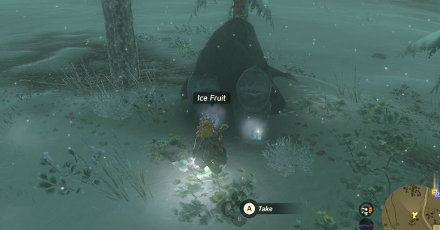
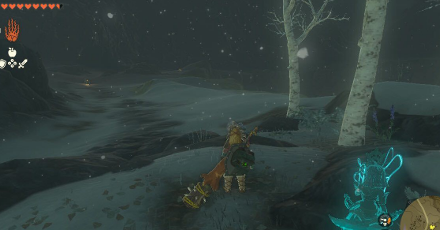
Start Coordinates -1647, 2439, 0237 Give an ice fruit offering to the other statue to get a Korok Seed. |
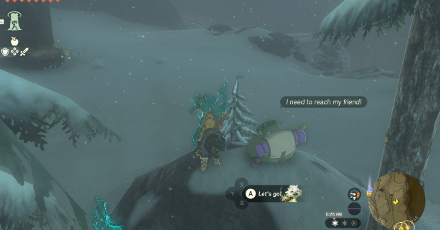
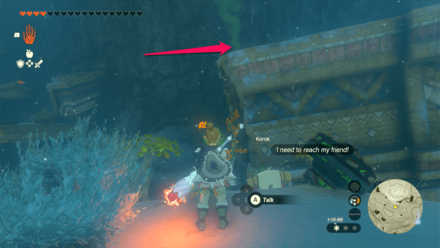
 Enlarge EnlargeKorok Seed x2 |
Start Coordinates -1540, 2554, 0238 End Coordinates -1349, 2791, 0203 Get the Korok to its friend to get two Korok Seeds. |
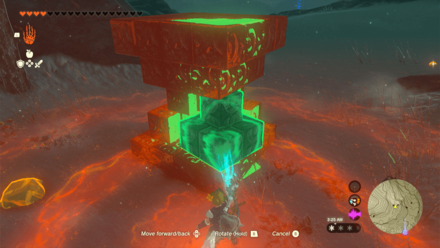
 Enlarge EnlargeKorok Seed |
Start Coordinates -1148, 3088, 0346 Get the boulder from the hole located further down the road. Place the boulder on the pedestal to get the Korok Seed. |
 Enlarge EnlargeKorok Seed x2 |
Start Coordinates -2329, 2955, 0404 End Coordinates -2374, 3019, 0441 Make a new bridge from broken off pieces to reach the other Korok. |
 Enlarge EnlargeKorok Seed |
Start Coordinates -3001, 3220, 0582 Use ascend on the tree stump stuck at the ceiling of the cave to get the Korok Seed. |
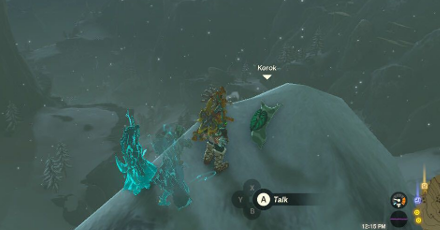
 Enlarge EnlargeKorok Seed x2 |
Start Coordinates -2892, 3492, 0246 End Coordinates -3237, 3686, 0243 Get the Korok to his friend to get the Korok Seed. |
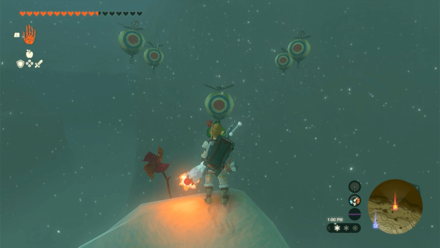
 Enlarge EnlargeKorok Seed |
Start Coordinates -3467, 3473, 0481 Hit the spinning balloons to get the Korok Seed. |
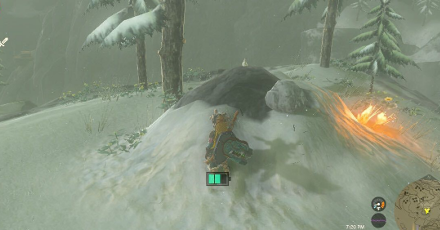 Enlarge EnlargeKorok Seed |
Start Coordinates -3577, 3266, 0388 Pick up the isolated rock from the mound to get the Korok Seed. |
 Enlarge EnlargeKorok Seed |
Start Coordinates -4036, 3365, 0264 Pick up the rock from the top of the rock formation to get the Korok Seed. |
 Enlarge EnlargeKorok Seed |
Start Coordinates -4273, 3499, 0390 Hit the dandelion and catch it before it hits the ground to get a Korok Seed. |
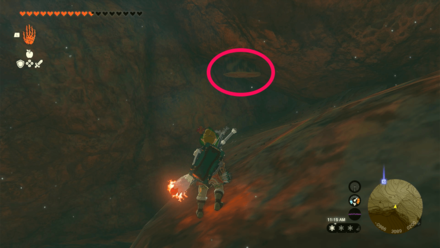
 Enlarge EnlargeKorok Seed |
Start Coordinates -3973, 3736, 0225 Shoot the balloon inside the skeleton's left eye socket. |
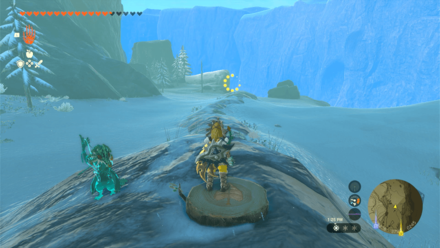 Enlarge EnlargeKorok Seed |
Start Coordinates -3428, 3799, 0245 End Coordinates -3507, 3836, 0236 Step on the tree stump and race towards the ring before time runs out. |
 Enlarge EnlargeKorok Seed |
Start Coordinates -2601, 3237, 0388 Grab the rock and place it to complete the rock circle around the birch tree. |
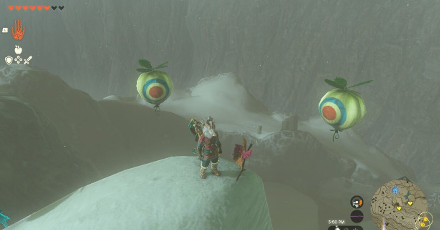
 Enlarge EnlargeKorok Seed |
Start Coordinates -2357, 3676, 0274 Hit the moving balloons to get the Korok Seed. |
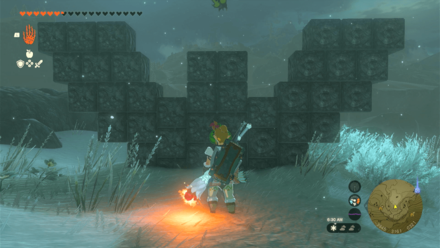
 Enlarge EnlargeKorok Seed |
Start Coordinates -1212, 3600, 0191 Complete the metal block set to reveal the Korok. Complete the alternating pattern to solve the puzzle. |
 Enlarge EnlargeKorok Seed |
Start Coordinates -0874, 3313, 0223 Shoot the acorn inside the tree trunk. |
 Enlarge EnlargeKorok Seed |
Start Coordinates -0685, 3535, 0284 Scale and climb the eastern end of the labyrinth's wall and shoot the balloon to reveal the Korok. |
 Enlarge EnlargeKorok Seed |
Start Coordinates -0996, 3084, 0200 At the cliffside, use Ascend through the tree stump to reveal the Korok. |
 Enlarge EnlargeKorok Seed |
Start Coordinates -2001, 3147, 0385 End Coordinates -1972, 3115, 0352 Jump from the initial platform located by the summit of the hill and glide towards the target platform. |
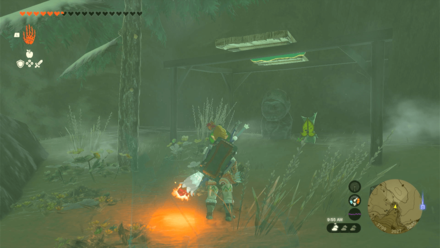
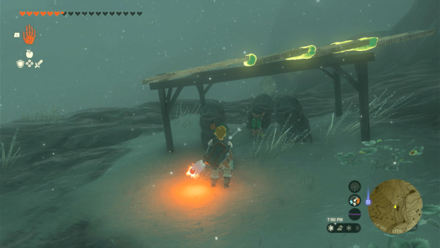 Enlarge EnlargeKorok Seed |
Start Coordinates -4184, 3376, 0242 Grab the wooden planks on the rock above and near the statues. Combine them and place the roof above the shelter. |
 Enlarge EnlargeKorok Seed x2 |
Start Coordinates -3669, 3386, 0323 End Coordinates -4123, 3429, 0222 Reunite the Korok on the hill to its friend. |
 Enlarge EnlargeKorok Seed |
Start Coordinates -3840, 3417, 0275 Use Ascend on the tree stump below the cliff to get the Korok Seed. |
 Enlarge EnlargeKorok Seed |
Start Coordinates -3844, 3346, 0311 End Coordinates -3771, 3342, 0340 Follow the disappearing yellow flowers across the hill towards the fallen pillar until you reach the white flower. |
 Enlarge EnlargeKorok Seed |
Start Coordinates -4249, 3127, 0194 Climb the dead tree and examine the sparkles at the top. |
 Enlarge EnlargeKorok Seed |
Start Coordinates -3942, 3161, 0321 Complete the metal block set to reveal the Korok. Slide the set of blocks to complete the W-shaped pattern. |
 Enlarge EnlargeKorok Seed |
Start Coordinates -3796, 3028, 0245 Grab the planks from the protruding cliffs above, attach them lengthwise, and place it above the statue using Ultrahand. |
 Enlarge EnlargeKorok Seed |
Start Coordinates -3753, 2799, 0137 Pick up the lone rock on the cliff. |
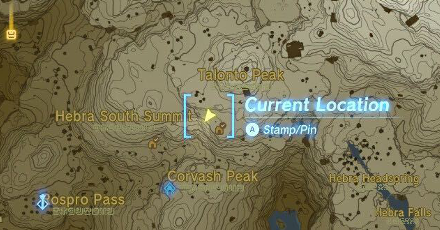
 Enlarge EnlargeKorok Seed |
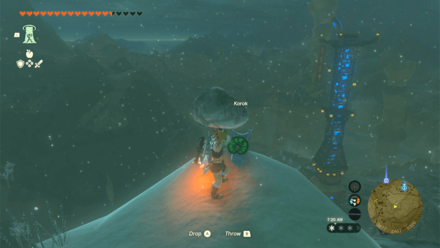
Start Coordinates -3351, 2992, 0515 Pick up the lone rock at the summit of the mountain. |
 Enlarge EnlargeKorok Seed |
Start Coordinates -3850, 2737, 0029 Melt the ice and lift the rock to reveal the Korok. |
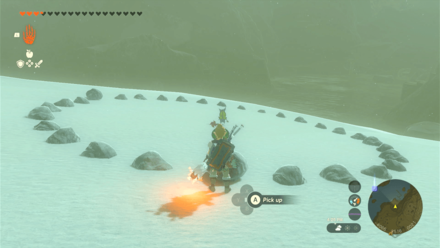 Enlarge EnlargeKorok Seed |
Start Coordinates -4066, 2516, 0021 Place the rocks to complete the circle and reveal the Korok. |
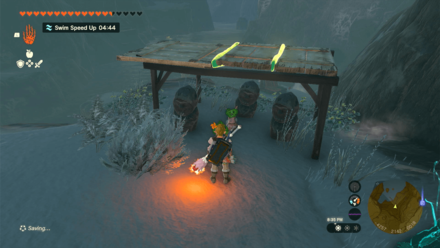 Enlarge EnlargeKorok Seed |
Start Coordinates -4255, 2143, 0018 Grab the wooden planks nearby and place it above the statues using Ultrahand. |
 Enlarge EnlargeKorok Seed x2 |
Start Coordinates -4259, 2173, -0010 End Coordinates -4115, 2415, -0013 Reunite the Korok to its friend across Lake Kilsie. |
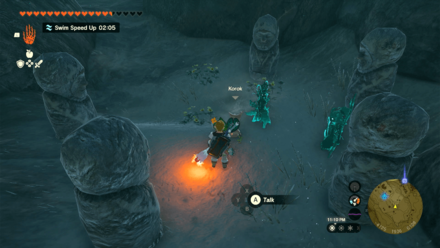 Enlarge EnlargeKorok Seed |
Start Coordinates -4125, 1936, 0198 End Coordinates -4124, 1935, 0198 Follow the disappearing yellow flowers appearing behind the statues until the Korok appears. |
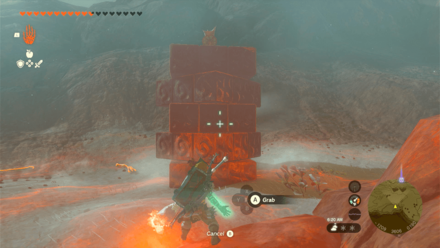
 Enlarge EnlargeKorok Seed |
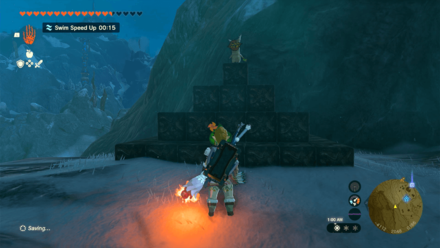
Start Coordinates -4111, 2046, 0186 Place the metal blocks to complete the pyramid and reveal the Korok. |
 Enlarge EnlargeKorok Seed |
Start Coordinates -3958, 2037, 0208 Lift the rock near the entrance of West Lake Totori Cave. |
 Enlarge EnlargeKorok Seed |
Start Coordinates -3944, 1970, 0209 Lift the rock at the top of the tree. |
 Enlarge EnlargeKorok Seed |
Start Coordinates -3796, 2322, 0170 End Coordinates -3794, 2318, 0174 Follow the flowers on top of the Flight Range's roof. |
 Enlarge EnlargeKorok Seed |
Start Coordinates -3567, 2257, 0151 Interact with the sparkles on top of the chimney of Hebra Trailhead Lodge |
 Enlarge EnlargeKorok Seed |
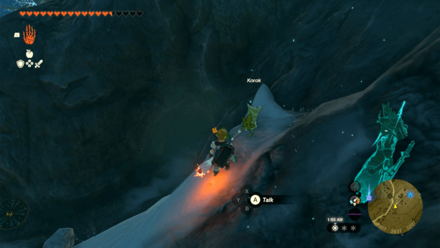
Start Coordinates -3677, 2467, 0320 Burn the vines and lift the rock at the summit of the mountain to reveal the Korok. |
 Enlarge EnlargeKorok Seed |
Start Coordinates -3328, 2301, 0403 End Coordinates -3293, 2441, 0403 Step on the tree stump and race towards the ring before time runs out. |
 Enlarge EnlargeKorok Seed |
Start Coordinates -3423, 2067, 0164 Use Ascend on the tree stump below the cliff to get the Korok Seed. |
 Enlarge EnlargeKorok Seed |
Start Coordinates -3163, 2462, 0374 Place the rock to complete the circle and reveal the Korok. You can find the rock northeast of the puzzle. |
 Enlarge EnlargeKorok Seed |
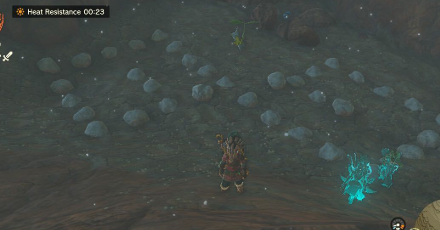
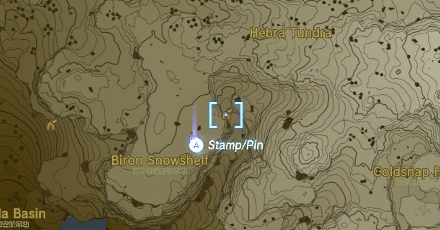
Start Coordinates -3062, 2843, 0429 Complete the Rupee-shaped rock pattern on top of the snowy field at Coldsnap Hollow to reveal the Korok. |
 Enlarge EnlargeKorok Seed x2 |
Start Coordinates -2835, 2838, 0582 End Coordinates -2795, 2876, 0600 Reunite the Korok to its friend on the Zonai ruins near the cliff. |
 Enlarge EnlargeKorok Seed |
Start Coordinates -2480, 2748, 0511 Complete the metal block set to reveal the Korok. Slide the set of blocks diagonally to complete the set of blocks. |
 Enlarge EnlargeKorok Seed |
Start Coordinates -2082, 2588, 0302 Complete the square-shaped rock pattern to reveal the Korok. |
 Enlarge EnlargeKorok Seed |
Start Coordinates -3993, 3836, 0220 End Coordinates -4173, 3816, 0218 Jump from the initial platform and glide towards the target platform. Use the updraft to launch Link up in the air. |
Korok Seed Map: All Korok Seed Locations
Hebra Mountains Stables
All Stable Locations
| Overworld Location | Coordinates |
|---|---|
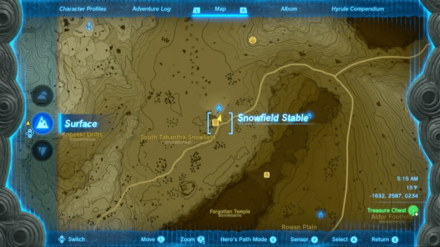
 Enlarge EnlargeSnowfield Stable |
-1640, 2573, 0233 |
Hebra Mountains Quests
Side Quests
| Quest | Coordinates |
|---|---|
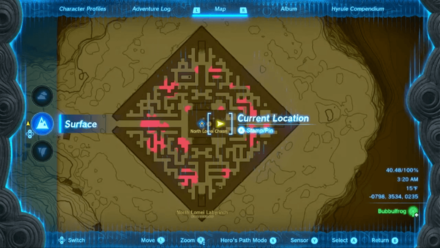 Enlarge EnlargeThe North Lomei Prophecy |
-0799, 3534, 0235 |
 Enlarge EnlargeGerudo's Colossal Fossil |
-3883, 3691, 0223 |
 Enlarge EnlargeThe Captured Tent |
-1661, 2542, 0233 |
|
Enlarge Who Finds the Haven |
-1661, 2542, 0233 |
 Enlarge EnlargeA Picture for Snowfield Stable |
-1650, 2572, 0234 |
Side Adventures
| Quest | Coordinates |
|---|---|
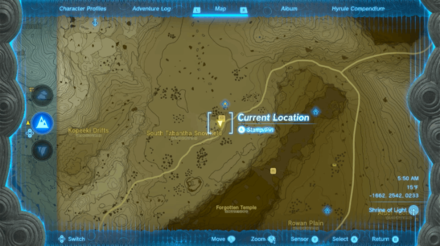
 Enlarge EnlargeSerenade to Mija |
-1632, 2586, 0234 |
 Enlarge EnlargeZelda's Golden Horse |
-1644, 2579, 0233 |
Hebra Mountains Settlements
All Towns and Settlement Locations
| Overworld Location | Coordinates |
|---|---|
 Enlarge EnlargeFlight Range |
-3790, 2315, 0161 |
Hebra Mountains Hudson Signs
Addison Sign Locations
| Location | Solution |
|---|---|
 Enlarge Enlarge |
 Enlarge Enlarge |
| Coordinates: -1870, 2323, 0237 Solution: Use a plank and slide it in the slot on the side d the sign. Put legs on both ends of the sign to stop it from falling. |
|
 Enlarge Enlarge |
 Enlarge Enlarge |
| Coordinates: -2209, 2928, 0390 Solution: Squeeze the sign from the front and sides using using legs. |
|
 Enlarge Enlarge |
 Enlarge Enlarge |
| Coordinates: -1609, 3338, 0243 Solution: Stabilize the left side of the sign where a slot for a plank would be. |
|
 Enlarge Enlarge |
 Enlarge Enlarge |
| Coordinates: -3255, 2570, 0447 Solution: Put the rock on the plank to keep the sign stabilized. |
|
 Enlarge Enlarge |
 Enlarge Enlarge |
| Coordinates: -4113, 2757, 0025 Solution: Put planks on both sides of the sign as well as the front. |
|
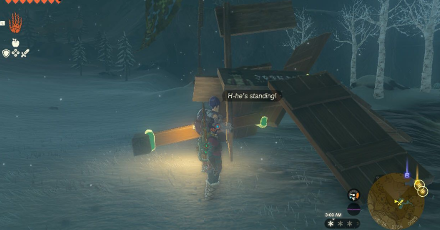
 Enlarge Enlarge |
 Enlarge Enlarge |
| Coordinates: -3613, 2186, 0144 Solution: Use the nearby wooden boards and beams to make a stand for the Hudson sign to lean on. Place two wooden beams below the stand to make it more stable. |
|
All Hudson Sign Locations: How to Help Addison's Signs Stand
Hebra Mountains Points of Interest
Cave Locations and Coordinates
| Overworld Location | Coordinates |
|---|---|
 Enlarge EnlargeEast Biron Snowshelf Cave |
-3555, 3090, 0274 |
 Enlarge EnlargeNorth Biron Snowshelf Cave |
-3960, 3240, 0238 |
 Enlarge EnlargeLake Kilsie Cave |
-3929, 2867, -0013 |
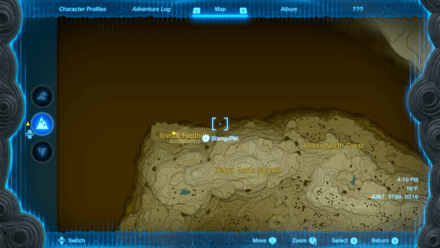
 Enlarge EnlargeIcefall Foothills Cave |
-4431, 3755, 0224 |
 Enlarge EnlargeHebra Great Skeleton |
-3822, 3603, 0257 |
 Enlarge EnlargeHebra South Summit Cave |
-3396, 2494, 0314 |
 Enlarge EnlargeHebra Mountains Northwest Cave |
-3000, 3223, 0507 |
 Enlarge EnlargePikida Stonegrove Northwest Cave |
-2413, 3136, 0374 |
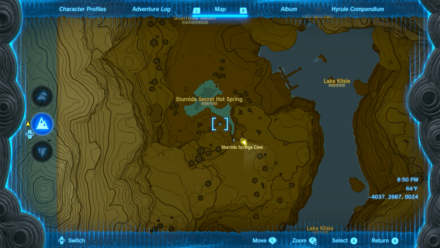 Enlarge EnlargeSturnida Springs Cave |
-4037, 2667, 0024 |
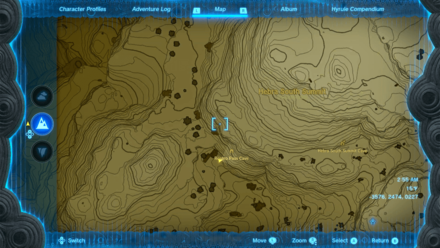 Enlarge EnlargeRospro Pass Cave |
-3576, 2474, 0228 |
 Enlarge EnlargeWest Lake Totori Cave |
-3953, 2032, 0201 |
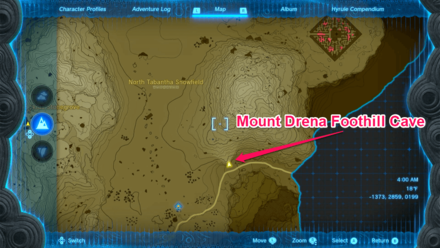 Enlarge EnlargeMount Drena Foothill Cave |
-1373, 2859, 0199 |
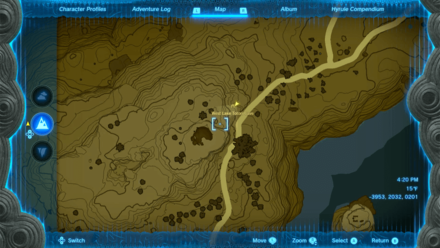
 Enlarge EnlargeTalonto Peak Cave |
-3203, 2472, 0347 |
Well Locations and Coordinates
| Overworld Location | Coordinates |
|---|---|
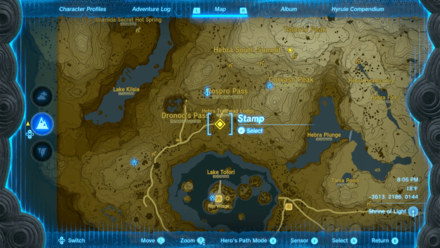
 Enlarge EnlargeDronoc's Pass Well |
-3834, 2103, 0141 |
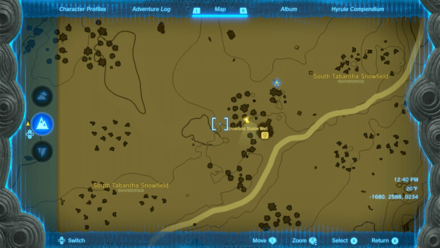 Enlarge EnlargeSnowfield Stable Well |
-1680, 2588, 0234 |
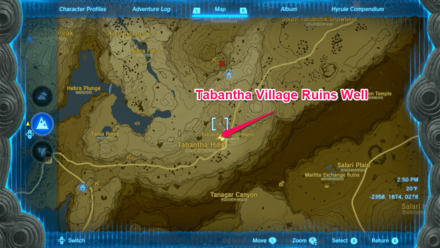 Enlarge EnlargeTabantha Village Ruins Well |
-2358, 1874, 0278 |
Notable Map Locations
| Overworld Location | Coordinates |
|---|---|
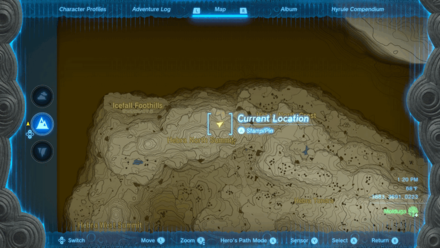
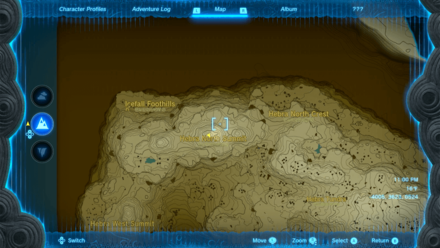
 Enlarge EnlargeIcefall Foothills |
-4367, 3799, 0218 |
 Enlarge EnlargeHebra North Summit |
-4005, 3623, 0524 |
 Enlarge EnlargeHebra North Crest |
-3536, 3749, 0338 |
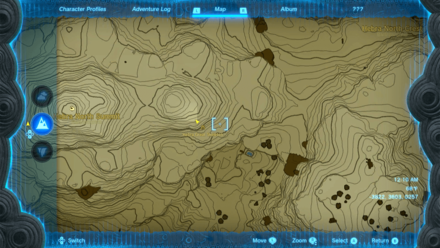
 Enlarge EnlargeSherfin's Secret Hot Spring |
-4317, 3488, 0367 |
 Enlarge EnlargeHebra Trailhead Lodge |
-3583, 2249, 0140 |
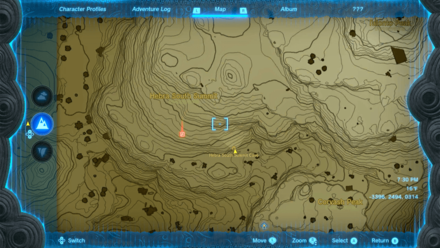
 Enlarge EnlargeGoflam's Secret Hot Spring |
-3406, 3552, 0368 |
 Enlarge EnlargeHebra Tundra |
-3377, 3291, 0424 |
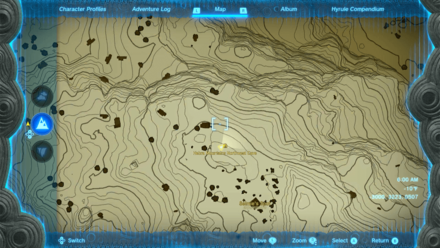
 Enlarge EnlargeSelmie's Spot |
-2967, 3130, 0569 |
 Enlarge EnlargeHebra East Summit |
-2829, 3053, 0625 |
 Enlarge EnlargeHebra Peak |
-2782, 2889, 0738 |
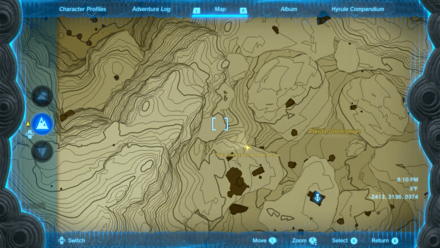
 Enlarge EnlargePikida Stonegrove |
-2348, 3201, 0428 |
The Legend of Zelda: Tears of the Kingdom Related Guides

Interactive Map of Hyrule:
All Locations and Map Icons
All Area Maps and Locations
| Hyrule Map Locations | |||||
|---|---|---|---|---|---|
Other Maps
List of Surface Regions
Comment
Author

The Legend of Zelda: Tears of the Kingdom Walkthrough & Guides Wiki
Hebra Mountains Region Map: Korok Seed Locations, Shrines, and Quests
Please participate in our site
improvement survey
03/2026
improvement survey
03/2026
Would you assist in
improving Game8's site?
improving Game8's site?

×
We are listening to our users' valuable opinions and discussing how to act on them.
The information collected through this survey will be used for the purpose of improving our services. In addition, the information will only be disclosed a part of a statistic in a format that will not allow identification of personal information.
Begin Survey
Not Now
×
Please rate each item regarding Game8.co's Advertisements.
Amount of Ads
Very Dissatisfied
Somewhat Dissatisfied
Fine
Somewhat Satisfied
Highly Satisfied
Placement of Ads
Timing of Ad Display
Ad Loading Speed
Safeness of Ads
Content of Ads
×
Please rate each item regarding Game8.co's Quality of Articles.
Amount of information
Very Dissatisfied
Somewhat Dissatisfied
Fine
Somewhat Satisfied
Highly Satisfied
Frequency of updates
Speed of new information
Accuracy of articles
Understandibility of articles
Readability of sentences
×
Please rate each item regarding Game8.co's Usability of the Site.
Ease of finding information
Very Dissatisfied
Somewhat Dissatisfied
Fine
Somewhat Satisfied
Highly Satisfied
Loading Speed
Use of Color
Font Size
Visibility of Images
Easy to Understand Layout
×
Please rate each item regarding Game8.co's Message Boards, Comments.
Ease of Writing
Very Dissatisfied
Somewhat Dissatisfied
Fine
Somewhat Satisfied
Highly Satisfied
Readability
Ease in Finding Information
Comment Quality
Comment Quantity
Admin Response
×
Please rate each item regarding Game8.co's Site's new design.
Please rate our site's new design
Very Dissatisfied
Somewhat Dissatisfied
Fine
Somewhat Satisfied
Highly Satisfied
Do you think that the website's design change makes the site easier to use?
Has the new design made it easier for you to find information on the site?
Has the new design improved the overall visual appeal of the site?
How would you rate your overall satisfaction with the new design of the site?
×
How likely are you to recommend Game8 to someone you know?
Very Unlikely
0
1
2
3
4
5
6
7
8
9
10
Very Likely
If you have other opinions regarding potential improvement to the website, please share them with us. We would appreciate your honest opinion.
Note: This is a free response section, so you can proceed without entering anything.
Note: Please be sure not to enter any kind of personal information into your response.
Note: Please be sure not to enter any kind of personal information into your response.
×
Thank You
×
Thank you for participating in our survey! Your answers will help us to improve the quality of our website and services.
We hope you continue to make use of Game8.
We hope you continue to make use of Game8.
Close
Rankings
- We could not find the message board you were looking for.
Gaming News


![Slay the Spire 2 Review [Early Access] | Still the Deckbuilder to Beat](https://img.game8.co/4433115/44e19e1fb0b4755466b9e516ec7ffb1e.png/thumb)

![Resident Evil Village Review [Switch 2] | Almost Flawless Port](https://img.game8.co/4432790/e1859f64830960ce4248d898f8cd38d9.jpeg/thumb)
Popular Games

Genshin Impact Walkthrough & Guides Wiki
Honkai: Star Rail Walkthrough & Guides Wiki
Umamusume: Pretty Derby Walkthrough & Guides Wiki
Pokemon Pokopia Walkthrough & Guides Wiki
Resident Evil Requiem (RE9) Walkthrough & Guides Wiki
Monster Hunter Wilds Walkthrough & Guides Wiki
Wuthering Waves Walkthrough & Guides Wiki
Arknights: Endfield Walkthrough & Guides Wiki
Pokemon FireRed and LeafGreen (FRLG) Walkthrough & Guides Wiki
Pokemon TCG Pocket (PTCGP) Strategies & Guides Wiki


Recommended Games
Fire Emblem Heroes (FEH) Walkthrough & Guides Wiki
Diablo 4: Vessel of Hatred Walkthrough & Guides Wiki
Yu-Gi-Oh! Master Duel Walkthrough & Guides Wiki
Super Smash Bros. Ultimate Walkthrough & Guides Wiki
Pokemon Brilliant Diamond and Shining Pearl (BDSP) Walkthrough & Guides Wiki
Elden Ring Shadow of the Erdtree Walkthrough & Guides Wiki
Monster Hunter World Walkthrough & Guides Wiki
The Legend of Zelda: Tears of the Kingdom Walkthrough & Guides Wiki
Persona 3 Reload Walkthrough & Guides Wiki
Cyberpunk 2077: Ultimate Edition Walkthrough & Guides Wiki


All rights reserved
© Nintendo. The Legend of Zelda and Nintendo Switch are trademarks of Nintendo.
The copyrights of videos of games used in our content and other intellectual property rights belong to the provider of the game.
The contents we provide on this site were created personally by members of the Game8 editorial department.
We refuse the right to reuse or repost content taken without our permission such as data or images to other sites.