This survey will take about 1 minute.
Your answers will help us to improve our website.
Path of Exile 2 (PoE 2)
Stun Explained: How to Stun Enemies
Latest: 0.5.0 Release Date
☆ Fate of the Vaal ▶︎ The Last of the Druids
┗ Bonded Mods | 0.4 Mystery Box
★ Druid: Class Overview | Builds
☆ NEW: Disciple of Varashta Ascendancy!
★ Best Class | Best Builds | Leveling Builds
Players can stun bosses and enemies in Path of Exile 2 (PoE 2) to immobilize them momentarily. See what stunning is, the mechanics of stunning, how to stun enemies, what skills and gems that have the Stun tag, the affixes, Uniques, and what Stun is!
List of Contents
What is Stun?
Status Ailment That Imobilizes
Stun refers to a status ailment which immobilizes and interupts enemies or players very briefly. It has a chance to proc on hits and attacks, with higher damage increasing the chances.
Stun In-Game Description
Hits against any target have a chance to Stun them, with a stun being more likely the more damage was dealt. Stunning a target interruptes their current action and prevents them from taking another action for a short time.
Physical damage, and player (but not monster) Melee Damage, are each 50% more likely to Stun targets. For players, these bonuses are multiplicative with each other.
All Hits that could potentially influct a Stun also cause Heavy Stun buildup.
How to Stun Bosses and Enemies
Fill-up the Stun Meter to Heavy Stun
Players must buildup and fill the enemy's stun bar to stun or stagger bosses or enemies. Once they do, the enemy becomes momentarily immobilized, allowing players to deal damage or defeat them.
Hit Enemies to Stun Them by Chance
Only applicable to normal map monsters, there is a chance for enemies to be stunned or staggered shortly upon getting hit. Players should note that bosses generally cannot be stunned in this manner and can only be stunned by filling up their Stagger bar.
Stun Mechanics Explained
| Stun Mechanics |
|---|
|
|
Stun Meter
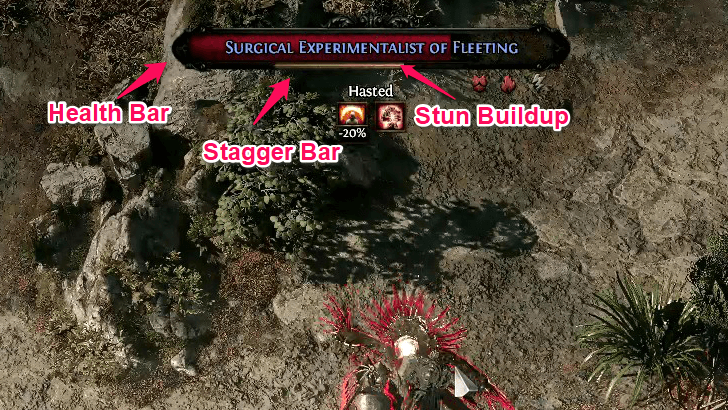
Every enemy and monster in the game has a Stun Meter located below their Health Bar. When players hit enemies, this meter fills up, with the yellow line indicating their current stun buildup. Enemies will be heavy stunned and immobilized briefly when this meter is filled.
Players should note that enemy stun buildup will begin depleting if they do not attack the enemy for approximately eight seconds.
Stun Meter Cooldown
After enemies get heavy stunned, the Stun Meter will start to deplete. The time it takes for the meter to fully deplete shows how long the enemies are stunned or staggered (i.e., Stun Duration).
Additionally, once the enemy is heavy stunned, their stun resistance greatly increases, and the stun buildup indicator turns orange. This state lasts approximately eight seconds and does not end when the enemy's immobilized period is over.
Stun Build-Up Depends on Damage Dealt
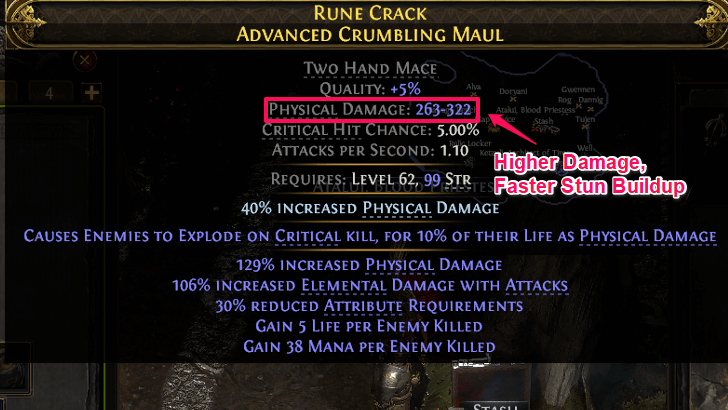
At its core, the amount of stun buildup depends on the damage dealt by an attack, meaning the higher the attack damage a player has, the faster they can fill an enemy's stagger bar.
More Stun Build Up With Physical and Melee Damage
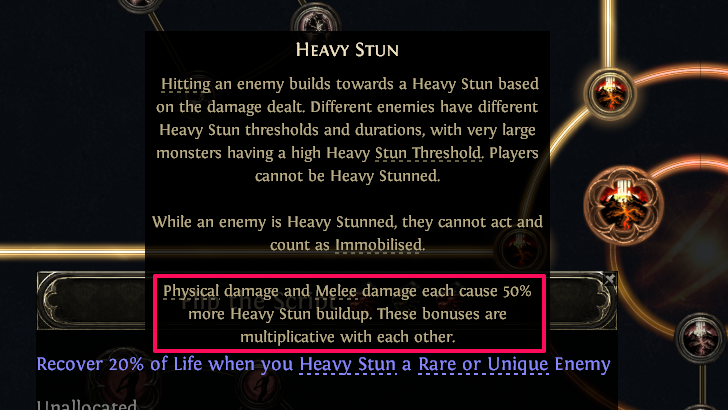
While every attack can fill up an enemy's Stagger Bar, Physical and Melee attacks or damage increase stun buildup 50% more, making classes like the Warrior or Monk more suitable for stun or stagger mechanics.
List of Classes and Ascendancies
Stun vs. Heavy Stun
| Stun | Heavy Stun | |
|---|---|---|
| Duration | Shorter | Longer |
| Trigger | Random Chance on Hit | Stagger Bar is Filled Up |
While similar, there is a difference between a Stun and a Heavy Stun. Stuns or Staggers last very briefly and have a chance to occur when players hit or attack the enemy. The chances for random staggers depend on the damage of the attack, with higher damage increasing the chances.
Meanwhile, Heavy Stuns last longer than a normal stagger and only occur when an enemy's Stun Meter fills up. The table above summarizes the differences between the two.
Primed for Stun
| Enemy Type | Threshold |
|---|---|
| Normal | 40% |
| Magic | 60% |
| Rare | 70% |
| Unique | 80% |
Primed for Stun is a unique mechanic that only activates with skills like Staggering Palm and Boneshatter. When enemies are primed for stun, indicated by a white orb on their head, players can immediately heavy stun them with the mentioned skills.
Different enemies get primed for stun at different stun buildups or stagger levels. Listed in the table above are the thresholds per enemy type.
Increasing Stun Build-up and Modifiying Stun Effects
Players can improve their ability to stun enemies and modify stun effects using passive skills, equipment and gems. They can also utilize temporary status ailments like Daze to do so.
Passive Skills, Equipment, and Gems
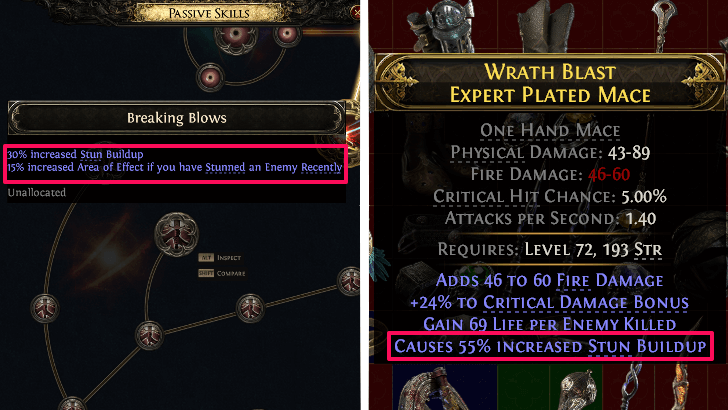
Players can increase their stun buildup and modify stun effects through Skills, Equipment, and Gems. For example, passive skills like Breaking Blows and Honourless increase stun buildup and melee damage against heavy stunned enemies.
For Equipment, martial weapons like maces can have modifiers that increase stun buildup and duration. Lastly, Support gems like Overpower or Ruthless increase stun buildup under certain conditions.
Daze Effect
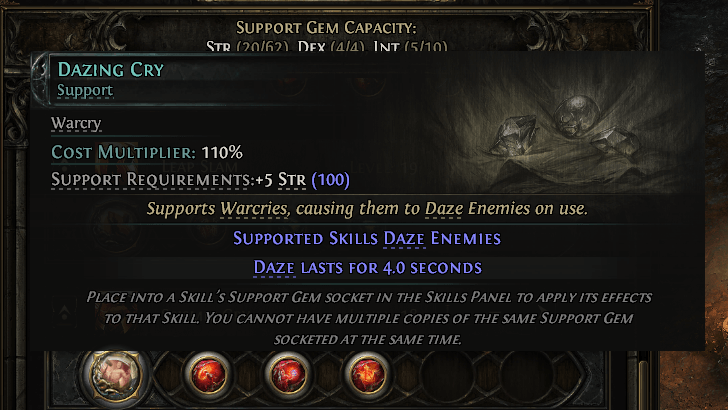
In the game, players can inflict a status called Daze, which increases the player's stun buildup by 50% against enemies that have it. As of Early Access, only the Dazing Cry, Break Posture, and Discombobulate support gems grant players the ability to Daze enemies.
Stun Threshold
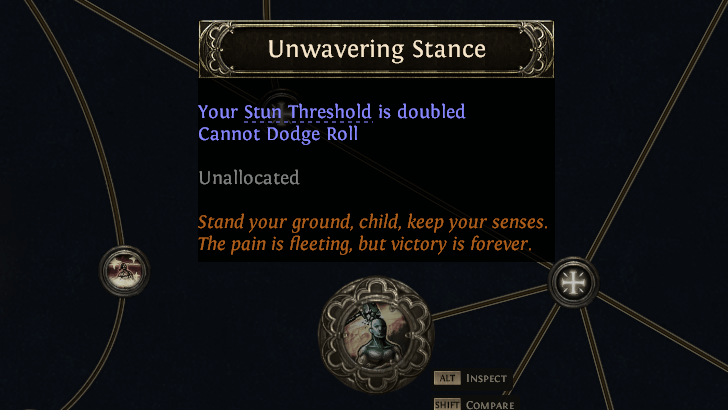
Players and enemies have a Stun Threshold stat. For players, this dictates the amount of damage they can take within a brief period before getting stunned. Meanwhile, for enemies, this dictates the amount of damage it takes to fill up their Stun Meter.
Enemies Have Different Stun Thresholds and Duration
Players will notice that different enemies will have different Stun Thresholds and Durations. Generally, the higher the monster rarity, the higher their stun threshold and duration. As such, bosses are typically more difficult to stun but are staggered for longer, unlike normal map monsters.
Stun Uniques
Unique Gear with Stun
| We're still checking out the Uniques that has this tag! |
Stun Affixes
All Affixes with Stun
| We're still checking out the affixes. Please come back for more updates! |
Stun Skills
Stun in Ascendancy Skills
| Skill | Effect |
|---|---|
 Heavy Bracing Heavy Bracing |
Body Armour grants 100% increased Stun Threshold |
| Stun Buildup |
18% increased Stun Buildup |
| Surprising Strength |
50% more Damage against Heavy Stunned Enemies |
Stun in Passives
| We're still checking out this skill tag. Please come back for more updates! |
Passive Skill Tree Guide and List of Passives
Stun Gems
All Stun Skill Gems
| Gem | Effects |
|---|---|
 Bloodhound's Mark Bloodhound's Mark
|
Mark: ・Limit 1 Marked target ・Mark duration is 8 seconds ・Marked target releases a Blood Explosion when Heavy Stunned ・Marked target reelases a Blood Explosion on death if they had at least 20% Heavy Stun buildup from Blood Loss ・Marked target receives Heavy Stun buildup equal to 200% of Blood Loss Explosion: ・67 to 100 base Physical Damage ・Cannot cause Bleeding ・Explosion radius is 2 metres ・Gains up to 100% more damage and 100% more area of effect based on the percentage of target's Heavy Stun buildup caused by Blood Loss |
 Boneshatter Boneshatter
|
・+2 Melee strike range ・While Dual Wielding, both weapons hit with 30% less damage ・Cannot cause Stun Buildup |
 Flash Grenade Flash Grenade
|
・Detonation time is 0.85 seconds ・500% more Stun Buildup ・Explosion radius is 2.7 meters ・Blinds enemies and allies |
 Rolling Slam Rolling Slam
|
Rolling Slam: ・1 second to Total Attack Time ・While Dual Wielding, both weapons hit with 30% less damage First Slam: ・Attack Damage: 88% ・50% more Stun buildup ・Impact radius is 1.4 metres ・Causes Daze buildup equal to 0-50% of Physical Damage dealt (from Quality) Second Slam: ・Attack Damage: 176% ・Impact radius is 1.8 metres ・Causes Daze buildup equal to 0-50% of Physical Damage dealt (from Quality) |
 Seismic Cry Seismic Cry
|
・Deals 50-75 Physical Damage ・20% increased Warcry Speed ・200% increased Knockback distancel400% more Stun Buildup ・Knockback enemies on hit ・Hits ignore enemy Physical Damage Reduction ・Empowers the next Melee Slam Attack ・Additional Attack per Endurance Charge consumed ・Warcry radius is 4M |
 Skeletal Brute Skeletal Brute
|
None |
 Spear of Solaris Spear of Solaris
|
Impact: ・Requires 20 Glory to use ・Converts 75% of Physical Damage to Fire Damage ・+1.4 seconds to Total Attack Time ・Can't be evaded ・Impact radius is 2 metres ・Additional Effects from Quality: 0(0-40)% more Magnitude of Ignite inflicted Pulse: ・Ground Spear pulses every 0.2 seconds, up to 20 times ・Converts 75% of Physical Damage to Fire Damage ・Pulse radius is 2 metres ・Additional Effects from Quality: 0(0-40)% more Magnitude of Ignite inflicted Ignited Ground: ・Converts 100% of Physical Damage to Fire Damage ・Ignited Ground radius is 2 metres ・Gains radius over the ground Spear's lifetime, up to 30% more at the end of the Spear's lifetime ・Additional Effects from Quality: 0(0-40)% more Magnitude of Ignite inflicted |
 Staggering Palm Staggering Palm
|
Staggering Palm: ・10 to 16 added Attack Physical Damage ・Can't be Evaded ・+7% to Critical Hit chance ・Buff Duration is 6s Projectile (Quarterstaff): ・Projectiles Pierce all targets Projectile (Unarmed): ・Projectiles pierce all targets ・10 to 16 added Physical damage ・+7% to Critical Hit chance |
 Vaulting Impact Vaulting Impact
|
・1 Second to total Attack Time ・30% more Stun Buildup ・Consume Daze on Enemies to Cause 300% more Stun Buildup ・Impact Radius is 2.4 Metres |
 Wing Blast Wing Blast
|
Wing Blast: ・0.3 Seconds to Total Attack Time Cannot ・ Cause Stun Buildup Knocks Back ・ Enemies Blast Length Is 6 Metres ・ 10%Surpassing Chance to Grant a Power Charge on Heavy Stun, Modified by Monster Power Shockwave: |
All Stun Support Gems
| Gem | Effects |
|---|---|
 Auto Reload Auto Reload
|
・Supported skills reload automatically on Heavy Stunning an enemy |
 Brink I Brink I
|
・Stun buildup caused by Supported Skills cannot reach 100% ・Hits with Supported Skills cause 30% more Stun Buildup |
|
Brink II
|
・Stun Buildup caused by Supported Skills cannot reach 100% ・Hits with Supported Skills cause 50% more Stun buildup. |
 Devastate Devastate
|
・Supported skills fully break Armour when inflicting a Heavy Stun |
 Double Barrel III Double Barrel III
|
・Supported Skills reload automatically when Heavyy Stunning an enemy with them ・Supported Skills have 20% less reload speed ・Supported Skills load an additional bolt. |
 Enduring Impact I Enduring Impact I
|
・30% chance to gain an Endurance Charge when Heavily Stunning a non-unique Enemy with Supported Skills ・Gain 1 Endurance Charge on Heavily Stunning a Unique Enemy with Supported Skill. |
|
Enduring Impact II
|
・30% chance to gain an Endurance Charge when Heavily Stunning a non-unique Enemy with Supported Skills ・Gain 3 Endurance Charge on Heavily Stunning a Unique Enemy with Supported Skill. |
 Impact Shockwave Impact Shockwave
|
・Supported skills create an Aftershock when they Heavy Stun an enemy, dealing the same damage to enemies within 1.8 metres |
 Pin I Pin I
|
・Physical Damage from Supported Skill is Pinning ・Modifiers to Stun Buildup for Supported Skills instead apply to Pin Buildup ・Supported Skills cannot cause Stun Buildup |
|
Pin II
|
・Supported Skills have 50% increased Critical Hit Chance against Immobilized Enemies ・Modifiers Stun Buildup for Supported Skills instead apply to Pin Buildup ・Supported Skills cannot cause Stun Buildup ・Physical Damage from Supported Skills is Pinning. |
|
Pin III
|
・Modifiers to Stun Buildup for Supported Skills instead apply to Pin Buildup ・Supported Skills cannot cause Stun Buildup ・Physical Damage from Supported Skills is Pinning ・Hits with Supported Skills cause 60% less Pin buildup ・Pin caused by Supported Skills has 30% more duration |
 Practical Magic Practical Magic
|
Support: ・Gain 30% increased spell damage for 8 seconds on heavy stunning an enemy with supported skills |
|
Practical Magic II
|
Support: ・Gain 40% increased spell damage for 8 seconds on heavy stunning an enemy with supported skills |
 Retaliate I Retaliate I
|
・Supported Skills deal up to 40% more attack damage, scaling up as your stun bar increases |
|
Retaliate II
|
・Hits from Supported Skills Stun enemies as though dealing more damage equivalent to the current percentage of your Stun Bar ・Supported Skills deal up to 40% more Attack Damge, scaling up as your Stun Bar increases. |
 Rupture Rupture
|
・Supported skills aggravate bleeding on hitting heavy stunned enemies |
 Ruthless Ruthless
|
・Every Fifth use of Supported Attacks causes 500% more Stun Buildup. |
 Spar Spar
|
・Hits from Supported Skills Stun enemies as though dealing more damage equivalent to the current percentage of your stun bar |
 Steadfast I Steadfast I
|
・You have 50% more Stun Threshold while Channelling Supported Skills |
|
Steadfast II
|
・You have 100% more Ailment Threshold while Channelling Supported Skills ・You have 50% more Stun Threshold while Channelling Supported Skills |
 Stun I Stun I
|
・Hits with Supported Skills cause 50% more Stun Buildup. |
|
Stun II
|
・Hits with Supported Skills cause 70% more Stun buildup |
|
Stun III
|
・Hits with Supported Skills cause 300% more Stun buildup ・Supported Skills deal 50% less Damage |
 Syzygy Syzygy
|
・Hits from Supported Skills are considered Crushing Blows against ignited and fully armour broken enemies heavily stunning enemies which are ignited and fully armour broken with supported skills will permanently intimidate them |
 Unbreakable Unbreakable
|
・200% more Stun threshold while using supported skills |
 Vanguard I Vanguard I
|
・Gain 2 Guard per Ten Strength when you Stun an Enemy ・Gain an additional 4 Guard per Ten Strength if Heavily Stunning ・Guard duration is 4 seconds. |
|
Vanguard II
|
・Gain 2 Guard per Ten Strength when you Stun an Enemy ・Gain an additional 6 Guard per Ten Strength if Heavily Stunning ・Guard duration is 4 seconds. |
 Wind Wave Wind Wave
|
Support: ・Trigger Wind Wave when Stunned while using supported skills Wind Wave: ・knocks back enemies ・Knock enemies back on hit |
All Stun Spirit Gems
| Gem | Effects |
|---|---|
 Dread Banner Dread Banner
|
・10% more Aura per Valour ・Banner Aura radius is 4 meters ・Banner duration is 6.65s, or until you leave the Aura ・Aura grants 0.17 Flask charges per second ・Aura grants 14% more Stun Threshold and Elemental Ailment Threshold |
 Overwhelming Presence Overwhelming Presence
|
・Enemies in your presence have 18% reduced Elemental Ailment threshold ・Enemies in your presence have 19% reduced Stun threshold |
 Rhoa Mount Rhoa Mount
|
None |
Path of Exile 2 (PoE 2) Related Guides

Glossary and Basic Game Mechanics
All Glossary Guides
Comment
Author

Stun Explained: How to Stun Enemies
Please participate in our site
improvement survey
04/2026
improvement survey
04/2026
Would you assist in
improving Game8's site?
improving Game8's site?

×
We are listening to our users' valuable opinions and discussing how to act on them.
The information collected through this survey will be used for the purpose of improving our services. In addition, the information will only be disclosed a part of a statistic in a format that will not allow identification of personal information.
Begin Survey
Not Now
×
Please rate each item regarding Game8.co's Advertisements.
Amount of Ads
Very Dissatisfied
Somewhat Dissatisfied
Fine
Somewhat Satisfied
Highly Satisfied
Placement of Ads
Timing of Ad Display
Ad Loading Speed
Safeness of Ads
Content of Ads
×
Please rate each item regarding Game8.co's Quality of Articles.
Amount of information
Very Dissatisfied
Somewhat Dissatisfied
Fine
Somewhat Satisfied
Highly Satisfied
Frequency of updates
Speed of new information
Accuracy of articles
Understandibility of articles
Readability of sentences
×
Please rate each item regarding Game8.co's Usability of the Site.
Ease of finding information
Very Dissatisfied
Somewhat Dissatisfied
Fine
Somewhat Satisfied
Highly Satisfied
Loading Speed
Use of Color
Font Size
Visibility of Images
Easy to Understand Layout
×
Please rate each item regarding Game8.co's Message Boards, Comments.
Ease of Writing
Very Dissatisfied
Somewhat Dissatisfied
Fine
Somewhat Satisfied
Highly Satisfied
Readability
Ease in Finding Information
Comment Quality
Comment Quantity
Admin Response
×
Please rate each item regarding Game8.co's Site's new design.
Please rate our site's new design
Very Dissatisfied
Somewhat Dissatisfied
Fine
Somewhat Satisfied
Highly Satisfied
Do you think that the website's design change makes the site easier to use?
Has the new design made it easier for you to find information on the site?
Has the new design improved the overall visual appeal of the site?
How would you rate your overall satisfaction with the new design of the site?
×
How likely are you to recommend Game8 to someone you know?
Very Unlikely
0
1
2
3
4
5
6
7
8
9
10
Very Likely
If you have other opinions regarding potential improvement to the website, please share them with us. We would appreciate your honest opinion.
Note: This is a free response section, so you can proceed without entering anything.
Note: Please be sure not to enter any kind of personal information into your response.
Note: Please be sure not to enter any kind of personal information into your response.
×
Thank You
×
Thank you for participating in our survey! Your answers will help us to improve the quality of our website and services.
We hope you continue to make use of Game8.
We hope you continue to make use of Game8.
Close
Rankings
- We could not find the message board you were looking for.

Gaming News


![Forza Horizon 6 Review [Preview] | Beautiful Roads With a Whole Lot of Oversteer](https://img.game8.co/4460981/a7254c24945c43fbdf6ad9bea52b5ce9.png/thumb)
![Borderlands Mobile Review [Playtest] | The Same Borderlands Made Easy](https://img.game8.co/4465500/aac0c880a39ec5cd46073e49d18f3ed5.png/thumb)
Popular Games

Genshin Impact Walkthrough & Guides Wiki
Crimson Desert Walkthrough & Guides Wiki
Umamusume: Pretty Derby Walkthrough & Guides Wiki
Honkai: Star Rail Walkthrough & Guides Wiki
Monster Hunter Stories 3: Twisted Reflection Walkthrough & Guides Wiki
Wuthering Waves Walkthrough & Guides Wiki
The Seven Deadly Sins: Origin Walkthrough & Guides Wiki
Pokemon TCG Pocket (PTCGP) Strategies & Guides Wiki
Pokemon Pokopia Walkthrough & Guides Wiki
Zenless Zone Zero Walkthrough & Guides Wiki


Recommended Games
Monster Hunter World Walkthrough & Guides Wiki
Fire Emblem Heroes (FEH) Walkthrough & Guides Wiki
Pokemon Brilliant Diamond and Shining Pearl (BDSP) Walkthrough & Guides Wiki
Super Smash Bros. Ultimate Walkthrough & Guides Wiki
Diablo 4: Vessel of Hatred Walkthrough & Guides Wiki
Cyberpunk 2077: Ultimate Edition Walkthrough & Guides Wiki
Yu-Gi-Oh! Master Duel Walkthrough & Guides Wiki
Elden Ring Shadow of the Erdtree Walkthrough & Guides Wiki
The Legend of Zelda: Tears of the Kingdom Walkthrough & Guides Wiki
Persona 3 Reload Walkthrough & Guides Wiki


All rights reserved
© 2010 - 2024 Grinding Gear Games
The copyrights of videos of games used in our content and other intellectual property rights belong to the provider of the game.
The contents we provide on this site were created personally by members of the Game8 editorial department.
We refuse the right to reuse or repost content taken without our permission such as data or images to other sites.