This survey will take about 1 minute.
Your answers will help us to improve our website.
Zelda: Tears of the Kingdom (TotK)
Eldin Canyon Region Map: Korok Seed Locations, Shrines, and Quests
▲ Get Pristine Weapons from the depths!
△ All 1000 Koroks | All 4 Great Fairies
▲ 81 Addison Signs | 147 Caves | 58 Wells
△ Tips: Farm Rupees | Starting Armor
▲ Best Weapons | Best Armor | Best Food
Eldin Canyon is a region found in the Surface of Hyrule in The Legend of Zelda: Tears of the Kingdom (TotK). Read on to see the full Eldin Canyon region map, as well as locations for Korok Seeds, Shrines, Quests, and other points of interest found within the Eldin Canyon!
List of Contents
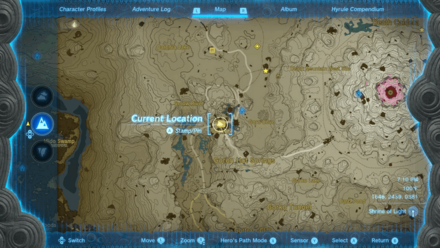
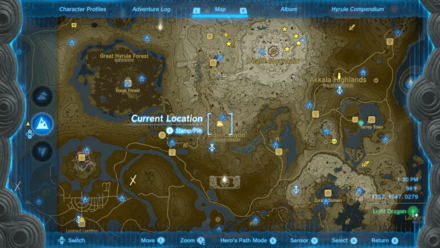
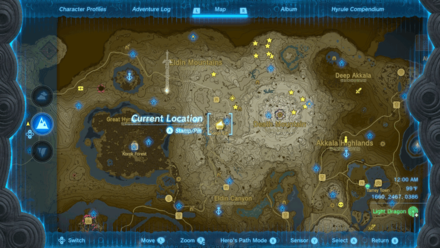
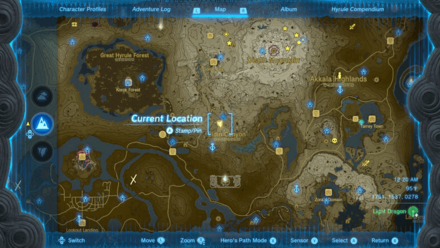
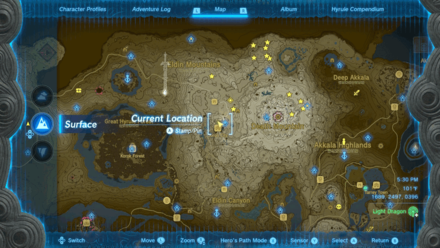
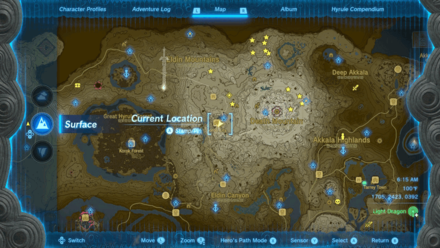
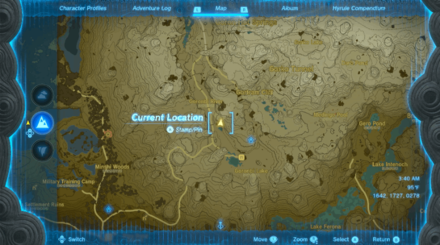
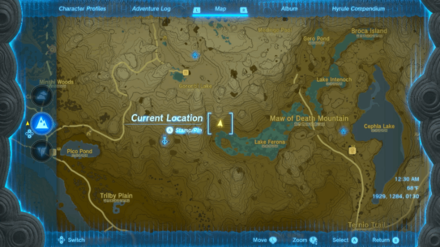
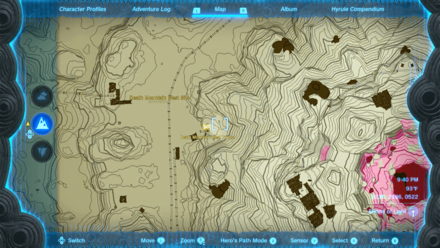
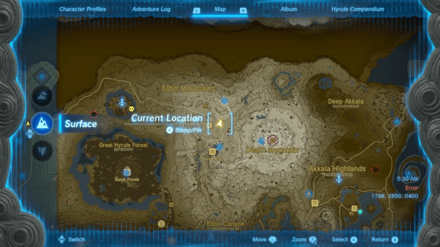
Eldin Canyon Region Map
Eldin Canyon Full Map
 Enlarge EnlargeView Full Image |
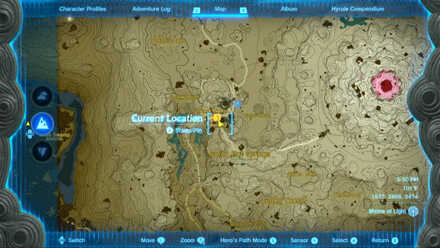
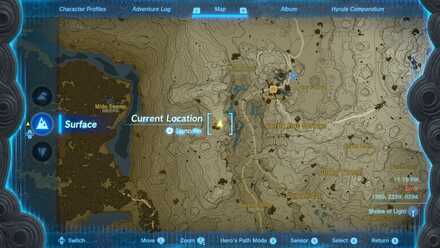
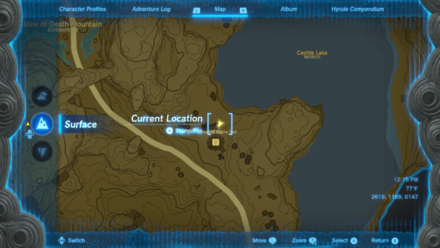
Eldin Canyon Tower Map Location
Map and Coordinates
| Overworld Location | Coordinates |
|---|---|
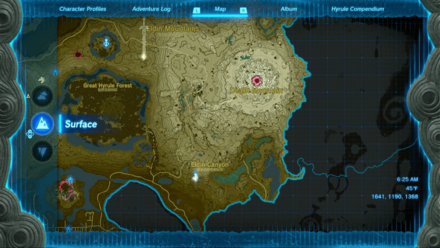 Enlarge EnlargeEldin Canyon Skyview Tower |
1641, 1190, 0225 |
Skyview Tower Guide: All Tower Locations
Eldin Canyon Shrine Locations
Shrine Map Locations and Coordinates
| Location | Coordinates |
|---|---|
 Enlarge EnlargeMayachideg Shrine (Proving Grounds: The Hunt) |
Video Guide 3062, 1823, 0216 |
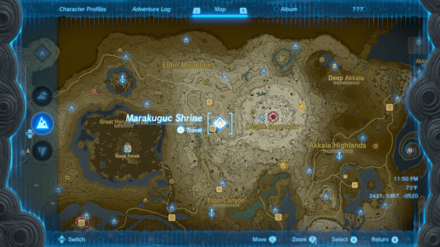 Enlarge EnlargeMarakuguc Shrine (Wheeled Wonders) |
Video Guide 1762, 2510, 0436 |
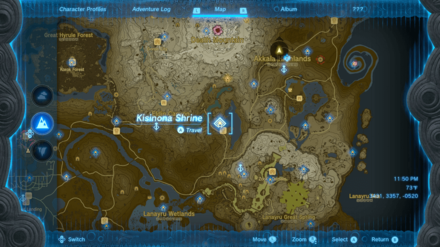 Enlarge EnlargeKisinona Shrine (Wind Power) |
Video Guide 2567, 1246, 0173 |
 Enlarge EnlargeJiotak Shrine (Rauru's Blessing) |
1833, 3179, 0257 |
 Enlarge EnlargeSibajitak Shrine (Alignment) |
Video Guide 2399, 3274, 0402 |
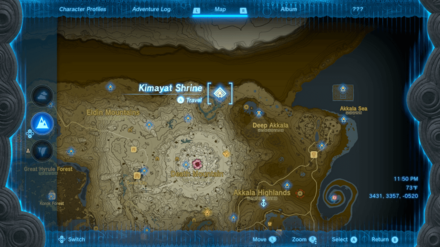 Enlarge EnlargeKimayat Shrine (Proving Grounds: Smash) |
2863, 3637, 0241 |
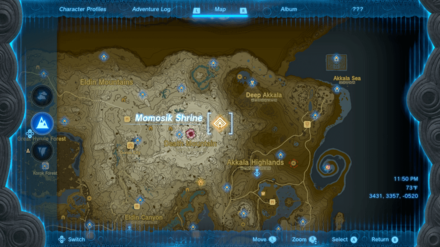 Enlarge EnlargeMomosik Shrine (Rauru's Blessing) |
2959, 2758, 0524 |
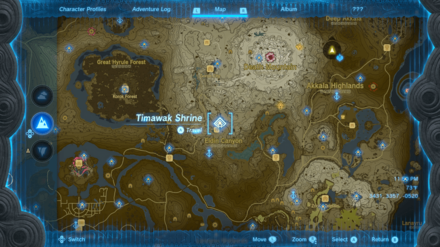 Enlarge EnlargeTimawak Shrine (Against the Flow) |
Video Guide 1799, 1638, 0311 |
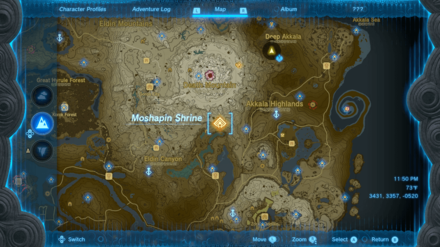 Enlarge EnlargeMoshapin Shrine (Rauru's Blessing) |
2678, 1905, 0131 |
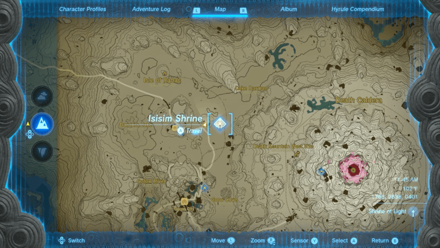 Enlarge EnlargeIsisim Shrine (Proving Grounds: In Reverse) |
1841, 2841, 0363 |
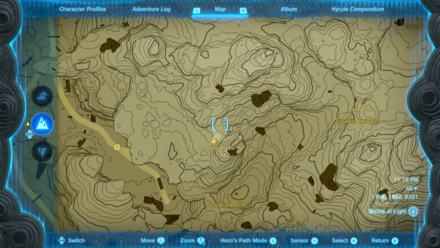
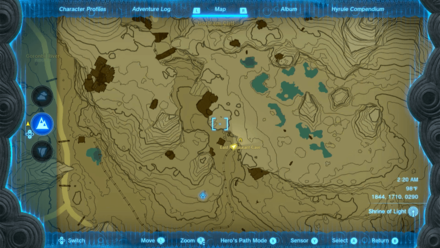
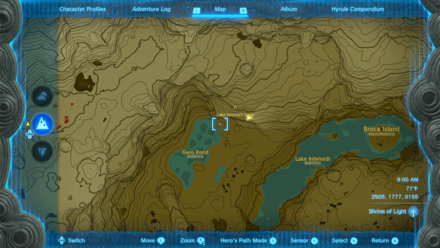
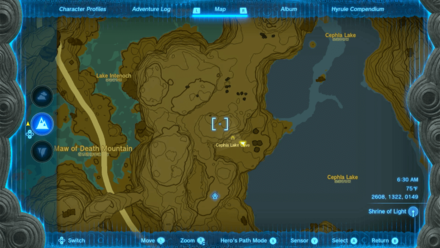
Eldin Canyon Korok Seed Locations
Korok Seed Locations and Coordinates
| Overworld | Location Details |
|---|---|
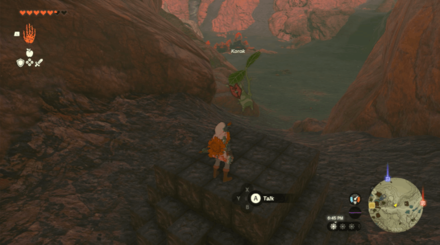
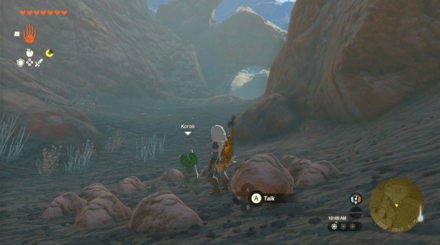
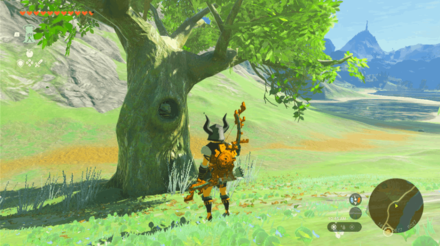
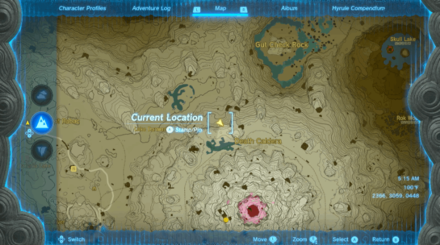
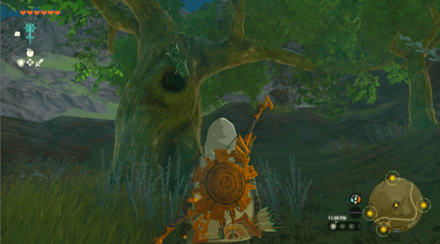 Enlarge EnlargeKorok Seed |
Start Coordinates 1333, 1317, 0167 Shoot the acorn in the tree's hollow to reveal the Korok. |
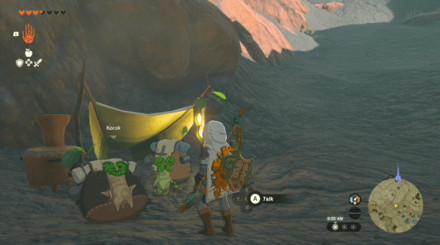
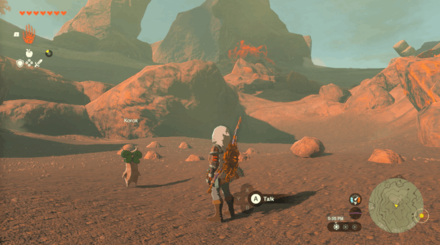
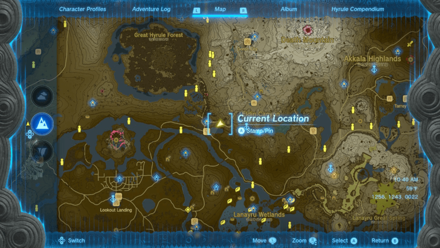
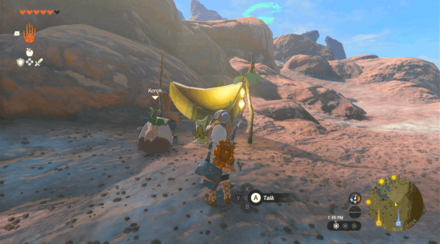 Enlarge EnlargeKorok Seed x2 |
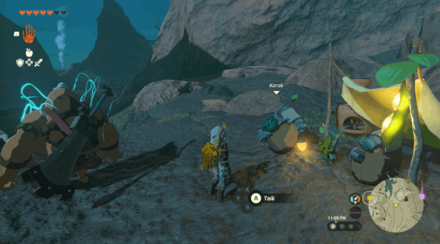
Start Coordinates 3350, 3666, 0221 End Coordinates 2969, 3647, 0224 Reunite the Korok west of Akkala Wilds to its friend near Kimayat Shrine. |
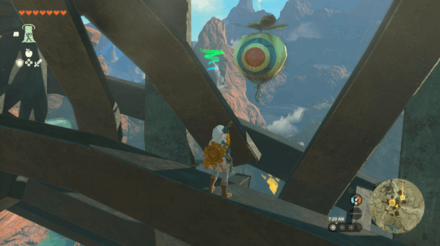
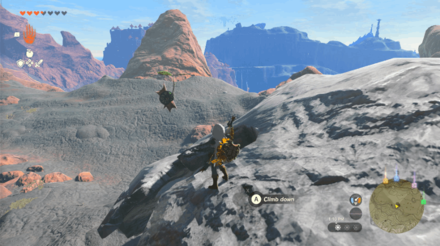
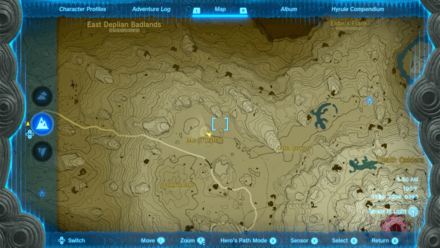
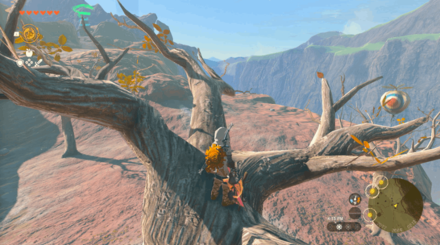 Enlarge EnlargeKorok Seed |
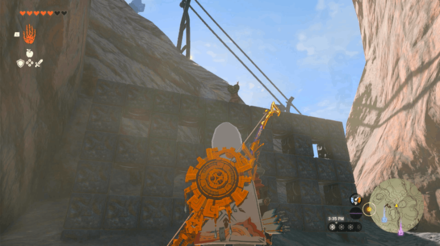
Start Coordinates 3077, 3684, 0212 Stand by the pinwheel on the large decayed tree and shoot the three balloons. |
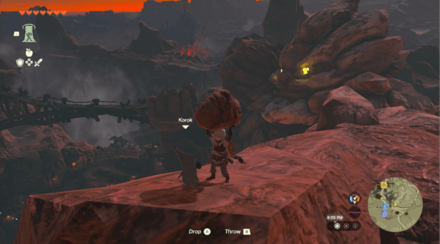
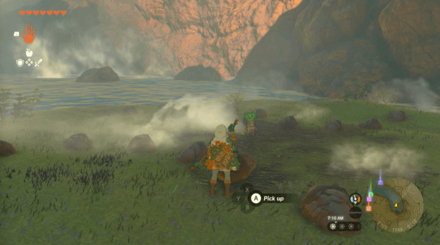
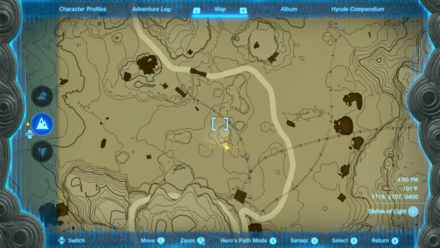
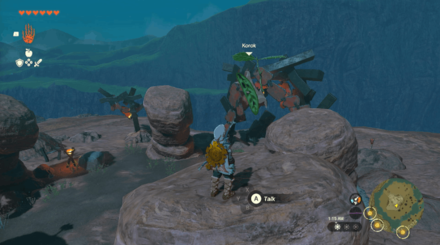 Enlarge EnlargeKorok Seed |
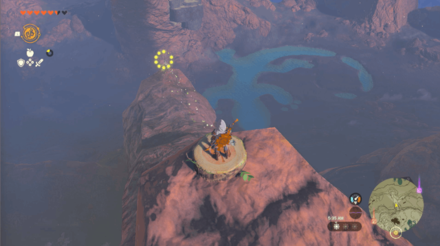
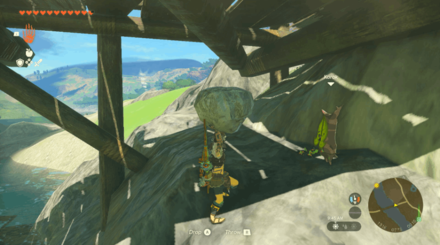
Start Coordinates 2670, 3441, 0374 Climb the rock pillar in Gut Check Rock and examine the sparkles at the top. |
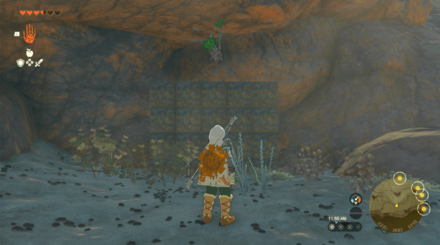 Enlarge EnlargeKorok Seed |
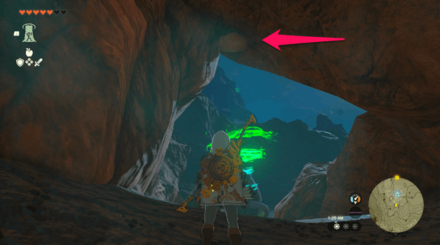
Start Coordinates 2232, 3679, 0232 Use Ultrahand on the small set of blocks to complete the larger set of blocks in Eldin's Flank. |
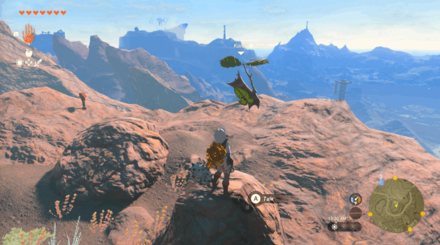 Enlarge EnlargeKorok Seed |
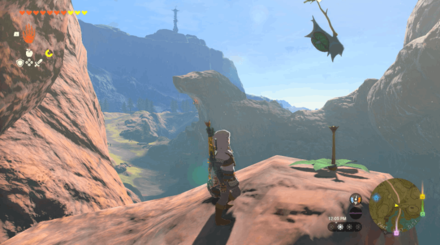
Start Coordinates 1424, 1535, 0363 Examine the sparkles that appear when you step on the small rock formation. |
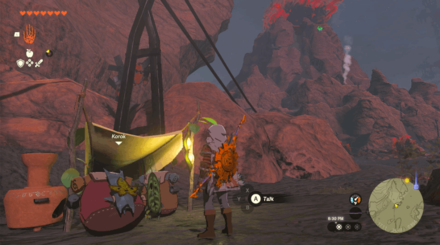
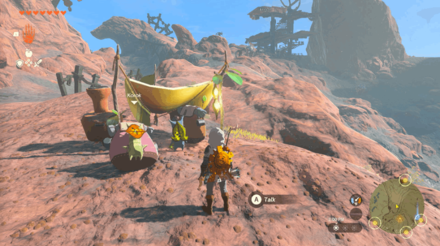 Enlarge EnlargeKorok Seed x2 |
Start Coordinates 1535, 1606, 0304 End Coordinates 1874, 1629, 0302 Reunite the Korok to its friend near Goronbi Lake. |
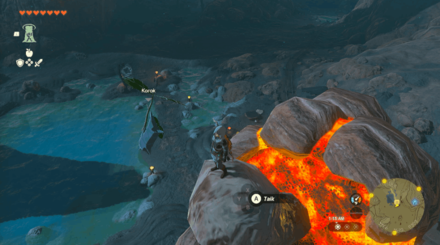 Enlarge EnlargeKorok Seed |
Start Coordinates 1766, 1539, 0309 Examine the sparkles on top of Bedrock Bistro. |
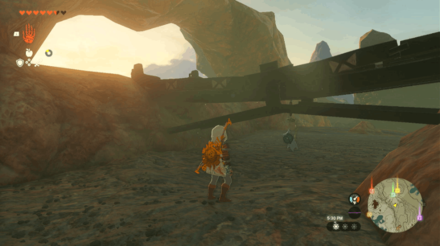
 Enlarge EnlargeKorok Seed x2 |
Start Coordinates 1542, 1807, 0283 End Coordinates 1502, 1800, 0310 Reunite the Korok by Goronbi River to its friend. |
 Enlarge EnlargeKorok Seed |
Start Coordinates 1451, 1746, 0310 Use Ultrahand on the rock inside the pond and place it on the wooden pedestal. |
 Enlarge EnlargeKorok Seed |
Start Coordinates 1700, 1754, 0345 Use Ultrahand on the nearby rock and place it on the wooden pedestal. |
 Enlarge EnlargeKorok Seed |
Start Coordinates 1433, 1952, 0337 Use Ascend on the tree stump stuck at the ceiling of the cave to get the Korok Seed. |
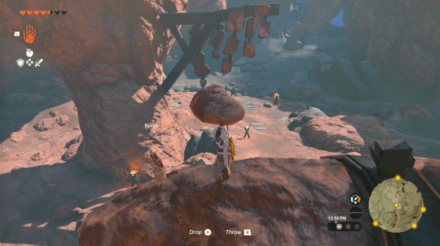 Enlarge EnlargeKorok Seed |
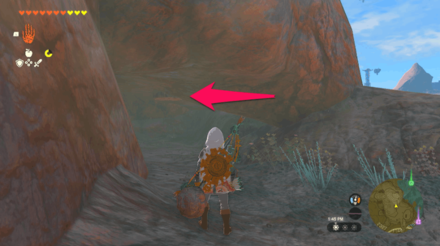
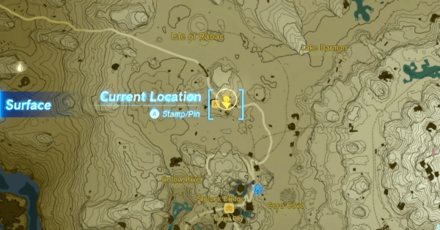
Start Coordinates 1669, 1980, 0342 Pick up the lone rock on the rock formation that looks like a pickaxe in in Southern Mine. |
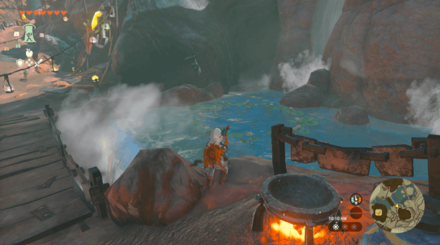
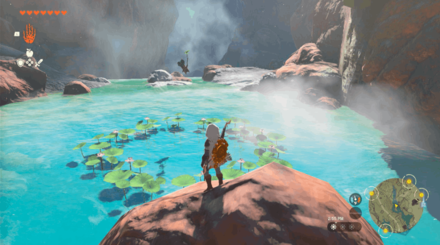 Enlarge EnlargeKorok Seed |
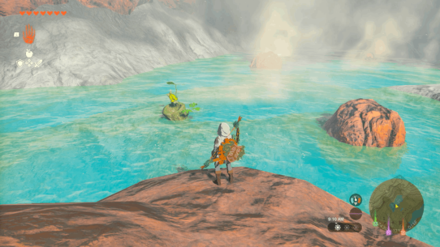
Start Coordinates 1473,2223, 0294 Dive into the circle of waterlilies to reveal the Korok. |
 Enlarge EnlargeKorok Seed |
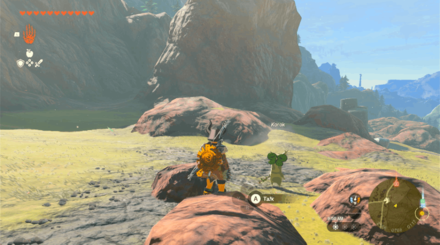
Start Coordinates 1254, 2291, 0322 Get the two nearby rocks and place them in the gaps of the rock pattern. |
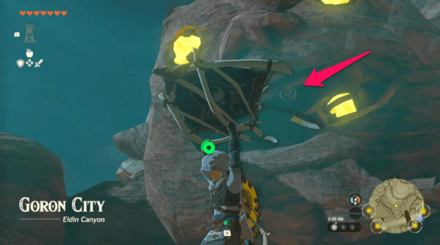 Enlarge EnlargeKorok Seed |
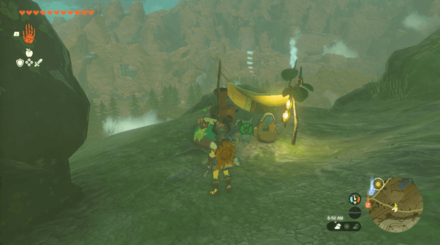
Start Coordinates 1593, 2474, 0436 Shoot the balloon inside the mouth of the large stone monument in Goron City. |
 Enlarge EnlargeKorok Seed |
Start Coordinates 1666, 2409, 0449 Shoot the balloon right below Stolock Bridge in Goron City. |
 Enlarge EnlargeKorok Seed |
Start Coordinates 1720, 2421, 0390 Dive into the circle of waterlilies to reveal the Korok. |
 Enlarge EnlargeKorok Seed |
Start Coordinates 1723, 2554, 0498 Pick up the lone rock on top of the left hand of the Daruk stone monument. |
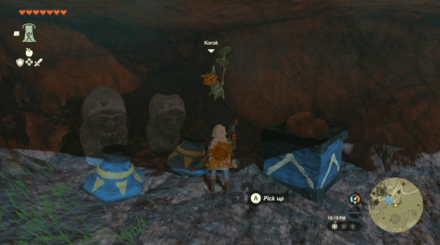 Enlarge EnlargeKorok Seed |
Start Coordinates 1808, 2528, 0402 Place the other blue vase on the empty prayer bowl to reveal the Korok. |
 Enlarge EnlargeKorok Seed x2 |
Start Coordinates 1815, 2641, 0400 End Coordinates 1990, 2597, 0457 Reunite the Korok that's north of Goro Cove to its friend. |
 Enlarge EnlargeKorok Seed |
Start Coordinates 2083, 2329, 0498 Use Ultrahand to place the small set inside the bigger set of blocks. |
 Enlarge EnlargeKorok Seed |
Start Coordinates 2222, 2365, 0518 End Coordinates 2237, 2363, 0530 Follow the yellow flowers under the Bridge of Eldin until you reach a white flower on top of the bridge. |
 Enlarge EnlargeKorok Seed |
Start Coordinates 1992, 2117, 0473 Use Ultrahand to place the nearby boulder on the wooden pedestal. |
 Enlarge EnlargeKorok Seed |
Start Coordinates 1799, 2209. 0497 End Coordinates 1758, 2224, 0482 Step on the stump in Goron Hot Springs and glide down the target without toughing the ground. |
 Enlarge EnlargeKorok Seed |
Start Coordinates 1745, 2329, 0420 Use Ultrahand on the small set of blocks and use it to complete the larger set of blocks. |
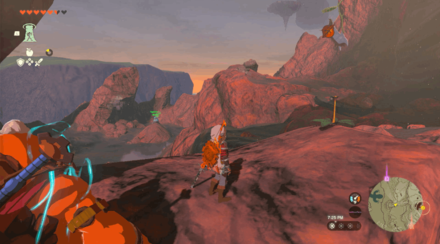
 Enlarge EnlargeKorok Seed x2 |
Start Coordinates 1982, 2039, 0423 End Coordinates 1832, 1903, 0342 Reunite the Korok outside Gorko Tunnel to its friend. |
 Enlarge EnlargeKorok Seed |
Start Coordinates 2265, 1829, 0322 End Coordinates 2264, 1836, 0332 Follow the yellow flowers until you reach a white flower around a giant broken skull near Medingo Pool. |
 Enlarge EnlargeKorok Seed |
Start Coordinates 2703, 1744, 0229 Get the nearby rock and place it in the gap of the rock pattern around Broca Island. |
 Enlarge EnlargeKorok Seed |
Start Coordinates 2428, 1722, 0145 Remove the cork in Gero Pond to reveal the Korok. |
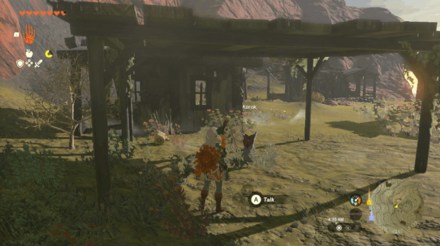
 Enlarge EnlargeKorok Seed |
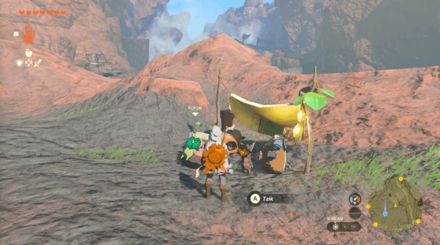
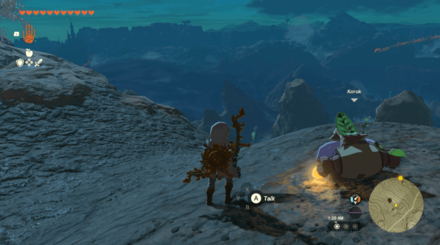
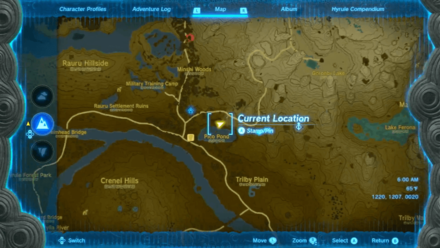
Start Coordinates 2672, 1076, 0156 Chase and examine the moving sparles around the broken shack, south of Foothill Stable. |
 Enlarge EnlargeKorok Seed |
Start Coordinates 2719, 1163, 0180 Use Ultrahand on the small set of blocks and use it to complete the larger set of blocks. |
 Enlarge EnlargeKorok Seed |
Start Coordinates 2443, 1242, 0150 Hit the dandelion and catch it before it lands on the ground. |
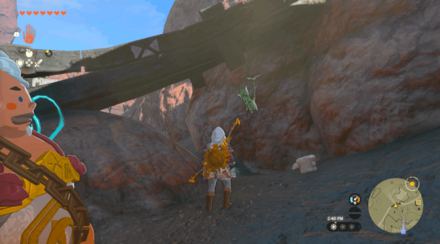
 Enlarge EnlargeKorok Seed |
Start Coordinates 2313, 1132, 0187 Ascend through the tree stump to get the Korok Seed. |
|
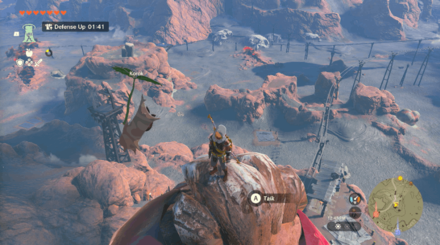
Enlarge Korok Seed x2 |
Start Coordinates 2371, 1403, 0130 End Coordinates 2129, 1084, 0131 Reunite the Korok in Maw of Death Mountain to its friend. |
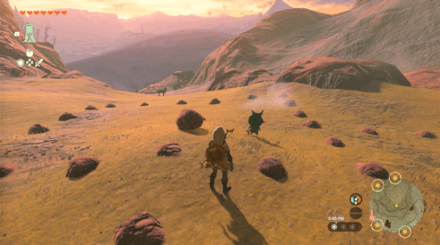
 Enlarge EnlargeKorok Seed |
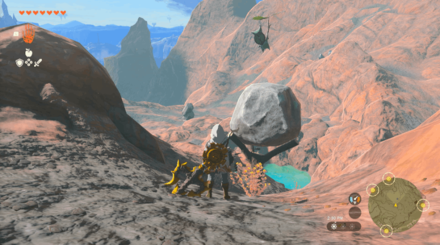
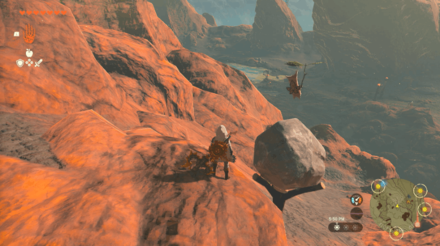
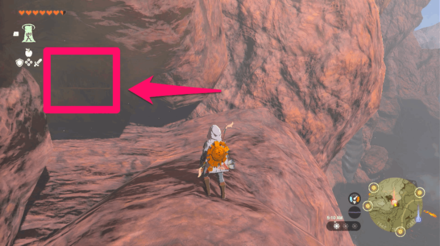
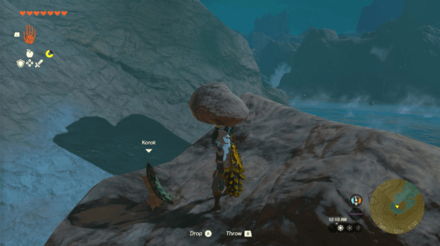
Start Coordinates 1941, 1205, 0140 Pick up the lone rock on top of the small hill, west of Lake Ferona. |
 Enlarge EnlargeKorok Seed |
Start Coordinates 2292, 0943, 0110 Pick up the nearby rock and place it in the gap of the rock circle. |
 Enlarge EnlargeKorok Seed |
Start Coordinates 1858, 0787, 0091 Pick up the rock in the middle of the large, glowing Zonai pattern. |
 Enlarge EnlargeKorok Seed |
Start Coordinates 3032, 2290, 0333 Place the missing wooden platform to complete the roof of the small shed in Shadow Hamlet Ruins. |
 Enlarge EnlargeKorok Seed |
Start Coordinates 1603, 2825, 0467 Examine the sparkles at the very top of YunoboCo HQ. |
 Enlarge EnlargeKorok Seed |
Start Coordinates 1565, 2945, 0399 Shoot the acorn under small bridge, north of YunoboCo HQ. |
 Enlarge EnlargeKorok Seed |
Start Coordinates 1376, 2845, 0361 Pick up the two nearby rocks and place them in the gaps of the rock zigzag. |
 Enlarge EnlargeKorok Seed x2 |
Start Coordinates 1724, 2609, 0430 End Coordinates 1713, 3058, 0393 Reunite the Korok north of Goron City to its friend. |
 Enlarge EnlargeKorok Seed |
Start Coordinates 2232, 3041, 0445 Shoot the acorn below the small bridge to reveal the Korok. |
 Enlarge EnlargeKorok Seed |
Start Coordinates 2171, 3036, 0453 Hit the dandelion and catch it before it lands on the ground. |
 Enlarge EnlargeKorok Seed |
Start Coordinates 2194, 3008, 0508 End Coordinates 2155, 3054, 0474 Step on the stump and reach the ring before time runs out. |
 Enlarge EnlargeKorok Seed |
Start Coordinates 2061, 2756, 0476 Use Ultrahand on the small set of blocks to complete the bigger set of blocks. |
 Enlarge EnlargeKorok Seed x2 |
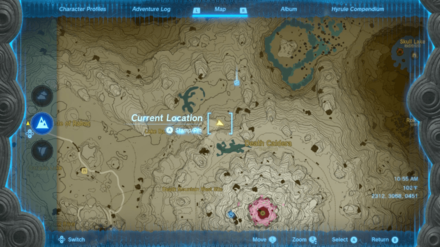
Start Coordinates 2178, 2779, 0523 End Coordinates 2511, 2982, 0523 Reunite the Korok outside Death Mountain West Site to its friend near Death Caldera. |
 Enlarge EnlargeKorok Seed |
Start Coordinates 2405, 3328, 0403 Ascend through the tree stump behind Sibajitak Shrine to get the Korok Seed. |
 Enlarge EnlargeKorok Seed x2 |
Start Coordinates 2642, 1102, 0157 End Coordinates 2760, 0772, 0199 Reunite the Korok near Foothill Stable to its friend by Ternio Trail. |
 Enlarge EnlargeKorok Seed |
Start Coordinates 2555, 0765, 0117 Chase and examine the moving sparkles to the west of Ternio Trail. |
 Enlarge EnlargeKorok Seed |
Start Coordinates 1318, 0717, 0017 Pick up the rock underneath the northeast end of Thims Bridge. |
 Enlarge EnlargeKorok Seed |
Start Coordinates 1466, 0677, 0024 Shoot the acorn inside the hollow of a tree by the road, south of Trilby Plain. |
 Enlarge EnlargeKorok Seed x2 |
Start Coordinates 1249, 3004, 0421 End Coordinates 0771, 2857, 0215 Reunite the Korok northwest of YunoboCo HQ to its friend. |
 Enlarge EnlargeKorok Seed |
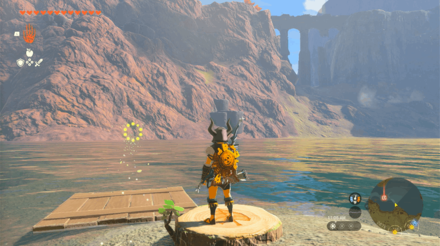
Start Coordinates 2678, 1350, 0127 Step on the stump on the shore of Cephla Lake, northeast of Kisinona Shrine, and get to the ring before time runs out. |
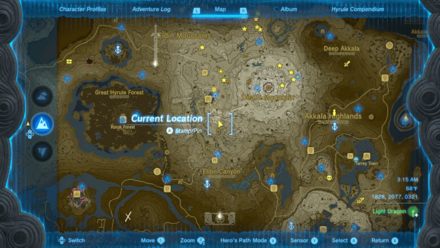
Korok Seed Map: All Korok Seed Locations
Eldin Canyon Stables
All Stable Locations
| Overworld Location | Coordinates |
|---|---|
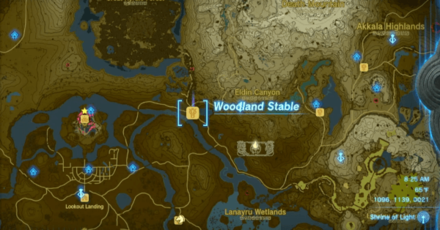 Enlarge EnlargeWoodland Stable |
1096, 1139, 0021 |
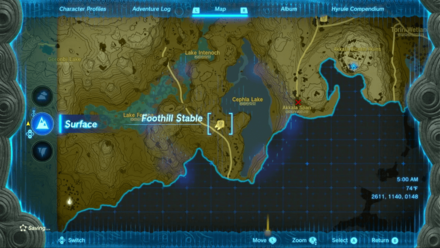 Enlarge EnlargeFoothill Stable |
2611, 1140, 0148 |
Eldin Canyon Quests
Main Quests
| Quest | Coordinates |
|---|---|
 Enlarge EnlargeYunobo of Goron City |
1649, 2447, 0381 |
Side Quests
| Quest | Coordinates |
|---|---|
 Enlarge EnlargeMisko's Cave of Chests |
2606, 1325, 0150 |
 Enlarge EnlargeMisko's Treasure: Heroines Manuscript |
2603, 1319, 0150 |
|
Enlarge Misko's Treasure: Pirate Manuscript |
2603, 1319, 0150 |
|
Enlarge Misko's Treasure: Twins Manuscript |
2603, 1319, 0150 |
 Enlarge EnlargeMisko's Treasure: The Fierce Deity |
2582, 1426, 0134 |
 Enlarge EnlargeMisko's Treasure of Awakening |
1379, 2258, 0294 |
|
The Ancient City Gorondia |
1745, 2579, 0427 |
 Enlarge EnlargeThe Hidden Treasure at Lizard Lakes |
1648, 2439, 0381 |
 Enlarge EnlargeHebra's Colossal Fossil |
1670, 3668, 0100 |
 Enlarge EnlargeMeat for Meat |
1757, 1548, 0279 |
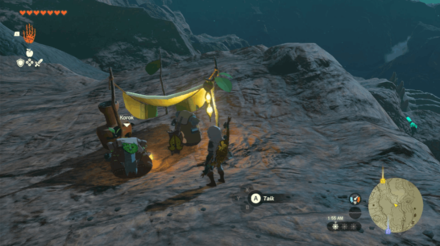
 Enlarge EnlargeMoon-Gazing Gorons |
1677, 2427, 0383 |
 Enlarge EnlargeRock Roast or Dust |
1757, 1548, 0279 |
 Enlarge EnlargeAmber Dealer |
1660, 2469, 0386 |
 Enlarge EnlargeCash In on Ripened Flint |
1751, 1537, 0278 |
 Enlarge EnlargeSoul of the Gorons |
1690, 2498, 0396 |
 Enlarge EnlargeThe Abandoned Laborer |
2345, 2680, 0514 |
 Enlarge EnlargeSimmerstone Springs |
1705, 2423, 0392 |
 Enlarge EnlargeMine-Cart Land: Open For Business! |
1828, 2077, 0321 |
|
Enlarge Mine-Cart Land: Quickshot Course |
1828, 2077, 0321 |
|
Enlarge Mine-Cart Land: Death Mountain |
1828, 2077, 0321 |
 Enlarge EnlargeA Picture for Woodland Stable |
1061, 1127, 0022 |
 Enlarge EnlargeA Picture for Foothill Stable |
2611, 1140, 0148 |
Side Adventures
| Quest | Coordinates |
|---|---|
 Enlarge EnlargeSerenade to a Great Fairy |
1046, 1148, 0022 |
 Enlarge EnlargeThe Hunt for Bubbul Gems |
1220, 1207, 0020 |
 Enlarge EnlargeFor Our Princess |
2579, 1153, 0147 |
 Enlarge EnlargeThe Search for Koltin |
1220, 1207, 0020 |
 Enlarge EnlargeBring Peace to Eldin |
2330, 3074, 0448 |
Eldin Canyon Settlements
All Towns and Settlement Locations
| Overworld Location | Coordinates |
|---|---|
 Enlarge EnlargeGoron City |
1644, 2442, 0381 |
 Enlarge EnlargeYunoboCo HQ |
1648, 2836, 0415 |
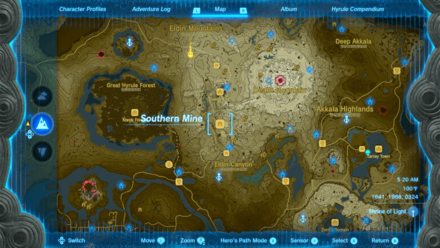 Enlarge EnlargeSouthern Mine |
1641, 1988, 0324 |
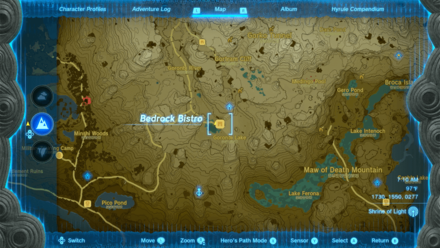 Enlarge EnlargeBedrock Bistro |
1730, 1550, 0277 |
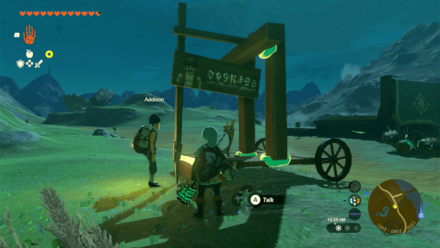
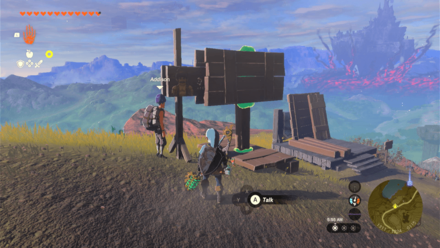
Eldin Canyon Hudson Signs
Addison Sign Locations
| Location | Solution |
|---|---|
 Enlarge Enlarge |
 Enlarge Enlarge |
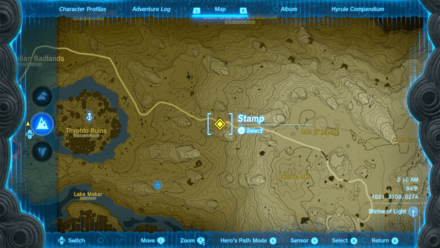
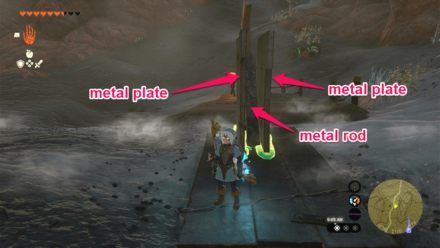
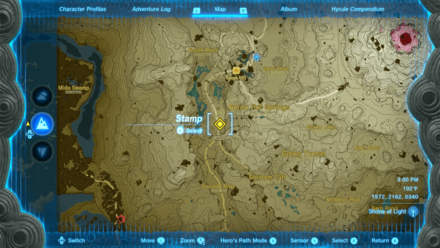
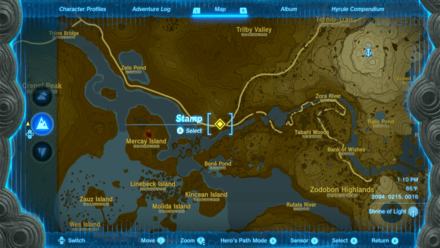
| Coordinates: 1021, 3109, 0274 Solution: Use the metal rod and plates to create a makeshift frame for the Hudson board to lean at. |
|
 Enlarge Enlarge |
 Enlarge Enlarge |
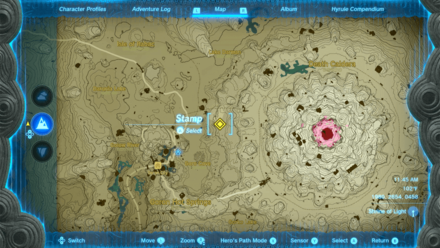
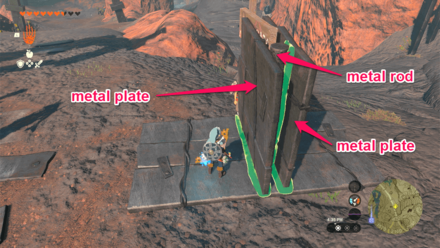
| Coordinates: 1980, 2654, 0458 Solution: Use the metal plate and rods nearby to create a makeshift support. Place the Hudson board between the two metal rods. |
|
 Enlarge Enlarge |
 Enlarge Enlarge |
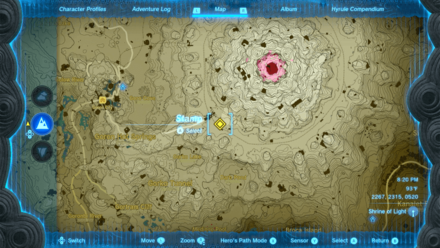
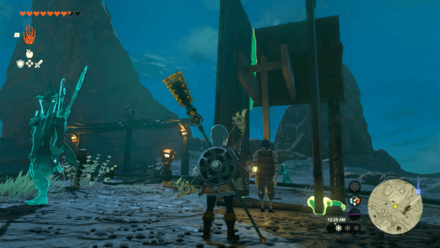
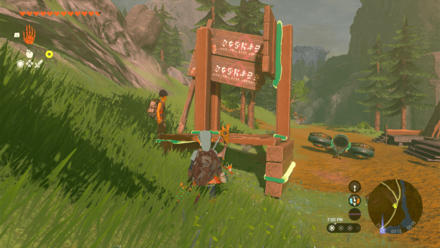
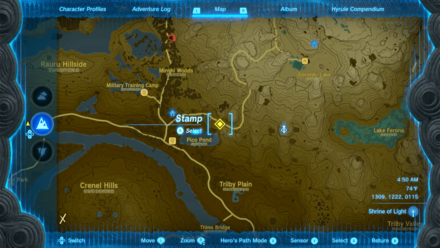
| Coordinates: 1572, 2162, 0340 Solution: Use the metal rod and plates to create a makeshift frame for the Hudson board to lean at. |
|
 Enlarge Enlarge |
 Enlarge Enlarge |
| Coordinates: 2267, 2315, 0520 Solution: Use the metal rods and plates and create a makeshift stall for the Hudson board to lean at. |
|
 Enlarge Enlarge |
 Enlarge Enlarge |
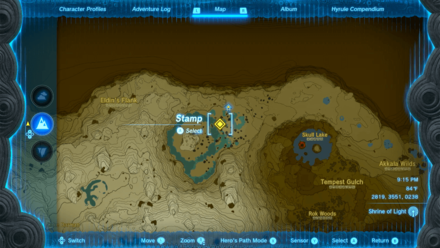
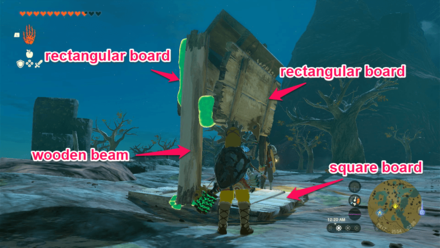
| Coordinates: 2819, 3551, 0238 Solution: Use the nearby wooden boards and craft a makeshift clasp to hold the Hudson board. |
|
 Enlarge Enlarge |
 Enlarge Enlarge |
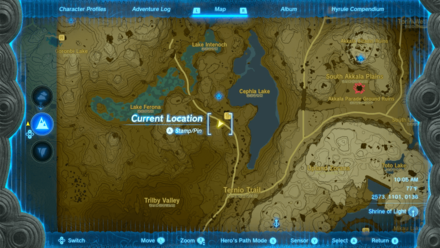
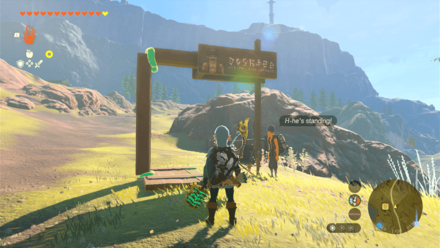
| Coordinates: 2573, 1101, 0136 Solution: Use the nearby wooden materials to make a stand. Insert a wooden beam inside the Hudson board to secure it. |
|
 Enlarge Enlarge |
 Enlarge Enlarge |
| Coordinates: 1344, 0800, 0021 Solution: Build a wooden arc for the Hudson sign to hang on to using the wooden materials nearby. |
|
 Enlarge Enlarge |
 Enlarge Enlarge |
| Coordinates: 2094, 0215, 0016 Solution: Use the nearby wooden materials to make a scaffolding for the Hudson sign to lean on. Place wooden beams below the frame to stabilize it. |
|
 Enlarge Enlarge |
 Enlarge Enlarge |
| Coordinates: 1309, 1222, 0115 Solution: Use the nearby wooden boards and planks to clasp the Hudson board and hold it steady. |
|
All Hudson Sign Locations: How to Help Addison's Signs Stand
Eldin Canyon Points of Interest
Cave Locations and Coordinates
| Overworld Location | Coordinates |
|---|---|
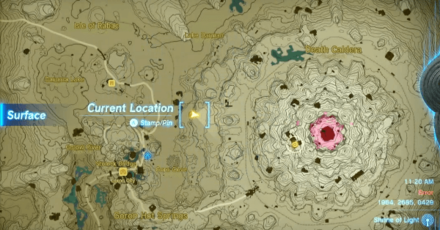 Enlarge EnlargeDeath Mountain Foothill Cave |
1966, 2685, 0429 |
 Enlarge EnlargeWest Restaurant Cave |
1642, 1727, 0278 |
 Enlarge EnlargeLake Ferona Cave |
1929, 1284, 0130 |
 Enlarge EnlargeLake Darman Monster Den |
2366, 3059, 0448 |
 Enlarge EnlargePico Pond Cave |
1252, 1238, 0025 |
 Enlarge EnlargeIsle of Rabac Gallery |
1560, 3100, 0395 |
 Enlarge EnlargeYunoboCo HQ South Cave |
1715, 2707, 0400 |
 Enlarge EnlargeLizard's Burrow |
2202, 3078, 0406 |
 Enlarge EnlargeDeath Mountain West Tunnel |
2231, 2684, 0521 |
 Enlarge EnlargeDeath Mountain East Tunnel |
2783, 2787, 0523 |
 Enlarge EnlargeGorko Tunnel |
2004, 2040, 0424 |
 Enlarge EnlargeGoronbi River Cave |
1427, 2100, 0287 |
 Enlarge EnlargeSouthern Mine Cave |
1798, 1982, 0321 |
 Enlarge EnlargeEast Restaurant Cave |
1844, 1710, 0290 |
 Enlarge EnlargeLake Intenoch Cave |
2485, 1793, 0161 |
 Enlarge EnlargeFoothill Monster Den |
2279, 1514, 0158 |
 Enlarge EnlargeCephla Lake Cave |
2598, 1326, 0151 |
 Enlarge EnlargeYunoboCo HQ East Cave |
1768, 2850, 0400 |
Well Locations and Coordinates
| Overworld Location | Coordinates |
|---|---|
 Enlarge EnlargeFoothill Stable Well |
2619, 1169, 0147 |
 Enlarge EnlargeShadow Hamlet Ruins Well |
3057, 2310, 0317 |
 Enlarge EnlargeWoodland Stable Well |
1091, 1152, 0021 |
Notable Map Locations
| Overworld Location | Coordinates |
|---|---|
 Enlarge EnlargeStolock Bridge |
1672, 2406, 0414 |
The Legend of Zelda: Tears of the Kingdom Related Guides

Interactive Map of Hyrule:
All Locations and Map Icons
All Area Maps and Locations
| Hyrule Map Locations | |||||
|---|---|---|---|---|---|
Other Maps
List of Surface Regions
Comment
Author

The Legend of Zelda: Tears of the Kingdom Walkthrough & Guides Wiki
Eldin Canyon Region Map: Korok Seed Locations, Shrines, and Quests
Please participate in our site
improvement survey
03/2026
improvement survey
03/2026
Would you assist in
improving Game8's site?
improving Game8's site?

×
We are listening to our users' valuable opinions and discussing how to act on them.
The information collected through this survey will be used for the purpose of improving our services. In addition, the information will only be disclosed a part of a statistic in a format that will not allow identification of personal information.
Begin Survey
Not Now
×
Please rate each item regarding Game8.co's Advertisements.
Amount of Ads
Very Dissatisfied
Somewhat Dissatisfied
Fine
Somewhat Satisfied
Highly Satisfied
Placement of Ads
Timing of Ad Display
Ad Loading Speed
Safeness of Ads
Content of Ads
×
Please rate each item regarding Game8.co's Quality of Articles.
Amount of information
Very Dissatisfied
Somewhat Dissatisfied
Fine
Somewhat Satisfied
Highly Satisfied
Frequency of updates
Speed of new information
Accuracy of articles
Understandibility of articles
Readability of sentences
×
Please rate each item regarding Game8.co's Usability of the Site.
Ease of finding information
Very Dissatisfied
Somewhat Dissatisfied
Fine
Somewhat Satisfied
Highly Satisfied
Loading Speed
Use of Color
Font Size
Visibility of Images
Easy to Understand Layout
×
Please rate each item regarding Game8.co's Message Boards, Comments.
Ease of Writing
Very Dissatisfied
Somewhat Dissatisfied
Fine
Somewhat Satisfied
Highly Satisfied
Readability
Ease in Finding Information
Comment Quality
Comment Quantity
Admin Response
×
Please rate each item regarding Game8.co's Site's new design.
Please rate our site's new design
Very Dissatisfied
Somewhat Dissatisfied
Fine
Somewhat Satisfied
Highly Satisfied
Do you think that the website's design change makes the site easier to use?
Has the new design made it easier for you to find information on the site?
Has the new design improved the overall visual appeal of the site?
How would you rate your overall satisfaction with the new design of the site?
×
How likely are you to recommend Game8 to someone you know?
Very Unlikely
0
1
2
3
4
5
6
7
8
9
10
Very Likely
If you have other opinions regarding potential improvement to the website, please share them with us. We would appreciate your honest opinion.
Note: This is a free response section, so you can proceed without entering anything.
Note: Please be sure not to enter any kind of personal information into your response.
Note: Please be sure not to enter any kind of personal information into your response.
×
Thank You
×
Thank you for participating in our survey! Your answers will help us to improve the quality of our website and services.
We hope you continue to make use of Game8.
We hope you continue to make use of Game8.
Close
Rankings
- We could not find the message board you were looking for.
Gaming News


![Everwind Review [Early Access] | The Shaky First Step to A Very Long Journey](https://img.game8.co/4440226/ab079b1153298a042633dd1ef51e878e.png/thumb)

![Monster Hunter Stories 3 Review [First Impressions] | Simply Rejuvenating](https://img.game8.co/4438641/2a31b7702bd70e78ec8efd24661dacda.jpeg/thumb)
Popular Games

Genshin Impact Walkthrough & Guides Wiki
Honkai: Star Rail Walkthrough & Guides Wiki
Umamusume: Pretty Derby Walkthrough & Guides Wiki
Pokemon Pokopia Walkthrough & Guides Wiki
Resident Evil Requiem (RE9) Walkthrough & Guides Wiki
Monster Hunter Wilds Walkthrough & Guides Wiki
Wuthering Waves Walkthrough & Guides Wiki
Arknights: Endfield Walkthrough & Guides Wiki
Pokemon FireRed and LeafGreen (FRLG) Walkthrough & Guides Wiki
Pokemon TCG Pocket (PTCGP) Strategies & Guides Wiki


Recommended Games
Diablo 4: Vessel of Hatred Walkthrough & Guides Wiki
Fire Emblem Heroes (FEH) Walkthrough & Guides Wiki
Yu-Gi-Oh! Master Duel Walkthrough & Guides Wiki
Super Smash Bros. Ultimate Walkthrough & Guides Wiki
Pokemon Brilliant Diamond and Shining Pearl (BDSP) Walkthrough & Guides Wiki
Elden Ring Shadow of the Erdtree Walkthrough & Guides Wiki
Monster Hunter World Walkthrough & Guides Wiki
The Legend of Zelda: Tears of the Kingdom Walkthrough & Guides Wiki
Persona 3 Reload Walkthrough & Guides Wiki
Cyberpunk 2077: Ultimate Edition Walkthrough & Guides Wiki


All rights reserved
© Nintendo. The Legend of Zelda and Nintendo Switch are trademarks of Nintendo.
The copyrights of videos of games used in our content and other intellectual property rights belong to the provider of the game.
The contents we provide on this site were created personally by members of the Game8 editorial department.
We refuse the right to reuse or repost content taken without our permission such as data or images to other sites.