Horus Tearlaments Deck List & Card Guide
Hello, Duelists! We regret to inform everyone that we have discontinued updates for Yu-Gi-Oh! Master Duel since December 2025. Our Friends Board and PVP Board will be active, but some of our guides will not be up-to-date. Thank you for your support!
Horus Tearlaments is an Aggro deck in Yu-Gi-Oh Master Duel, combining two archetypes that welcome sending their cards to the Graveyard to create presence on the field. Check out the core deck list and key combos, as well as tips on how to play, alternative card options & counters against this specific Deck!
Horus Tearlaments Deck List
| Main Deck: 42 cards | ||||
|---|---|---|---|---|
 x3
x3 |
 x3
x3 |
 x3
x3 |
 x3
x3 |
 x2
x2 |
 x2
x2 |
 x1
x1 |
 x1
x1 |
 x1
x1 |
 x1
x1 |
 x1
x1 |
 x1
x1 |
 x1
x1 |
 x1
x1 |
 x1
x1 |
 x3
x3 |
 x3
x3 |
 x3
x3 |
 x1
x1 |
 x1
x1 |
 x1
x1 |
 x1
x1 |
 x1
x1 |
 x1
x1 |
 x1
x1 |
 x1
x1 |
||||
| Extra Deck: 15 cards | ||||
 x1
x1 |
 x1
x1 |
 x1
x1 |
 x1
x1 |
 x1
x1 |
 x1
x1 |
 x1
x1 |
 x1
x1 |
 x1
x1 |
 x1
x1 |
 x1
x1 |
 x1
x1 |
 x1
x1 |
 x1
x1 |
 x1
x1 |
Horus Tearlaments Breakdown
| Rarity | Name | Qty |
|---|---|---|
| Tearlaments Scream | 3 | |
| Super Polymerization | 3 | |
| Called by the Grave | 1 | |
| Crossout Designator | 1 | |
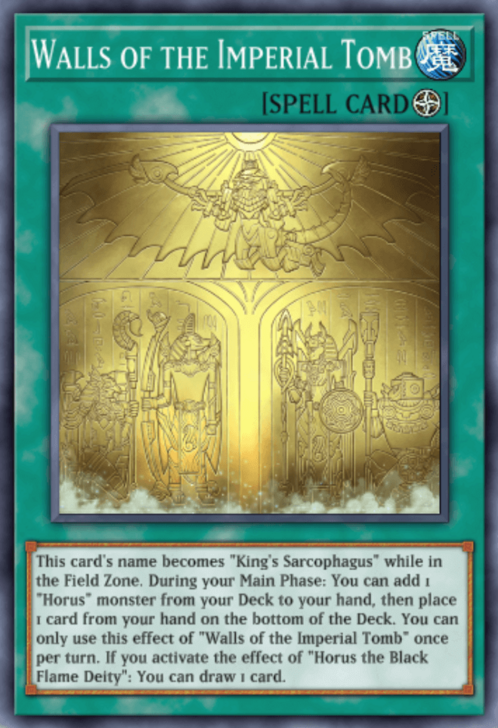
| Walls of the Imperial Tomb | 1 | |
| Tearlaments Grief | 1 | |
| Polymerization | 1 |
| Rarity | Name | Qty |
|---|---|---|
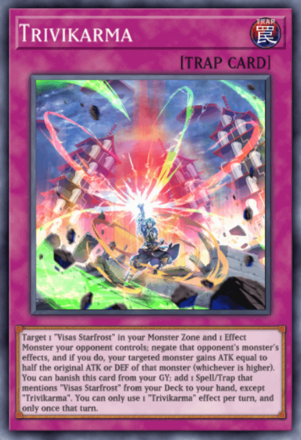
| Trivikarma | 1 | |
| Tearlaments Sulliek | 1 | |
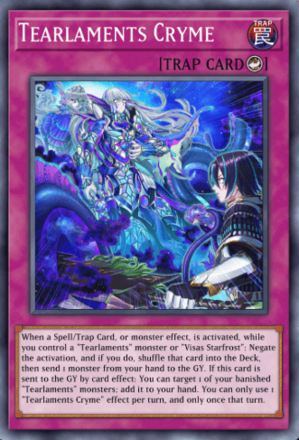
| Tearlaments Cryme | 1 |
Alternate Card Arts for Horus Tearlaments
| Mudora the Sword Oracle & Keldo the Sacred Protector | |
|---|---|
|
|
Almost always a staple since the original iteration of the Ishizu Tealraments Deck, Mudora the Sword Oracle and Keldo the Sacred Protector can shuffle cards from either Graveyard back to the Deck. This Quick Effect can be used offensively or defensively, and it almost always retrieves crucial cards back should you use it instead. |
| Foolish Burial & Foolish Burial Goods | |
|
|
Because of how both Horus and Tearlaments cards like being sent to the Graveyard, Foolish Burial and Foolish Burial Goods would be good cards to tech in. It is simply a targeted card sending to the GY, which eliminates the random chance usually brought about when milling cards to the GY. |
| Starving Venom Fusion Dragon | |
|
|
With DARK being the second strongest Affinity and the most represented one, when using Super Polymerization two DARK monsters is an easy summon into Starving Venom Fusion Dragon. It has the ability to clear all monsters on the field, and 2800 ATK is still decent for a Level 8 Fusion Monster. |
| That Grass Looks Greener | |
|
|
If you decide to run a 60-card version of this Deck, it is well worth considering adding That Grass Looks Greener. If used on Turn 1 against a 40-card Deck and left to resolve properly, that is an immediate 20 cards sent to the Graveyard in one fell swoop, and that is a wide variety of GY effects waiting to be triggered. |
| Card Destruction | |
|
|
Continuing the theme of sending cards to the GY, Card Destruction is a risky option if you have a bad hand to start. This also allows the opponent to draw and refresh their own hand, but there could also be an opportunity for them to send their most needed cards on hand to the GY as well. It is up to the player to weigh the advantage over the possible drawbacks when using this Limited Spell Card. |
| Canopic Protector | |
|
|
Canopic Protector lets players Special Summon "Horus" monsters from the hand or GY once per Chain whenever the opponent activates a card or effect. This allows constant presence of the monsters on the field if the opponent dares to activate their effects. |
Horus Tearlament Tier Evaluation
| Tier Ranking | |||
|---|---|---|---|
| Deck Archetype | Deck Difficulty | ||
| Aggro | Easy | ||
| Deck Evaluation | |||
Horus Tearlaments Deck Guide: How to Play
Playstyle and Win Condition
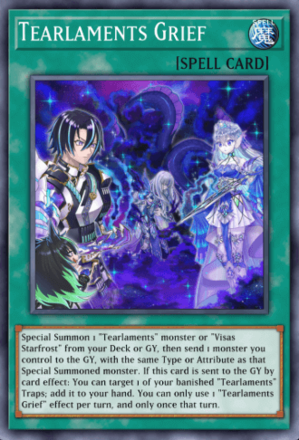
Tearlaments Cards and Milling
|
|
The Tearlaments are known for effects of milling their own Deck to send cards to the Graveyard. Most of the monsters here trigger effects when sent to the GY, which includes more card milling, Special Sumons, or even Fusion Summons.
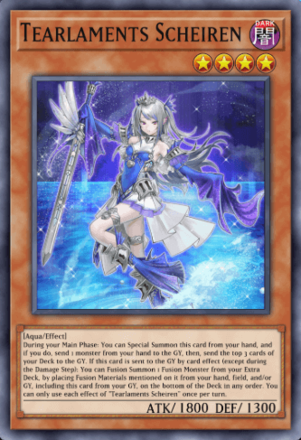
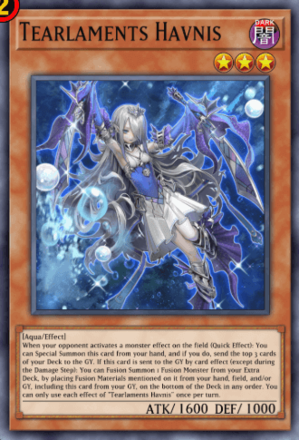
Key cards include Tearlaments Reinoheart as a combo starter to send a "Tearlaments" monsters to the GY, Havnis as a punisher against monster effects, and Scream for decreasing opponent's monsters' ATK.
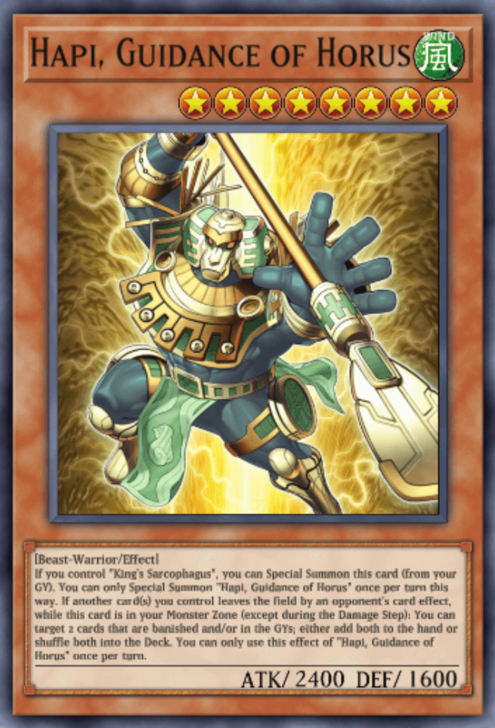
Horus Cards
|
|
The Horus Deck Engine enjoys having their monster cards be sent to the Graveyard, as long as they have at one copy of a Spell Card named King's Sarcophagus active on the field, whether it be the actual Continuous Spell or the Field Spell that can take on its name, Walls of the Imperial Tomb.
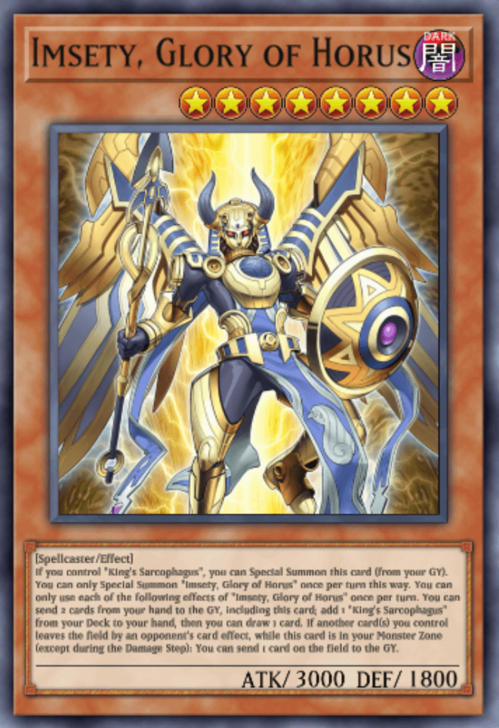
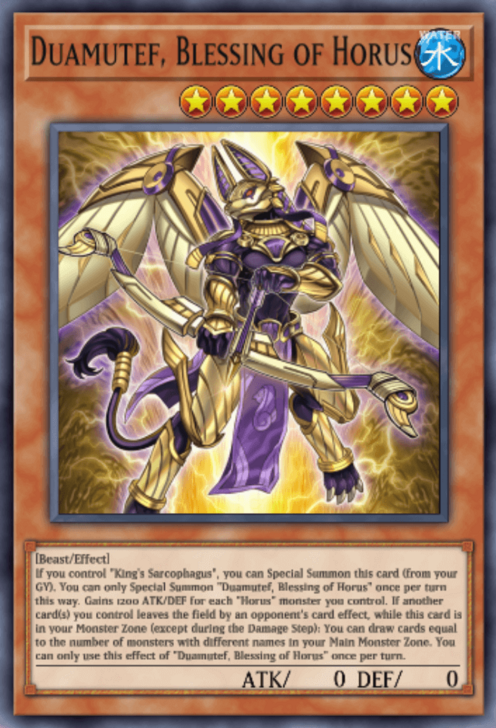
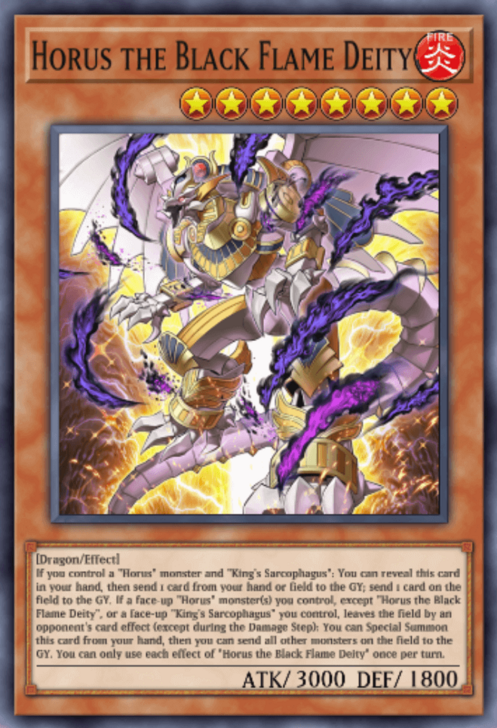
Imsety is the main monster to be sent to the GY for the Special Summon. Hapi, Duamutef and Qebehsenuef are additional monsters you can adjust to your taste, while the titular Horus the Black Flame Deity acts as a pseudo-Nibiru punish.
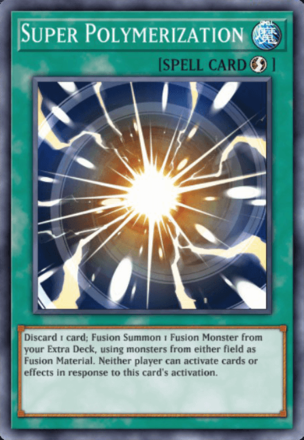
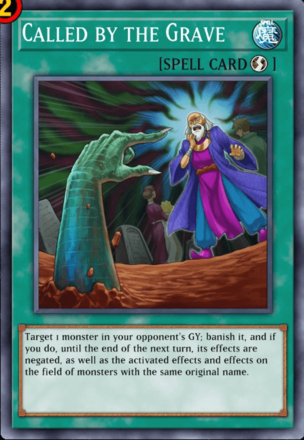
Support Cards
|
|
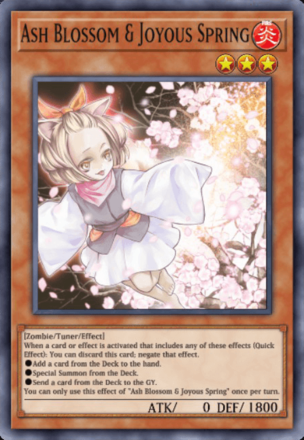
Classic support cards come into play which can work for both standalone versions of the archetypes. Maxx "C", Ash Blossom, Crossout Designator and Called by the Grave are borderline mandatory for every Deck in the meta due to their power basically centered around these four cards.
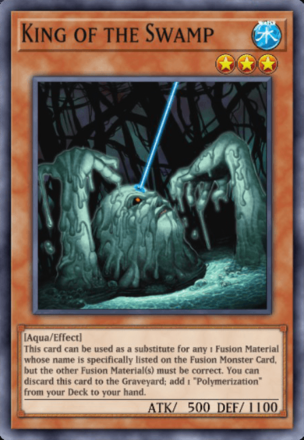
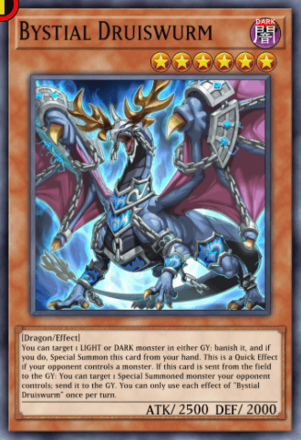
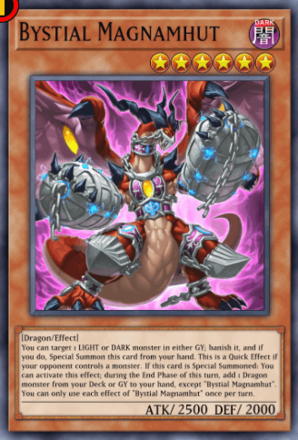
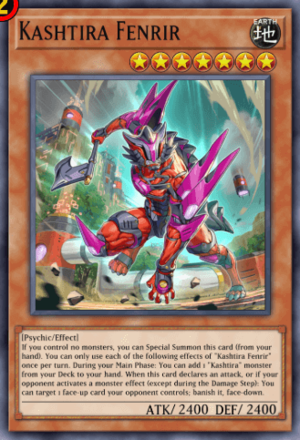
King of the Swamp serves as Fusion Material substitutes whenever a "Tearlaments" monster conducts a Fusion Summon, while the Bystials banishes DARK monsters to summon thesmelves, and Kashtira Fenrir is a punish for monster effect activation.
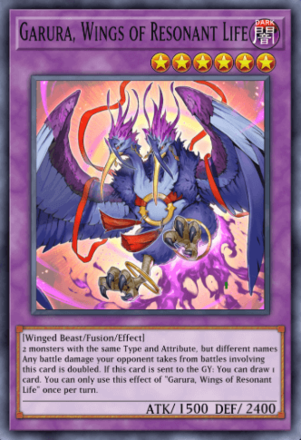
Super Polymerization only works if the opponent runs monsters on the field that can be used as materials for Mudragon or Garura.
Extra Deck Options
|
|
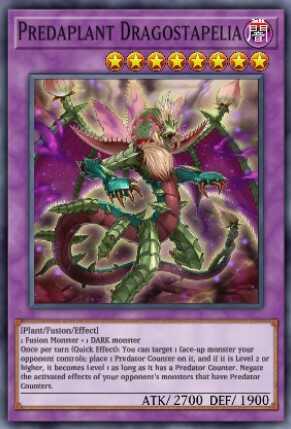
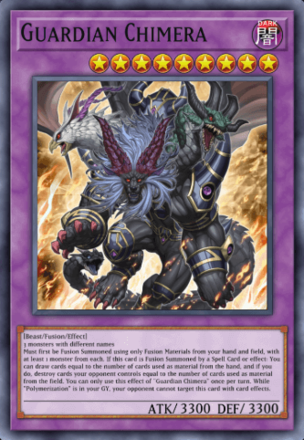
Aside from the usual "Tearlament" Fusion monsters, there are other possible boss monsters for the Deck. Cards include Guardian Chimera, Grapha, Dragon Overlord of Dark World and Predaplant Dragostapelia are usual sightings in Tearlaments Decks, especially if they can make use of King of the Swamp.
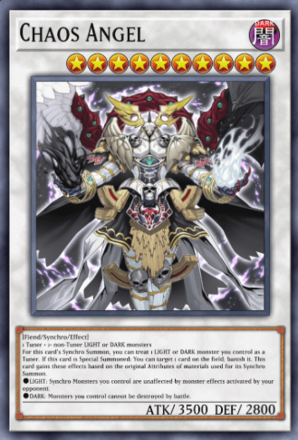
Chaos Angel can make use of DARK Monsters as Tuners, so no need to tech actual Tuners into the Main Deck
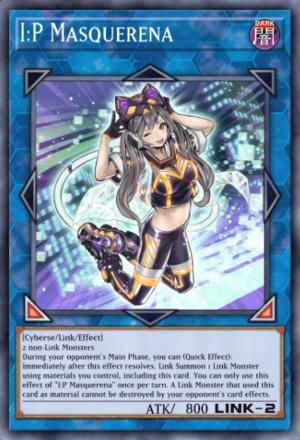
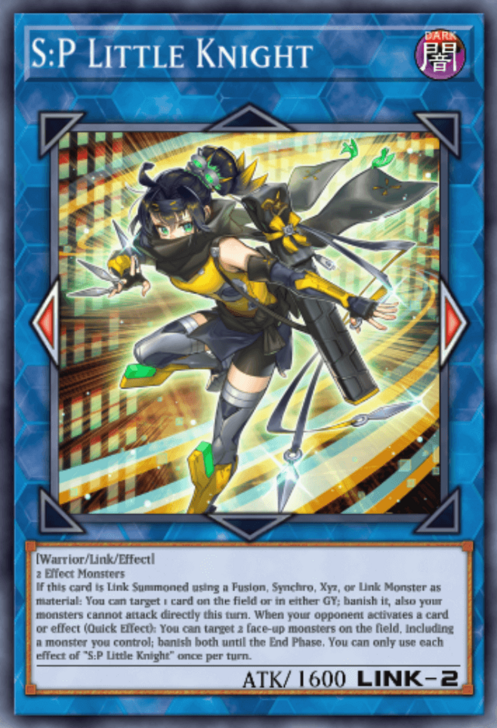
For Xyz Monsters, Time Thief Redoer into Divine Arsenal AA-ZEUS - Sky Thunder is a classic combo. For Link Monsters, I:P Masquerena and the newer S:P Little Knight are a dangerous combo that can banish cards.
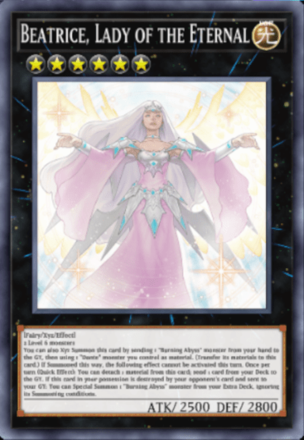
|
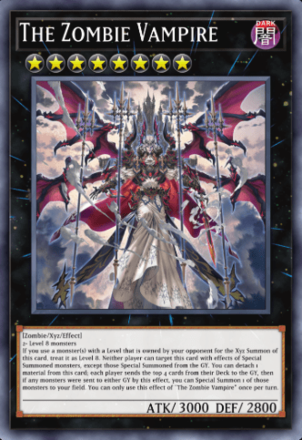
A special addition for this version are Beatrice, Lady of the Eternal, which is mainly going to be summoned if you get to have both Bystial Monsters on the field, and The Zombie Vampire now that there are easily-summonable Level 8 monsters with the Horus engine that has more milling power.
Core Combos and Interactions
Sample Hand 1
| Cards on Hand | |
|---|---|
|
|
|
| Step | Description |
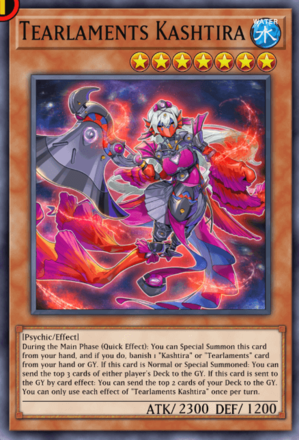
| 1 | Special Summon Kashtira Fenrir immediately onto the field, then activate its effect; add Tearlaments Kashtira from the Deck to your hand. |
| 2 | Activate Tearlaments Scream from the hand, then afterwards activate Polymerization; using Tearlaments Kashtira and King of the Swamp from the hand as materials, Fusion Summon Tearlaments Kitkallos. |
| 3 | Chain Link 3: Activate the effect of Tearlaments Kashitra upon being sent to GY; mill 2 cards from the Deck to the GY. Chain Link 2: Activate Tearlaments Kitkallos's effect upon Special Summon; add Tearlaments Reinoheart from the Deck to the hand. Chain Link 1: Activate the effect of Tearlaments Scream; mill three cards from the top of your Deck to the GY. For this combo, the milled cards are: Wall of the Imperial Tomb, Qebehsenuef, Reinoheart, Horus the Black Flame Deity, Tearlaments Cryme |
| 4 | Activate the second effect of Tearlaments Kitkallos; Special Summon Tearlaments Kashtira from the GY back onto the field, then send itself to the GY. Trigger both of their effects afterwards, in this order: Chain Link 2: Trigger the effect of Tearlaments Kashtira, and mill three cards from your Deck to the GY. Chain Link 1: Trigger the effect of Tearlaments Kashtira, and mill five cards from your Deck to the GY. For this combo, the milled cards are: 2 Ash Blossoms, Tearlaments Scream, Tearlaments Scheiren, King of the Swamp, Crossout Designator, Super Polymerization, Imsety |
| 5 | Chain Link 2: Trigger the effect of Tearlaments Scream from the GY; add Tearlaments Sulliek from the Deck to the hand. Chain Link 1: Trigger the effect of Tearlaments Scheiren from the GY; using itself and Tearlaments Kitkallos as mateirals, shuffle them back into the Deck and Fusion Summon Tearlaments Rulkallos. |
| 6 | Normal Summon Tearlaments Reinoheart, and trigger its effect; send Tearlaments Havnis to the Graveyard. |
| 7 | Activate Tearlaments Havnis from the Graveyard; using itself, King of the Swamp and Tearlaments Reinoheart on the field as materials, Fusion Summon Tearlaments Kaleido-Heart. |
| 8 | Set Called by the Grave if you have not used it yet to counter a monster hand trap that sends itself to the GY. Also, set Tearlaments Sulliek. |
| No Field Spell Active | ||||
|---|---|---|---|---|
|
|
X | |||
|
|
|
|
||
| - |
SET |
|
SET |
- |
Boss Monsters
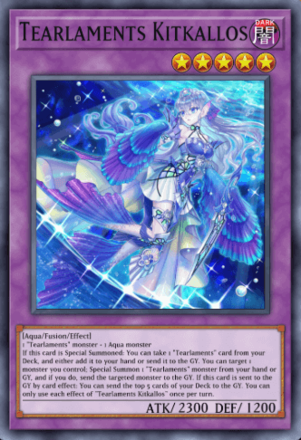
| Tearlaments Kitkallos | |
|---|---|
|
|
Despite being a Level 5 Fusion Monster with mid stats, Tearlaments Kitkallos is easily the most crucial monster out of the entire Tearlaments card. It searches out a "Tearlaments" card on Special Summon, and can tribute itself to Special Summon a "Tearlaments" monster from the hand or GY. The cherry on top is its GY effect, where it immediately mills 5 cards from the Deck to the GY. |
| Tearlaments Rulkallos | |
|
|
Tearlaments Rulkallos negates a Special Summon once per turn, by sending a "Tearlaments" card from the field to the GY. It can either send itself, and use its Special Summon effect to resurrect itself back to the field, or send a different card and trigger their GY effect. |
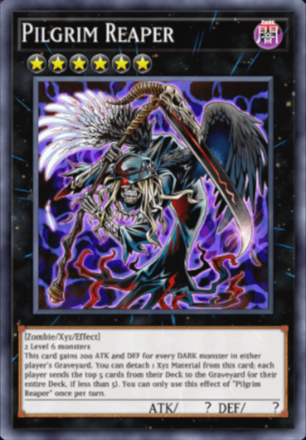
| The Zombie Vampire | |
|
|
There are quite a number of Level 8 monsters in the Deck Recipe that can be used to summon The Zombie Vampire. It can mill 4 cards from both players' Decks, and when there's a monster card among them it can Special Summon it to your side of the field. The best case scenario is that you mill a "Tearlaments" card, while stealing a powerful monster from the opponent in one fell swoop. |
| Chaos Angel | |
|
|
Despite not having any Tuners in the Main Deck, Chaos Angel is still a viable option due to it considering a DARK monster as a Tuner. On Synchro Summon, this card immediately banishes any card on the field, and because it most likely uses a DARK monster as material, it also provides blanket protection for all your monsters from battle destruction. |
Horus Tearlaments Counters: How to Beat
Best Decks to Use Against Horus Tearlaments
Floowandereeze

Floowandereeze has always been a great matchup against Tearlaments and their various Special Summons, and the Horus variant is no exception. Floowandereeze & Empen stops monsters from using their effects while in Attack Position, and quite a number of their other boss monsters either tribute monsters or bounce them back to the hand (or Extra Deck).
What makes this match-up even more annoying for Horus Tearlaments is the floodgates this Deck can run, especially cards like Dimensional Fissure or Macro Cosmos, which effectively denies them their Graveyard.
Floowandereeze Deck List & Card Guide
Kashtira
Kashtira punishes the use of monster effects if it has its key Main Deck monsters on the field. On top of that, their main boss monster Kashtira Arise-Heart denies the GY and banishes all cards that were meant to go there while this card is face-up and active.
Combined with the effect of Kashtira Shangri-Ira, and the Deck can start blocking Card Zones left and right.
Kashtira Deck List & Card Guide
Exosisters
The Exosisters are one of the best Decks that deal with moving cards out of the GY for any reason. If they have their Main Deck monsters on the field when that happens, it is an immediate Xyz Summon of an Exosister
monster, like Exosister Mikailis which banishes a card on summon, or Exosister Kaspitell which stops all Special Summons from the GY.
This is a Deck that does not mind going first or second in a Duel, especially with cards like Evenly Matched and Dark Ruler No More being able to break even the toughest boards.
Exosister Deck List & Card Guide
Best Cards to Tech Against Horus Tearlaments
| Necrovalley | |
|---|---|
|
|
So much of this Deck relies on moving cards in and out of the Graveyard, like Horus Special Summoning their monsters from there, or Tearlaments shuffling cards from it to Fusion Summon. Necrovalley stops both archetypes and locks the GY so that no card can move out of it once there. |
| Summon Limit | |
|
|
Both archetypes can easily Special Summon multiple monsters in a single turn, and it is not surprising to see the user use all of their Monster Zones filled with boss monsters. Summon Limit should put a stop to that, bottlenecking both players to only two Summons in total during their turn. |
| There Can Be Only One | |
|
|
Rivalry of WarlordsOne forces both players to only have one moster Type. This means players can only work with a single monster type--which both archetypes do not like and prefers a wide variety for thier endgame plans. |
| Dimension Shifter | |
|
|
Dimension Shifter is most effective during the first turn against this Deck, especially when the opponent begins to activate effects to mill cards to the Graveyard. Once active, it banishes all cards that were meant to go to the Graveyard until the end of the next turn. For two turns, the Graveyard is basically unused. |
| Maxx "C" | |
|
|
With the number of Special Summons this Deck can do in a single turn, Maxx "C" still remains the best counter against this kind of strategy. If this hand trap's effect successfully resolves, the opponent is now left with two painful choices: either continue Special Summoning and grant you massive card advantage, or stop the turn combo completely. |
Related Packs to Horus Tearlaments
Yu-Gi-Oh Master Duel Related Guides

Yu-Gi-Oh Master Duel Deck Archetypes
Yu-Gi-Oh Master Duel Decks
Deck Tier List: Best Decks for Season 49
List of All Covered Decks
World Champion Decks
Decks Used in Worlds 2024
| Decks Used By All Teams in Worlds 2024 | ||
|---|---|---|
| snipehunters | CER | Hero's Future |
| BOTB | MYYGO | Thank Love |
| CER 2 x FCG | BRAZ IL | Maxx “Yee” |
| Double Noir | Rogue Ruler | |
Aggro Decks
Control Decks
Burn Decks
| List of All Burn Decks | ||
|---|---|---|
| Red-Eyes Burn | Timelord Burn | Chain Burn |
| D.D. Dynamite | Igknight OTK | Cubic |
| Dinosaur Bishbaalkin FTK | Volcanic Snake-Eyes | Transaction Rollback Burn |
Alt-Win Decks
| List of All Alternate Win Decks | ||
|---|---|---|
| Crooked Cook Exodia | Flower Cardian Exodia | Treasure Panda Exodia |
| Suicide | Defense OTK | |
All Budget Decks
Best Cards for Decks
Comment
Author

Horus Tearlaments Deck List & Card Guide
Rankings
- We could not find the message board you were looking for.
Gaming News


![Monster Hunter Stories 3 Review [First Impressions] | Simply Rejuvenating](https://img.game8.co/4438641/2a31b7702bd70e78ec8efd24661dacda.jpeg/thumb)
Popular Games

Genshin Impact Walkthrough & Guides Wiki
Umamusume: Pretty Derby Walkthrough & Guides Wiki
Pokemon Pokopia Walkthrough & Guides Wiki
Honkai: Star Rail Walkthrough & Guides Wiki
Monster Hunter Stories 3: Twisted Reflection Walkthrough & Guides Wiki
Arknights: Endfield Walkthrough & Guides Wiki
Wuthering Waves Walkthrough & Guides Wiki
Zenless Zone Zero Walkthrough & Guides Wiki
Pokemon TCG Pocket (PTCGP) Strategies & Guides Wiki
Monster Hunter Wilds Walkthrough & Guides Wiki


Recommended Games
Diablo 4: Vessel of Hatred Walkthrough & Guides Wiki
Cyberpunk 2077: Ultimate Edition Walkthrough & Guides Wiki
Fire Emblem Heroes (FEH) Walkthrough & Guides Wiki
Yu-Gi-Oh! Master Duel Walkthrough & Guides Wiki
Super Smash Bros. Ultimate Walkthrough & Guides Wiki
Pokemon Brilliant Diamond and Shining Pearl (BDSP) Walkthrough & Guides Wiki
Elden Ring Shadow of the Erdtree Walkthrough & Guides Wiki
Monster Hunter World Walkthrough & Guides Wiki
The Legend of Zelda: Tears of the Kingdom Walkthrough & Guides Wiki
Persona 3 Reload Walkthrough & Guides Wiki


All rights reserved
©高橋和希 スタジオ・ダイス/集英社・テレビ東京・NAS
©Konami Digital Entertainment
The copyrights of videos of games used in our content and other intellectual property rights belong to the provider of the game.
The contents we provide on this site were created personally by members of the Game8 editorial department.
We refuse the right to reuse or repost content taken without our permission such as data or images to other sites.