Vaylantz Deck List & Card Guide
Hello, Duelists! We regret to inform everyone that we have discontinued updates for Yu-Gi-Oh! Master Duel since December 2025. Our Friends Board and PVP Board will be active, but some of our guides will not be up-to-date. Thank you for your support!

Vaylantz is an Aggro deck in Yu-Gi-Oh Master Duel. Check out the core deck list, key combos, as well as how to play & counters!
Vaylantz Deck List
| Main Deck: 40 cards | ||||
|---|---|---|---|---|
 x3
x3 |
 x3
x3 |
 x3
x3 |
 x3
x3 |
 x3
x3 |
 x3
x3 |
 x2
x2 |
 x1
x1 |
 x1
x1 |
 x1
x1 |
 x1
x1 |
 x3
x3 |
 x3
x3 |
 x3
x3 |
 x3
x3 |
 x2
x2 |
 x1
x1 |
 x1
x1 |
- | - |
| Extra Deck: 15 cards | ||||
 x2
x2 |
 x1
x1 |
 x1
x1 |
 x1
x1 |
 x1
x1 |
 x1
x1 |
 x1
x1 |
 x1
x1 |
 x1
x1 |
 x1
x1 |
 x1
x1 |
 x1
x1 |
 x1
x1 |
 x1
x1 |
- |
Vaylantz Breakdown
Vaylantz Deck Guide: How to Play
| Work in Progress - Coming Soon! |
|---|
Playstyle and Win Condition
The Vaylantz archetype can make a case for being one of the most unique Pendulum-based archetypes in the game. Their entire playstyle is in essence playing a board game within a card game, moving pieces on the field on adjacent spaces--including the opponent's cards in some cases.
On top of being able to conduct Pendulum Summons like normal, some of the Vaylantz Pendulum Monsters have the ability to Special Summon themselves from the Pendulum Zone to the Main Monster Zone right above it. Some other Monsters have the ability to move from one Zone to another, possibly freeing up a Monster Zone that can be used for extending a combo involving Link Monsters.
|
|
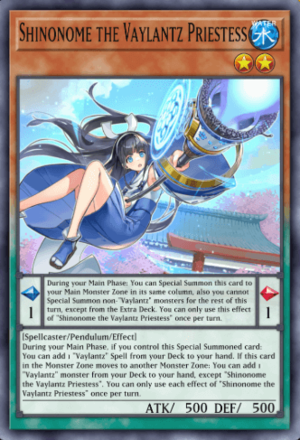
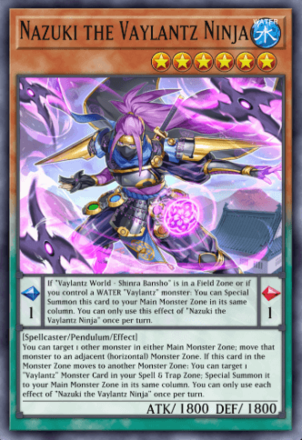
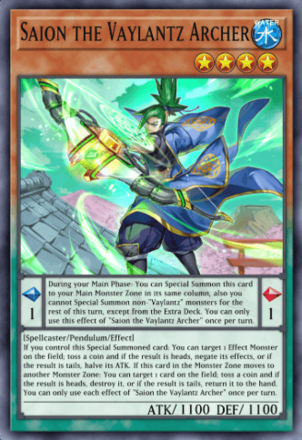
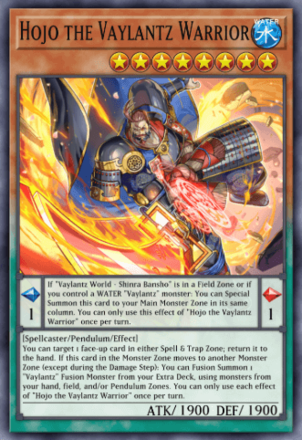
Key Monsters among the Main Deck are Shinonome, Nazuki, Hojo and Saion, all WATER Spellcaster monsters that share the Pendulum Effect of being moved to the Main Monster Zone via Special Summon.
Each one has their own effects that provide advantage to the Vaylantz Deck. Shinonome searches Spell Cards from the Deck to the hand, Nazuki moves another Monster you control from the Spell & Trap Zone to the Main Monster Zone, Hojo conducts a Fusion Summon when moved from the Pendulum Zones, and Saion can either negate an opponent's monster's effects or half its ATK.
|
|
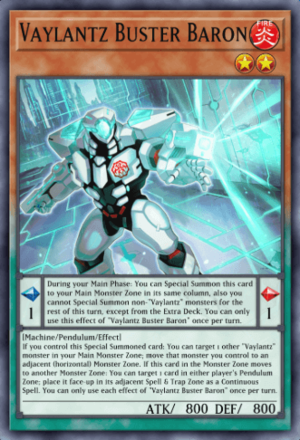
The three other Vaylantz Pendulum Monsters--Buster Baron, Mad Marquess and Voltage Viscount--have their worth in the Deck too. These Pendulum Monsters are the primary enablers of moving the cards from Main Monster Zones to Spell & Trap Zones, particularly the Pendulum Zones.
Buster Baron's Monster Effect makes it move Pendulum Monsters in one of the opponent's Pendulum Zone into an adjacent Spell/Trap Zone, effectively making it a Continuous Spell. Voltage Viscount can place Pendulum Monsters that are face-up on top of the Extra Deck onto unoccupied Pendulum Zones. Lastly, Mad Marquess can excavate cards and Special Summon monsters with the roll of a die.
|
|
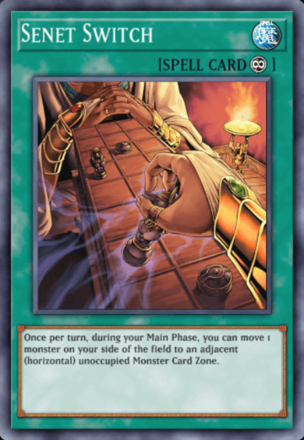
In a perfect combo, a Vaylantz player will be able to use all three of the archetype's dedicated Field Spells and use their effects to gain as much advantage as possible. Vaylantz Wars - The Place of Beginning serves as an initial searcher for the other two Field Spells, and by destroying a Monster placed in your Pendulum Zone, it can search out Senet Switch to enable more card-moving within the combo. Keep in mind that Senet Switch does not have a once-per-turn clause, so bouncing it back to the hand after the first activation can let it use its effect a second time.
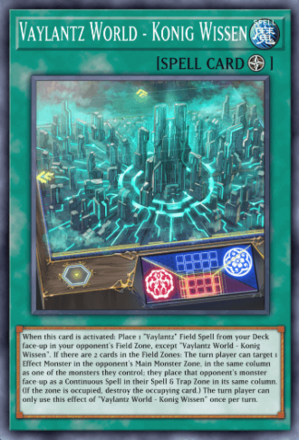
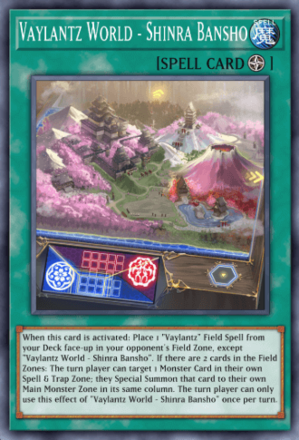
The Vaylantz World Field Spells work when both Field Spells are used simultaneously, each occupying the Field Spell Zones--including the opponent's. When activating either one, its initial effect causes the other to be placed on the other side of the field. As for their unique effects, Konig Wissen can turn an opponent's monster into a Continuous Spell by moving it to the Spell & Trap Zone of the same column, while Shinra Bansho can move a Monster Card from the Spell & Trap Zone back to the Main Monster Zone.
|
|
For all the shenanigans the Deck can pull off, it is somewhat prone to getting bricked. Searchers are paramount in getting cards to the hand as soon as possible. Vaylantz Wakening - Solo Activation is now the Deck's best one-card combo starter, while Small World searches out similar cards from the hand at the cost of banishing a couple of cards face-down.
|
|
The Boss Monsters for the Vaylantz archetype are Fusion Monsters, but in technicallity players do not need to slot in Polymerization or any Fusion Spell Card at all. Vaylantz Genesis Grand Duke can be brought out by tributing a Level 5 or higher non-Fusion Vaylantz monster, placed on a Main Monster Zone the same column as the Extra Monster Zone.
Meanwhile, bringing out Mamonaka the Vaylantz United is usually done the help of Hojo the Vaylantz Warrior. Once on the field, it can move one of the opponent's monsters to the Spell & Trap Zone it's adjacent to. If the Spell & Trap Zone is occupied, however, the monster is instead destroyed, and inflicts burn damage equal to the destroyed monster's ATK.

|
Other generic and popular boss monsters can be slotted into the Deck with relative ease, given the specialty of this Deck is all about being able to Special Summon multiple times. All of these cards share the similar puprose of protection, while maintaining strength on the Field. Players are free to swap out the Extra Deck monsters with more generic material requirements.
Core Combos and Interactions
Sample Combo
| Sample Hand | |
|---|---|
|
|
|
| Step | Description |
| 1 | Activate both Shinonome the Vaylantz Priestess and Nazuki the Vaylantz Ninja as Pendulum Scales. |
| 2 | Activate Shinonome the Vaylantz Priestess's Pendulum Effect, and Special Summon it from the Pendulum Zone to the Main Monster Zone above it. Activate its Monster Effect next to search out a copy of Vaylantz Arrival - The Place of Beginning to add to the hand. Then, using its effect, destroy Nazuki the Vaylantz Ninja from the Pendulum Zone to search out Senet Switch. |
| 3 | Activate Vaylantz Arrival - The Place of Beginning, then add a copy of Vaylantz World - Konig Wissen from the Deck to the hand. Activate it afterwards; using its effect, place a copy of Vaylantz World - Shinra Bansho from the Deck to the opponent's Field Spell Zone. |
| 4 | Activate Senet Switch, and use its effect to move Shinonome the Vaylantz Priestess to an adjacent Monster Zone--which should be right under the Extra Monster Zone. This allows Shinonome to activate its effect when placed there, then search out another copy of Vaylantz Voltage Viscount. |
| 5 | Activate Vaylantz Voltage Viscount as a Pendulum Scale, and activate its Pendulum Effect to Special Summon itself to its adjacent Main Monster Zone. Remember to do this on the opposite side as where you Special Summoned Shinonome. Afterwards, activate Voltage Viscount's Monster Effect, select Nazuki the Vaylantz Ninja face-up on top of the Extra Deck, and place them on the Spell & Trap Zone as a Continuous Spell. Make sure that its adjacent Main Monzter Zone is unoccupied. |
| 6 | Activate Vaylantz World - Shinra Bansho from the opponent's Field Spell Zone, target Nazuki the Vaylantz Ninja in the Spell & Trap Zone, and Special Summon it to its adjacent Main Monster Zone. Then, immediately tribute Nazuki to Special Summon Vaylantz Genesis Grand Duke. |
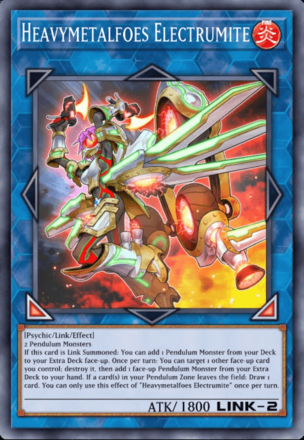
| 7 | Immediately after, using Vaylantz Genesis Grand Duke and Shinonome the Vaylantz Priestess as material, Link Summon Heavymetalfoes Electrumite. Try to do Link Summon this monster on the opposide side of where Vaylantz Voltage Viscount is on. Then, activate Electrumite's first effect, target Hojo the Vaylantz Warrior in the Deck and send it face-up to the top of the Extra Deck. |
| 8 | Activate the second effect of Heavymetalfoes Electrumite; destroy Vaylantz World - Konig Wissen, and bring back Nazuki the Vaylantz Ninja from the top of the Extra Deck back to the hand. |
| Enemy Field Spell: Vaylantz World - Shinra Bansho | ||||
|---|---|---|---|---|
|
|
X | |||
|
|
||||
| - | - |
|
- | - |
| 9 | Activate both Nazuki the Vaylantz Ninja as a Pendulum Scale once again. Make sure to place the Pendulum Scale on the other side of where Vaylantz Voltage Viscount is placed. Activate its effect again to Special Summon itself to the adjacent Main Monster Zone. |
|---|---|
| 10 | Activate Nazuki's Monster Effect again after being Special Summoned; move Vaylantz Voltage Viscount to the left, being under the Extra Monster Zone. Here, activat Voltage Viscount's effect, target Vaylantz Genesis Grand Duke from the top of the Extra Deck, and place it on the Pendulum Zone underneath Nazuki. |
| 11 | Using Nazuki the Vaylantz Ninja and Heavymetalfoes Electrumite as materials, Link Summon Beyond the Pendulum. Activate its effect; pay 1200 LP as cost, search out another copy of Vaylantz Voltage Viscount to add to the hand, and use it to complete the Pendulum Scale. |
| 12 | Pendulum Summon Nazuki the Vaylantz Ninja and Hojo the Vaylantz Warrior from the Extra Deck, using the Main Monster Zones pointed at with Beyond the Pendulum's Link Markers. Placing matters here to continue the combo: Nazuki must be summoned on the left, and Hojo must be summoned on the right. |
| 13 | Activate the Pendulum Effect of Vaylantz Genesis Grand Duke to move Nazuki the Vaylantz Ninja to the right, underneath Beyond the Pendulum in the Extra Monster Zone. Then, activate its effect after being moved; target the Vaylantz Voltage Viscount occupying the other Pendulum Zone and Special Summon it to its adjacent Main Monster Zone. |
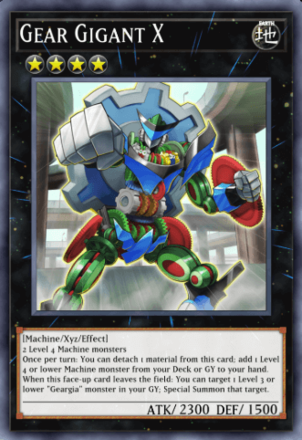
| 14 | Using the two copies of Vaylantz Voltage Viscount as material, Xyz Summon Gear Gigant X. Place it in the Main Monster Zone underneath the unoccupied Extra Monster Zone. Then, activate its effect, and search out Cyber-Stein from the Deck to add to the hand. |
| 15 | Normal Summon Cyber-Stein. Then, activate its effect; pay 5000 Life Points, to Special Summon Naturia Exterio. |
| Enemy Field Spell: Vaylantz World - Shinra Bansho | ||||
|---|---|---|---|---|
|
|
X | |||

|
|
|
|
|
|
|
- |
|
- | - |
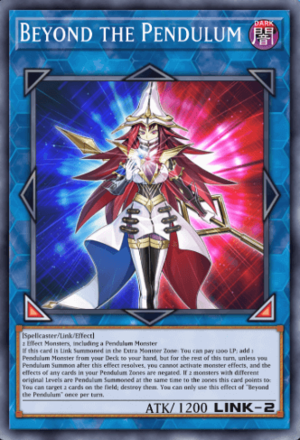
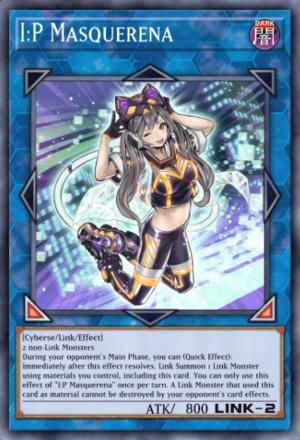
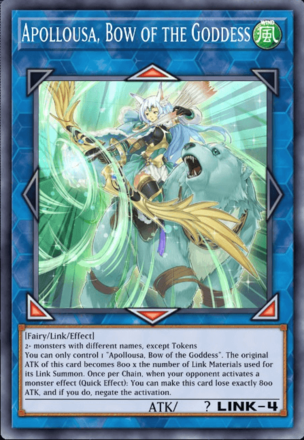
| 16 | Using Cyber-Stein, Gear Gigant X, and Beyond the Pendulum as materials, Link Summon Apollousa, Bow of the Goddess. |
|---|---|
| 17 | Activate the Monster Effect of Hojo the Vaylantz Warrior; bounce Senet Switch back to the hand, then immediately afterwards activate the Continuous Spell Card again. Remember that Senet Switch does not have a hard once-per-turn clause. Using its effect, move Hojo to the right, underneath the unoccupied Extra Monster Zone, and use its effect to condcut a Fusion Summon. Using Hojo the Vaylantz Warrior, Nazuki the Vaylantz Ninja and Vaylantz Genesis Grand Duke in the Pendulum Zone as materials, Fusion Summon Mamonaka the Vaylantz United. |
Final Board
| Enemy Field Spell: Vaylantz World - Shinra Bansho | ||||
|---|---|---|---|---|
|
|
X | |||
|
|
|
|||
| - |
|
- | - | |
| Naturia Exterio | |
|---|---|
|
|
Cheated out onto the field with the help of Cyber-Stein, Naturia Exterio provides constant protection from Spells and Traps through its effect. So long as this card is face-up on the field and there are cards in the GY and Deck, it can keep negating Spell Cards and Trap Cards as it has no once-per-turn clause whatsoever. |
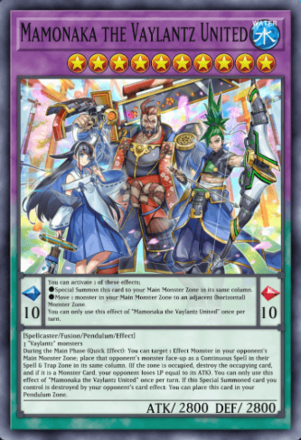
| Mamonaka the Vaylantz United | |
|
|
Mamonaka the Vaylantz United is quite a Boss monster for the Vaylantz archetype. As a Fusion Monster, not only are its stats above average, it has the unique effect of shifting a monster the opponent controls into the Spell & Trap Zone, effectively turning them into a Continuous Spell and wasting a Spell/Trap Zone for them to use. It also has its benefits when on an Pendulum Zone, being able to move Special Summon Monsters, or move one you already control to an adjacent Monster Zone. |
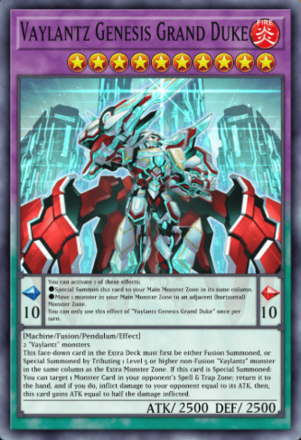
| Vaylantz Genesis Grand Duke | |
|
|
As a Pendulum Monster, Vaylantz Genesis Grand Duke effectively shares the same effect as Mamonaka. As a Fusion Monster, it has a special effect of being able to be Summoned by only tributing a Level 5 or higher Vaylantz monster. Upon being Special Summoned, it can target Monsters in the Spell & Trap Zone, bounce it back to the hand, burn the opponent for damage equal to its ATK, and gain ATK for itself equal to half the destroyed monster's. |
| Number 38: Hope Harbinger Dragon Titanic Galaxy | |
|
|
An option that is available if the player manages to have 2 Level 8 Monsters on the field that can be used as material, Number 38: Hope Harbinger Dragon Titanic Galaxy is a great defensive Xyz Monster to run. It can negate Spell Cards on either turn and absorb it as Xyz Material, and it can also redirect monster attacks to itself with its impressive stat spread. |
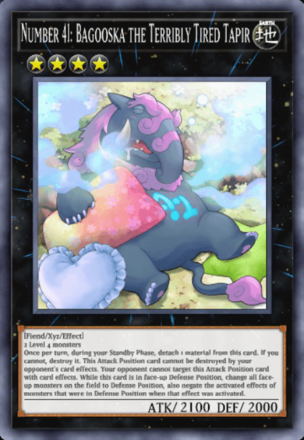
| Number 41: Bagooska the Terribly Tired Tapir | |
|
|
Yet another defensive Xyz Monster to consider, and more accessible due to it being a Rank 4 Xyz Monster, Number 41: Bagooska the Terribly Tired Tapir is a floodgate once it hits the field. When in Defense Position, this forces all other monsters to go into Defense Position, and it automatically negates their effects. Combined with other floodgates, and the opponent will have trouble responding to when this card is shifted to Attack Position. |
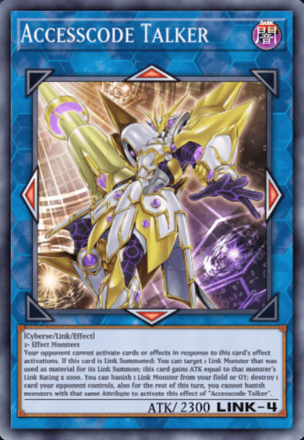
| Accesscode Talker | |
|
|
A classic LINK-4 Monster to be added in the Extra Deck, Accesscode Talker is a universal option for Decks that can commit to Link Climbing. Taking advantage of having a LINK-3 in the Extra Deck, it can boost its own ATK based on the Link Rating of a Link Monster used as material, and it has the ability to destroy cards on the field. |
| Apollousa, Bow of the Goddess | |
|
|
Another classic LINK-4 Boss Monster in the Extra Deck, Apollousa, Bow of the Goddess is a bane for activated effects. Depending on the number of materials used to Summon, which is easy to do as she only needs Effect Monsters as materials, it gains ATK and an equal number of effect negations. At absolute maximum, this monster will have 4 available negates and 3200 ATK upon being Link Summoned. |
Vaylantz Counters: How to Beat
Best Decks to Use Against Vaylantz
Branded Decks

Branded Decks have far too many answers and floodgates as a response to Vaylantz's penchant to Special Summon one after another. Once it manages to get a copy or two of Masquerade the Blazing Dragon, it pressures the player to stop at some point before the key monsters are out on the field, before the burn damage wipes out their Life Points. On top of that, Fallen of Albaz can use the Fusion, Xyz or Link monsters it's up against as Fusion Material for an easy Mirrorjade the Iceblade Dragon summon.
| Branded Fusion Decks | |
|---|---|
| Branded Tri-Brigade | Branded Despia |
| Branded Cyber Dragon | Branded Zombies |
| Branded Ishizu | Branded Dragonmaids |
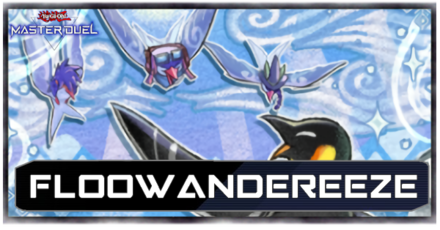
Floowandereeze
Floowandereeze is one of the roughest Decks to go up against because of their ability to summon even if it's not their turn yet. All they need is one Normal Summon from their opponent to run away with the game--and unfortunately, Valyantz does need to use a Normal Summon in order to continue part of its signature combo. Once that happens, Floowandereeze and the Magnificent Map will trigger, and the out-of-turn Normal Summons begin.
Numeron
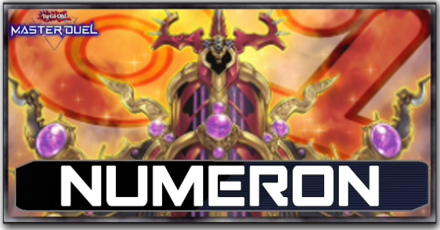
Numeron Decks are notorious for having every out in the game for pesky, negate-filled boards--and that includes Kaijus and The Winged Dragon of Ra - Sphere Mode for the pesky monsters with effects. Add the fact that Vaylantz Decks usually do not tech in any negates themselves from the Spell and Trap cards, there is no stopping this Deck once Numeron Gate is activated.
Best Cards to Tech Against Vaylantz
| Maxx "C" | |
|---|---|
|
|
Vaylantz Decks needs a full commitment to chain Special Summon upon Special Summon in order to get a strong board before the end of the turn. Unless the Vaylantz user is confident that Maxx C will Deck Out its opponent due to the sheer number of Special Summons, activating this card can almost always discourage the user from going through with their usual commbos. |
| The Winged Dragon of Ra - Sphere Mode | |
|
|
More often than not, Vaylantz Decks will aim to have three or more of its Extra Deck boss monsters on the field as their board at the end of the turn, all with trigger effects to counter other potential effects. This is the perfect condition to use The Winged Dragon of Ra - Sphere Mode to wipe them all off the field without activating their effects in retaliation. |
| Number 41: Bagooska the Terribly Tired Tapir | |
|
|
While Vaylantz Deck users have their own copy of Number 41: Bagooska the Terribly Tired Tapir to prevent any monster the opponent summons to activate their effects and force them to Defense Position, it is also a threat to its own should Vaylantz goes second and Bagooska is already out on the field before the first Pendulum Monster can move zones and activate effects. |
| Summon Limit | |
|
|
Through moving Pendulum Monsters from their Pendulum Zones to Monster Zones, it effectively summons them, and it does that quite often across the board. Summon Limit effectively bottlenecks Vaylantz users from chainig summons, preventing them from getting to their key monsters sooner than later.. |
| Anti-Spell Fragrance | |
|
|
Spell Cards are integral to Vaylantz Decks, in terms of activating effects and searching out key cards to continue comboes. This Deck in particular uses two Field Spells, one of each to be activated on both sides of the field. Anti-Spell Fragrance slows down the Deck considerably, and prevents the usage of important cards like the aforementioend Field Spells. |
| Skill Drain | |
|
|
Once the Vaylantz Pendulum Monsters move from their Pendulum Zones to Monster Zones, they effectively turn into Monster Cards, making them privy to Skill Drain's effect. Even if it moves columns with the help of other cards, the effects that should trigger when it does do not activate at all, so long as this Continuous Trap Card remains face-up on the field. |
Related Packs to Vaylantz
Yu-Gi-Oh Master Duel Related Guides

Yu-Gi-Oh Master Duel Deck Archetypes
Yu-Gi-Oh Master Duel Decks
Deck Tier List: Best Decks for Season 49
List of All Covered Decks
World Champion Decks
Decks Used in Worlds 2024
| Decks Used By All Teams in Worlds 2024 | ||
|---|---|---|
| snipehunters | CER | Hero's Future |
| BOTB | MYYGO | Thank Love |
| CER 2 x FCG | BRAZ IL | Maxx “Yee” |
| Double Noir | Rogue Ruler | |
Aggro Decks
Control Decks
Burn Decks
| List of All Burn Decks | ||
|---|---|---|
| Red-Eyes Burn | Timelord Burn | Chain Burn |
| D.D. Dynamite | Igknight OTK | Cubic |
| Dinosaur Bishbaalkin FTK | Volcanic Snake-Eyes | Transaction Rollback Burn |
Alt-Win Decks
| List of All Alternate Win Decks | ||
|---|---|---|
| Crooked Cook Exodia | Flower Cardian Exodia | Treasure Panda Exodia |
| Suicide | Defense OTK | |
All Budget Decks
Best Cards for Decks
Author

Vaylantz Deck List & Card Guide
Rankings
Gaming News

![Monster Hunter Stories 3 Review [First Impressions] | Simply Rejuvenating](https://img.game8.co/4438641/2a31b7702bd70e78ec8efd24661dacda.jpeg/show)


![Monster Hunter Stories 3 Review [First Impressions] | Simply Rejuvenating](https://img.game8.co/4438641/2a31b7702bd70e78ec8efd24661dacda.jpeg/thumb)
Popular Games

Genshin Impact Walkthrough & Guides Wiki
Honkai: Star Rail Walkthrough & Guides Wiki
Umamusume: Pretty Derby Walkthrough & Guides Wiki
Pokemon Pokopia Walkthrough & Guides Wiki
Resident Evil Requiem (RE9) Walkthrough & Guides Wiki
Monster Hunter Wilds Walkthrough & Guides Wiki
Wuthering Waves Walkthrough & Guides Wiki
Arknights: Endfield Walkthrough & Guides Wiki
Pokemon FireRed and LeafGreen (FRLG) Walkthrough & Guides Wiki
Pokemon TCG Pocket (PTCGP) Strategies & Guides Wiki


Recommended Games
Diablo 4: Vessel of Hatred Walkthrough & Guides Wiki
Cyberpunk 2077: Ultimate Edition Walkthrough & Guides Wiki
Fire Emblem Heroes (FEH) Walkthrough & Guides Wiki
Yu-Gi-Oh! Master Duel Walkthrough & Guides Wiki
Super Smash Bros. Ultimate Walkthrough & Guides Wiki
Pokemon Brilliant Diamond and Shining Pearl (BDSP) Walkthrough & Guides Wiki
Elden Ring Shadow of the Erdtree Walkthrough & Guides Wiki
Monster Hunter World Walkthrough & Guides Wiki
The Legend of Zelda: Tears of the Kingdom Walkthrough & Guides Wiki
Persona 3 Reload Walkthrough & Guides Wiki


All rights reserved
©高橋和希 スタジオ・ダイス/集英社・テレビ東京・NAS
©Konami Digital Entertainment
The copyrights of videos of games used in our content and other intellectual property rights belong to the provider of the game.
The contents we provide on this site were created personally by members of the Game8 editorial department.
We refuse the right to reuse or repost content taken without our permission such as data or images to other sites.