Separate Ways - Chapter 4 Walkthrough
★ The Resident Evil Requiem wiki is now live!
☆ Learn the best ways to speedrun & reach Professional S+!
★ Discover all the Skips you can make in a single playthrough!

This is a walkthrough for Separate Ways - Chapter 4 of Resident Evil 4 Remake (RE4). Read on for a detailed walkthrough, route maps for each objective, a list of important items obtainable, and tips on how to complete this chapter!
| ◄ Previous Chapter | Next Chapter ▶ |
|---|---|
|
Separate Ways - Chapter 3 |
Separate Ways - Chapter 5 |
Separate Ways - Chapter 4 Basic Information
Chapter Summary
Explore the Castle and look for the ingredients needed to make a cure while Luis is looking for the Amber.
Chapter Details
| Separate Ways - Chapter 4 | |
|---|---|
| Location | Fortified Tower Treasure Room Hall of Tribulation Courtyard Castle Battlements |
| Recommended Weapons |
Blacktail
Blast Crossbow TMP |
Enemies Encountered
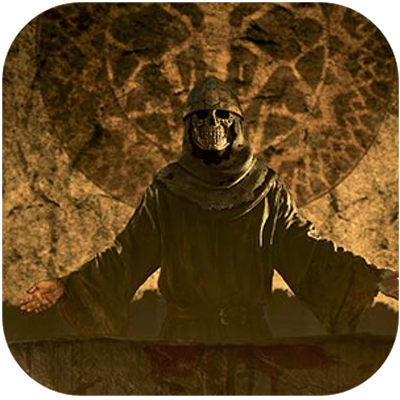 Cultist (Zealot) Cultist (Zealot)
|
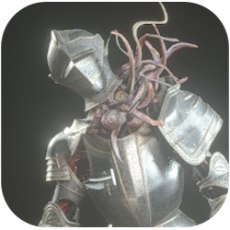 Armadura Armadura
|
Separate Ways - Chapter 4 Walkthrough
Chapter Objectives
| Objectives | |
|---|---|
| 1 | Find the Cure with Luis |
| 2 | Search for the Red Ink |
| 3 | Search for the Gold Bottle |
| 4 | Search for the Blue Butterfly |
Find the Cure with Luis
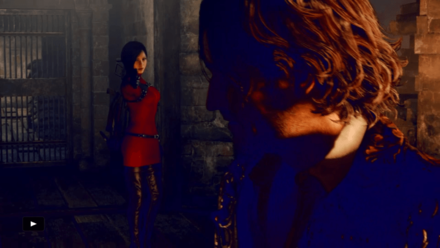
The enemies in this area are considerably tougher than those in earlier chapters. They now spawn parasites after death or carry shields to block your shots. Inside the Fortified Tower, you will encounter multiple of these cultists while searching for the cure with Luis. The path in this area is straightforward, you just need to follow it until you reach Luis's Laboratory.
Go After Luis
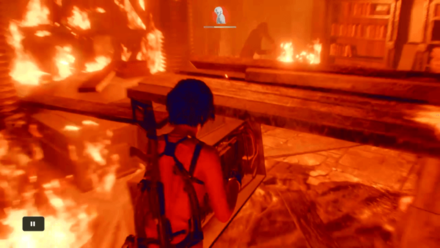
When you reach Luis's Laboratory, both of you will notice that it's on fire. Luis will enter to search for the cure he kept for Leon and Ashley. You must follow Luis into the area and rescue him to progress further in this chapter.
Go Back Upstairs

After saving Luis, go up the stairs of the Fortified Tower until you reach the last room. Here, Luis will provide you with the list of ingredients needed to create the cure capable of suppressing the parasite within your bodies.
Search for the Ingredients - Red Ink
| Route Map |
|---|
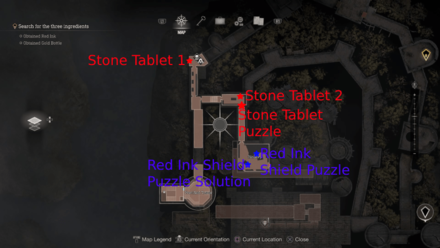 |
To obtain the Red Ink ingredient, you must first solve the Stone Tablet Puzzle to access the path that leads to the Bindery. Once there, you'll need to solve the Red Ink Shield Puzzle to unlock the drawer containing the Red Ink.
Stone Tablet Puzzle Sollution
| Stone Tablet Puzzle Solution | |||
|---|---|---|---|
 |
|||
| North Slot | West Slot | East Slot | South Slot |
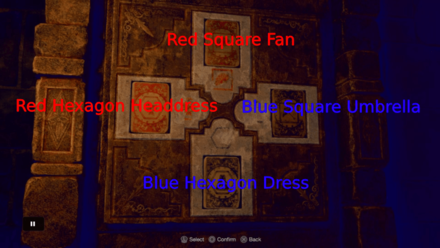
| Red Square Fan | Red Hexagon Headdress | Blue Square Umbrella | Blue Hexagon Dress |
You can solve this puzzle by arranging the Stone Tablets according to the icon next to the slot. Some of the icons can still be seen. However, the blue icons are already faded. You will have to guess what icons should be displayed on the East and the South slot.
Red Ink Shield Puzzle Solution
| Red Ink Shield Puzzle Solution |
|---|
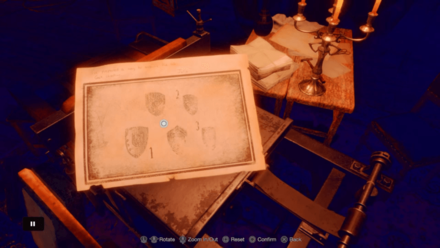
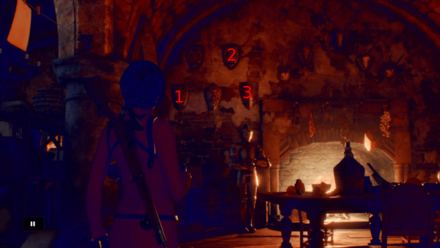 |
To solve this puzzle, you must shoot the shields in the correct sequence to unlock the hidden drawer in the room, which contains the Red Ink. You can find the clue on the printing press machine in the center of the room.
Search for the Gold Bottle
Animal Gong Puzzle
| Gate | Animal Gong |
|---|---|
| 1st Gate | 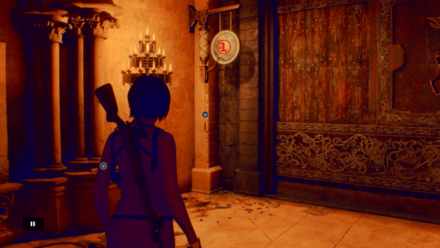 Stag |
| 2nd Gate | 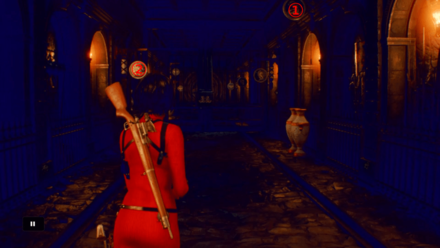 Snake, Snake |
| 3rd Gate | 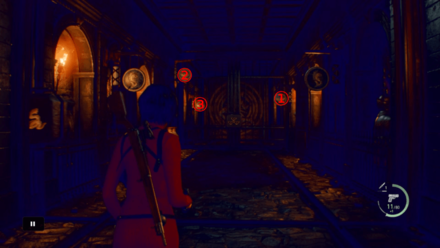 Bird, Bird, Bird |
| 4th Gate |  Bird, Bird, Bird |
| 5th Gate | 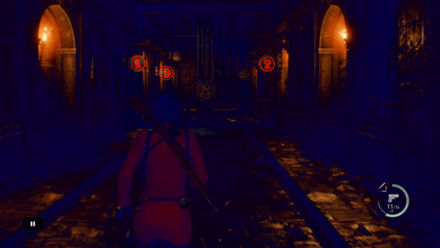 Fish, Fish, Fish |
| 6th Gate | 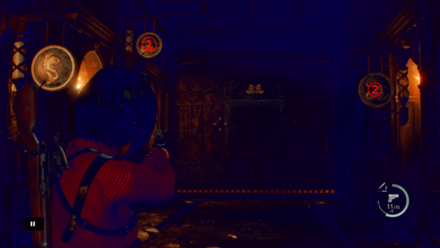 Snake, Snake |
To access the treasure room, you must obtain the Crimson Lantern to open the gate. You can find the Crimson Lantern behind a different gate to your right, but first, you need to solve the Animal Gong puzzle to unlock it. Solve this puzzle by ringing the gong with the same animal as the gate to open them.
Gold Bottle Puzzle Solution
| Route Map | |
|---|---|
 Silver Bottle |
 Gold Bottle |
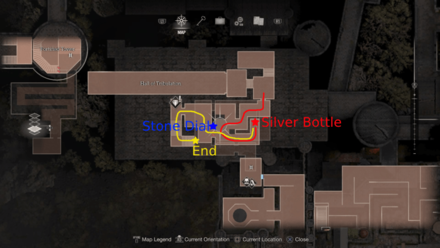
After leaving the Hall of Tribulation and using the Crimson Lantern, you will come across a room with a Stone Dial where you can insert the Silver and Gold Bottles to unlock the gate with a matching-color emblem. Start by acquiring the Silver Bottle on the 2nd floor and placing it on the Stone Dial to open the first gate. Once you've crossed the gate, retrieve the Silver Bottle and head downstairs to the treasure room.
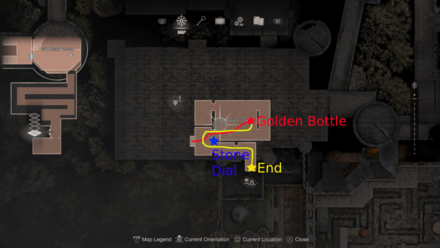
From here, you'll encounter two gates with silver and gold emblems. Begin by placing the Silver Bottle on the Stone Dial to open the silver emblem gate and access the room where you'll find the Gold Bottle. After picking up the Gold Bottle, a group of Armadura will attack you. Use your Flashbang to quickly eliminate them or use your Melee Attack to remove their helmets, exposing the parasites. Once you've dealt with the enemies in this area, replace the Silver Bottle with the Gold Bottle to pass through the gate. Continue following the path until you reach the Courtyard.
Search for the Blue Butterfly
| Route Map | |
|---|---|
 Courtyard |
 Castle Walls |
Exit the Courtyard

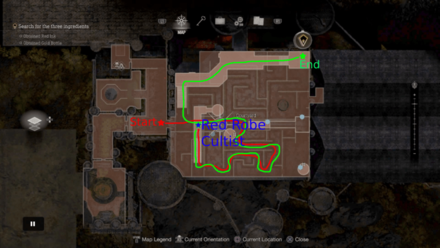
Proceed to the Courtyard and eliminate the Cultist wearing a red robe to obtain the key that opens the door leading to the Castle Walls. During the fight, he will constantly try to escape. Consider using your TMP for its high fire rate to inflict damage before he can get away from you. Try to eliminate him as quickly as possible, and then head north to the Castle Walls.
Blue Butterfly Combination Lock Puzzle Solution
| Blue Butterfly Combination Lock Solution |
|---|
 Beetle, Skull, Lizzard |
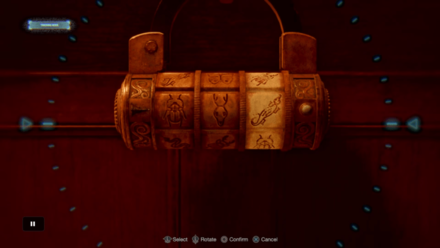
Upon reaching the castle walls, continue heading north until you reach a dead end. From there, you can jump down to the small gap on your left to reach the Collection Room. In this area, you will use IRIS to check for footprints, which will provide you with clues on how to solve the Combination Lock Puzzle that contains the Blue Butterfly ingredient.
| ◄ Previous Chapter | Next Chapter ▶ |
|---|---|
|
Separate Ways - Chapter 3 |
Separate Ways - Chapter 5 |
Separate Ways - Chapter 4 Tips and Strategies
| Separate Ways - Chapter 4 Tips and Strategies |
|---|
|
|
Explore the Area to Find Puzzle Solutions
In this chapter, there are five puzzles in total that you need to solve to collect the ingredients that you need for the cure. Look for clues and files near the puzzle to learn the solution.
Complete the Blue Medallions Request

You can find all of the Blue Medallions in the Courtyard area while you are fighting the red robe Cultist. Make sure that you eliminate all the enemies in the area first before you try to look for them to avoid taking unecessary damage.
Courtyard Blue Medallion Guide
Chapter 4 Completion Reward

After completing Chapter 4 of the Separate Ways DLC, you will finish the Hound of Death Challenge and earn 300 CP. You can then use these CP in the Extras Shop to purchase exclusive content.
Separate Ways Challenges
Resident Evil 4 Remake Related Guides

Separate Ways DLC Content
| ▼Separate Ways DLC Contents | |
|---|---|
| Walkthrough | Puzzles |
| Tips and Tricks | Weapons |
| Collectibles | Bosses |
Separate Ways Story Walkthrough
| Separate Ways Story Walkthrough | |
|---|---|
| Chapter 1 | Chapter 2 |
| Chapter 3 | Chapter 4 |
| Chapter 5 | Chapter 6 |
| Chapter 7 | |
Comment
Author
Separate Ways - Chapter 4 Walkthrough
improvement survey
03/2026
improving Game8's site?

Your answers will help us to improve our website.
Note: Please be sure not to enter any kind of personal information into your response.

We hope you continue to make use of Game8.
Rankings
- We could not find the message board you were looking for.
Gaming News
Popular Games

Genshin Impact Walkthrough & Guides Wiki

Honkai: Star Rail Walkthrough & Guides Wiki

Umamusume: Pretty Derby Walkthrough & Guides Wiki

Pokemon Pokopia Walkthrough & Guides Wiki

Resident Evil Requiem (RE9) Walkthrough & Guides Wiki

Monster Hunter Wilds Walkthrough & Guides Wiki

Wuthering Waves Walkthrough & Guides Wiki

Arknights: Endfield Walkthrough & Guides Wiki

Pokemon FireRed and LeafGreen (FRLG) Walkthrough & Guides Wiki

Pokemon TCG Pocket (PTCGP) Strategies & Guides Wiki
Recommended Games

Diablo 4: Vessel of Hatred Walkthrough & Guides Wiki

Fire Emblem Heroes (FEH) Walkthrough & Guides Wiki

Yu-Gi-Oh! Master Duel Walkthrough & Guides Wiki

Super Smash Bros. Ultimate Walkthrough & Guides Wiki

Pokemon Brilliant Diamond and Shining Pearl (BDSP) Walkthrough & Guides Wiki

Elden Ring Shadow of the Erdtree Walkthrough & Guides Wiki

Monster Hunter World Walkthrough & Guides Wiki

The Legend of Zelda: Tears of the Kingdom Walkthrough & Guides Wiki

Persona 3 Reload Walkthrough & Guides Wiki

Cyberpunk 2077: Ultimate Edition Walkthrough & Guides Wiki
All rights reserved
©CAPCOM CO., LTD. ALL RIGHTS RESERVED.
The copyrights of videos of games used in our content and other intellectual property rights belong to the provider of the game.
The contents we provide on this site were created personally by members of the Game8 editorial department.
We refuse the right to reuse or repost content taken without our permission such as data or images to other sites.


![Everwind Review [Early Access] | The Shaky First Step to A Very Long Journey](https://img.game8.co/4440226/ab079b1153298a042633dd1ef51e878e.png/thumb)

![Monster Hunter Stories 3 Review [First Impressions] | Simply Rejuvenating](https://img.game8.co/4438641/2a31b7702bd70e78ec8efd24661dacda.jpeg/thumb)


