This survey will take about 1 minute.
Your answers will help us to improve our website.
Resident Evil 4 Remake (RE4)
Separate Ways - Chapter 5 Walkthrough
★ The Resident Evil Requiem wiki is now live!
☆ Learn the best ways to speedrun & reach Professional S+!
★ Discover all the Skips you can make in a single playthrough!

This is a walkthrough for Separate Ways - Chapter 5 of Resident Evil 4 Remake (RE4). Read on for a detailed walkthrough, route maps for each objective, a list of important items obtainable, and tips on how to complete this chapter!
| ◄ Previous Chapter | Next Chapter ▶ |
|---|---|
|
Separate Ways - Chapter 4 |
Separate Ways - Chapter 6 |
Separate Ways - Chapter 5 Basic Information
Chapter Summary
Reunite with Luis, only to find out that Krauser has stolen the Amber. You then group up with Leon as you follow Krauser onto the island.
Chapter Details
| Separate Ways - Chapter 5 | |
|---|---|
| Location | Gregorio's Waterway Blast Furnace Hive Clock Tower Dock |
| Recommended Weapons |
Blacktail
SR M1903 Blast Crossbow TMP |
Enemies Encountered
 Cultist (Zealot) Cultist (Zealot)
|
 Garrador Garrador
|
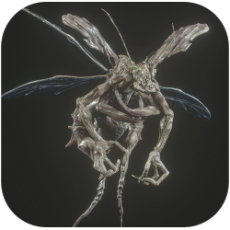 Novistador Novistador
|
 Pesanta Pesanta
|
Separate Ways - Chapter 5 Walkthrough
Chapter Objectives
| Objectives | |
|---|---|
| 1 | Use Iris to Track Luis |
| 2 | Go through the Waterway |
| 3 | Defeat Pesanta |
| 4 | Go After Krauser |
Use Iris to Track Luis
Follow Luis's footprints and look for his note to get out of the castle tower and head to the Gregorio's Waterway. In this section, you will encounter some cultists along the way. Use your handgun and melee attacks to clear a path while conserving ammo.
Go through the Waterway
| Route Map |
|---|
 |
Throughout your exploration in the Waterway, you will find signs that Luis left for you to catch up to him. Continue to follow these signs until you are able to reach the Blast Furnace area.
Follow Luis's Signs

Go straight ahead until you reach an area where Ada will refuse to jump down into the water. Turn right, and you will find a small crevice that you need to pass through. After that, you will see the Lord of the Waterway Request. Pick it up and continue following the path to your right.
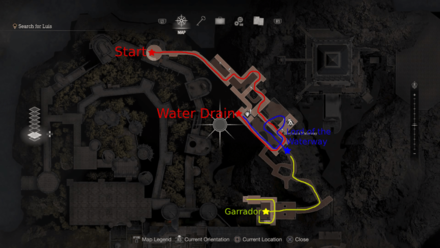
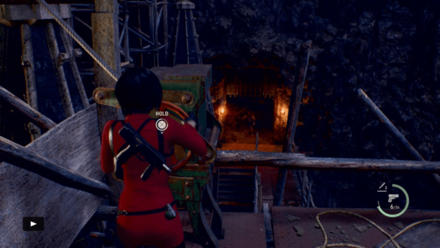
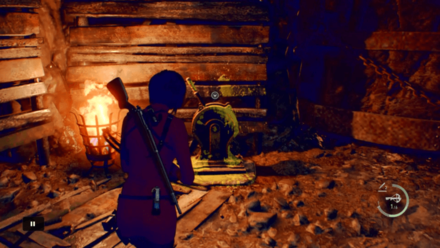
Drain the Water

From here, you will yourself in a small room where you can see a valve that you need to turn to drain the water, along with a Biosensor Scope. Turn the valve and pick up the scope before turning around to see the merchant.
Jump down into the water and look for the Lord of the Waterway (Large Fish) inside the cave. After that, you can continue to follow the path until you reach the Garrador.
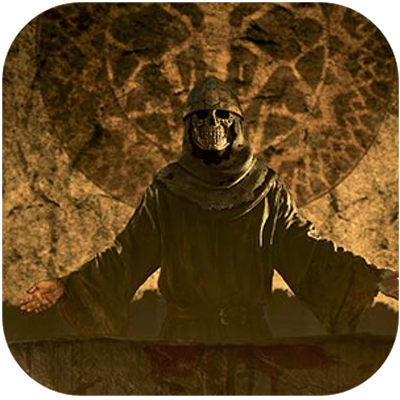
Garrador Fight
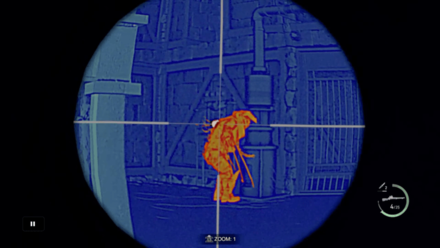
Upon leaving the waterway, you will encounter a Garrador, along with some cultists who are blocking the elevator leading to the Blast Furnace. Stay low and eliminate all the cultists in the area before dealing with the Garrador. It is advisable to use your Blast Crossbow to kill the Garrador since it makes no sound when used.
Alternatively, if you don't have any Arrows for your Blast Crossbow, you can use your rifle with the Biosensor Scope to shoot the plaga behind the Garrador. This makes a lot of noise, make sure to reposition yourself after firing each shot.
Defeat Pesanta
| Route Map |
|---|
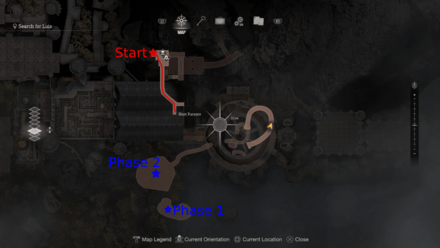 |
Upon reaching the Blast Furnace area, the Black Robe will immediately attack you, forcing you to jump down to the platform below. Using your Grappling Hook, Ada will pull the broken bridge to pin down the Black Robe, revealing the Pesanta.
Phase 1
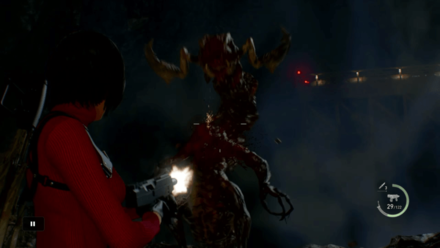
Immediately pick up all the items and ammo behind you because you won't be able to return to this area after defeating the Pesanta. Once you've collected all the items, start focusing on its head and shoot it with your TMP or Rifle.
The area is spacious enough for you to kite the Pesanta without getting too close. Keep circling around the area while dealing damage with your powerful weapons. However, make sure to save your Arrows and Grenades for the second phase.
Phase 2
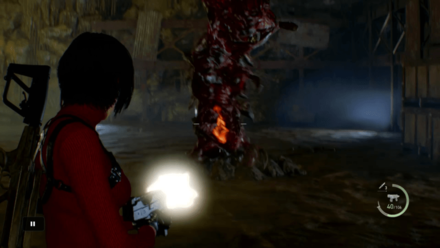
After dealing enough damage to the Pesanta, its tail will detach from the main body, triggering Phase 2 of the boss fight. You will now be in an area much larger than in Phase 1. Use this to your advantage and maintain your distance. Additionally, the Pesanta will sometimes spawn bombs on the floor that explode on contact. Try to move away from these bombs as much as possible.
Continue to keep your distance while waiting for the tail to become upright. Once it is still, look for the glowing wound on its chest and use your Blast Crossbow or Rifle to shoot it. Keep repeating this cycle until you defeat it.
Go After Krauser
| Route Map |
|---|
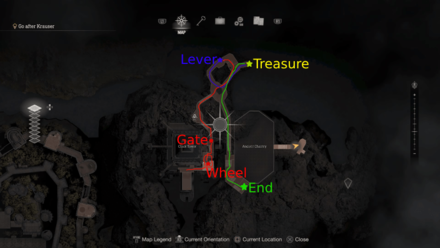 |
After defeating the Pesanta and locating Luis, you will encounter Krauser as he attempts to escape the Castle with the Amber. Chase Krauser to the Clock Tower and then proceed inside the cave.
Open the Clocktower Gate
Go to the upper platform next to the Clock Tower and turn the valve to open the gate. Cultists will start spawning as soon as you turn the valve, and the gate will slowly begin to close. Try to eliminate all of the enemies in the area first before fully opening the gate, and then immediately run inside. Alternatively, you can use your Grappling Hook to take a shortcut after jumping down from the platform.
Blocked Path Inside the Cave
While inside the cave, you will encounter areas blocked by large rocks, preventing further progress. You need to locate a lever that will lift the rocks obstructing your path. Once you pull the lever, a path to the Ancient Chantry will open. These rocks will drop down for a few seconds before being lifted up again. Make sure that you time it when you cross to avoid getting crushed.
Boat Key at the Docks
| Route Map |
|---|
 |
After using the elevator to reach the docks, you'll need to search for a boat key to group up with Leon and pursue Krauser to the Island.
| ◄ Previous Chapter | Next Chapter ▶ |
|---|---|
|
Separate Ways - Chapter 4 |
Separate Ways - Chapter 6 |
Separate Ways - Chapter 5 Tips and Strategies
| Separate Ways - Chapter 5 Tips and Strategies |
|---|
|
|
Purchase the Ada Wong Charm
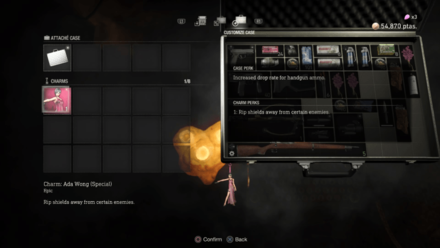
This will enable you to rip shields away from cultists, rendering them vulnerable to your shots. It's an extremely useful ability, especially when you're surrounded by enemies with shields, allowing you to eliminate them much faster. You can exchange 5 Spinels for this Charm at the merchant.
How to Remove Shields with Grappling Gun
Complete All the Requests
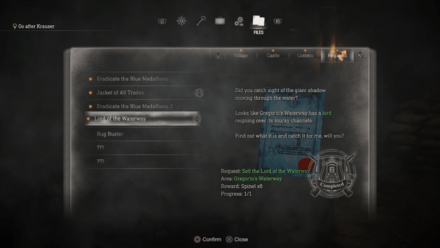
In Chapter 5, there are two requests (Lord of the Waterway and Bug Buster) that you can complete to earn more spinels. It's advisable to finish them before proceeding to Chapter 6 because you won't be able to revisit previous chapters. You can exchange the Spinel rewards for valuable items such as treasures and charms.
| Related Request Guides | |
|---|---|
| Lord of the Waterway | Path of Penitence Bug Buster |
Chapter 5 Completion Reward
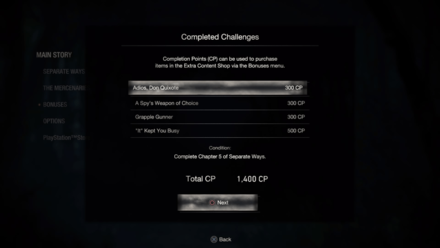
Completing chapter 5 of the Separate Ways DLC rewards you with Adios, Don Quixote, and It Kept You Busy for a total of 800 CP. You can use these CP to purchase exclusive content from the Extras Shop.
Separate Ways Challenges
Resident Evil 4 Remake Related Guides

Separate Ways DLC Content
| ▼Separate Ways DLC Contents | |
|---|---|
| Walkthrough | Puzzles |
| Tips and Tricks | Weapons |
| Collectibles | Bosses |
Separate Ways Story Walkthrough
| Separate Ways Story Walkthrough | |
|---|---|
| Chapter 1 | Chapter 2 |
| Chapter 3 | Chapter 4 |
| Chapter 5 | Chapter 6 |
| Chapter 7 | |
Comment
Author

Separate Ways - Chapter 5 Walkthrough
Please participate in our site
improvement survey
03/2026
improvement survey
03/2026
Would you assist in
improving Game8's site?
improving Game8's site?

×
We are listening to our users' valuable opinions and discussing how to act on them.
The information collected through this survey will be used for the purpose of improving our services. In addition, the information will only be disclosed a part of a statistic in a format that will not allow identification of personal information.
Begin Survey
Not Now
×
Please rate each item regarding Game8.co's Advertisements.
Amount of Ads
Very Dissatisfied
Somewhat Dissatisfied
Fine
Somewhat Satisfied
Highly Satisfied
Placement of Ads
Timing of Ad Display
Ad Loading Speed
Safeness of Ads
Content of Ads
×
Please rate each item regarding Game8.co's Quality of Articles.
Amount of information
Very Dissatisfied
Somewhat Dissatisfied
Fine
Somewhat Satisfied
Highly Satisfied
Frequency of updates
Speed of new information
Accuracy of articles
Understandibility of articles
Readability of sentences
×
Please rate each item regarding Game8.co's Usability of the Site.
Ease of finding information
Very Dissatisfied
Somewhat Dissatisfied
Fine
Somewhat Satisfied
Highly Satisfied
Loading Speed
Use of Color
Font Size
Visibility of Images
Easy to Understand Layout
×
Please rate each item regarding Game8.co's Message Boards, Comments.
Ease of Writing
Very Dissatisfied
Somewhat Dissatisfied
Fine
Somewhat Satisfied
Highly Satisfied
Readability
Ease in Finding Information
Comment Quality
Comment Quantity
Admin Response
×
Please rate each item regarding Game8.co's Site's new design.
Please rate our site's new design
Very Dissatisfied
Somewhat Dissatisfied
Fine
Somewhat Satisfied
Highly Satisfied
Do you think that the website's design change makes the site easier to use?
Has the new design made it easier for you to find information on the site?
Has the new design improved the overall visual appeal of the site?
How would you rate your overall satisfaction with the new design of the site?
×
How likely are you to recommend Game8 to someone you know?
Very Unlikely
0
1
2
3
4
5
6
7
8
9
10
Very Likely
If you have other opinions regarding potential improvement to the website, please share them with us. We would appreciate your honest opinion.
Note: This is a free response section, so you can proceed without entering anything.
Note: Please be sure not to enter any kind of personal information into your response.
Note: Please be sure not to enter any kind of personal information into your response.
×
Thank You
×
Thank you for participating in our survey! Your answers will help us to improve the quality of our website and services.
We hope you continue to make use of Game8.
We hope you continue to make use of Game8.
Close
Rankings
- We could not find the message board you were looking for.
Gaming News


![Slay the Spire 2 Review [Early Access] | Still the Deckbuilder to Beat](https://img.game8.co/4433115/44e19e1fb0b4755466b9e516ec7ffb1e.png/thumb)

![Resident Evil Village Review [Switch 2] | Almost Flawless Port](https://img.game8.co/4432790/e1859f64830960ce4248d898f8cd38d9.jpeg/thumb)
Popular Games

Genshin Impact Walkthrough & Guides Wiki
Honkai: Star Rail Walkthrough & Guides Wiki
Umamusume: Pretty Derby Walkthrough & Guides Wiki
Pokemon Pokopia Walkthrough & Guides Wiki
Resident Evil Requiem (RE9) Walkthrough & Guides Wiki
Monster Hunter Wilds Walkthrough & Guides Wiki
Wuthering Waves Walkthrough & Guides Wiki
Arknights: Endfield Walkthrough & Guides Wiki
Pokemon FireRed and LeafGreen (FRLG) Walkthrough & Guides Wiki
Pokemon TCG Pocket (PTCGP) Strategies & Guides Wiki


Recommended Games
Fire Emblem Heroes (FEH) Walkthrough & Guides Wiki
Diablo 4: Vessel of Hatred Walkthrough & Guides Wiki
Yu-Gi-Oh! Master Duel Walkthrough & Guides Wiki
Super Smash Bros. Ultimate Walkthrough & Guides Wiki
Pokemon Brilliant Diamond and Shining Pearl (BDSP) Walkthrough & Guides Wiki
Elden Ring Shadow of the Erdtree Walkthrough & Guides Wiki
Monster Hunter World Walkthrough & Guides Wiki
The Legend of Zelda: Tears of the Kingdom Walkthrough & Guides Wiki
Persona 3 Reload Walkthrough & Guides Wiki
Cyberpunk 2077: Ultimate Edition Walkthrough & Guides Wiki


All rights reserved
©CAPCOM CO., LTD. ALL RIGHTS RESERVED.
The copyrights of videos of games used in our content and other intellectual property rights belong to the provider of the game.
The contents we provide on this site were created personally by members of the Game8 editorial department.
We refuse the right to reuse or repost content taken without our permission such as data or images to other sites.