This survey will take about 1 minute.
Your answers will help us to improve our website.
Resident Evil 4 Remake (RE4)
Clocktower Lift Guide
★ The Resident Evil Requiem wiki is now live!
☆ Learn the best ways to speedrun & reach Professional S+!
★ Discover all the Skips you can make in a single playthrough!
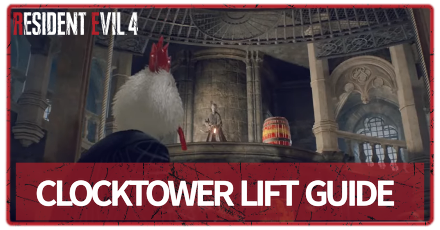
The Clocktower Lift section in Resident Evil 4 Remake (RE4) is a challenging story-related scenario you will tackle upon reaching Chapter 12. Read on to learn more about the Clocktower lift, how to defeat five enemies with the iron ball, reaching the top without the lift stopping once, and get available treasures!
List of Contents
Clocktower Lift Guide
Clocktower Lift Enemies
| 1 | Use a magnum or rifle to deal with the Zealot (Staff) in front of you. Aim a little lower to avoid hitting its mask since a headshot can kill it instantly. |
|---|---|
| 2 | Defeat the Cultist wielding a fire arrow that will appear on your right. You can make use of the red explosive barrel to eliminate it and the surrounding enemies. |
| 3 | Face towards the left and defeat the two Cultists. |
| 4 | 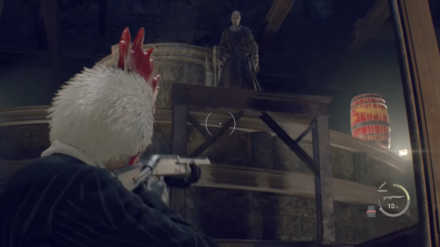 Defeat one more Cultist further on the left. |
| 5 | On the same area, three more Cultists will appear. Use a shotgun and red explosive barrel to easily defeat them. |
| 6 | 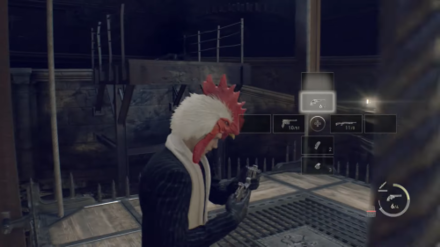 Turn to the left and use a shotgun to deal with one more Cultist. After then, there will be a short break period that you can use to reload your weapons. |
| 7 | Use a magnum or rifle to deal with the Zealot (Staff) at your back. |
| 8 | Turn towards the upper right to defeat the Cultist and the shield-bearer attempting to descend. |
| 9 | Lastly, observe whether any Cultists are ascending the pillars in front and to the left. If there are some, shoot them down to clear the stage. Put a shotgun to use if you get into a tight situation. |
Clocktower Lift Tips
Immediately Deal with Enemies When They Get on the Lift
If you deal with enemies as soon as they get on the lift, the lift will not stop and you will still be viable for the Capacity Compliance achievement. It's recommended to use a shotgun to immediately defeat enemies in this situation.
You Can Clear the Stage Even if You Ignore the Zealots (Staff)
It is possible to clear the stage and get the Capacity Compliance achievement even if you ignore the Zealot (Staff). If you do not want to use a magnum, just focus on dealing with the other Cultists.
If you do decide to deal with the Zealot (Staff), aim for their heads to guarantee a kill even with the use of a magnum. Aim slightly lower to prevent their mask from mitigating some damage.
How to Defeat Five Enemies with the Iron Balls in the Clock Tower
Simply Activate the Iron Ball
The enemies defeated by the iron ball as they climb up also count toward the condition of the challenge. However, feel free to use the lever if you didn't reach the target kills. Make sure to do this before riding the lift in the clock tower.
If you decide to activate the lever, drop the iron balls twice. This will eliminate the two groups of Cultists that will appear and easily clear the challenge.
Note that even if you meet the conditions, the completion message will not appear right away. You can confirm it after clearing the chapter.
Finish the Strrrike! Challenge
| Challenge | Condition |
|---|---|
| Strrrike! (Rewards: 500 CP) |
Defeat 5 enemies with the iron balls in the clock tower. |
All Challenges and How to Complete
Reaching the Top of the Clocktower Without the Lift Stopping Once
If the Lift Stops, Reload and Try Again
Once Leon mentions a dialogue asking if there is something wrong with the lift, it means you have already failed the conditions for the Capacity Compliance achievement. If this happens, load the autosave from the menu and try again.
On difficulties other than Professional, you will have an autosave as soon as you get on the lift.
On Professional mode, you will need to retry from a manually saved location. It is ideal to return to the entrance of the Clocktower to save after defeating the enemies before the lift. However, keep time in mind if you are aiming for a Professional S+ clear.
Best Save Points on Professional
Use Aim Assist in Standard or Lower Difficulty
If you're having trouble acquiring the trophy on Standard or lower difficulty, use Aim Assist. This will lessen the challenge of aiming during the Clocktower lift challenge.
Activate aim assist on Hardcore or higher difficulty by equipping the Gas Mask
 Gas Mask Gas Mask |
Aiming Guide: How to Aim Better
Get the Capacity Compliance Achievement
| Trophy | Conditions |
|---|---|
 Capacity Compliance (Reward:500CP) |
Reach the top of the clock tower without the lift stopping once. |
Achievements List and Trophy Guide
Available Treasures In the Clocktower
Clock Tower
| Gold Bar | |
|---|---|
Map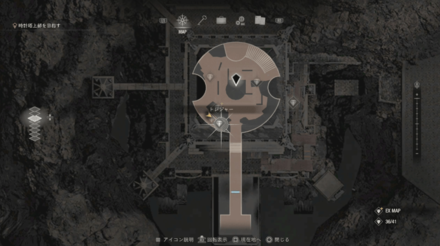 |
In-Game Location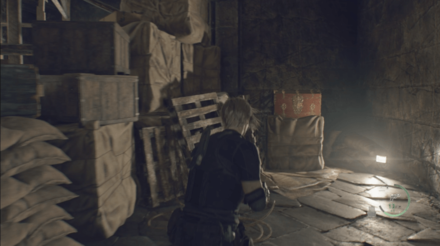 |
| Chapter 12 | Clocktower Obtain the Gold Bar inside a treasure chest southwest of the first floor of the Clocktower. |
|
| Alexandrite | |
|---|---|
Map |
In-Game Location |
| Chapter 12 | Clocktower Get the Alexandrite by shooting the basket hanging from the southwest staircase on the second floor of the Clocktower. |
|
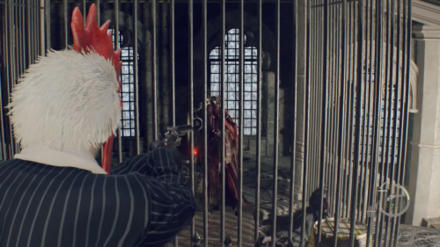
| Mirror with Pearls and Rubies | |
|---|---|
Map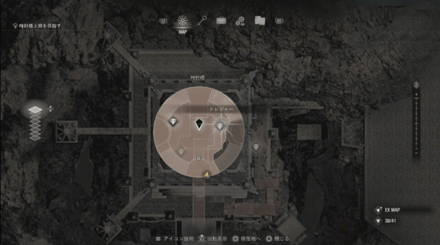 |
In-Game Location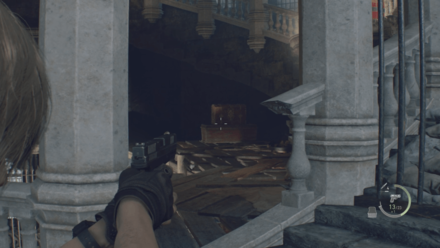 |
| Chapter 12 | Clocktower Located at the third floor of the Clock Tower. When the iron ball rolls down the stairs, do not go down the ladder but instead go behind the lever to find the treasure chest. |
|
| Extravagant Clock | |
|---|---|
Map |
In-Game Location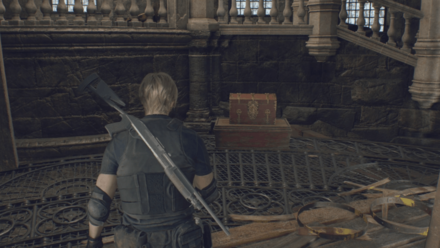 |
| Chapter 12 | Clocktower The Extravagant Clock can be obtained from a treasure chest after dropping down the ladder near the iron ball lever. |
|
| Yellow Diamond | |
|---|---|
Map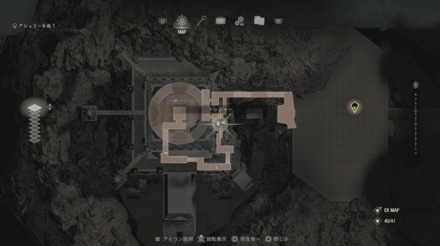 |
In-Game Location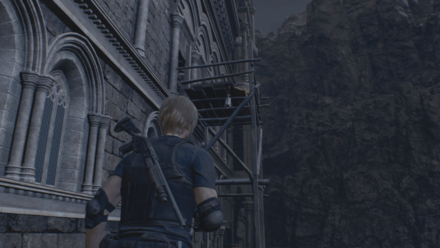 |
| Chapter 12 | Clocktower The Yellow Diamond can be obtained by shooting the hanging container from a wooden platform along the walls of the Clocktower. |
|
Resident Evil 4 Remake Related Guides

Tips and Tricks: A Beginner's Guide
All Tips and Tricks Guides
Comment
Author

Clocktower Lift Guide
Please participate in our site
improvement survey
03/2026
improvement survey
03/2026
Would you assist in
improving Game8's site?
improving Game8's site?

×
We are listening to our users' valuable opinions and discussing how to act on them.
The information collected through this survey will be used for the purpose of improving our services. In addition, the information will only be disclosed a part of a statistic in a format that will not allow identification of personal information.
Begin Survey
Not Now
×
Please rate each item regarding Game8.co's Advertisements.
Amount of Ads
Very Dissatisfied
Somewhat Dissatisfied
Fine
Somewhat Satisfied
Highly Satisfied
Placement of Ads
Timing of Ad Display
Ad Loading Speed
Safeness of Ads
Content of Ads
×
Please rate each item regarding Game8.co's Quality of Articles.
Amount of information
Very Dissatisfied
Somewhat Dissatisfied
Fine
Somewhat Satisfied
Highly Satisfied
Frequency of updates
Speed of new information
Accuracy of articles
Understandibility of articles
Readability of sentences
×
Please rate each item regarding Game8.co's Usability of the Site.
Ease of finding information
Very Dissatisfied
Somewhat Dissatisfied
Fine
Somewhat Satisfied
Highly Satisfied
Loading Speed
Use of Color
Font Size
Visibility of Images
Easy to Understand Layout
×
Please rate each item regarding Game8.co's Message Boards, Comments.
Ease of Writing
Very Dissatisfied
Somewhat Dissatisfied
Fine
Somewhat Satisfied
Highly Satisfied
Readability
Ease in Finding Information
Comment Quality
Comment Quantity
Admin Response
×
Please rate each item regarding Game8.co's Site's new design.
Please rate our site's new design
Very Dissatisfied
Somewhat Dissatisfied
Fine
Somewhat Satisfied
Highly Satisfied
Do you think that the website's design change makes the site easier to use?
Has the new design made it easier for you to find information on the site?
Has the new design improved the overall visual appeal of the site?
How would you rate your overall satisfaction with the new design of the site?
×
How likely are you to recommend Game8 to someone you know?
Very Unlikely
0
1
2
3
4
5
6
7
8
9
10
Very Likely
If you have other opinions regarding potential improvement to the website, please share them with us. We would appreciate your honest opinion.
Note: This is a free response section, so you can proceed without entering anything.
Note: Please be sure not to enter any kind of personal information into your response.
Note: Please be sure not to enter any kind of personal information into your response.
×
Thank You
×
Thank you for participating in our survey! Your answers will help us to improve the quality of our website and services.
We hope you continue to make use of Game8.
We hope you continue to make use of Game8.
Close
Rankings
- We could not find the message board you were looking for.
Gaming News


![Slay the Spire 2 Review [Early Access] | Still the Deckbuilder to Beat](https://img.game8.co/4433115/44e19e1fb0b4755466b9e516ec7ffb1e.png/thumb)

![Resident Evil Village Review [Switch 2] | Almost Flawless Port](https://img.game8.co/4432790/e1859f64830960ce4248d898f8cd38d9.jpeg/thumb)
Popular Games

Genshin Impact Walkthrough & Guides Wiki
Honkai: Star Rail Walkthrough & Guides Wiki
Umamusume: Pretty Derby Walkthrough & Guides Wiki
Pokemon Pokopia Walkthrough & Guides Wiki
Resident Evil Requiem (RE9) Walkthrough & Guides Wiki
Monster Hunter Wilds Walkthrough & Guides Wiki
Wuthering Waves Walkthrough & Guides Wiki
Arknights: Endfield Walkthrough & Guides Wiki
Pokemon FireRed and LeafGreen (FRLG) Walkthrough & Guides Wiki
Pokemon TCG Pocket (PTCGP) Strategies & Guides Wiki


Recommended Games
Fire Emblem Heroes (FEH) Walkthrough & Guides Wiki
Diablo 4: Vessel of Hatred Walkthrough & Guides Wiki
Yu-Gi-Oh! Master Duel Walkthrough & Guides Wiki
Super Smash Bros. Ultimate Walkthrough & Guides Wiki
Pokemon Brilliant Diamond and Shining Pearl (BDSP) Walkthrough & Guides Wiki
Elden Ring Shadow of the Erdtree Walkthrough & Guides Wiki
Monster Hunter World Walkthrough & Guides Wiki
The Legend of Zelda: Tears of the Kingdom Walkthrough & Guides Wiki
Persona 3 Reload Walkthrough & Guides Wiki
Cyberpunk 2077: Ultimate Edition Walkthrough & Guides Wiki


All rights reserved
©CAPCOM CO., LTD. ALL RIGHTS RESERVED.
The copyrights of videos of games used in our content and other intellectual property rights belong to the provider of the game.
The contents we provide on this site were created personally by members of the Game8 editorial department.
We refuse the right to reuse or repost content taken without our permission such as data or images to other sites.