Crux of Nothingness Guide
Latest: 0.5.0 Release Date
☆ Fate of the Vaal ▶︎ The Last of the Druids
┗ Bonded Mods | 0.4 Mystery Box
★ Druid: Class Overview | Builds
☆ NEW: Disciple of Varashta Ascendancy!
★ Best Class | Best Builds | Leveling Builds
The Crux of Nothingness is an area in Path of Exile 2 (PoE 2) where players can fight and defeat The King in the Mists. See a guide to the Crux of Nothingness, its drops, boss, and location below.
| All Ritual Guides | |
|---|---|
| Ritual Guide | Crux of Nothingness Guide |
Crux of Nothingness Guide
| Crux of Nothingness Tips and Tricks |
|---|
|
|
Destroy Mystic Fetishes and Affliction Totems
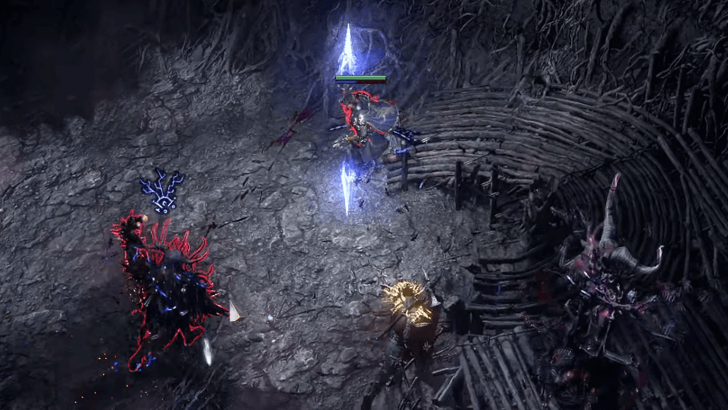
Players should immediately destroy Mystic Fetishes and Affliction Totems that the King in the Mists plants or activates. These objects may summon numerous hazards in the arena or inflict lethal DoT damage on players, ultimately putting them in a precarious spot. Players can find these objects on the platforms around the arena.
Follow the Glowing Wisps in the Maze
When the boss fight transitions into the second phase, players get teleported to a new maze area that will slowly fill with swarms of rats and kill players. As such, players must follow the nearby glowing wisps to find the portal back to the main arena and avoid death.
Do Not Stay on the Platforms For Too Long
Players should not stay on the nearby platforms, at least not for long. While the platforms around the arena may seem like a strategic position, standing on them inflicts players with Portent Vapors, which increases the damage players take per stack.
Accumulating enough stacks will likely lead to players getting one or two-shot by the boss' attacks.
Raise Crux of Nothingness Difficulty to Get Better Rewards
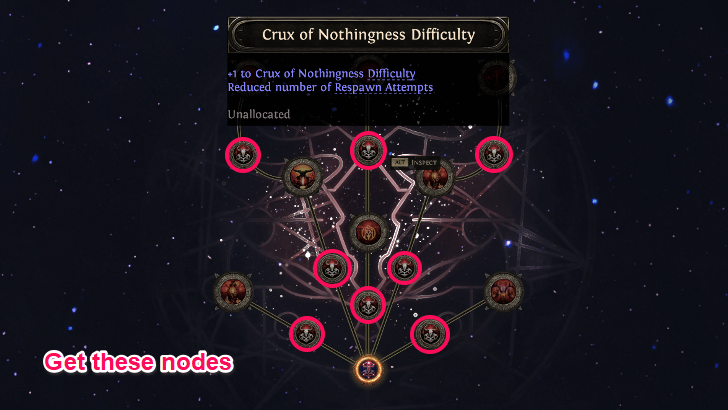
Players should increase their Crux of Nothingness difficulty throught the Ritual Atlas tree to get better loot. However, this results in fewer respawn attempts and a harder boss fight. Given this, players should ensure that their builds are capable enough to handle the set difficulty.
Crux of Nothingness Drops
Unique Items
| Name | Implicit and Modifiers |
|---|---|
 The Burden of Shadows Chiming Staff The Burden of Shadows Chiming Staff Staff |
Fixed Modifiers:
・20-30% increased Cast Speed ・Skill Mana Costs Converted to Life Costs ・Skills gain 1% of Damage as Chaos Damage per 3 Life Cost |
 Beetlebite Velour Shoes Beetlebite Velour Shoes Boots |
Fixed Modifiers:
・20-30% increased Movement Speed ・60-120% increased Evasion and Energy Shield ・Aggravate Bleeding on Enemies when they Enter your Presence ・100% increased Thorns damage |
 Pragmatism Explorer Armour Pragmatism Explorer Armour Body Armour |
Fixed Modifiers:
・200-300% increased Armour and Evasion ・+10-20% to all Elemental Resistances ・-17% to Chaos Resistance ・Charms use no Charges |
 From Nothing Diamond From Nothing Diamond Jewel |
Fixed Modifiers:
・Passives in Radius of X Keystone Passive can be Allocated without being connected to your tree |
Players may obtain the following Unique Items upon defeating the King in the Mists. Some items only drop or have higher chances of dropping at higher Crux of Nothingness difficulties.
Rare and Valuable Items and Currency
| Item/Currency | Description |
|---|---|
|
|
Randomizes the numeric values of modifiers on an item |
|
|
Augments a Rare item with a new random modifier |
|
|
Adds a Support Gem Socket to a Skill Gem with 4 Support Gem Sockets. |
| Used to enter and run high level maps in the Atlas. |
Completing the Crux of Nothingness area can also give players multiple rare and valuable items. Listed above are some of the most notable ones.
Crux of Nothingness Boss
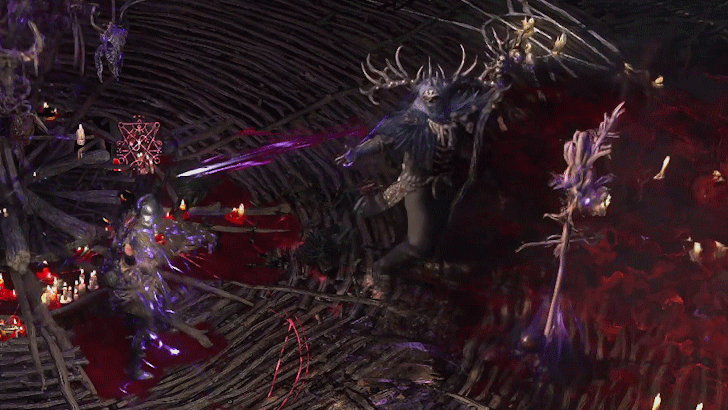
The King in the Mists in the Crux of Nothingness is a more powerful version of the boss players faced in Act 1 of the normal and cruel campaigns. It specializes in debuffing players and putting them in disadvantageous circumstances.
The King in the Mists Boss Guide
Crux of Nothingness Location
Access Through the Realmgate with an Audience With the King
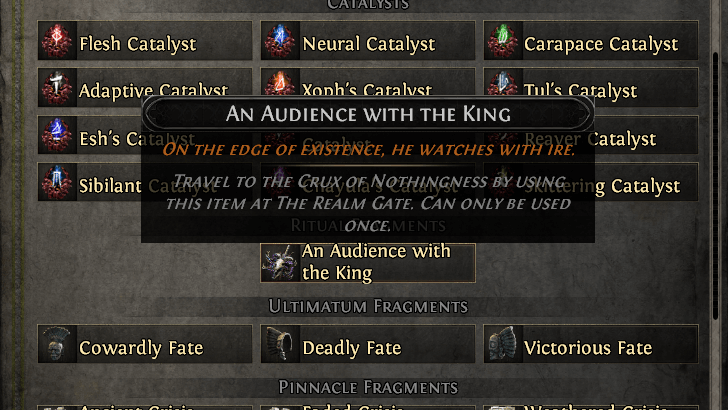
Players can enter the Crux of Nothingness area by inputting An Audience With the King into the Realmgate. Players can obtain this item as a tribute from the Ritual Atlas mechanic.
Crux of Nothingness Explained
Boss Arena for the King in the Mists
The Crux of Nothingness is a boss arena where players can fight the pinnacle boss version of the King in the Mists. It is a round and relatively large area that has three platforms to the sides.
Players Get 5 Respawn Attempts
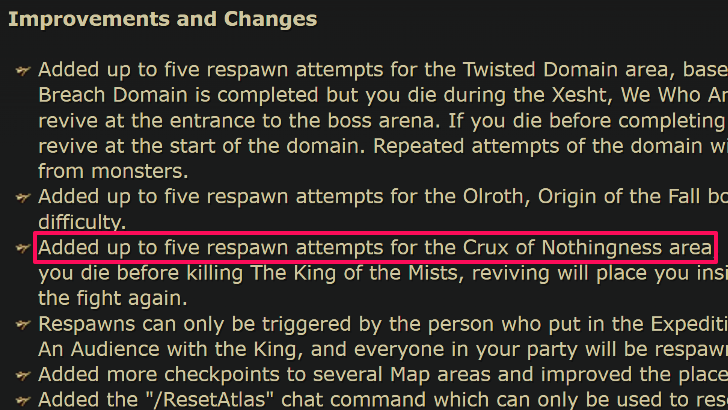
As of the 0.1.1c patch, players get five respawn attempts while in the Crux of Nothingness. If they die while fighting the boss, they will get teleported inside the arena again and can make another attempt at the boss.
0.1.1c Patch Notes and Summary
Path of Exile 2 Related Guides

Atlas of Worlds Endgame Explained
Atlas Guides
Atlas Maps
Comment
Author

Crux of Nothingness Guide
Rankings
- We could not find the message board you were looking for.

Gaming News


![Monster Hunter Stories 3 Review [First Impressions] | Simply Rejuvenating](https://img.game8.co/4438641/2a31b7702bd70e78ec8efd24661dacda.jpeg/thumb)
Popular Games

Genshin Impact Walkthrough & Guides Wiki
Honkai: Star Rail Walkthrough & Guides Wiki
Umamusume: Pretty Derby Walkthrough & Guides Wiki
Pokemon Pokopia Walkthrough & Guides Wiki
Resident Evil Requiem (RE9) Walkthrough & Guides Wiki
Monster Hunter Wilds Walkthrough & Guides Wiki
Wuthering Waves Walkthrough & Guides Wiki
Arknights: Endfield Walkthrough & Guides Wiki
Pokemon FireRed and LeafGreen (FRLG) Walkthrough & Guides Wiki
Pokemon TCG Pocket (PTCGP) Strategies & Guides Wiki


Recommended Games
Diablo 4: Vessel of Hatred Walkthrough & Guides Wiki
Cyberpunk 2077: Ultimate Edition Walkthrough & Guides Wiki
Fire Emblem Heroes (FEH) Walkthrough & Guides Wiki
Yu-Gi-Oh! Master Duel Walkthrough & Guides Wiki
Super Smash Bros. Ultimate Walkthrough & Guides Wiki
Pokemon Brilliant Diamond and Shining Pearl (BDSP) Walkthrough & Guides Wiki
Elden Ring Shadow of the Erdtree Walkthrough & Guides Wiki
Monster Hunter World Walkthrough & Guides Wiki
The Legend of Zelda: Tears of the Kingdom Walkthrough & Guides Wiki
Persona 3 Reload Walkthrough & Guides Wiki


All rights reserved
© 2010 - 2024 Grinding Gear Games
The copyrights of videos of games used in our content and other intellectual property rights belong to the provider of the game.
The contents we provide on this site were created personally by members of the Game8 editorial department.
We refuse the right to reuse or repost content taken without our permission such as data or images to other sites.