Best Combos for Early to Late Game
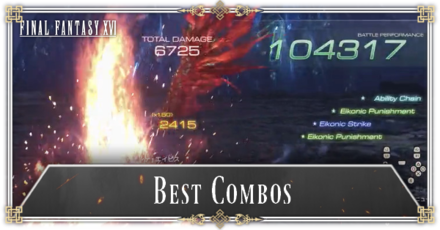
Executing combos is an effective way of dealing plenty of damage in Final Fantasy 16 (FF16). Read on to learn the best combos for early to late game, best Torgal combos, and combos using mastered eikonic feats and abilities!
List of Contents
Best Combos for Early Game
| Early Game Combos List |
|---|
|
|
Basic Combo
| 1 | |
|---|---|
| 2 | |
| 3 | |
| 4 | |
| 5 |
This is the basic multi-hit combo which you should use if the Eikon abilities are not ready yet. Build up damage with repeated melee attacks and ending with a Magic Burst.
▲ Back to Early Game Combos List ▲
Magic Burst Combo
| 1 | |
|---|---|
| 2 | |
| 3 | |
| 4 | |
| 5 | |
| 6 | |
| 7 | |
| 8 |
This combo uses both magic and melee attacks to deal damage. It's less effective when you're surrounded, so make sure to evade when necessary.
▲ Back to Early Game Combos List ▲
Lunge to Magic Burst Combo
| 1 | |
|---|---|
| 2 | |
| 3 | Repeat 1 and 2 |
This combo loops through the Lunge and Magic Burst. While it doesn't do a lot of damage, it's effective for dealing continuous damage to smaller enemies.
▲ Back to Early Game Combos List ▲
Garuda + Phoenix Combo
| 1 | Hold |
|---|---|
| 2 | |
| 3 | |
| 4 | |
| 5 | |
| 6 | |
| 7 | |
| 8 | |
| 9 | |
| 10 |
Combining the powers of the Garuda and Phoenix Eikons can let you deal a lot of damage. Gouge is used to greatly reduce the enemy's Will Gauge and can be continued with Deadly Embrace then Wicked Wheel.
Note that you'll need to switch Eikons midway through the combo with L2. For this combo, you should switch to Phoenix right around the Downthrust.
▲ Back to Early Game Combos List ▲
Garuda + Phoenix (Staggered)
| 1 | |
|---|---|
| 2 | |
| 3 | |
| 4 | |
| 5 | |
| 6 | |
| 7 | |
| 8 | |
| 9 |
This combo is a powerful combination of Garuda and Phoenix abilities that can deal high damage to staggered enemies. Switch to Phoenix between the Wicked Wheel and Downthrust to follow up with Scarlet Cyclone and Rising Flames.
▲ Back to Early Game Combos List ▲
Best Combos for Mid Game
| Mid Game Combos List |
|---|
|
|
Will o' the Wykes to Lightning Rod
| 1 | |
|---|---|
| 2 |
With the ability Will o' the Wykes, attack and protect yourself from the opponent while dealing damage! Keep on applying the Lightning Rod on the enemy if it moves in order to keep your attacks consistent.
▲ Back to Mid Game Combos List ▲
Wicked Wheel to Upheaval
| 1 | |
|---|---|
| 2 |
Using the ability Wicked Wheel, attack and lift your opponent from the ground into the air. After bringing them midair, use the Upheaval ability to crush your opponent into the ground for extra damage overall!
▲ Back to Mid Game Combos List ▲
Ifrit + Garuda + Titan Combo (Staggered)
| 1 | Press |
|---|---|
| 2 | |
| 3 | |
| 4 | |
| 5 | |
| 6 | |
| 7 |
This combo requires 3 Eikons to be unlocked. You will need Garuda, Phoenix, and Titan's abilities. This will let you cycle through the 3 different Eikons and you can repeat this combo again after. Flames of Rebirth and Windup should help in extending damage over time!
▲ Back to Mid Game Combos List ▲
Best Combos for Late Game
| Late Game Combos List |
|---|
|
|
Mesmerize + Wide Range Attack
| 1 | |
|---|---|
| 2 |
For this combo it is recommended to use the ability Mesmerize, a move that can pull enemies to one spot, first. These are the recommended follow up attacks that can damage enemies at a wider range.
▲ Back to Late Game Combos List ▲
Garuda + Ramuh + Odin Combo
| 1 | |
|---|---|
| 2 | |
| 3 |
To use this combo, you will need to unlock all of the Eikons. Start this combo by using Deadly Embrace to pull the enemy down and then enable Lightning Rod to strike your opponent in one spot! Use Dancing Steel to complete the continuous cycle of attacks.
▲ Back to Late Game Combos List ▲
Cold Snap + Lightning Rod + Dancing Steel
| 1 | |
|---|---|
| 2 | |
| 3 | |
| 4 |
Temporarily freeze an enemy with Frostbite by casting Cold Snap when dodging an attack. Place the Lightning Rod near the frozen enemy, and activate Dancing Steel. You will deal lots of damage from both the discharge of the Lightning Rod and by hitting enemies with Dancing Steel. It also fills up your Zantetsuken gauge.
▲ Back to Late Game Combos List ▲
Double Zantetsuken Combo
| 1 | |
|---|---|
| 2 | Fill the Zantetsuken gauge at the maximum limit before staggering the enemy |
| 3 | Press |
| 4 | |
| 5 | Long press |
| 6 | Release |
| 7 | |
| 8 | |
| 9 | Long press |
| 10 | Release |
| 11 |
Filling up the Zantetsuken gauge before staggering an enemy will let you use it twice during the combo to deal huge amounts of damage to the enemy. The Zantetsuken requires you to hold Square, activate Odin's Arm of Darkness, and release Square. Do this before and after the combo since you'll refill the Zantetsuken gauge again after casting Dancing Steel.
▲ Back to Late Game Combos List ▲
Best Torgal Combo
Command Torgal to Attack
| Sic ↑ |
Normal: Single attack on the enemy Precision Sic: ┗ Enemies on the ground: Torgal does a combo of attacks. ┗ Enemies in midair: Torgal deals continuous damage to the enemy while spinning. |
|---|---|
| Ravage ↓ |
Normal: Launches small enemies in the air Precision Sic: ┗ Enemies on the ground: Deals a spinning move that damages enemies before launching them in the air ┗ Enemies in midair: Torgal slams the enemies on the ground, leaving them in a downed state. |
| Heal → | Torgal restores Clive's HP in combat. |
Command Torgal by pressing the D-Pad buttons corresponding to Torgal's action in combat.
His Sics and Ravages become Precision Sics that deals higher damage when commanded at the right time.
Combos using Torgal
Ravage to Punish Combo
| 1 | |
|---|---|
| 2 | Move close then |
| 3 | Repeat 1 and 2 |
You can loop this combo with help and combat support from your companion Torgal. Using this can easily knock down some lighter enemies.
Torgal Combo
| 1 | |
|---|---|
| 2 | |
| 3 | |
| 4 | |
| 5 | Hold |
| 6 | |
| 7 | |
| 8 | |
| 9 | |
| 10 |
The combo begins with Torgal launching the enemy in the air, followed up by an aerial combo. The input is slightly trickier than usual, but the overall damage is worth learning it.
Mastered Eikonic Feats and Abilities Combos
| High-Scoring Combos List |
|---|
|
|
High-Scoring Combo 1
| Ability Arrangement | |
|---|---|
 Phoenix Phoenix |
|
 Garuda Garuda |
|
 Shiva Shiva |
|
| Combo Sequence | |
| 1 | |
| 2 | |
| 3 | |
| 4 | |
| 5 | |
| 6 | |
| 7 | |
| 8 | Hold |
| 9 | |
| 10 | |
| 11 | |
| 12 | |
| 13 | |
| 14 | |
| 15 | |
| 16 | |
| 17 | |
| 18 | |
| 19 | |
| 20 | |
| 21 | |
| 22 | |
This is a combo that makes use of Eikonic Feats along with Rime. Use Deadly Embrace to pull back an enemy blown away by Gouge and restrain the enemy in Rime's continuous attacks. Cast Thunderstorm near the enemy to raise it along with the wand.
Note that this combo is effective on small enemies and is not practical to use during FF16's story. This combo is better used during Arcade Mode as it gives out high scores. Keep this in mind when doing these flashy combos.
▲ Back to High-Scoring Combos List ▲
High-Scoring Combo 2
| Ability Arrangement | |
|---|---|
| Phoenix |
|
 Odin Odin |
|
| Shiva |
|
| Combo Sequence | |
| 1 | |
| 2 | |
| 3 | |
| 4 | |
| 5 | |
| 6 | |
| 7 | Hold |
| 8 | |
| 9 | |
| 10 | |
| 11 | |
| 12 | |
| 13 | Hold |
| 14 | |
| 15 | |
| 16 | Hold |
| 17 | |
| 18 | |
| 19 | |
| 20 | |
| 21 | |
| 22 | Hold |
| 23 | |
| 24 | |
| 25 | |
| 26 | |
| 27 | |
| 28 | |
| 29 | |
| 30 | |
| 31 | |
| 32 | |
| 33 | Press |
| 34 | |
| 35 | |
| 36 | Hold |
This combo brings Rift Slip, Zantetsuken, Shiva's Cold Snaps, and Torgal into play. It would be better if The Pull of Darkness is equipped, which increases the rate at where the Zantetsuken gauge fills up from the Dancing Steel ability.
Quickly cast Dancing Steel during Thunderstorm's animation to hit the enemy while still in the air and get that flashy part of the combo.
Note that this combo is much harder to pull off compared to the first combo and is not practical to use at all. You can try this in the Arcade Mode to pull off a lot of techniques that will surely get you those high scores!
▲ Back to High-Scoring Combos List ▲
Final Fantasy 16 (FF16) Related Guides

Tips and Tricks: A Beginner's Guide to FF16
All Tips and Tricks
Comment
Author

Best Combos for Early to Late Game
Rankings
- We could not find the message board you were looking for.
Gaming News
![Neverness to Everness (NTE) Review [Beta Co-Ex Test] | Rolling the Dice on Something Special](https://img.game8.co/4414628/dd3192c8f1f074ea788451a11eb862a7.jpeg/show)


Popular Games

Genshin Impact Walkthrough & Guides Wiki
Honkai: Star Rail Walkthrough & Guides Wiki
Arknights: Endfield Walkthrough & Guides Wiki
Umamusume: Pretty Derby Walkthrough & Guides Wiki
Wuthering Waves Walkthrough & Guides Wiki
Pokemon TCG Pocket (PTCGP) Strategies & Guides Wiki
Abyss Walkthrough & Guides Wiki
Zenless Zone Zero Walkthrough & Guides Wiki
Digimon Story: Time Stranger Walkthrough & Guides Wiki
Clair Obscur: Expedition 33 Walkthrough & Guides Wiki


Recommended Games
Fire Emblem Heroes (FEH) Walkthrough & Guides Wiki
Pokemon Brilliant Diamond and Shining Pearl (BDSP) Walkthrough & Guides Wiki
Diablo 4: Vessel of Hatred Walkthrough & Guides Wiki
Super Smash Bros. Ultimate Walkthrough & Guides Wiki
Yu-Gi-Oh! Master Duel Walkthrough & Guides Wiki
Elden Ring Shadow of the Erdtree Walkthrough & Guides Wiki
Monster Hunter World Walkthrough & Guides Wiki
The Legend of Zelda: Tears of the Kingdom Walkthrough & Guides Wiki
Persona 3 Reload Walkthrough & Guides Wiki
Cyberpunk 2077: Ultimate Edition Walkthrough & Guides Wiki


All rights reserved
© 2023 SQUARE ENIX CO., LTD. All Rights Reserved.
The copyrights of videos of games used in our content and other intellectual property rights belong to the provider of the game.
The contents we provide on this site were created personally by members of the Game8 editorial department.
We refuse the right to reuse or repost content taken without our permission such as data or images to other sites.