 Ancestral Spirit's Horn
 Arrow's Reach Talisman
 Arrow's Sting Talisman
 Arsenal Charm
 Arsenal Charm +1
 Assassin's Cerulean Dagger
 Assassin's Crimson Dagger
 Axe Talisman
 Blessed Dew Talisman
 Blue Dancer Charm
 Blue-Feathered Branchsword
 Boltdrake Talisman
 Boltdrake Talisman +1
 Boltdrake Talisman +2
 Bull-Goat's Talisman
 Carian Filigreed Crest
 Cerulean Amber Medallion
 Cerulean Amber Medallion +1
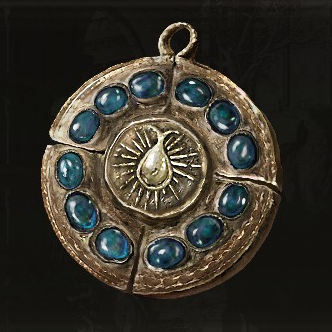 Cerulean Amber Medallion +2
 Cerulean Seed Talisman
 Clarifying Horn Charm
 Clarifying Horn Charm +1
 Claw Talisman
 Companion Jar
 Concealing Veil
 Crepus's Vial
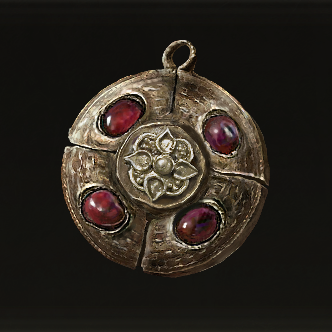 Crimson Amber Medallion
 Crimson Amber Medallion +1
 Crimson Amber Medallion +2
 Crimson Seed Talisman
 Crucible Feather Talisman
 Crucible Knot Talisman
 Crucible Scale Talisman
 Curved Sword Talisman
 Daedicar's Woe
 Dagger Talisman
 Dragoncrest Greatshield Talisman
 Dragoncrest Shield Talisman
 Dragoncrest Shield Talisman +1
 Dragoncrest Shield Talisman +2
 Erdtree's Favor
 Erdtree's Favor +1
 Erdtree's Favor +2
 Faithful's Canvas Talisman
 Fire Scorpion Charm
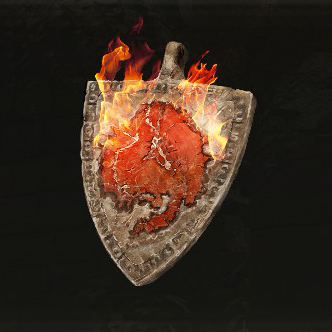 Flamedrake Talisman
 Flamedrake Talisman +1
 Flamedrake Talisman +2
 Flock's Canvas Talisman
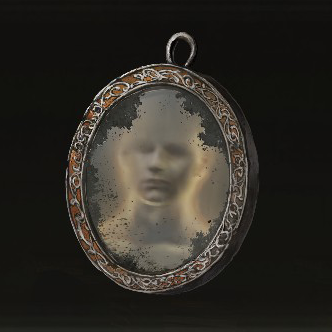 Furled Finger's Trick-Mirror
 Godfrey Icon
 Godskin Swaddling Cloth
 Graven-Mass Talisman
 Graven-School Talisman
 Great-Jar's Arsenal
 Greatshield Talisman
 Green Turtle Talisman
 Haligdrake Talisman
 Haligdrake Talisman +1
 Haligdrake Talisman +2
 Hammer Talisman
 Host's Trick-Mirror
 Immunizing Horn Charm
 Immunizing Horn Charm +1
 Kindred of Rot's Exultation
 Lance Talisman
 Lightning Scorpion Charm
 Longtail Cat Talisman
 Lord of Blood's Exultation
 Magic Scorpion Charm
 Marika's Scarseal
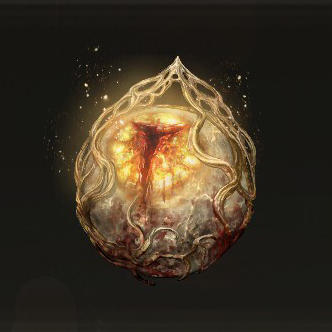 Marika's Soreseal
 Millicent's Prosthesis
 Moon of Nokstella
 Mottled Necklace
 Mottled Necklace +1
 Old Lord's Talisman
 Pearldrake Talisman
 Pearldrake Talisman +1
 Pearldrake Talisman +2
 Perfumer's Talisman
 Primal Glintstone Blade
 Prince of Death's Cyst
 Prince of Death's Pustule
 Prosthesis-Wearer Heirloom
 Radagon Icon
 Radagon's Scarseal
 Radagon's Soreseal
 Red-Feathered Branchsword
 Ritual Shield Talisman
 Ritual Sword Talisman
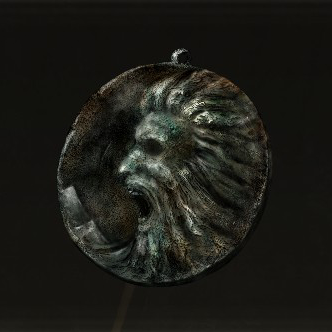 Roar Medallion
 Rotten Winged Sword Insignia
 Sacred Scorpion Charm
 Sacrificial Twig
 Shabriri's Woe
 Shard of Alexander
 Silver Scarab
 Spear Talisman
 Spelldrake Talisman
 Spelldrake Talisman +1
 Spelldrake Talisman +2
 Stalwart Horn Charm
 Stalwart Horn Charm +1
 Stargazer Heirloom
 Starscourge Heirloom
 Taker's Cameo
 Twinblade Talisman
 Two Fingers Heirloom
 Viridian Amber Medallion
 Viridian Amber Medallion +1
 Viridian Amber Medallion +2
 Warrior Jar Shard
 Winged Sword Insignia
This survey will take about 1 minute.
Your answers will help us to improve our website.
Elden Ring
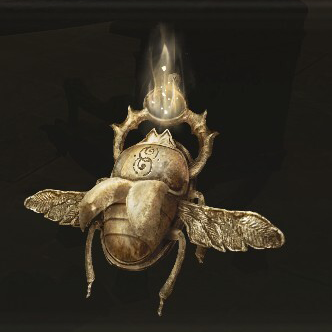
Gold Scarab Location and How to Get
The Gold Scarab (Golden Scarab) is a type of Talisman in Elden Ring. Read on to learn the Gold Scarab's effects, location, lore description, and how to obtain it!
Gold Scarab Overview
Gold Scarab Effect
| Gold Scarab | ||
|---|---|---|
|
Effect | Increases runes obtained from defeated enemies. |
| Weight | 1.2 | |
| Lore Description |
|---|
| "A talisman facsimile of a scarab, the carrier of treasures and precious things. This golden scarab increases the amount of runes obtained from defeating enemies." |
How to Get the Gold Scarab
Defeat the Cleanrot Knights inside the Abandoned Cave
| Map Location |
|---|
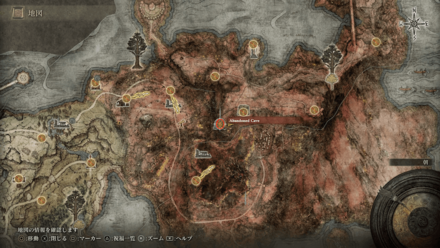 View Full Image |
The Gold Scarab is a reward you obtain after defeating the two Cleanrot Knights inside the Abandoned Cave. The cave can be found south of the Deep Siofra Well Site of Grace in the Caelid region.
Abandoned Cave Walkthrough and Location
Abandoned Cave Guide
The Abandoned Cave features environments that are harmful or downright lethal while being a dark cave with enemies that can apply Scarlet Rot.
We highly recommend speedrunning it to avoid unnecessary damage for the dungeon's boss fight. Below are some tips to get through the dungeon the safest way.
| 1 | Do not roll into swamps. Rolling will cause the swamp's content to coat your entire body. This will make your character accumulate Scarlet Rot even if you're out of the swamp. |
|---|---|
| 2 | Bring Preserving Boluses to get rid of Scarlet Rot build up and Scarlet Rot itself in the event you are afflicted with it |
| 3 | Bring a Lantern or a Torch. |
| 4 | Be careful of the last ledge jump just before the boss room. The jump needed for the last ledge before the boss room where its guarded by two shamans is deceptively tricky. |
How to Use Gold Scarab
Equip to Gain More Runes
While having the Gold Scarab equipped as a Talisman, you will gain about 20% more Runes whenever you defeat an enemy. This makes it an excellent Talisman to have equipped while farming enemies to grind levels.
Rune Farming Locations and Guide: How to Get Runes Fast (Souls)
Swap Quickly Upon Defeating Bosses
You don't have to always have the Gold Scarab equipped when fighting a boss, since you will need every advantage you can get. However, if you are quick enough, you can swap to the Gold Scarab the moment the boss falls.
If done right, you will still benefit from the bonus Runes.
Elden Ring Related Guides
All Talisman Guides
| Talisman Guides | |
|---|---|
| All Talismans | All DLC Talismans |
List of Talismans
Author

Gold Scarab Location and How to Get
Please participate in our site
improvement survey
03/2026
improvement survey
03/2026
Would you assist in
improving Game8's site?
improving Game8's site?

×
We are listening to our users' valuable opinions and discussing how to act on them.
The information collected through this survey will be used for the purpose of improving our services. In addition, the information will only be disclosed a part of a statistic in a format that will not allow identification of personal information.
Begin Survey
Not Now
×
Please rate each item regarding Game8.co's Advertisements.
Amount of Ads
Very Dissatisfied
Somewhat Dissatisfied
Fine
Somewhat Satisfied
Highly Satisfied
Placement of Ads
Timing of Ad Display
Ad Loading Speed
Safeness of Ads
Content of Ads
×
Please rate each item regarding Game8.co's Quality of Articles.
Amount of information
Very Dissatisfied
Somewhat Dissatisfied
Fine
Somewhat Satisfied
Highly Satisfied
Frequency of updates
Speed of new information
Accuracy of articles
Understandibility of articles
Readability of sentences
×
Please rate each item regarding Game8.co's Usability of the Site.
Ease of finding information
Very Dissatisfied
Somewhat Dissatisfied
Fine
Somewhat Satisfied
Highly Satisfied
Loading Speed
Use of Color
Font Size
Visibility of Images
Easy to Understand Layout
×
Please rate each item regarding Game8.co's Message Boards, Comments.
Ease of Writing
Very Dissatisfied
Somewhat Dissatisfied
Fine
Somewhat Satisfied
Highly Satisfied
Readability
Ease in Finding Information
Comment Quality
Comment Quantity
Admin Response
×
Please rate each item regarding Game8.co's Site's new design.
Please rate our site's new design
Very Dissatisfied
Somewhat Dissatisfied
Fine
Somewhat Satisfied
Highly Satisfied
Do you think that the website's design change makes the site easier to use?
Has the new design made it easier for you to find information on the site?
Has the new design improved the overall visual appeal of the site?
How would you rate your overall satisfaction with the new design of the site?
×
How likely are you to recommend Game8 to someone you know?
Very Unlikely
0
1
2
3
4
5
6
7
8
9
10
Very Likely
If you have other opinions regarding potential improvement to the website, please share them with us. We would appreciate your honest opinion.
Note: This is a free response section, so you can proceed without entering anything.
Note: Please be sure not to enter any kind of personal information into your response.
Note: Please be sure not to enter any kind of personal information into your response.
×
Thank You
×
Thank you for participating in our survey! Your answers will help us to improve the quality of our website and services.
We hope you continue to make use of Game8.
We hope you continue to make use of Game8.
Close
Rankings
- We could not find the message board you were looking for.
Gaming News


Popular Games

Genshin Impact Walkthrough & Guides Wiki
Honkai: Star Rail Walkthrough & Guides Wiki
Umamusume: Pretty Derby Walkthrough & Guides Wiki
Pokemon Pokopia Walkthrough & Guides Wiki
Resident Evil Requiem (RE9) Walkthrough & Guides Wiki
Monster Hunter Wilds Walkthrough & Guides Wiki
Wuthering Waves Walkthrough & Guides Wiki
Arknights: Endfield Walkthrough & Guides Wiki
Pokemon FireRed and LeafGreen (FRLG) Walkthrough & Guides Wiki
Pokemon TCG Pocket (PTCGP) Strategies & Guides Wiki


Recommended Games
Diablo 4: Vessel of Hatred Walkthrough & Guides Wiki
Fire Emblem Heroes (FEH) Walkthrough & Guides Wiki
Yu-Gi-Oh! Master Duel Walkthrough & Guides Wiki
Super Smash Bros. Ultimate Walkthrough & Guides Wiki
Pokemon Brilliant Diamond and Shining Pearl (BDSP) Walkthrough & Guides Wiki
Elden Ring Shadow of the Erdtree Walkthrough & Guides Wiki
Monster Hunter World Walkthrough & Guides Wiki
The Legend of Zelda: Tears of the Kingdom Walkthrough & Guides Wiki
Persona 3 Reload Walkthrough & Guides Wiki
Cyberpunk 2077: Ultimate Edition Walkthrough & Guides Wiki


All rights reserved
ELDEN RING™ & ©BANDAI NAMCO Entertainment Inc. / ©2021 FromSoftware, Inc.
The copyrights of videos of games used in our content and other intellectual property rights belong to the provider of the game.
The contents we provide on this site were created personally by members of the Game8 editorial department.
We refuse the right to reuse or repost content taken without our permission such as data or images to other sites.