The Great Hollow Guide and Crystal Locations
★ Team up using our Multiplayer Board!
☆ The Forsaken Hollows DLC: Scholar | Undertaker
★ The Great Hollow Guide and Rewards
☆ New Bosses: Balancers | Dreglord
★ Best Class Tier List and Best Teams
☆ How to Unlock Forsaken Hollows DLC
This is a guide to The Great Hollow Shifting Earth and its crystal locations in Elden Ring Nightreign: The Forsaken Hollows DLC. Learn about The Great Hollow, a map of the crystal locations, and how to clear this shifting earth and obtain its rewards!
| Attention |
|---|
 under the page's title to be notified of any updates!
The Great Hollow Crystal Locations
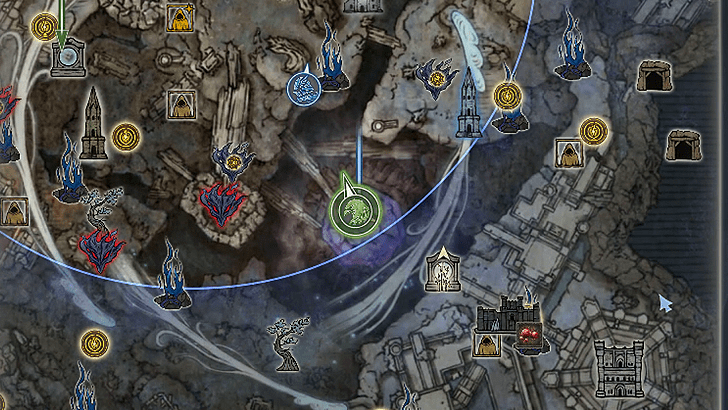
| Crystal Locations Map |
|---|
 ⓘ Above are the common locations for the crystals. Note that not all crystals will appear in every session. ⓘ You can ride the Spectral Hawks to quickly travel around and get an overhead view for any nearby crystals. |
 ⓘ 4 crystals are needed for a 2-3 player expedition, while only 3 crystals are needed for a solo expedition. |
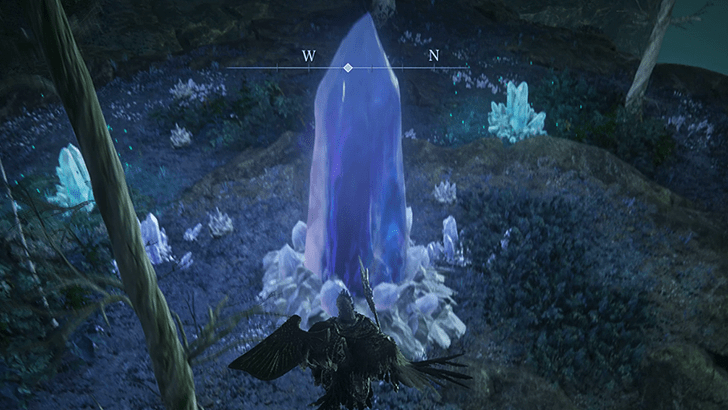
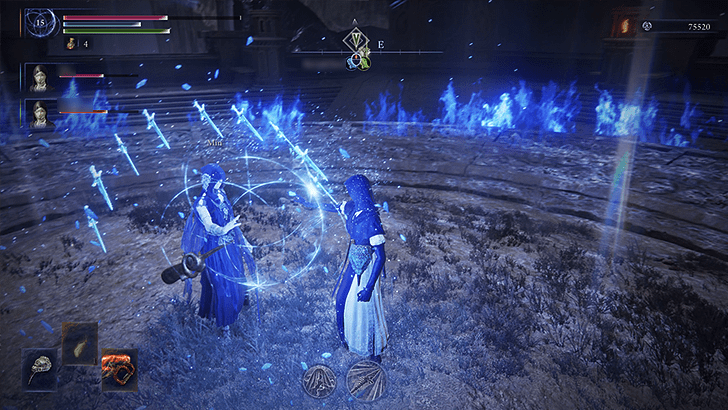
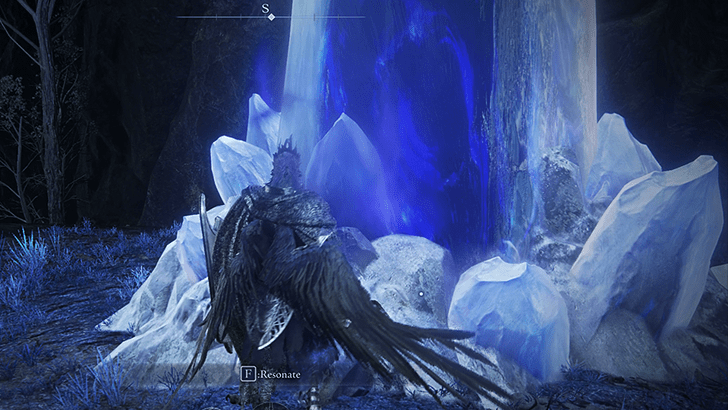
The large bluish crystals are tied to the Favor of the Great Hollow and the max health reduction debuff areas in the northwest and southeast urban locations can be found across the map.
Going nearby and resonating with at most 4 crystals (or 3 if on a solo expedition, good for Remembrance hunts) will shatter the giant crystal and eliminate the debuff areas altogether.
Once enough crystals have been destroyed, head over to the large (now broken) purple crystal near the center of the map. Interact with the legendary drop there to get the Favor of the Great Hollow. You can then exit this area by using the Spirit Stream nearby.
How to Unlock The Great Hollow
Defeat 2 Nightlords and Unlock 2 New Nightfarers in DLC

To unlock the The Great Hollow, you must first defeat two Nightlords, which includes Tricephalos and one other boss, and also unlock the two new Nightfarers added in the DLC.
Once you meet the conditions, head to the chapel that opens behind the Small Jar Merchant. From there, you’ll be able to take on The Great Hollow Shifting Earth event, as well as the boss expedition for the Balancers.
How to Unlock Forsaken Hollows DLC
The Great Hollow Rewards
| Favor of the Great Hollow | False Vision of a Great Rune | Weapon Duplication |
Favor of the Great Hollow
| Favor of the Great Hollow Power | |
|---|---|
 |
 |
| Breaks crystal curse, and when Sacred Flasks are exhausted, boost art gauge. | |
Resonating with 4 main crystals (3 in a Solo Expedition) in The Great Hollow will allow you to obtain the Favor of the Great Hollow marked at the middle of the map.
This power helps eliminate the passive max health reduction present in the two urban areas of the map, making it much easier to explore them.
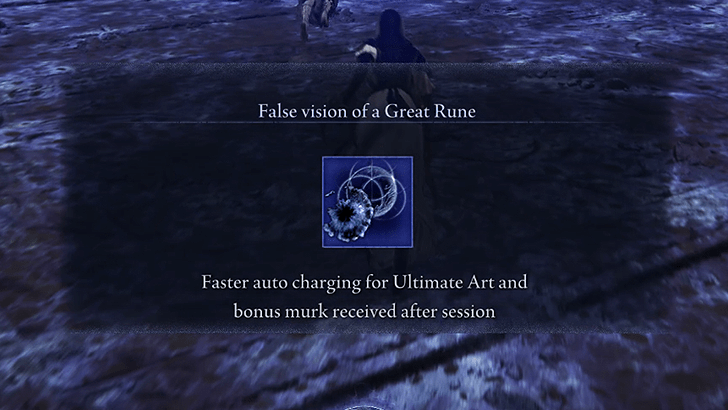
False Vision of a Great Rune
| False Vision of a Great Rune | |
|---|---|
 |
 |
 Faster auto charging for Ultimate Art and bonus murk received after session. ⓘ 2000 extra Murk is rewarded at the end of the session with this power. Up to 4000 can be earned if you complete both Divine Towers and obtain both great runes. |
|
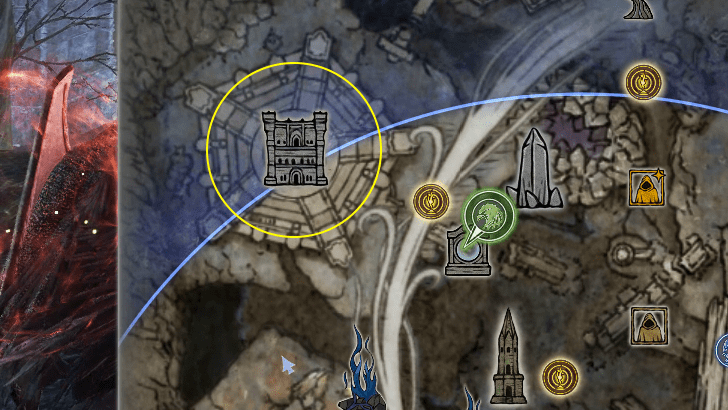
There are 2 Divine Tower POIs, one towards the northwest and one towards the southeast, that will reward the power above when you obtain their great rune at the top. This requires defeating all 3 bosses in the structure, 1 on each floor. You only need to complete and obtain the rune of 1 of the towers to get this power.
Weapon Duplication
| False Vision of a Great Rune | |
|---|---|
 |
 |
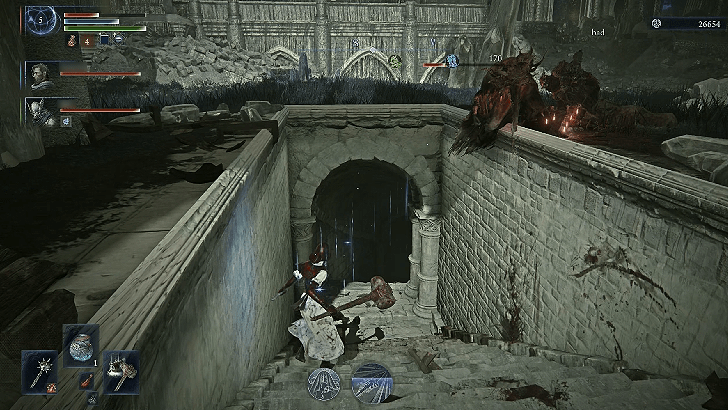
 A duplication altar can be found at the lower bottom part of the map, to the slight southwest of the giant purple crystal. Look for a staircase entrance leading to an underground tomb with an Elder Inquisitor. |
|
Similar to Noklateo, the Great Hollow will also feature a weapon duplication altar in an area beneath the east side of the map. Defeat the Elder Inquisitor guarding the underground tomb to gain access to the duplication altar.
The Great Hollow Progression Guide
| Day 1 Progression |
|---|
|
|
| Day 2 Progression |
|
|
| ⓘ Above is a recommended sample guide progression for The Great Hollow. You and your team may alter or deviate from the steps depending on your goals for the session. |
Kill the Kaiden Mercenaries at the Start of the Match

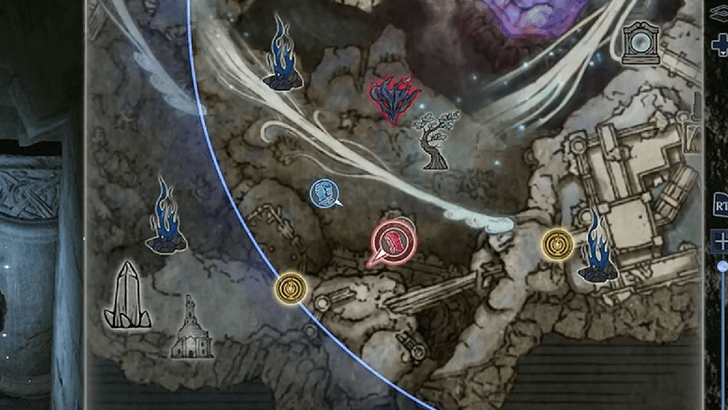
Unlike the Limveld map, the Great Hollow has a lot of unmarked POIs and bosses, requiring you to be familiar with the map if you want any sort of progression on Day 1. There are 2 distinct spawns in the Great Hollow - one to the very south of the map and another at the southwest.
If you spawn to the south, kill the enemies in the small camp for an easy level 2, then make your way west to reach the Kaiden Mercenaries. These guys will give you an easy level 3 at the start of the match. On top of that, they'll reward you with an easy-to-get blue weapon.
Avoid the Crystal-Strewn Castles During the First Day

The ruined castle areas in the southeast and northwest corners of the map both contain a crystal curse that halves your HP if you don't have the favor of the Great Hollow. To avoid wasting time, don't challenge these POIs during the first day.
Resonate with Crystals to Get the Favor of the Great Hollow
These crystals are large and can stand out when viewed from a distance, even on a Spectral Hawk.
You'll want to resonate with the 4 crystals (3 if on a solo expedition) as early as Day 1 if you plan on exploring the castle locations during Day 2. Resonating with 2~3 crystals during Day 1 is recommended, so that you'll still have enough time to complete them in Day 2.
Get at Least 2 to 3 Churches Before Night 1
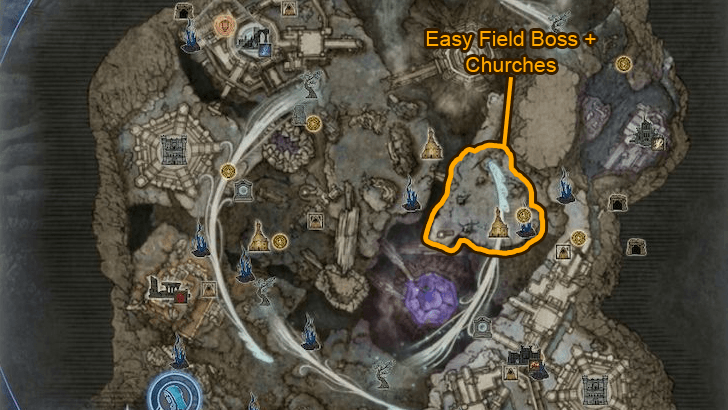
Once the first ring closes during Day 1, you'll have fewer options when it comes to POIs that you can hit to get levels. Prioritize getting flask upgrades before Night 1. Luckily, a lot of the easy-to-reach churches will usually be within the 2nd ring of Day 1, so hit them up before the Night 1 boss fight.
One of the best locations to hit early will be the large plateau to the northeast of the map. While there may not be 2 churches here all the time, the world boss that roams the area will usually be very easy to take down in a group.
Defeat the Night 1 Boss

For this fight, you'll want to be somewhere around level 6 or 7. Runs at level 5 will be doable but difficult (make sure you have flask charges to compensate). Some of the more common Night 1 bosses are:
- Curseblade and Divine Beast Warrior: Kill the Curseblade first to restore the light within the boss area. The Divine Beast Warrior will be the lightning variant from SoTE.
- Demon in Pain and Demon from Below: Focus on eliminating one to avoid getting overwhelmed when both start doing their low HP powerups.
New Night 1 Bosses in Dreglord Expedition
Upon completing the Balancers and undertaking the Dreglord expedition, you are likely to encounter new night bosses, like the ones below:
- Great Red Bear This can be tougher to deal with due to its wide sweeps, along with the inital Rune Bears you have to fight before it.
- Death Knights. Deals a lot of Lightning damage. May be much more manageable to deal with if you have a Scholar. 1st stage of the fight is only 1 Death Knight, but the following stage spawns 3 of them simultaneously.
List of All Bosses and Weaknesses
Get the Favor of the Great Hollow at the Start of Day 2

If you haven't already, make sure to secure the Favor of the Great Hollow at the start of Day 2. Once you have the blessing, it'll open up a ton of exploration options that you can challenge to get endgame purple and legendary loot.
Secure Purple or Legendary Weapons During Day 2

Day 2 is all about gearing up with good weapons (or, at least better, than your current loadout). If you don't have a decent purple yet, start hitting either of the 2 ruined castles (northwest or southeast).
These locations will have bosses and mini-bosses you can kill to get runes, decent purple weapons, power drops, and even legendaries.
Go to the Divine Tower to Challenge the Night 2 Boss
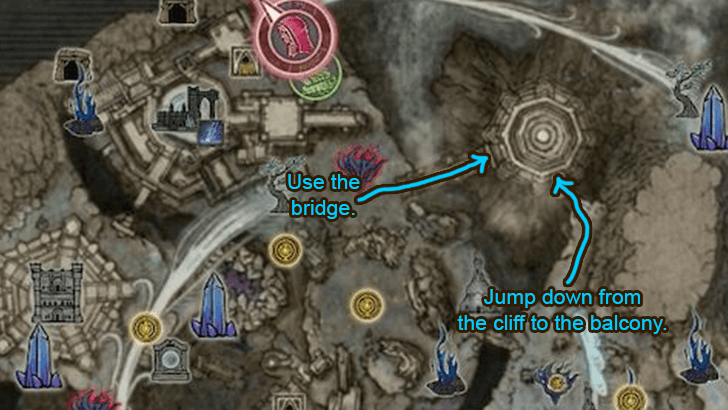
Make sure to pay attention to the location of the Night 2 Boss. The boss will always spawn inside the Divine Tower at the north of the map. There are only 2 ways to get inside, so make sure not to get caught by the ring closing when making your way to the tower.
If you're coming from the west, there will be a long bridge you can use to reach the Divine Tower. If you're coming from the east or south of the tower, you'll need to make a rather risky jump to reach the tower's balcony at its south side.
Defeat the Night 2 Boss

This fight will usually depend on the boss you fought during Night 1. Defeat whatever boss spawns to reach the Nightlord's arena.
- Lord of Blood (Mohg): Likely boss if you fought the Curseblade and Divine Beast Warrior. Heal through his Nihil move at half HP then destroy at least 2 or 3 of his blood tridents during Phase 2 to prevent getting Nihile'd to death midway through.
- Demon Prince: Guaranteed if you fought the Demon in Pain and Demon from Below.
New Night 2 Bosses in Dreglord Expedition
Upon completing the Balancers and undertaking the Dreglord expedition, you are likely to encounter new night bosses, like the ones below:
- Divine Beast Dancing Lion: This boss is capable of dealing Lightning damage, as well as spreading it across the arena.
- Knight Artorias: A fast boss with an even more aggressive second phase. Usually appears as the Night 2 boss if you face the Night 1 Great Red Bear.
Elden Ring Nightreign Related Guides

List of Shifting Earth Events
| The Crater | The Mountaintop |
| The Rotted Woods | Noklateo, the Shrouded City |
| The Great Hollow | - |
Comment
Author
The Great Hollow Guide and Crystal Locations
Rankings
- We could not find the message board you were looking for.
Gaming News


Popular Games

Genshin Impact Walkthrough & Guides Wiki
Umamusume: Pretty Derby Walkthrough & Guides Wiki
Crimson Desert Walkthrough & Guides Wiki
Monster Hunter Stories 3: Twisted Reflection Walkthrough & Guides Wiki
Honkai: Star Rail Walkthrough & Guides Wiki
Pokemon Pokopia Walkthrough & Guides Wiki
The Seven Deadly Sins: Origin Walkthrough & Guides Wiki
Wuthering Waves Walkthrough & Guides Wiki
Zenless Zone Zero Walkthrough & Guides Wiki
Arknights: Endfield Walkthrough & Guides Wiki


Recommended Games
Fire Emblem Heroes (FEH) Walkthrough & Guides Wiki
Diablo 4: Vessel of Hatred Walkthrough & Guides Wiki
Cyberpunk 2077: Ultimate Edition Walkthrough & Guides Wiki
Yu-Gi-Oh! Master Duel Walkthrough & Guides Wiki
Super Smash Bros. Ultimate Walkthrough & Guides Wiki
Pokemon Brilliant Diamond and Shining Pearl (BDSP) Walkthrough & Guides Wiki
Elden Ring Shadow of the Erdtree Walkthrough & Guides Wiki
Monster Hunter World Walkthrough & Guides Wiki
The Legend of Zelda: Tears of the Kingdom Walkthrough & Guides Wiki
Persona 3 Reload Walkthrough & Guides Wiki


All rights reserved
© 2010 - 2024 Bandai Namco Entertainment Europe S.A.S
The copyrights of videos of games used in our content and other intellectual property rights belong to the provider of the game.
The contents we provide on this site were created personally by members of the Game8 editorial department.
We refuse the right to reuse or repost content taken without our permission such as data or images to other sites.