Shield of Night Location, Stats, and Scaling
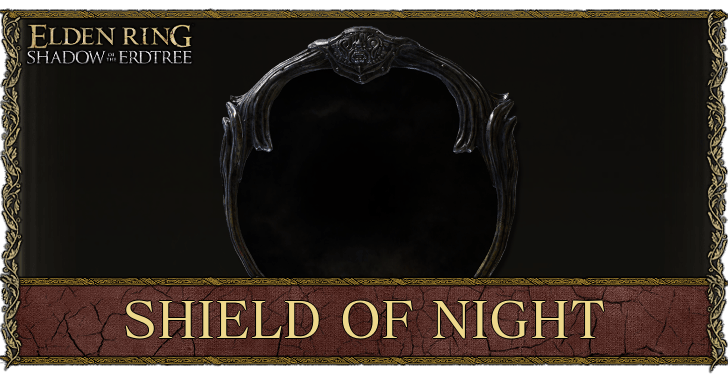
Shield of Night is a Small Shield in Elden Ring DLC Shadow of the Erdtree that scales with Dexterity and Intelligence. Read on to learn how to get the Shield of Night, as well as its location, description, upgrades, stat requirements, and best Ashes of War.
Shield of Night Location
| Note: The Shield of Night is only available if you own the Shadow of the Erdtree DLC. |
Found on a Corpse in Bonny Gaol
The Shield of Night can be looted off of a corpse inside Bonny Gaol in Gravesite Plain. The corpse will be on a ledge overlooking the area with living jars and corpses.
To reach this location, you will need to make your way to the Jar Elevator midway through the dungeon. Once you ride it to reach the lower levels, don't hop off at the bottom. Instead, wait for it to go back up to reach the highest floor of the dungeon. At the top, you can hop off and defeat a Living Jar Innard guarding the ledge with the corpse.
How to Get the Shield of Night in Bonny Gaol
| 1 | 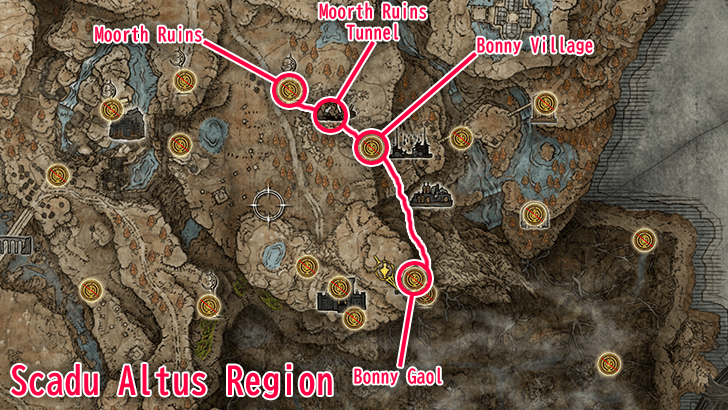 To reach Bonny Gaol, you will first need to use the tunnel underneath the Moorth Ruins in Scadu Altus to arrive in Bonny Village. From the Bonny Village site of grace, ride south across the rope bridge to reach the entrance of Bonny Gaol. |
|---|---|
| 2 | 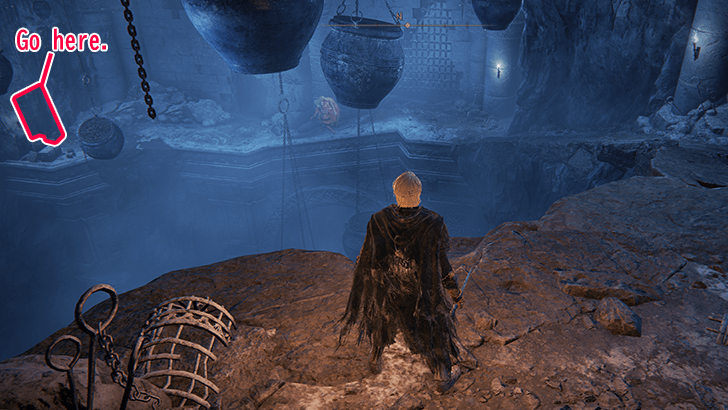 From the Bonny Gaol site of grace, head north until you reach a large area with a chasm. Across the chasm, there will be a doorway as well as a hole for you to enter. Enter the doorway and not the hole where the Jar Innard emerged from. |
| 3 | 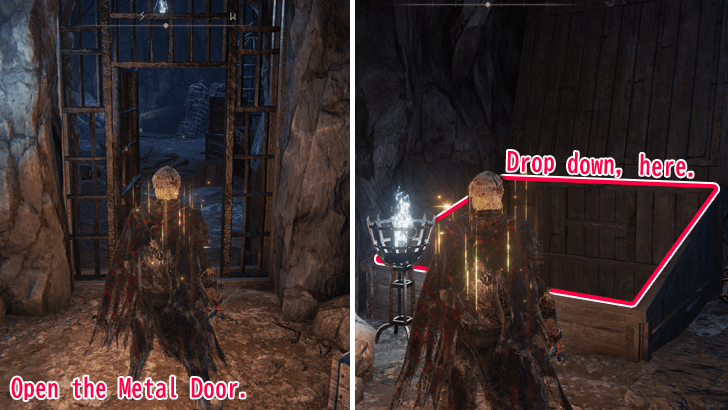 Inside this new room, open the metal door in the far end and hop into the large hole in the cell you enter (marked by the wooden box and brazier). You can avoid the enemies here since they won't follow you down. |
| 4 | 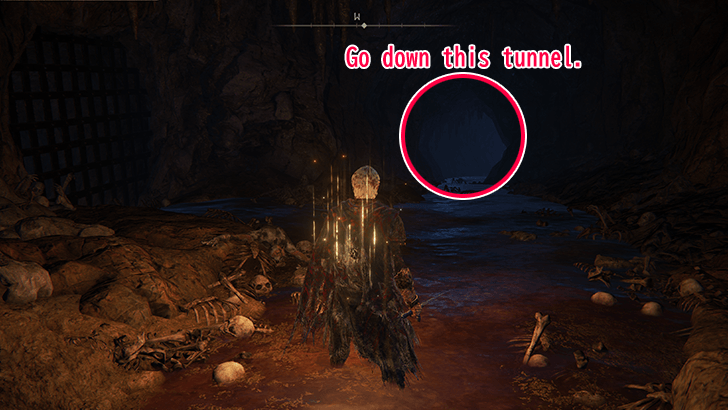 After hopping into the hole, you'll arrive at a cave system. Face west by northwest and head down this tunnel until you reach the area where a lot of slimes drop from the ceiling. |
| 5 | 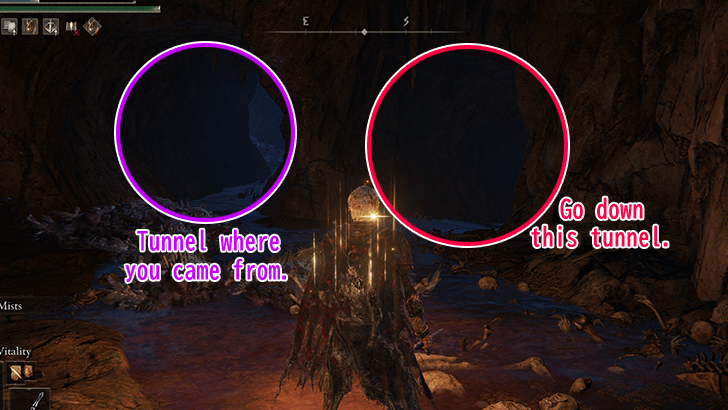 As soon as you exit into the cavern with slimes, turn around and go through the tunnel next to the one you used to enter this area (south). |
| 6 | 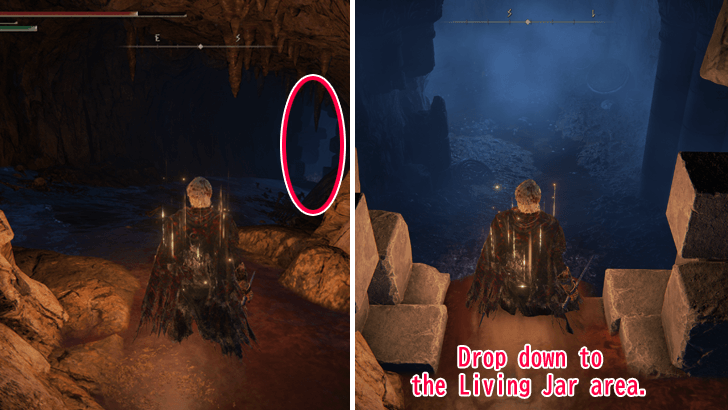 Follow this tunnel until you drop down into an area littered with corpses and Living Jars. |
| 7 | 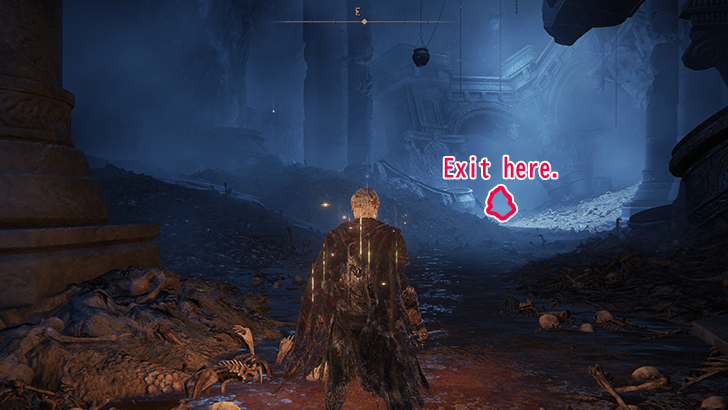 Upon arriving at the sewer with corpses and Living Jars, skip the enemies by running through the entire section and exiting via the opening in the wall at the eastern end of the large area. |
| 8 | 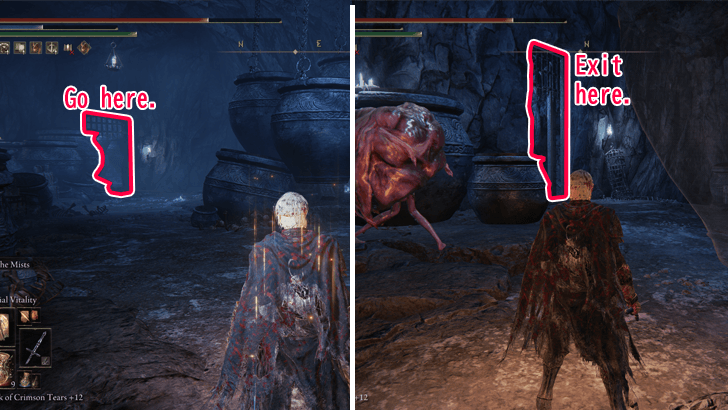 As soon as you drop down, face northeast and exit through the open doorway. You will be ambushed by at least 3 Jar Innard enemies in this area - 2 in the room you dropped into and another in the room you enter. Once all 3 are dead, exit through the northern doorway in the room where you fought the final Jar Innard. |
| 9 | 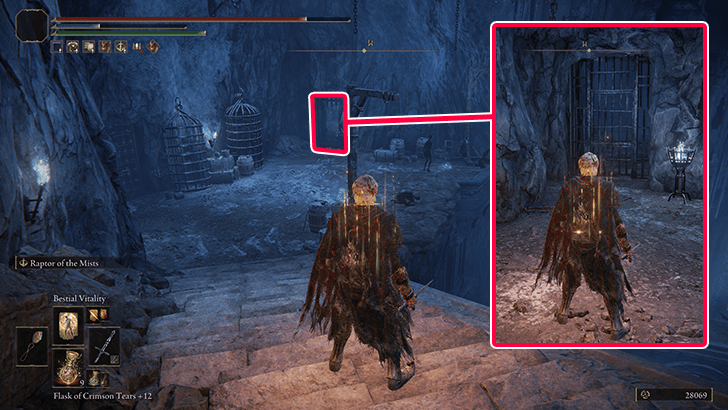 As soon as you exit, you should see the main Bonny Gaol chasm again. Look left as you exit and go through the doorway to your west. Inside, open the cell door and head into a new room with a dining table and 2 seated Shadow Beings. |
| 10 | Across this new room will be the doorway that leads to the Jar Elevator. Hop aboard and stay on it until you reach the highest level of the dungeon. At the top, hop off before the elevator starts going back down again. |
| 11 | 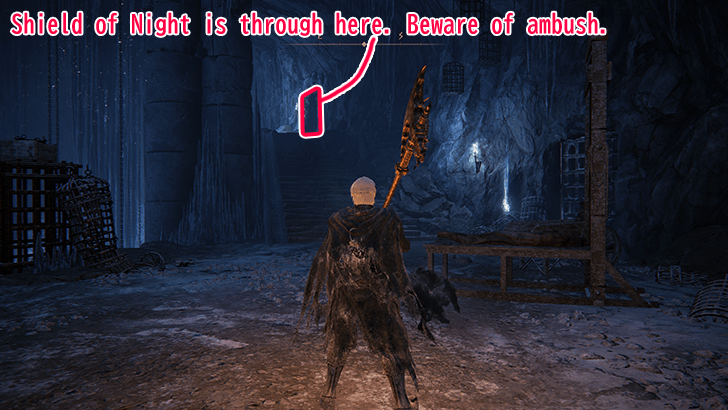 At the top, face southeast and go up the stairs. A Jar Innard will ambush you at the doorway, make sure you hug the door as close as possible to avoid getting knocked into the chasm. Defeat the Jar Innard to reach the ledge behind it. |
| 12 | 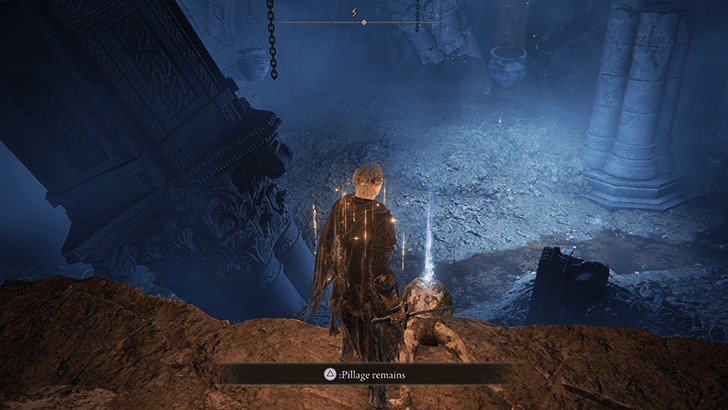 Loot the Shield of Night from the corpse on the ledge. You can continue the dungeon by dropping back down to the large area with Living Jars (Step 6) and retracing your steps back to the Jar Elevator from earlier. |
Shield of Night Description and Stats Overview
Basic Information
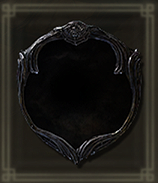 Shield of Night Shield of Night
|
Overview |
|---|---|
|
Type:
Small Shield
ATK Type: Strike Skill: Revenge of the Night Weight: 2.0 |
|
| Description | |
| A shield awarded to Swordhands of Night, cast in a bottomless black from which no light can escape. The outer surface is only semicorporeal, providing reliable defense against attacks that are not physical in nature. | |
Required Stats to Equip
| STR | DEX | INT | FAI | ARC |
|---|---|---|---|---|
| 8 | 0 | 18 | 0 | 0 |
Stat Scaling
| STR | DEX | INT | FAI | ARC |
|---|---|---|---|---|
| E | - | D | - | - |
Basic Stats
| Phys. Atk. | 78 | Phys. Def. | 55.0 |
|---|---|---|---|
| Mag. Atk. | 50 | Mag. Def. | 70.0 |
| Fire Atk. | 0 | Fire Def. | 45.0 |
| Lght. Atk. | 0 | Lght. Def. | 45.0 |
| Holy Atk. | 0 | Holy Def. | 45.0 |
| Crit. Atk. | 100 | Guard Boost | 34 |
Shield of Night Upgrades
| Jump to a Section! | ||
|---|---|---|
| Base vs. Max | Max Upgrades | Req. Materials |
Base and Max Level Comparison
| Lvl. | Phys. Dmg. | Sec. Dmg. | STR | DEX | INT | FAI | ARC |
|---|---|---|---|---|---|---|---|
| +0 | 78 |
50 MAG |
E | - | D | - | - |
| +10 | 165 | 107 MAG | - | D | - | - | - |
Max Upgrade Level in Each Affinity
| The Shield of Night is a unique weapon. It cannot be modified to have other affinities. |
Required Upgrade Materials
| Levels | Material | Quantity |
|---|---|---|
| +2 | Somber Smithing Stone 2 | (1) |
| +3 | Somber Smithing Stone 3 | (1) |
| +4 | Somber Smithing Stone 4 | (1) |
| +5 | Somber Smithing Stone 5 | (1) |
| +6 | Somber Smithing Stone 6 | (1) |
| +7 | Somber Smithing Stone 7 | (1) |
| +8 | Somber Smithing Stone 8 | (1) |
| +9 | Somber Smithing Stone 9 | (1) |
| +10 | Somber Ancient Dragon Smithing Stone | (1) |
Shield of Night requires one Somber Smithing Stone for every level to upgrade until +9. The final level at +10 requires a Somber Ancient Dragon Smithing Stone.
Somber Smithing Stones Farming Guide
Shield of Night Ashes of War
Cannot Be Infused with Ashes of War
The Shield of Night cannot be infused with a different Ash of War since it is considered a unique weapon. Weapons that are upgraded using Somber Smithing Stones are classified as unique weapons.
Elden Ring Related Guides

Weapon Guides
List of Weapons by Stat Scaling
| Strength | Dexterity | Intelligence | |||
| Faith | Arcane | ||||
List of Weapons by Damage Types
List of Weapons by Status Effects
List of Weapon Types
Comment
Author
Shield of Night Location, Stats, and Scaling
improvement survey
03/2026
improving Game8's site?

Your answers will help us to improve our website.
Note: Please be sure not to enter any kind of personal information into your response.

We hope you continue to make use of Game8.
Rankings
- We could not find the message board you were looking for.
Gaming News
Popular Games

Genshin Impact Walkthrough & Guides Wiki

Honkai: Star Rail Walkthrough & Guides Wiki

Umamusume: Pretty Derby Walkthrough & Guides Wiki

Pokemon Pokopia Walkthrough & Guides Wiki

Resident Evil Requiem (RE9) Walkthrough & Guides Wiki

Monster Hunter Wilds Walkthrough & Guides Wiki

Wuthering Waves Walkthrough & Guides Wiki

Arknights: Endfield Walkthrough & Guides Wiki

Pokemon FireRed and LeafGreen (FRLG) Walkthrough & Guides Wiki

Pokemon TCG Pocket (PTCGP) Strategies & Guides Wiki
Recommended Games

Diablo 4: Vessel of Hatred Walkthrough & Guides Wiki

Fire Emblem Heroes (FEH) Walkthrough & Guides Wiki

Yu-Gi-Oh! Master Duel Walkthrough & Guides Wiki

Super Smash Bros. Ultimate Walkthrough & Guides Wiki

Pokemon Brilliant Diamond and Shining Pearl (BDSP) Walkthrough & Guides Wiki

Elden Ring Shadow of the Erdtree Walkthrough & Guides Wiki

Monster Hunter World Walkthrough & Guides Wiki

The Legend of Zelda: Tears of the Kingdom Walkthrough & Guides Wiki

Persona 3 Reload Walkthrough & Guides Wiki

Cyberpunk 2077: Ultimate Edition Walkthrough & Guides Wiki
All rights reserved
ELDEN RING™ & ©BANDAI NAMCO Entertainment Inc. / ©2021 FromSoftware, Inc.
The copyrights of videos of games used in our content and other intellectual property rights belong to the provider of the game.
The contents we provide on this site were created personally by members of the Game8 editorial department.
We refuse the right to reuse or repost content taken without our permission such as data or images to other sites.


![Everwind Review [Early Access] | The Shaky First Step to A Very Long Journey](https://img.game8.co/4440226/ab079b1153298a042633dd1ef51e878e.png/thumb)

![Monster Hunter Stories 3 Review [First Impressions] | Simply Rejuvenating](https://img.game8.co/4438641/2a31b7702bd70e78ec8efd24661dacda.jpeg/thumb)


