This survey will take about 1 minute.
Your answers will help us to improve our website.
FF7 Rebirth
Ironclad Hard Mode Guide
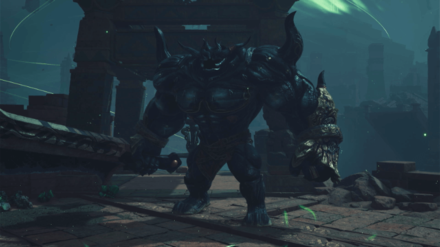
Ironclad is an Artificial Enemy from Final Fantasy 7 Rebirth (FF7 Rebirth). Read on to learn how to beat Ironclad on Hard Mode, how to pressure and stagger it, as well as its weaknesses, resistances, immunities, drops, and location.
List of Contents
Ironclad Overview
Ironclad Basic Information
| 169. Ironclad | ||
|---|---|---|
 Iron giants created by the Cetra with both constructive and combative capabilities in mind. So long as a steady supply of lifestream energy is available, they will always stand back up when knocked dowm. |
||
| Areas | Species | Movement |
| Temple of the Ancients | Artificial | Grounded |
Ironclad Weaknesses and Resistances
| Weaknesses | Normal:
Staggered: - |
|---|---|
| Resistances | Lesser:
Greater: - Staggered: - |
| Immunities | Normal:
Staggered: - |
| Absorbs | Normal: - |
Ironclad Droppable Items
| Drops | Common:
Astral Remnant
Rare: None |
|---|---|
| Ability Yield | Steal:
Astral Remnant
Morph: None |
Ironclad Abilities
| Abilities |
・Condemned ・Grand Sword ・Firaga ・Graviga ・Thanatosian Blade ・Crush ・Sharpen |
|---|
How to Pressure and Stagger Ironclad
| How to Pressure Ironclad |
|---|
| After a certain amount of time, they will use Sharpen and become pressured. If not staggered soon afterward, they will unleash a powerful attack. |
Wait for Ironclad to Use Sharpen
You can't pressure Ironclad yourself, and you'll need to wait for it to use Sharpen and automatically pressure yourself. Save your ATB Charges when you can so that you can raise its Stagger Meter as soon as it uses this move.
How to Beat Ironclad on Hard Mode
| Ironclad Hard Mode Tips |
|---|
| Best Hard Mode Builds for Ironclad |
|
|
Ironclad Hard Mode Builds
| These Hard Mode builds use equipment that are at least Weapon Level 8. If you don't have enough Materia slots or the right Weapon Skills to complete a character's setup, consider using a different weapon or collect all of their Manuscripts first. |
Tifa
Cloud
Barret
 Tifa Tifa Main DPS | |||||
| Weapon | Armor | ||||
|---|---|---|---|---|---|
| Dragon Claws | Cetran Bracer | ||||
| Accessory | Summon Materia | ||||
| Enhanced Expeditionary Medal | Odin | ||||
| Weapon Materia | Armor Materia | ||||
| Weapon Skills | |||||
 Cloud Cloud Secondary DPS | |||||
| Weapon | Armor | ||||
|---|---|---|---|---|---|
| Sleek Saber | Valkyrian Bangle | ||||
| Accessory | Summon Materia | ||||
| Transference Module | Gilgamesh | ||||
| Weapon Materia | Armor Materia | ||||
| Weapon Skills | |||||
You can replace Cloud's accessory with a Gotterdammerung if you have it.
 Barret Barret Support | |||||
| Weapon | Armor | ||||
|---|---|---|---|---|---|
| Barrage Blaster | Cetran Armlet | ||||
| Accessory | Summon Materia | ||||
| Enhanced Karmic Cowl | Kujata | ||||
| Weapon Materia | Armor Materia | ||||
| Weapon Skills | |||||
Activate Plasma Discharge Immediately
Have Tifa activate Plasma Discharge as soon as the fight starts so that you can exploit the Ironclad's Lightning weakness without having to cast any Thunder spells or equipping Elemental-Lightning on your weapon.
Unlocked by Beating Biological Intel: Blinded by Light
Do note that you'll need to unlock this ability for the Enemy Skill Materia by beating the Biological Intel: Blinded by Light challenge in the Combat Simulator. If ever you haven't beat it yet, check out our guide for it below!
How to Beat Biological Intel: Blinded by Light
Cast Barrier Materia Spells
Since the Ironclad's attacks deal Physical damage, barring Firaga and Graviga, you'll want to have the Barrier buff active to halve the damage of its attacks. Cast this buff when you can to minimize its damage output.
Counter Graviga with Manawall
Graviga will always bring a character down to 1 HP, and the only way to counter this is by having the Manaward buff active. Make sure that you cast Manawall when it uses this move so that you can weaken Graviga's effect while also applying the generally great Barrier buff.
Use Barret's Lifesaver

Have Barret use Lifesaver as soon as he can so that he can redirect Ironclad's damage towards himself. This way you can focus all of your healing towards Barret, and you can save MP and ATB Charges by having him use Chakra instead of having to cast Cure spells.
Spam Focused Abilities Once Pressured
| Abilities That Increase the Stagger Meter | |
|---|---|
| Cloud | Focused Thrust |
| Barret | Focused Shot / Bonus Round |
| Tifa | Focused Strike |
Try to save your ATB Charges for when Ironclad uses Sharpen and automatically pressures itself. Once it uses this move, you'll want to stagger it as soon as possible so that you can stop it from using Thanatosian Blade.
Dodge Condemned and Thanatosian Blade
Make sure that you dodge the Ironclad's Condemned and Thanatosian Blade attacks since these attacks can outright kill you if you're not prepared. Thanatosian Blade is also guaranteed to deal 9999 damage regardless of a character's defense or buffs.
Save Your Limit Breaks to Make Yourself Immune to Damage
In case you can't dodge away from these attacks, you can use a Limit Break to make a character immune to damage. Try to save them for situations like these instead of using them to maximize your damage output.
Add Elemental-Fire to Your Armor
If you're struggling to defeat the Ironclad, you can replace some of your Materia with Elemental-Fire on your Armor. This makes Firaga heal you if your Elemental is maxed out.
Ironclad Location
| Primary Region | |
|---|---|
| Northwood | |
| Map Location | World Location | 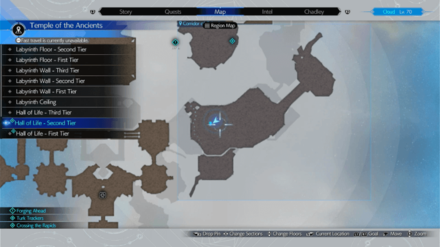 |
 |
| The Ironclad can be encountered in Temple of the Ancients in Chapter 13. | |
FF7 Rebirth Related Guides

Boss Fight Guide and List of All Bosses
Story Bosses
| All Major Story Bosses | |
|---|---|
| Chapter 1 | Materia Guardian |
| Chapter 2 | Midgardsormr |
| Chapter 3 |
Rude and Elena Mythril Golem |
| Chapter 4 |
Terror of the Deep Roche |
| Chapter 5 | Jenova Emergent |
| Chapter 6 | Grasptropod |
| Chapter 7 |
Custom Valkyrie Gigatrice |
| Chapter 8 |
Dyne Anuran Suppressor |
| Chapter 9 |
Specimen H1024 Crimson Mare Mk. II |
| Chapter 10 | Gi Nattak |
| Chapter 11 |
Diabolic Variant Yin and Yang Forgotten Specimen Galian Beast Roche |
| Chapter 12 |
Abzu Rude and Elena Rufus |
| Chapter 13 |
Red Dragon Ironclad Reno and Rude Tseng and Elena Moss-Grown Adamantoise Demon Gate |
| Chapter 14 |
Jenova Lifeclinger Sephiroth Reborn |
Optional Bosses
| Grasslands | |
|---|---|
| Summon | Titan |
| Classified Intel | Quetzalcoatl |
| Side Quests |
White Terror |
| Junon | |
| Summon | Phoenix |
| Classified Intel | Mindflayer |
| Side Quests |
White Mousse Hell Rider II Sandstorm Drake |
| Corel | |
| Summon | Alexander |
| Classified Intel | Tonberry King |
| Side Quests |
Dark Claw Joker |
| Minigame | Test 0 |
| Gongaga | |
| Summon | Kujata |
| Classified Intel | Great Malboro |
| Side Quests |
Levridon Mastodon Gorgon Mane Gigantoad |
| Cosmo Canyon | |
| Summon | Bahamut Arisen |
| Classified Intel | Jabberwock |
| Side Quests | Irasceros Gigaworm |
| Nibel | |
| Summon | Odin |
| Classified Intel | King Zu |
| Side Quests |
Queen Bee Dranabarga |
| Meridian Ocean | |
| Gilgamesh's Island |
Gilgamesh Titan and Bahamut Arisen Phoenix and Kujata Alexander and Odin |
| Pirate King's Treasure |
Ogre Raider Brineborn Demon Hueyacoatl Sea Dragon |
Comment
Author

Ironclad Hard Mode Guide
Please participate in our site
improvement survey
02/2026
improvement survey
02/2026
Would you assist in
improving Game8's site?
improving Game8's site?

×
We are listening to our users' valuable opinions and discussing how to act on them.
The information collected through this survey will be used for the purpose of improving our services. In addition, the information will only be disclosed a part of a statistic in a format that will not allow identification of personal information.
Begin Survey
Not Now
×
Please rate each item regarding Game8.co's Advertisements.
Amount of Ads
Very Dissatisfied
Somewhat Dissatisfied
Fine
Somewhat Satisfied
Highly Satisfied
Placement of Ads
Timing of Ad Display
Ad Loading Speed
Safeness of Ads
Content of Ads
×
Please rate each item regarding Game8.co's Quality of Articles.
Amount of information
Very Dissatisfied
Somewhat Dissatisfied
Fine
Somewhat Satisfied
Highly Satisfied
Frequency of updates
Speed of new information
Accuracy of articles
Understandibility of articles
Readability of sentences
×
Please rate each item regarding Game8.co's Usability of the Site.
Ease of finding information
Very Dissatisfied
Somewhat Dissatisfied
Fine
Somewhat Satisfied
Highly Satisfied
Loading Speed
Use of Color
Font Size
Visibility of Images
Easy to Understand Layout
×
Please rate each item regarding Game8.co's Message Boards, Comments.
Ease of Writing
Very Dissatisfied
Somewhat Dissatisfied
Fine
Somewhat Satisfied
Highly Satisfied
Readability
Ease in Finding Information
Comment Quality
Comment Quantity
Admin Response
×
Please rate each item regarding Game8.co's Site's new design.
Please rate our site's new design
Very Dissatisfied
Somewhat Dissatisfied
Fine
Somewhat Satisfied
Highly Satisfied
Do you think that the website's design change makes the site easier to use?
Has the new design made it easier for you to find information on the site?
Has the new design improved the overall visual appeal of the site?
How would you rate your overall satisfaction with the new design of the site?
×
How likely are you to recommend Game8 to someone you know?
Very Unlikely
0
1
2
3
4
5
6
7
8
9
10
Very Likely
If you have other opinions regarding potential improvement to the website, please share them with us. We would appreciate your honest opinion.
Note: This is a free response section, so you can proceed without entering anything.
Note: Please be sure not to enter any kind of personal information into your response.
Note: Please be sure not to enter any kind of personal information into your response.
×
Thank You
×
Thank you for participating in our survey! Your answers will help us to improve the quality of our website and services.
We hope you continue to make use of Game8.
We hope you continue to make use of Game8.
Close
Rankings
- We could not find the message board you were looking for.
Gaming News


Popular Games

Genshin Impact Walkthrough & Guides Wiki
Arknights: Endfield Walkthrough & Guides Wiki
Umamusume: Pretty Derby Walkthrough & Guides Wiki
Pokemon TCG Pocket (PTCGP) Strategies & Guides Wiki
Wuthering Waves Walkthrough & Guides Wiki
Honkai: Star Rail Walkthrough & Guides Wiki
Zenless Zone Zero Walkthrough & Guides Wiki
Where Winds Meet Walkthrough & Guides Wiki
Clair Obscur: Expedition 33 Walkthrough & Guides Wiki
Pokemon Legends: Z-A Walkthrough & Guides Wiki


Recommended Games
Fire Emblem Heroes (FEH) Walkthrough & Guides Wiki
Diablo 4: Vessel of Hatred Walkthrough & Guides Wiki
Super Smash Bros. Ultimate Walkthrough & Guides Wiki
Yu-Gi-Oh! Master Duel Walkthrough & Guides Wiki
Pokemon Brilliant Diamond and Shining Pearl (BDSP) Walkthrough & Guides Wiki
Elden Ring Shadow of the Erdtree Walkthrough & Guides Wiki
Monster Hunter World Walkthrough & Guides Wiki
The Legend of Zelda: Tears of the Kingdom Walkthrough & Guides Wiki
Persona 3 Reload Walkthrough & Guides Wiki
Cyberpunk 2077: Ultimate Edition Walkthrough & Guides Wiki


All rights reserved
© SQUARE ENIX CO., LTD. All Rights Reserved.
CHARACTER DESIGN: TETSUYA NOMURA/ROBERTO FERRARI
LOGO ILLUSTRATION: © 1997 YOSHITAKA AMANO
The copyrights of videos of games used in our content and other intellectual property rights belong to the provider of the game.
The contents we provide on this site were created personally by members of the Game8 editorial department.
We refuse the right to reuse or repost content taken without our permission such as data or images to other sites.