
This survey will take about 1 minute.
Your answers will help us to improve our website.
FF7 Rebirth
Chapter 13: Where Angels Fear to Tread Walkthrough
A walkthrough for Chapter 13: Where Angels Fear to Tread in Final Fantasy 7 Rebirth (FF7 Rebirth). Read on for a detailed guide of Chapter 13, including item locations, rewards, bosses, as well as useful tips for completing this chapter!
| ◄ Previous Chapter | Next Chapter ▶ |
|---|---|
|
Chapter 12 A Golden Key |
Chapter 14 End of the World |
List of Contents
Chapter 13: Where Angels Fear to Tread Walkthrough
| Chapter 13 Main Objectives | |
|---|---|
| 1 | Reaching the Northern Continent |
| 2 |
Forgotten Temple Labyrinth ┗ Boss Battle: Red Dragon |
| 3 | Cloud, Tifa, Barret Part 1 |
| 4 | Aerith, Red XIII, Yuffie Part 1 |
| 5 |
Cloud, Tifa, Barret Part 2 ┗ Boss Battle: Ironclad ┗ Boss Battle: Reno and Rude |
| 6 | Aerith, Red XIII, Yuffie Part 2 ┗ Boss Battle: Elena and Tseng |
| 7 |
Finding the Black Materia ┗ Boss Battle: Moss-Grown Adamantoise ┗ Boss Battle: Demon Gate |
Click on any of the links above to jump to the section!
Reaching the Northern Continent Walkthrough
| Objectives | |
|---|---|
| 1 | After arriving at the Costa del Sol port, board the Tiny Bronco and start heading to the Northern Continent. Simply hugging the western coastline and progressing as far north as you can go in the water will get you there. Once you start seeing the Shinra helicopters, you'll know you're on the right track. |
| 2 | 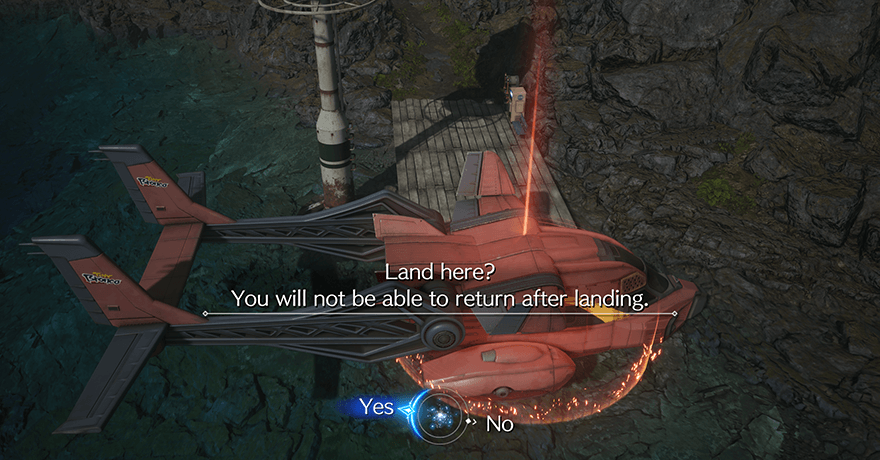 After the cutscene with Rufus, Hojo, and Turks ends, continue towards the temple you see in the distance. Park the Tiny Bronco at the dock as soon as you're ready. Warning: Choosing to dock is the Point of No Return, so either complete all the side content you want to now, or wait until after you finish the game and return to this point with Chapter Select. |
| 3 | Once docked, make your way to the temple entrance to trigger a cutscene with Aerith. |
Prepare Your Entire Party Using the Nearby Bench and Vending Machines
This entire chapter will be non-stop fighting, boss battles, and party split-ups that will test your experience using each of the 6 characters. Make sure to resupply on items, get better armor, and spend SP on Folios before you start tackling the temple proper.
Best Builds for Each Character
Forgotten Temple Labyrinth Walkthrough
| Objectives | |
|---|---|
| 1 | After the cutscene ends, fight your way through waves of Shinra soldiers guarding the temple. On top of regular troops, you'll also have to fight SOLDIERs that have access to powerful gravity spells. Tip: Magnify + Fire works wonders against the groups of Shinra soldiers. |
| 2 | When you're done dealing with the Shinra soldiers, make your way to the massive entrance of the Forgotten Temple to trigger the next cutscene.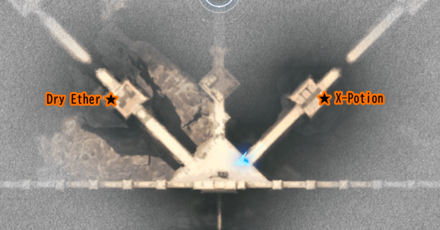 |
| 3 | Once the cutscene ends, go up the steps and enter the Union Room of the Temple of the Ancients. Deal with the Shinra guards in the next room before heading into the Labyrinth. |
| 4 | The Labyrinth is a massive area that requires you to solve gravity-shifting puzzles in order to progress. Your first stop will be the Rubystar Chamber. To begin, take the path east until you encounter 2 Blight Frogs and a Cthonilizard. Defeat them to access the way forward. |
| 5 |  Head up the steps and into the Rubystar Chamber - Floor area. Interact with the green cube and shift gravity, rotating until the glowing green arrow is pointing up. Press X to reach Rubystar Chamber - Ceiling. |
| 6 | After the gravity shift, head outside and down the steps. Defeat the 2 Ancient Dragons waiting for you before proceeding northeast until you reach a gap with a vine wall. |
| 7 | 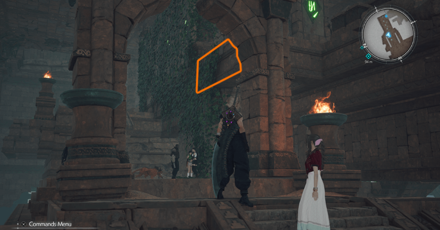 Climb the vine wall. However, instead of going east, head directly up the wall to reach a hidden ledge. The purple chest should contain Cloud's final available weapon - the |
| 8 | Return to the vine wall, this time heading east to cross the gap. Once across, you should be able to reach the Jadestar Chamber - Ceiling area. |
| 9 | 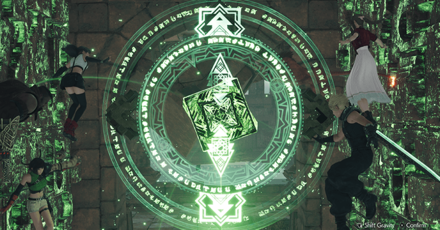 Inside the Jadestar Chamber, activate and rotate the green cube until the glowing green arrow is pointing down. Hit X to reach Jadestar Chamber - Floor. |
| 10 | After shifting gravity, head outside and go north. Defeat the 2 Cthonilizards and the Ancient Dragon waiting for you along the way. Once you reach the area overlooking a large beam of the Lifestream, turn east and start making your way towards the set of steps leading up to the Azurestar Chamber - Floor. |
| 11 |  There are 3 possible gravity shifts in Azurestar Chamber - Floor. To begin, rotate the green cube until the glowing green arrow is pointing up. Press X to reach Azurestar Chamber - Ceiling. Loot the yellow chest to get a |
| 12 | 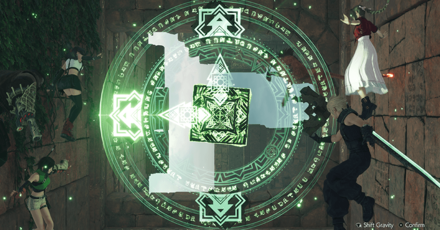 Next, interact with the green cube again. This time, rotate until the glowing green arrow is pointing left. Press X to reach Azurestar Chamber - Wall. |
| 13 | From Azurestar Chamber - Wall, climb up two sets of vine walls to reach the upper level of the area. Go to the opposite end of the large courtyard and defeat the 2-C SOLDIER, Security Officer, and 2 Riot Troopers guarding the other side. |
| 14 |  Once the area is clear of enemies, drag the dark green box underneath the vines. This should help you climb up to reach the waterfall area at the center of the courtyard. |
| 15 | At the top, watch two Shinra troopers jump down the waterfall. Before you follow after them, go to the area behind where they were to loot a chest with a |
| 16 | Once the potion is looted, jump down after the Shinra troopers to reach the Ablutionary Font. Climb up the steps directly in front of you and turn left. Defeat the 2 Cthonilizards and Blight Frog waiting for you. Chunk of Mythril Ore: Found in a yellow chest behind the Ablutionary Font. |
| 17 | Once the enemies are defeated, head west and you should reach 2 new chambers called the Mauvestar Chamber - Wall (purple) and the Amberstar Chamber - Wall (yellow). |
| 18 | 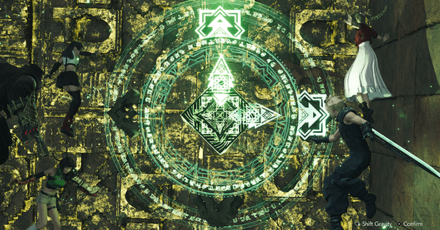 To begin, head inside Amberstar Chamber - Wall and rotate the green cube until the glowing green arrow is pointing up. Press X to shift gravity and reach Amberstar Chamber - Floor. |
| 19 | Upon arriving, exit the chamber and head up the stairs to your left. Defeat the 2 Ancient Dragons waiting for you. Once defeated, head up to the highest level and pick up the |
| 20 |  After securing the rare materia, return to Amberstar Chamber - Floor and rotate the green cube until the glowing green arrow is pointed right. Press X to return to Amberstar Chamber - Wall. |
| 21 | 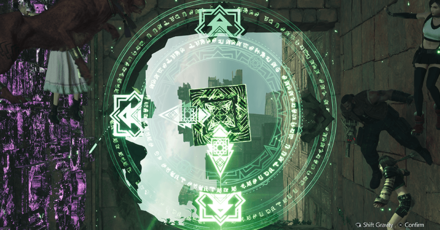 Next, head over to Mauvestar Chamber - Wall and rotate the green cube until the glowing green arrow is facing down. Press X to reach Mauvestar Chamber - Floor. |
| 22 | From Mauvestar Chamber - Floor, use the vine wall to climb to the top. Ascend and defeat the Ancient Dragon waiting for you. Open the yellow chest to get a |
| 23 | 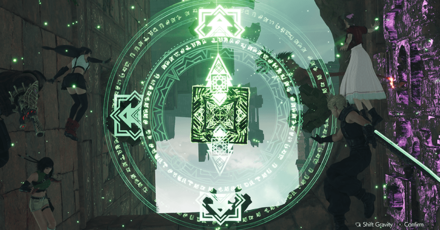 Return to Mauvestar Chamber - Floor and interact with the green cube. Rotate it until the glowing green arrow is facing up. Press X to reach Mauvestar Chamber - Ceiling. |
| 24 | From the Mauvestar Chamber - Ceiling, head outside and down the steps towards the group of Shinra troopers. Defeat them to reach the Shrine of Ephemerality. Inside, make sure to rest up and prepare for the coming boss fight at the bench and vending machines. Tip: The Red Dragon will be weak to Ice. If you don't already have it equipped, make sure to slot in a high-level
|
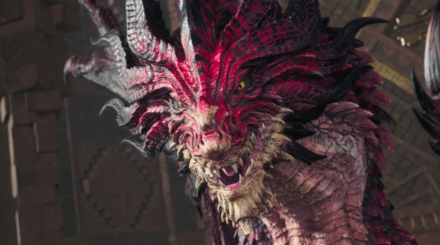
| 25 |  When ready, head inside the next room to fight the Red Dragon. Defeat it to reach the Path of Guidance. ┗ Recommended Party for Red Dragon ▶︎ How to Beat Red Dragon Tip: During Phase 2, make sure to target the Chest first since it will heavily nerf its room-wide breath attack. |
| 26 | With the Red Dragon defeated, head down the Path of Guidance and interact with the glowing pedestal. Doing so will take you to the Hall of Life. Watch the cutscene here and prepare for the group to get split up. |
Cloud, Tifa, Barret Part 1 Walkthrough
| Objectives | |
|---|---|
| 1 | Once the cutscene ends, you'll be made to control a party made up of Cloud, Tifa, and Barret. Begin by heading west until you encounter a swarm of Berserker Bees. Defeat them to progress. Tip: This next section will have you swap between two different parties multiple times. To make Materia transfers between parties easier, you can use the Set for All feature in the equipment screen to easily move all Materia from one character to another. |
| 2 | Next, head north and enter the circular building. Exit through the other side to come face-to-face with Shinra troops. Defeat the 2 Riot Troopers and the Type G Slug-Ray to clear the path forward. |
| 3 | Go over the low wall and make your way down the stairs to the lower level of the Corridor of Currents. After the first flight of stairs, the staircase will collapse. Use the vines to continue the climb down.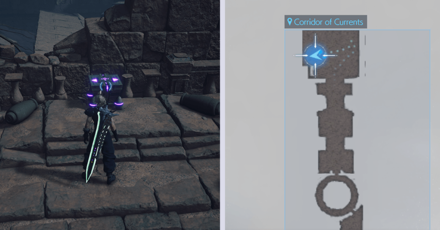 |
| 4 | After reaching the lower level. Follow along the outside ledge of the floating tower until you reach an area with 2 Cthonilizards and a swarm of Berserker Bees. Defeat them to reach the wind corridor puzzle on the side. Chunk of Cosmotite Ore: Found in an open area west of where you fought the Cthonilizards. Defeat the 2 Blight Frogs and swarm of Berserker Bees guarding it to access the chest. |
| 5 | Corridor of Crucibles In this next section, you will need to avoid getting hit by the wind currents. Wait for the wind to stop before crossing over to the first safe area. |
| 6 |  Once you reach the second wind current, wait for it to stop before turning left and heading into a small alcove that contains a large cube. Drag it using L2 to block off the third wind current. |
| 7 | With the third wind current blocked, backtrack to the main corridor and go to the very end. Defeat the Ancient Dragon and Berserker Bees waiting for you on the other side. |
| 8 | After dealing with the monsters, look for a nearby vine wall you can climb. Use it to reach the upper level of the circular tower and defeat the patrolling Special Forces Operator and Type G Slug-Ray. |
| 9 | Next, exit through the east door and follow the circular corridor until you reach another long, open walkway. When it starts to collapse, run and follow after Barret and Tifa to make it to the other side safely. |
| 10 | Similar to the previous tower, follow this circular corridor and exit at the north side. Enter the building directly in front of you to progress. |
| 11 | Inside the building, you'll come face-to-face with 3 2-C SOLDIER Operators. Defeat them to trigger a cutscene between your party and the Turks. |
Aerith, Red XIII, Yuffie Part 1 Walkthrough
| Objectives | |
|---|---|
| 1 | This next section will have you playing as Aerith, Red XIII, and Yuffie. During this segment, Aerith gets a new mechanic, allowing her to absorb Lifestream Fragments and using them to activate Vessels of Life. Doing so opens new paths forward for the party. ▶ How to Get Lifestream Fragments |
| 2 | To begin, head through the door in front of you. Interact with the green mako pool inside to absorb Lifestream Fragments. Use it to activate the Vessel of Life floating above the room's ruined section of wall. |
| 3 | 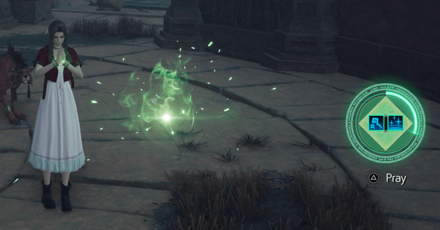 Mercy's Vessels With the path stabilized, proceed forward and defeat the Blight Frog and Panthera Protector in the next area. Absorb their Lifestream Fragments by holding down Triangle. Make sure to explore the area further to get more fragments from the surroundings as well as from breaking blue crystals you find. |
| 4 | 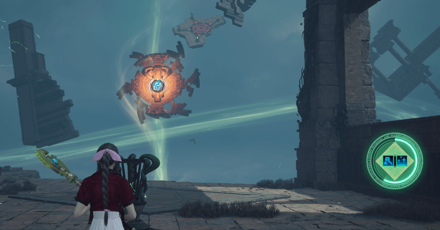 Once you have the Lifestream Fragment meter filled up more than halfway, head to the red runic circle. Face west and activate the Vessel of Life to pave the way forward. Note: If you collected enough Lifestream Fragments, you can face east and use what's left of it to re-assemble the tower containing a yellow chest with a
|
| 5 | Head inside the newly assembled tower and use the stairs to go down. At the bottom floor, break the crystal beneath the stairs and absorb its Lifestream Fragment. |
| 6 | Next, defeat the Ancient Dragon waiting outside and absorb its Lifestream Fragment. Once it's down, go around the area, and absorb the Lifestream Fragments floating in the air. Destroy and absorb any blue crystals along the way as well. |
| 7 | Order's Vessels This next puzzle will have you activating 5 different Vessels of Life. To start, deposit the Life Fragments you currently have to activate the Vessel to the east. It should reassemble a platform that has more Lifestream Fragments for you to absorb. |
| 8 | Next, return to the red runic circle and face west. Deposit your Lifestream Fragments until you reassemble a large temple structure. |
| 9 | Head inside the temple and defeat the 4 Blight Frogs waiting for you. Absorb their Lifestream Fragments as well as those of the blue crystals in the area, afterward. |
| 10 | With what you have, you should be able to activate the south Vessel of Life. After it reassembles the new structure, head inside. |
| 11 | Defeat the Floating Death, 2 Cthonilizards, and the Kelzmelzer waiting for you inside, and destroy any blue crystals you find along the way. Absorb their Lifestream Fragments to get a huge boost. Sapphire: Found inside a chest behind the broken wall of the room where you fought the Floating Death.
|
| 12 | Once you've collected all the Lifestream Fragments from this area, head back to the runic circle and face southeast. Deposit what you have to reassemble the tower you couldn't pass through before. |
| 13 | Defeat the 2 Ancient Dragons waiting for you at the tower and absorb their Lifestream Fragments. Keep exploring the area, destroying and absorbing blue crystals to get enough fragments for the final vessel. At the top of this tower is the previously inaccesible chest. Open it to get the |
| 14 | Once you have the Lifestream meter half filled, head back to the red runic circle and face north. Deposit what you have into the last Vessel of Life to assemble the way forward and complete Aerith's part 1. |
How to Get Lifestream Fragments
There are a total of 3 ways to get Lifestream Fragments during the sections where you play as Aerith, Yuffie, and Red XIII. You can either destroy blue crystals, defeat enemies, or find them lingering in the air.
If you find yourself short of fragments, keep exploring the area since some enemies and blue crystals will be hidden away, prompting you to go look for them if you want to access all the locked areas before moving on.
Cloud, Tifa, Barret Part 2 Walkthrough
| Objectives | |
|---|---|
| 1 | Once you switch back to Cloud, Tifa, and Barret, you'll immediately be thrown into a fight. Defeat the Panthera Protector and Blight Frog that spawns before continuing. |
| 2 | Next, head outside and watch a cutscene showing the direction the Turks are headed. Rest at a nearby bench before fighting the 3 Cthonilizards nearby. |
| 3 | 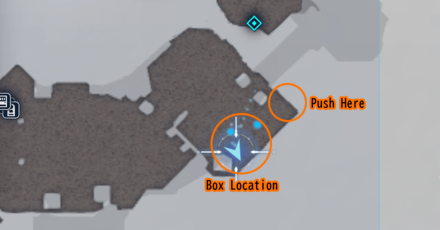 After dealing with the overgrown lizards, continue through the ruined corridor until you encounter 3 Shinra troopers. After watching them get swept away, look left to see a box you can drag. Push it over the eastern edge of this area to create a bridge for you to cross. |
| 4 | Continue forward across the gap to trigger a short cutscene. For this next section, you'll need to secure debris to create a bridge large enough for you to cross the next gap. |
| 5 | 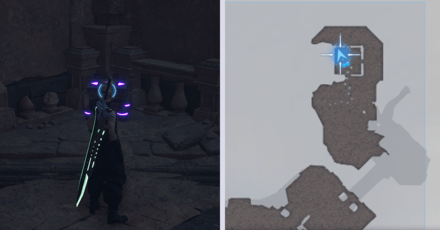 Begin by heading into the tower at the end of the path. Open the purple chest inside to get the |
| 6 | Once you have the new weapon, exit the tower then head up stairs to your east. Defeat the 2 Kelzmelzers waiting for you at the top. |
| 7 | Go southwest and look for a box you can drag. Push it across the northwest ledge to create the first part of the bridge. |
| 8 |  The Looming Monument Next, head up to the very top of the steps. You'll set your sights on a tower with a box on top. Approach it to find a contraption you can turn by pushing. Push it counterclockwise to fill up the vessel and activate the tower. |
| 9 |  Before you can topple the tower, an Ironclad mini-boss will appear. Stagger it to topple the tower and gain access to the box. ▶︎How to Beat Ironclad Tip: After a certain amount of time, the Ironclad will use a move called Sharpen. This pushes them into a pressured state, allowing you to build up the meter towards a stagger. |
| 10 | After a hard-fought battle, you should now have access to the moveable box. Push it over the northern edge to complete the makeshift bridge. |
| 11 | With the path forward set, head back to the building where you got Battle Cry and use it to cross the gap. |
| 12 | After arriving at the other side, turn right and make your way north. Open the chest at the end to get a |
| 13 | Once the enemies are dealt with head up the stairs and use the bench and vending machines you find to rest and resupply. Prepare for the upcoming boss fight against Reno and Rude. Tip: Reno is weak to Fire and Rude is weak to Wind. Slot Fire and Wind materia before the fight to easily deal damage with spare ATB charges during the fight. |
| 14 | When ready, head west along the platform and use the jump-down to your left to reach Reno and Rude. |
| 15 | At the start, you will team up with the Turks to defeat a collection of Cthonilizards and Blight Frogs. Once defeated, the temporary truce will cease, immediately placing you into a boss fight against the two Turks. |
| 16 |  Defeat Reno and Rude to conclude part 2 of Cloud's segment. ┗ Recommended Party for Reno and Rude ▶︎ How to Beat Reno and Rude |
Aerith, Red XIII, Yuffie Part 2 Walkthrough
| Objectives | |
|---|---|
| 1 | As soon as you switch back to Aerith, Red XIII, and Yuffie, head north towards the building you most recently assembled. Defeat the Ancient Dragon guarding the entrance and absorb its Lifestream Fragment to proceed. |
| 2 | Upon opening the door, a cutscene will trigger. Once it ends, destroy the blue crystals to your left to get more fragments. Rest and resupply at the bench nearby before continuing. |
| 3 | When ready, go east into a small building with a large Lifestream Fragment at the center. Absorb it to get enough for the red runic circle you saw earlier. |
| 4 | 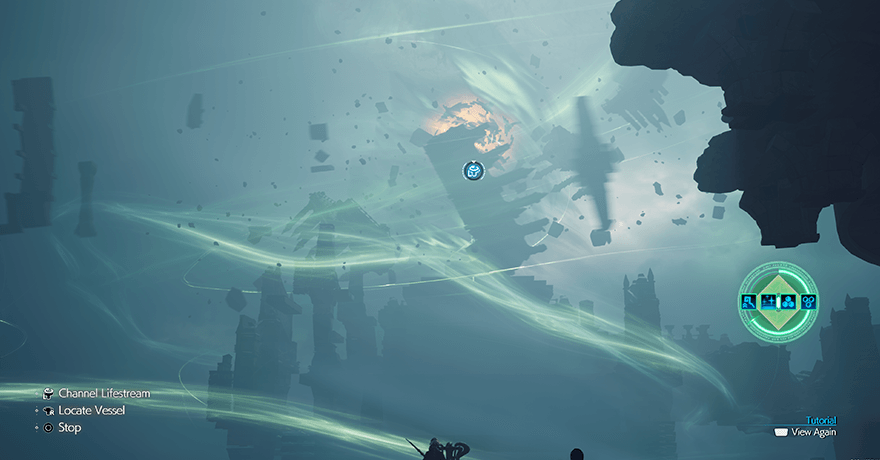 |
| 5 |  Corridor of Respite Most of the temple structure should now close together allowing you to traverse them. Begin by heading into the structure to your west. Collect Red XIII's weapon, |
| 6 |  Next, head north and deal with the swarm of Berserker Bees hovering above the green laser. Absorb their fragments before making your way to the southwest building of the area. |
| 7 | Inside, you'll find 3 Blight Frogs and a swarm of Berserker Bees. Defeat them and absorb their fragments before opening the yellow chest in the room. After you get the |
| 8 | 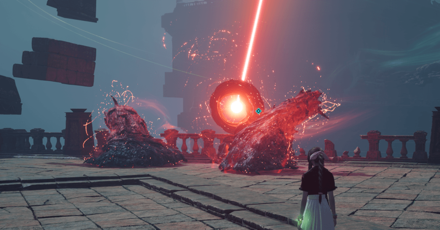 Once at the Corridor of Respite's red laser, defeat the 2 Hecteyes operating it to purify the laser. Make sure to absorb their fragments after defeating them for a large boost. |
| 9 | 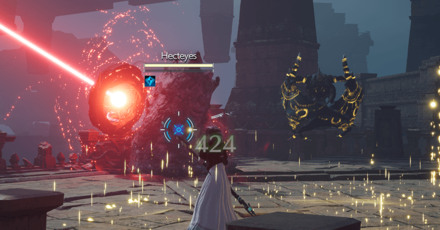 Corridor of Repose Next, make your back to the Corridor of Repose. Head east until your reach the red laser in this area. Similar to the previous step, defeat the Hecteyes and Floating Death guarding the laser, absorbing their fragments to purify the laser. |
| 10 | Once you've absorbed the fragments of the last Hecteyes, return to red runic circle at Salvation's Altar. Channel the rest of the Lifestream Fragments into the vessel to completely rebuild the temple. Astral Remnant: With the path rebuilt, you'll now be able to access the yellow chest at the center of the area. Open it to get this item.
|
| 11 | The next part will be a boss fight against Elena and Tseng. Before heading down into the Harmony Room, re-explore the area to get more Lifestream Fragments. Make sure you have all 4 buffs on Aerith before resting at the bench. Once ready, proceed to the next step. Tip: Elena is weak to Lightning and Tseng is weak to Ice. Slot Lightning and Ice materia before the fight to easily deal damage with spare ATB charges during the fight. |
| 12 | To rejoin Cloud's party, head down to the lower platform and use the stairs to your left or right to reach the lower level of the Harmony Room. Go through the double doors where you will encounter Elena and Tseng. |
| 13 |  Defeat Elena and Tseng to finally reunite with Cloud's party. ┗ Recommended Party for Elena and Tseng ▶︎ How to Beat Elena and Tseng |
Finding the Black Materia Walkthrough
| Objectives | |
|---|---|
| 1 | After defeating the Turks, Cloud and the gang head deeper into the temple. Go to the end of the Path of Temptation and interact with the pedestal to activate the elevator. |
| 2 | Once you reach the Hall of Resurrection, enter through the double doors to trigger a cutscene. |
| 3 | After the cutscene ends, you'll be playing as Aerith. Approach Tseng to trigger another short cutscene. Once that ends, interact with pedestal to activate the solo trials. |
| 4 | 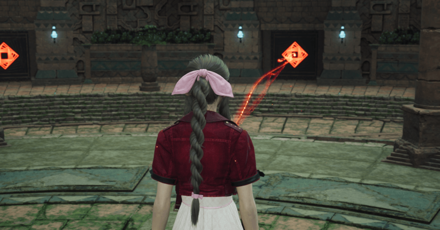 Approach Aerith's marked door and ead down the steps until you reach large face statue. Get close to it and hold down Triangle to start the trials for each of the 5 party members. |
| 5 | The first trial will have you play as Red XIII. Run and scale the walls of the area. The goal is to avoid fire from Shinra troopers and make it to the next area - Hojo's Lab. |
| 6 | Inside Hojo's Lab, you'll be subjected to a quicktime event after the initial cutscene. Follow the button prompts until he reaches the operating table. The cutscene should conclude Red XIII's trial. |
| 7 | Next, you'll be playing a Tifa back in Nibelheim. Follow after her kid version and climb the water tower at the center of town. |
| 8 | After Nibelheim goes up in flames, look for the kid version of Cloud. He'll point towards the direction of Tifa's dad. Follow after him to reach the Nibel reactor. |
| 9 | Inside the reactor, go to the end of the corridor and open the door. Approach your father's body and watch the cutscene to complete the trial. |
| 10 | Third on the list is Yuffie. Run down the steps until you fall. Once you catch yourself on some metal bars, pick up the green pinwheels and follow after the ghostly apparition of Sonon to continue. |
| 11 | At end of the section, head through the open door and into a section requiring your grappling hook. Grapple across until you reach the room on the other side. Press the elevator button to trigger a cutscene that ends Yuffie's trial. |
| 12 | Fourth will be Barret. Once you have control, go through the Corel mining town. Approach the woman in red to trigger a cutscene. |
| 13 | Once the cutscene ends, limp back into the now ruined town. Interact with the metal grille until Barret is able to push it over. Trigger another cutscene to end Barret's trial. |
| 14 | Finally, Aerith will undergo her trial. Look at the butterflies after the cutscene and hold Triangle to interact with it. Do this for all 4 butterflies to trigger the next cutscene. |
| 15 | Playing as the kid version of Aerith, make your way through the Sector 5 station and ask for help. After you meet Elmyra, return to your mother at the side of the station. This triggers the cutscene that ends Aerith's trial. |
| 16 | Back at the temple, take control of Cloud and head into the darkened, northern doorway. Head down into the Path of Penalty and into the Corridor of Effigies. |
| 17 | Make your way to the end of the long corridor until a cutscene triggers. When it ends, you'll find yourself inside the ruins of a Mako Reactor 1, marking the beginning of Cloud's trial. |
| 18 | Go to the other side of the room until you reach the body of Biggs. During the cutscene, you'll be transported to the tower supporting the Sector 7 Plate. |
| 19 | Head up to the next floor to re-live Jessie's death. Once the next cutscene ends, you'll be returned back to the Corridor of Effigies. |
| 20 | Continue making your way to the end until you reach the Spiral of Rebirth. Head down the spiral steps until you reach a room with a Panthera Protector and an Ancient Dragon. Defeat them to reach the next room. |
| 21 |  Go down the next flight of stairs until you reach a crossroads at the Shrine of Ambition. Before proceeding, take the southern path to reach a room with a Floating Death. Defeat it to get the optional chest in the room. |
| 22 | After looting everything, return to the crossroads area and take the path east. Follow it until you reach a room with a Moss-Grown Adamantoise mini-boss. Defeat it and exit the room via the west door. ▶︎ How to Beat Moss-Grown Adamantoise Tip: Moss-Grown Adamantoise are weak to Fire. |
| 23 | Keep going through the next room until you reach the Spiral of Rebirth - Lower Layer. Go down until you reach the Corridor of Dusk's Mural Chamber. |
| 24 | Inside, a cutscene will trigger. When it ends, continue till the end of the corridor until you're forced to fight a Floating Death and a Panthera Protector. Defeat them and exit the corridor. |
| 25 | Proceed through the Corridor of Disaster and the Corridor of the Apocalypse. Upon reaching the latter, you will have to defeat a Panthera Protector as well as another Moss-Grown Adamantoise. |
| 26 | After defeating the two enemies, rest and resupply using the nearby bench before making your way to the end of the Corridor of the Apocalypse. |
| 27 |  Once you reach the end of the corridor, a cutscene will play. When it ends, you'll be pitted against the final boss of the level - Demon Gate. ┗ Recommended Party for Demon Gate ▶︎ How to Beat Demon Gate Tip: While Demon Gate has no weaknesses, it can be pressured when you deal damage to it while it uses Encroach. |
| 28 | When the boss fight ends, follow after Cloud as Aerith. Watch the cutscenes then make a run for it to escape the temple's collapse. Conclude the chapter by finishing the last few walking segments as Cloud. |
Chapter 13 Boss Strategy Guide
| Chapter 13 Bosses Guide | |
|---|---|
| Red Dragon | Reno and Rude |
| Elena and Tseng | Demon Gate |
How to Beat Red Dragon
| Red Dragon | |
|---|---|
 |
|
| Location | Chapter Unlocked |
| Labyrinth | Where Angels Fear to Tread |
| Weaknesses | Lesser Resistances |
|
|
None
|
| Greater Resistances | Immunities |
|
None
|
|
| Absorbed Elements | When Triggered |
|
None
|
None
|
| Pressure Conditions | |
| Striking the scorched pillars and bringing them down on the dragon will pressure it. Destroying one of its wings while it is flying will cause it to plummet, pressuring it. Attacking its chest will reduce the range of Crimson Breath. | |
Found Inside the Ancient Temple
You will fight the Red Dragon inside the Ancient Temple after changing the gravity in Chapter 13.
Recommended Party Setup
| Recommended Party Setup | |
|---|---|
 Cloud Cloud
|
【Punisher】 ・Unleash powerful abilities, like Infinity's End and Braver, when the boss is staggered ・Use ranged sword attacks once the boss starts flying Recommended Level: 47 |
 Yuffie Yuffie
|
【Ranged Attacker】 ・Attack the boss from a distance using Ice Ninjutsu ・Can easily target the wings of the boss once it starts flying Recommended Level: 47 |
 Aerith Aerith
|
【Spellcaster】 ・Attack the boss with Ice magic ・Place Radiant Ward to double-cast spells Recommended Level: 47 |
Red Dragon Boss Fight Tips
- Hide Behind Pillars During Incendiary Breath
- Aim for the Chest after Destroying the Wings
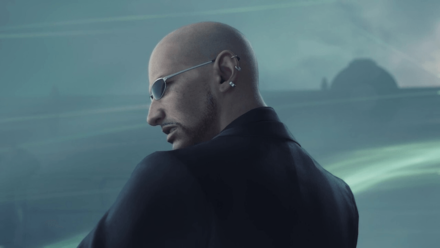
How to Beat Reno and Rude
Reno
| Reno | |
|---|---|
 |
|
| Location | Chapter Unlocked |
| Ancient Temple | Where Angels Fear to Tread |
| Weaknesses | Lesser Resistances |
|
|
None
|
| Greater Resistances | Immunities |
| Absorbed Elements | When Triggered |
|
None
|
None
|
| Pressure Conditions | |
| Evading his counters or countering him with powerful offensive abilities will pressure him. Interrupting his synergy strikes will also pressure him. | |
Rude
| Rude (Chapter 13) | |
|---|---|
 |
|
| Location | Chapter Unlocked |
| Ancient Temple | Where Angels Fear to Tread |
| Weaknesses | Lesser Resistances |
|
|
|
| Greater Resistances | Immunities |
| Absorbed Elements | When Triggered |
|
None
|
None
|
| Pressure Conditions | |
| Hitting him with multiple powerful offensive abilities while his guard is up will pressure him. Interrupting his synergy strikes will also pressure him. | |
Found Inside the Ancient Temple
You will fight Reno and Rude inside the Ancient Temple in Chapter 13.
Recommended Party Setup
| Recommended Party Setup | |
|---|---|
|
Cloud
|
【Main Attacker】 ・Focus on damaging and staggering the bosses with powerful abilities like Focused Thrust or Braver Recommended Level:48 |
 Barret Barret
|
【Tank / Spellcaster】 ・Use Lifesaver to tank damage received by other members while also increasing his HP ・Can get ATB fast, which makes him a good choice for casting spells ・Can also provide ample damage with his Focused Shot or Maximum Fury Recommended Level: 48 |
 Tifa Tifa
|
【Substitute / Punisher】 ・Can replace Cloud as the active character if his HP is low ・Use Unfettered Fury to stagger the bosses faster Recommended Level: 48 |
Reno and Rude Boss Fight Tips
- Defeat Reno First
- Aim to Stagger Reno after Getting Pressured
- Use Multiple Abilities on Rude While He's Guarding
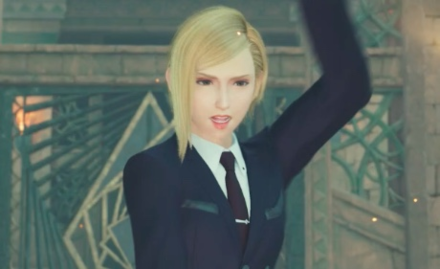
How to Beat Elena and Tseng
Elena
| Elena (Chapter 13) | |
|---|---|
 |
|
| Location | Chapter Unlocked |
| Star Life Room (2nd Floor) | Where Angels Fear to Tread |
| Weaknesses | Lesser Resistances |
|
|
None
|
| Greater Resistances | Immunities |
| Absorbed Elements | When Triggered |
|
None
|
None
|
| Pressure Conditions | |
| Hitting her with two powerful offensive abilities or interrupting her synergy strikes will pressure her. | |
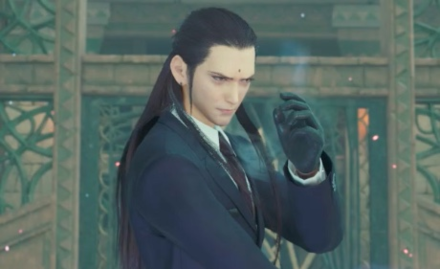
Tseng
| Tseng | |
|---|---|
 |
|
| Location | Chapter Unlocked |
| Star Life Room (2nd Floor) | Where Angels Fear to Tread |
| Weaknesses | Lesser Resistances |
|
|
None
|
| Greater Resistances | Immunities |
| Absorbed Elements | When Triggered |
|
None
|
None
|
| Pressure Conditions | |
| Blocking or evading his combo finishers will pressure him for a short time. Once he has recovered, he will begin to charge up for a powerful technique. Inflicting enough damage while he is charing will pressure him. Interrupting his synergy strikes will also pressure him. | |
Found Inside the Ancient Temple
You will fight Elena and Tseng inside the Ancient Temple in Chapter 13.
Recommended Party Setup
| Recommended Party Setup | |
|---|---|
|
Yuffie
|
【Main Attacker】 ・Can quickly get ATB charges ・Can switch between Ice or Lightning ranged attacks with her Elemental Ninjutsu ・Best used as the active character because of her speed Recommended Level: 48 |
 Red XIII Red XIII
|
【Substitute】 ・Switch to Red XIII if you want to take the aggro away from Yuffie ・Build up Vengeance to increase power and speed or use it to heal the team with Watcher's Respite Recommended Level: 48 |
|
Aerith
|
【Spellcaster】 ・Cast Lightning and Ice spells to damage the bosses ・Limit switching to Aerith as she doesn't have enough speed to evade attacks Recommended Level: 48 |
Elena and Tseng Boss Fight Tips
- Hit Elena Twice with Abilities to Pressure
- Hit them During their Coordinated Attack
- Guard Against the Last Attack from Tseng's Combo
How to Beat Demon Gate
| Demon Gate | |
|---|---|
 |
|
| Location | Chapter Unlocked |
| Near Murals | Where Angels Fear to Tread |
| Weaknesses | Lesser Resistances |
|
None
|
|
| Greater Resistances | Immunities |
|
None
|
|
| Absorbed Elements | When Triggered |
|
None
|
None
|
| Pressure Conditions | |
| Draws the walls inward to narrow the field of battle. Inflicting enough damage while it gathers strength to move will both interrupt and pressure it. It unleashes elementally aspected attacks from its enormous hands, but striking it with an opposing element will interrupt its assault. | |
Found Inside the Ancient Temple
You will fight the Demon Gate inside the Ancient Temple near the end of Chapter 13.
Recommended Party Setup
| Recommended Party Setup | |
|---|---|
|
Cloud
|
【Main Attacker】 ・Can be the active character as most of the attacks can easily be dodged, blocked, or countered. ・Use powerful abilities like Braver or Focused Thrust to damage and stagger the boss quickly Recommended Level: 49 |
|
Yuffie
|
【Damage / Support】 ・Can be a substitute for Cloud when he's low on health ・Can quickly charge ATB, allowing to cast more abilities or spells during the battle Recommended Level: 49 |
|
Aerith
|
【Spellcaster】 ・Use powerful spells on the boss with Elemental Materia ・Can place a Arcane Ward to double-cast a spell Recommended Level: 49 |
Demon Gate Boss Fight Tips
- Deal Enough Damage to Stop Encroach
- Use the Element Opposite of its Grand Impact
- Use Cloud's Counterfire against Ranged Attacks
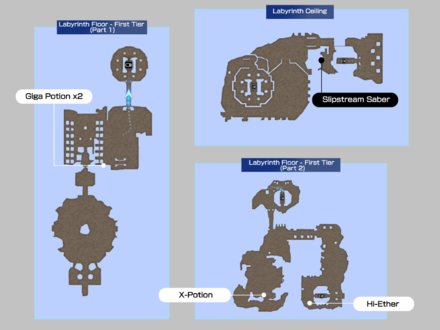
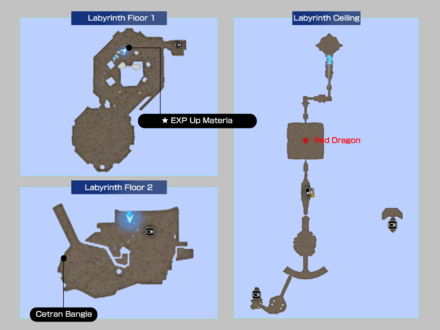
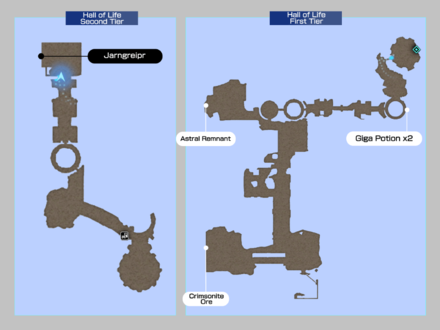
Chapter 13 Map and Obtainable Items
Maps
| List of Maps | ||
|---|---|---|
 |
 |
 |
 |
 |
 |
 |
 |
 |
Obtainable Items
| Temple of the Ancients - Labyrinth | ||
|---|---|---|
| Slipstream Saber | Whistlewind Scarf | |
| Cetran Bangle | - | |
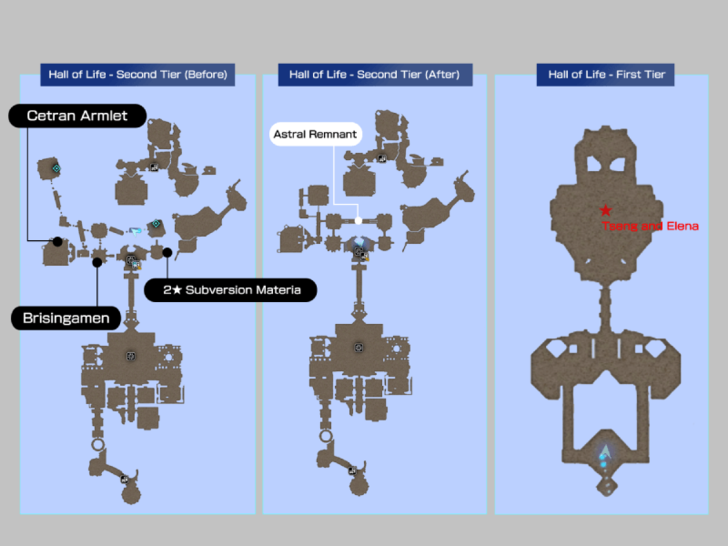
| Temple of the Ancients - Hall of Life | ||
| Jarngreipr | Gambanteinn | |
| Cetran Armband | Battle Cry | Circlet |
| Revival Materia Earrings | Brisingamen | |
| Cetran Armlet | - | - |
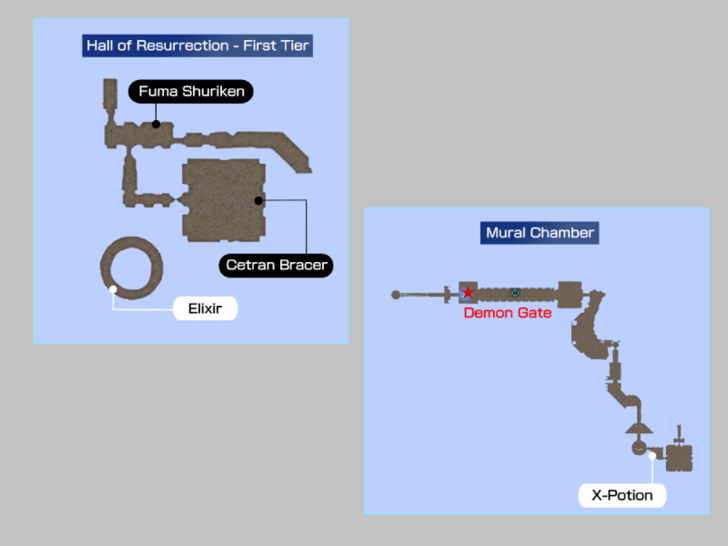
| Temple of the Ancients - Hall of Resurrection | ||
| Fuma Shuriken | Cetran Bracer | |
This list does not include the items that you get from destroying the wooden crates.
Materia List and How to Get All Materia
FF7 Rebirth Related Guides
| All Story Chapters | |
|---|---|
| Chapter 1 | Fall of a Hero |
| Chapter 2 | A New Journey Begins |
| Chapter 3 | Deeper into Darkness |
| Chapter 4 | Dawn of a New Era |
| Chapter 5 | Blood in the Water |
| Chapter 6 | Fool's Paradise |
| Chapter 7 | Those Left Behind |
| Chapter 8 | All That Glitters |
| Chapter 9 | The Planet Stirs |
| Chapter 10 | Watcher of the Vale |
| Chapter 11 | The Long Shadow of Shinra |
| Chapter 12 | A Golden Key |
| Chapter 13 | Where Angels Fear to Tread |
| Chapter 14 | End of the World |
| How Long to Beat? Game Length | |
| Post-Game Content and How to Get 100% Clear | |
Comment
4  IxAMxNIGHTMARE almost 2 years
Correcting myself! Soon as you finish the trials you will go from controlling child Aerith to Cloud. Before you even move, turn to the west and you will see a locked door. Go through it and the AP Up will be shining at the end of the corridor.
Author

Chapter 13: Where Angels Fear to Tread Walkthrough
Please participate in our site
improvement survey
04/2026
improvement survey
04/2026
Would you assist in
improving Game8's site?
improving Game8's site?

×
We are listening to our users' valuable opinions and discussing how to act on them.
The information collected through this survey will be used for the purpose of improving our services. In addition, the information will only be disclosed a part of a statistic in a format that will not allow identification of personal information.
Begin Survey
Not Now
×
Please rate each item regarding Game8.co's Advertisements.
Amount of Ads
Very Dissatisfied
Somewhat Dissatisfied
Fine
Somewhat Satisfied
Highly Satisfied
Placement of Ads
Timing of Ad Display
Ad Loading Speed
Safeness of Ads
Content of Ads
×
Please rate each item regarding Game8.co's Quality of Articles.
Amount of information
Very Dissatisfied
Somewhat Dissatisfied
Fine
Somewhat Satisfied
Highly Satisfied
Frequency of updates
Speed of new information
Accuracy of articles
Understandibility of articles
Readability of sentences
×
Please rate each item regarding Game8.co's Usability of the Site.
Ease of finding information
Very Dissatisfied
Somewhat Dissatisfied
Fine
Somewhat Satisfied
Highly Satisfied
Loading Speed
Use of Color
Font Size
Visibility of Images
Easy to Understand Layout
×
Please rate each item regarding Game8.co's Message Boards, Comments.
Ease of Writing
Very Dissatisfied
Somewhat Dissatisfied
Fine
Somewhat Satisfied
Highly Satisfied
Readability
Ease in Finding Information
Comment Quality
Comment Quantity
Admin Response
×
Please rate each item regarding Game8.co's Site's new design.
Please rate our site's new design
Very Dissatisfied
Somewhat Dissatisfied
Fine
Somewhat Satisfied
Highly Satisfied
Do you think that the website's design change makes the site easier to use?
Has the new design made it easier for you to find information on the site?
Has the new design improved the overall visual appeal of the site?
How would you rate your overall satisfaction with the new design of the site?
×
How likely are you to recommend Game8 to someone you know?
Very Unlikely
0
1
2
3
4
5
6
7
8
9
10
Very Likely
If you have other opinions regarding potential improvement to the website, please share them with us. We would appreciate your honest opinion.
Note: This is a free response section, so you can proceed without entering anything.
Note: Please be sure not to enter any kind of personal information into your response.
Note: Please be sure not to enter any kind of personal information into your response.
×
Thank You
×
Thank you for participating in our survey! Your answers will help us to improve the quality of our website and services.
We hope you continue to make use of Game8.
We hope you continue to make use of Game8.
Close
Rankings
- We could not find the message board you were looking for.
Gaming News

![Forza Horizon 6 Review [Preview] | Beautiful Roads With a Whole Lot of Oversteer](https://img.game8.co/4460981/a7254c24945c43fbdf6ad9bea52b5ce9.png/show)


![Forza Horizon 6 Review [Preview] | Beautiful Roads With a Whole Lot of Oversteer](https://img.game8.co/4460981/a7254c24945c43fbdf6ad9bea52b5ce9.png/thumb)
Popular Games

Genshin Impact Walkthrough & Guides Wiki
Crimson Desert Walkthrough & Guides Wiki
Umamusume: Pretty Derby Walkthrough & Guides Wiki
Honkai: Star Rail Walkthrough & Guides Wiki
Monster Hunter Stories 3: Twisted Reflection Walkthrough & Guides Wiki
Wuthering Waves Walkthrough & Guides Wiki
The Seven Deadly Sins: Origin Walkthrough & Guides Wiki
Pokemon TCG Pocket (PTCGP) Strategies & Guides Wiki
Pokemon Pokopia Walkthrough & Guides Wiki
Zenless Zone Zero Walkthrough & Guides Wiki


Recommended Games
Monster Hunter World Walkthrough & Guides Wiki
Fire Emblem Heroes (FEH) Walkthrough & Guides Wiki
Pokemon Brilliant Diamond and Shining Pearl (BDSP) Walkthrough & Guides Wiki
Super Smash Bros. Ultimate Walkthrough & Guides Wiki
Diablo 4: Vessel of Hatred Walkthrough & Guides Wiki
Cyberpunk 2077: Ultimate Edition Walkthrough & Guides Wiki
Yu-Gi-Oh! Master Duel Walkthrough & Guides Wiki
Elden Ring Shadow of the Erdtree Walkthrough & Guides Wiki
The Legend of Zelda: Tears of the Kingdom Walkthrough & Guides Wiki
Persona 3 Reload Walkthrough & Guides Wiki


All rights reserved
© SQUARE ENIX CO., LTD. All Rights Reserved.
CHARACTER DESIGN: TETSUYA NOMURA/ROBERTO FERRARI
LOGO ILLUSTRATION: © 1997 YOSHITAKA AMANO
The copyrights of videos of games used in our content and other intellectual property rights belong to the provider of the game.
The contents we provide on this site were created personally by members of the Game8 editorial department.
We refuse the right to reuse or repost content taken without our permission such as data or images to other sites.
missed a circlet before you fight ironclad a ledge to the left can drop down theres a box with circlet