Gears and Gambits Hard Mode Guide and Rewards
Gears and Gambits is a minigame available in Final Fantasy 7 Rebirth (FF7 Rebirth). Read on to learn how to unlock Gears and Gambits and its Hard Mode, tips to complete the minigame, and how to play it here.
List of Contents
Gears and Gambits Hard Mode Strategy
| Gears and Gambit Stages |
|---|
| |
Gears and Gambits 1 Strategy
| Recommended Formation and Gambits | |
|---|---|
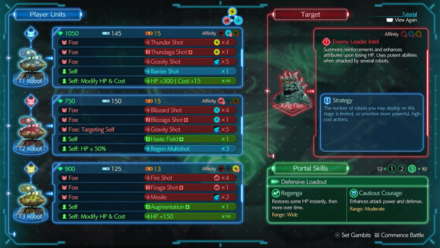 |
|
| Round Restriction | Number of Robots |
| T1 Robot | |
| Condition | Action |
| Foe Foe Foe Self Self: Modify HP and Cost |
Thunder Shot Thundaga Shot Gravity Shot Barrier Shot HP +300 | Cost +15 |
| T2 Robot | |
| Condition | Action |
| Foe Foe Foe: Targeting Self Self Self: HP ≤ 50% |
Blizzard Shot Blizzaga Shot Gravity Shot Haste Field + Regen Multishot |
| T3 Robot | |
| Condition | Action |
| Foe Foe Foe Self Self: Modify HP and Cost |
Fire Shot Firaga Shot Missile Augmentation + HP +150 |
| Stage 1 Conditions and Strategies | |
|
|
|
Do note that the number of robots you can deploy are limited to each type. If the robots are currently gathered into one place, use Regenga to restore some of their HP.
Deploy Robots That Target Enemy Weakness to Each Lane
Be sure to send out robots that exploit the elemental weaknesses of incoming enemies on each lane. Use Portal Skills to heal with Regenga or buff your attack and defense with Cautious Courage.
Gears and Gambits 2 Strategy
| Recommended Formation and Gambits | |
|---|---|
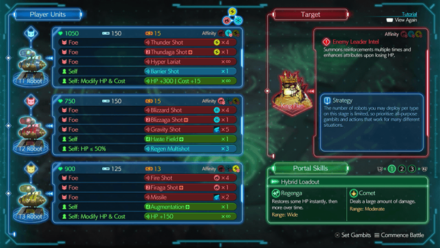 |
|
| Round Restriction | Number of Same-Type Robots |
| T1 Robot | |
| Condition | Action |
| Foe Foe Foe Self Self: Modify HP and Cost |
Thunder Shot Thundaga Shot Hyper Lariat Barrier Shot HP +300 | Cost +15 |
| T2 Robot | |
| Condition | Action |
| Foe Foe Foe: Targeting Self Self Self: HP ≤ 50% |
Blizzard Shot Blizzaga Shot+ Gravity Shot Haste Field + Regen Multishot |
| T3 Robot | |
| Condition | Action |
| Foe Foe Foe Self Self: Modify HP and Cost |
Fire Shot Firaga Shot+ Missile Augmentation + HP +150 |
| Stage 2 Conditions and Strategies | |
|
|
|
You can only send out 2 robots from each type, so make sure that the robots you're deploying can exploit the weaknesses of enemies in their designated lanes.
Be sure not to deploy more robots than necessary to prevent enemy forces from increasing their numbers and activating their Trigger Abilities.
Use Comet to Target Groups of Enemies
If the target enemy is below 60% HP, it will commence deployment of small enemies. Use Comet to take out the newly-summoned enemies and prevent enemy forces from rising.
Gears and Gambits 3 Strategy
| Recommended Formation and Gambits | |
|---|---|
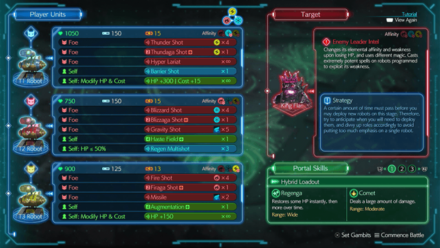 |
|
| Round Restriction | Robot Deployment Interval |
| T1 Robot | |
| Condition | Action |
| Foe Foe Foe Self Self: Modify HP and Cost |
Thunder Shot Thundaga Shot+ Hyper Lariat Barrier Shot HP +300 | Cost +15 |
| T2 Robot | |
| Condition | Action |
| Foe Foe Foe: Targeting Self Self Self: HP ≤ 50% |
Blizzard Shot Blizzaga Shot+ Gravity Shot Haste Field + Regen Multishot |
| T3 Robot | |
| Condition | Action |
| Foe Foe Foe Self Self: Modify HP and Cost |
Fire Shot Firaga Shot Missile Augmentation + HP +150 |
| Stage 3 Conditions and Strategies | |
|
|
|
There is a 10-second cooldown time that begins after each robot is deployed on the field. It is recommended that you only send out robots which can exploit the weaknesses of enemies on the field, rather than sending out a robot after each cooldown.
The necessity for numbers will not be an apparent factor when your robots can easily dispatch enemies by targeting their weaknesses.
Gears and Gambits 4 Strategy
| Recommended Formation and Gambits | |
|---|---|
 |
|
| Round Restriction | Robot Color ≠ Leader's |
| T1 Robot | |
| Condition | Action |
| Foe Foe Foe Self Self: Modify HP and Cost |
Thunder Shot Thundaga Shot+ Hyper Lariat Barrier Shot HP +300 | Cost +15 |
| T2 Robot | |
| Condition | Action |
| Foe Foe Foe: Targeting Self Self Self: HP ≤ 50% |
Blizzard Shot Blizzaga Shot+ Gravity Shot Haste Field + Regen Multishot |
| T3 Robot | |
| Condition | Action |
| Foe Foe Foe Self Self: Modify HP and Cost |
Fire Shot Firaga Shot Missile Augmentation + HP +150 |
| Stage 4 Conditions and Strategies | |
|
|
|
Robots with similar colors to the Target Enemy's attribute cannot be deployed in the field. It is advised that you set up the Gambits and Actions of your robots beforehand to circumvent this restriction.
From there, make use of earlier tactics from previous stages and deploy robots exploiting elemental weaknesses.
Gears and Gambits Tips
| Gears and Gambits Tips |
|---|
|
|
Set the Difficulty to Easy
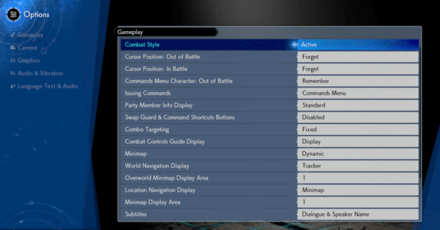
If you're having difficulty playing Gears and Gambits, try changing the game difficulty to Easy. This setting can be found in the Gameplay settings. If the difficulty is Normal or above, the ATB Gauge will fill slower which, in turn, will lead to deploying units slower.
Take Advantage of Elemental Weaknesses
Some enemies have an Elemental Weakness at the top-right corner of their HP bars. Deploy robots with the same element to quickly destroy the monsters with the elemental weakness.
Keep an Eye Out for Triggered Abilities
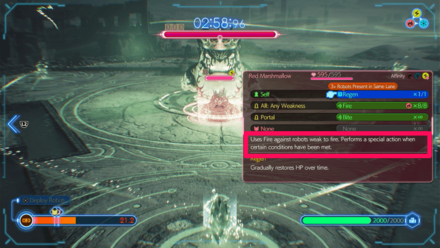
The central enemy can unleash abilities depending on various circumstances. Some examples include if the enemy has 50% HP remaining or if the enemy is being targeted by a certain number of robots.
You can press the Square button to see how their abilities can be triggered. Their triggers can be seen in the orange circles on the enemy information.
Use Portal Skills
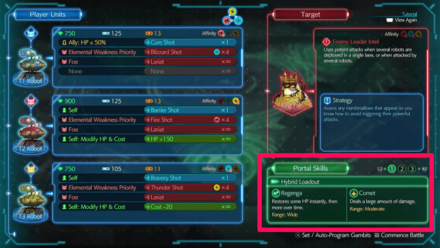
Portal Skills are powerful abilities that can only be used once per game. Damage-type Portal Skills are more effective against mobs of enemies, while Recovery-type Skills help keep your units alive.
Use Auto-Program if You’re Unsure
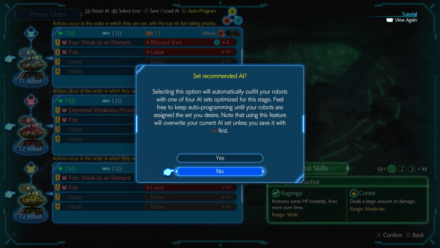
Auto-Program is a feature in the minigame wherein your robots will be automatically outfitted with recommended Gambits and Actions during the Player Units menu.
You can use Auto-Program in case you are unsure of the programs that you want to equip your robots in battle. Do note that Auto-Program will not be available in Hard Mode.
How to Play Gears and Gambits
Deploy Robots to Attack the Central Monster
Gears and Gambits play similarly to the Fort Condor minigame as you need to deploy robots to defeat the main enemy at the center.
You lose the game if the time runs out or if your base is destroyed.
Fort Condor Minigame Guide and Rewards
Choose a Lane to Send out Robots
Select a lane to dispatch robots by pressing L2 or R2 during the minigame. It is advisable that you send out robots to occupied enemy lanes, and exploit their weakness by dispatching the suitable robot for the situation.
How to Unlock Gears and Gambits
Defeat Gi Nattak in Chapter 10
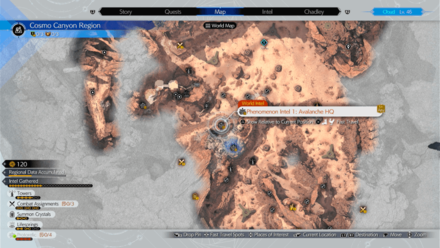
After defeating Gi Nattak in Chapter 10 and releasing the tower, a Phenomenon Intel will appear once you return to the Cosmo Canyon Region.
All Protorelic Locations (Phenomenon Intel)
How to Unlock Hard Mode
Complete All Phenomenon Intel in Cosmo Canyon

After you've unlocked your first Phenomenon Intel, you will gain access to the succeeding ones that will eventually lead you to the fourth one as you complete them.
Completing all 4 Phenomenon Intel in Cosmo Canyon will unlock the Hard Mode difficulty for Gears and Gambits.
All Cosmo Canyon Phenomenon Intel
Gears and Gambits Rewards
Gambit Technician Trophy
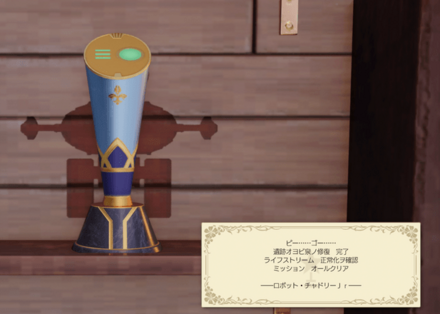
By completing Gears and Gambit in Hard Mode, you will be rewarded with the Gambit Technician Trophy, one of the many collectibles you need to unlock in Johnny's Treasure Trove. Make sure to play this minigame on hard mode, especially if you're aiming for a 100% completion.
FF7 Rebirth Related Guides

List of All Available Minigames
All Minigame Guides
Comment
Author
Gears and Gambits Hard Mode Guide and Rewards
Rankings
- We could not find the message board you were looking for.
Gaming News
Popular Games

Genshin Impact Walkthrough & Guides Wiki

Honkai: Star Rail Walkthrough & Guides Wiki

Arknights: Endfield Walkthrough & Guides Wiki

Umamusume: Pretty Derby Walkthrough & Guides Wiki

Wuthering Waves Walkthrough & Guides Wiki

Pokemon TCG Pocket (PTCGP) Strategies & Guides Wiki

Abyss Walkthrough & Guides Wiki

Zenless Zone Zero Walkthrough & Guides Wiki

Digimon Story: Time Stranger Walkthrough & Guides Wiki

Clair Obscur: Expedition 33 Walkthrough & Guides Wiki
Recommended Games

Fire Emblem Heroes (FEH) Walkthrough & Guides Wiki

Pokemon Brilliant Diamond and Shining Pearl (BDSP) Walkthrough & Guides Wiki

Diablo 4: Vessel of Hatred Walkthrough & Guides Wiki

Super Smash Bros. Ultimate Walkthrough & Guides Wiki

Yu-Gi-Oh! Master Duel Walkthrough & Guides Wiki

Elden Ring Shadow of the Erdtree Walkthrough & Guides Wiki

Monster Hunter World Walkthrough & Guides Wiki

The Legend of Zelda: Tears of the Kingdom Walkthrough & Guides Wiki

Persona 3 Reload Walkthrough & Guides Wiki

Cyberpunk 2077: Ultimate Edition Walkthrough & Guides Wiki
All rights reserved
© SQUARE ENIX CO., LTD. All Rights Reserved.
CHARACTER DESIGN: TETSUYA NOMURA/ROBERTO FERRARI
LOGO ILLUSTRATION: © 1997 YOSHITAKA AMANO
The copyrights of videos of games used in our content and other intellectual property rights belong to the provider of the game.
The contents we provide on this site were created personally by members of the Game8 editorial department.
We refuse the right to reuse or repost content taken without our permission such as data or images to other sites.
 Piano Minigame
 Hustle de Chocobo
 Moogle MIschief
 Dolphin Show Minigame
 Junon Parade and All 7th Infantry Locations
 Fort Condor
 Cactuar Caper and All Cactuar Locations
 Run Wild
 Card Carnival (Costa del Sol Queen's Blood Challenges)
 Pirate's Rampage
 Wheelie Rendezvous
 Minecart Adventure
 G-Bike Minigame
 Desert Rush
 Galactic Saviors
 3D Brawler
 Chocobo Races
 Musclehead Colosseum
 Jumpfrog
 Crunch-Off
 Glide de Chocobo
 Cactuar Crush
 Gold Saucer Queen's Blood Challenges


