Fort Condor Hard Mode Guide and Rewards
Fort Condor is a tower-defense minigame available in Final Fantasy 7 Rebirth (FF7 Rebirth). Read on to learn how to unlock Fort Condor and its Hard Mode, how to play, tips to complete the minigame, and rewards.
List of Contents
Fort Condor Tips
| Fort Condor Tips and Tricks |
|---|
| |
Set the Difficulty to Easy
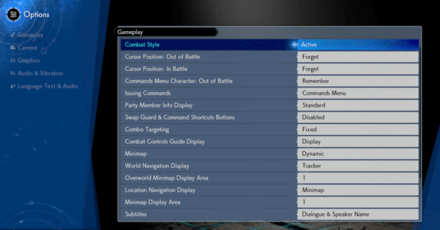
If you're having a hard time at Fort Condor, try changing the game difficulty to Easy, which can be found in the Gameplay settings. If the difficulty is Normal or above, the ATB Gauge will fill slower which, in turn, will lead to deploying units slower.
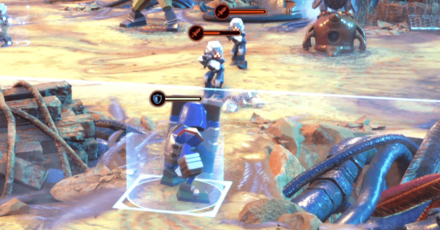
Understand Enemy Types and Manage ATB Properly

While sending out units right off the bat may seem sound at first, it's highly recommended that you watch the enemy's upcoming unit types before deploying units of your own. That way, you can properly manage your ATB and not risk sending out the wrong units.
The Enemy Strategy Gauge to the right of the screen will tell you what unit types the opponent is about to send out. Be sure to look at this to know which units you should deploy next.
Invest in Clerics and Mounted Defenses
As the saying goes, a good defense is a good offense. Investing in Clerics and sending them out with your troops can help keep your units on the field longer, allowing you to manage your ATB better.
Additionally, mounted defenses like trebuchets and ballistas should be deployed at your lane openings to reinforce your territory's boundaries. These units can also attack airborne enemies.
Choose Your Strategy According to Your Opponent's Setup

As early as the preparation screen, you will be able to see your opponent's lineup and what they're prioritizing. Should they have a lot of Vanguards, it may be beneficial if you prioritize Defense.
Deploy Units that can Attack Airborne Enemies
As Fort Condor stages get harder, your opponent will be able to send out flying units that can bypass ground infantry and mounted defenses, which will not bode well for your territory.
As such, be sure that you have units that can attack airborne enemies, such as Rangers and ballistas.
Balance Offense and Defense on Both Lanes
Your territory has two openings from which you can deploy units. Be sure to keep a vigilant eye on both of these openings, pressing X to slow down time and assess your current situation.
Instead of simply sending out foot soldiers from both lanes, try having one lane focused on defending the territory while the other pour out offensive units.
Set Up Your Units According to Your Hero Units
It will also be advantageous to know which Hero Units to bring along. If you see that your opponent has flying units to deploy, it would be wise to bring Barret along, especially if the flying units are agile and powerful.
If you wish to maximize your Hero Units' capabilities, make sure you select the proper Ally Units for them. If you have Tifa who is a Vanguard, it will be optimal to pair her up with an army filled with Vanguards to fill her gauge faster.
Deploy Your Hero Units When There are Many Allied Units Nearby
Apart from dealing severe damage to enemy units, your Hero Units will also buff all allied units nearby. Deploying them in the middle of a group can change the game drastically.
Go All-Out if Few Enemies are Left
Just as some of your units like Elite Vanguards can only be deployed for a limited time, there will come a time where your opponent will have less units to deploy. This usually happens towards the end of the minigame.
Once you get to this point, do not hesitate to spend all of your ATB Charges and deploy as much units as you can to storm the opponent's territory!
Fort Condor Hard Mode Strategy
| Jump to a Section! | |
|---|---|
| Best Team and Setup | |
| Stage 1 | Stage 2 |
| Stage 3 | Stage 4 |
Team 3 (Defense) is the Best Team for Hard Mode

For all of Fort Condor's 4 stages in Hard Mode, bringing the Defense Team and having Cloud and Barret as your Hero Units is the way to go. This team excels in keeping opponents at bay while slowly advancing towards enemy lines.
Always place ballistas right in front or next to your towers and save one for emergencies, and always do this at the start of every stage. After that, counter all of the enemy units by sending troops according to their type.
No Infinite Units
In Fort Condor's Normal Mode, some units can be deployed an unlimited number of times. In Hard Mode, however, all units can only be deployed for a certain number of times. Should all of these fall to 0, you will no longer be able to deploy any unit.
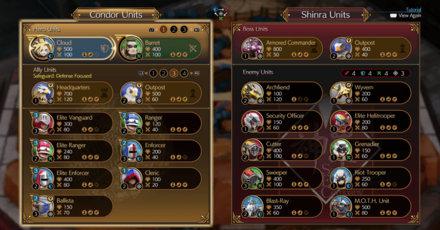
Stage 1 Strategy
| Allied and Enemy Unit Lineups | |
|---|---|
 |
|
| Enemy Unit Order | |
| Left Lane | Right Lane |
| - - - - - - - |
- - - - - - - |
| Conditions and Strategies | |
The first stage of Fort Condor's Hard Mode is still as straightforward as its Normal counterpart. Always start with the ballistas, then deploy an elite unit to counter your first wave of opponents.
Once close enough and the enemy's lineup is about to run out, send in your Hero Units to finish the job.
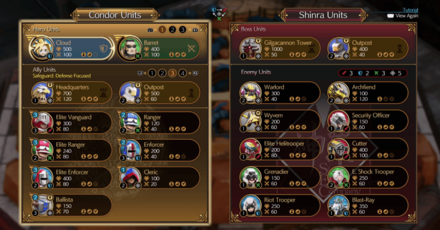
Stage 2 Strategy
| Allied and Enemy Unit Lineups | |
|---|---|
 |
|
| Enemy Unit Order | |
| Left Lane | Right Lane |
| - - - - - - - - - - |
- - - - - - |
| Conditions and Strategies | |
In Stage 2, you will start encountering Archfiends that will ignore your soldiers and go straight for your towers. It is imperative that you have your ballistas ready for this, and deploy troops near your towers.
Stage 3 Strategy
| Allied and Enemy Unit Lineups | ||
|---|---|---|
 |
||
| Enemy Unit Order | ||
| Left Lane | Right Lane | |
| - - - - - - |
- - - - - - - |
|
| Conditions and Strategies | ||
Stage 3 will have flying enemy units come for your territory. Watch out for them and take them down with your Rangers. Since each lane will have large droves of enemies sent out, counteract by sending out large troops of your own.
If you see your troops falling a little short on HP, send out Clerics to prolong their time on the field. The best case scenario is that your troops out last the enemy's and start advancing. Should this happen, only send out your clerics when your troops start moving forward.
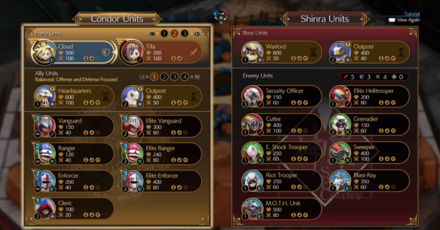
Stage 4 Strategy
| Allied and Enemy Unit Lineups | ||
|---|---|---|
 |
||
| Enemy Unit Order | ||
| Left Lane | Right Lane | |
| - - - - - - - - - - |
- - - - - - |
|
| Conditions and Strategies | ||
Stage 4 will be the hardest Fort Condor battle to date as eaves upon waves of elite enemies will be thrown at you all at once. Additionally, the Headquarters will change affinities to compensate for the units you have on field.
Only deploy your units when enemy units enter your territory and lure them to your ballistas and Outposts. This way, you can dwindle your opponent's army with the joint attack between your soldiers, ballistas, and outposts. Afterwards, focus on advancing.
How to Play Fort Condor
Understanding Unit Types
| Unit Type | → | Good Against |
|---|---|---|
| → | ||
| → | ||
| → |
The key to winning Fort Condor is by understanding the three types of units. These types are Vanguard which specializes in offense, Defense which helps preserve other units, and Ranged which stays put and attacks opponents from a distance.
One of these three types is strong against one other—Vanguards are effective against Ranged units, Ranged against Defense, and Defense against Vanguard.
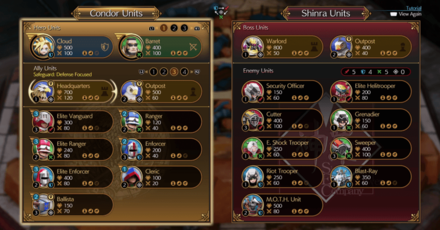
Set Up Your Units
Upon entering the preparation screen, you will be able to swap Hero Units and Ally Units depending on your overall strategy. Since Fort Condor is all about defending your territory, glancing at the enemy's setup will give you an idea of how to build your team.
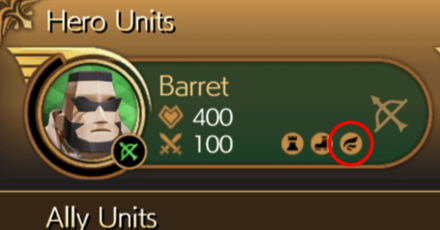
Hero Units
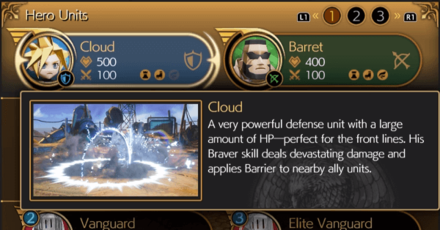
Hero Units are your ultimate units and can only be deployed if enough Ally Units of the same type have also been deployed. A meter below the ATB Gauge on the top-left corner of the screen will tell you if a Hero Unit is ready for deployment.
Hero Units will deal devastating damage to opponents and buff all Ally Units in the field. Be sure to view your Hero Units' abilities in the preparation screen before proceeding with your skirmish.
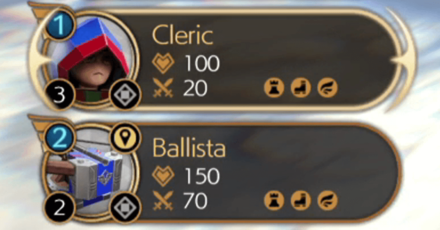
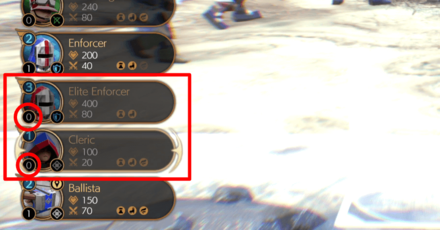
Ally Units
 |
||
| 1 | ATB Cost | Required number of ATB Charges needed for deployment |
|---|---|---|
| 2 | Unit Type | Tells whether a unit is a Vanguard, Ranged, or Defense |
| 3 | Deployment Limit | The maximum number of times a unit can be deployed. |
| 4 | HP and Attack | The health and strength of a unit. |
| 5 | Enemies Attacked | Tells which enemies a unit can attack (Towers, Infantry, Flying) |
Ally Units are infantry that you regularly deploy on the field to fight and defend your territory. In the preparation screen, the Ally Units that come right after your Hero Units are your Headquarters and Outposts, the former of which is the one you need to defend.
Ally Units consume ATB Charges located at the top-left corner of the screen. The more powerful the unit, the more ATB Charges they'll need. Some units can also be deployed for a certain number of times.
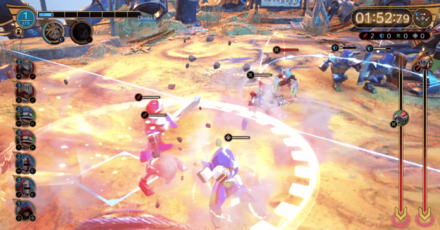
Skirmish Basics
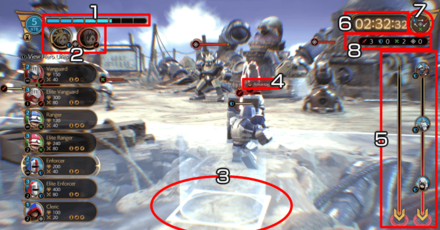 |
||
| 1 | ATB Gauge | Indicates Charges available for deployment. |
|---|---|---|
| 2 | Hero Unit Gauge | Indicates if a Hero Unit is ready for use. |
| 3 | Deployment Area | Indicates the area where a unit will be deployed. |
| 4 | Advantage Indicator | Indicated if your unit has an advantage over an opposing unit. |
| 5 | Enemy Strategy | Indicates the enemy's upcoming units. |
| 6 | Timer | The skirmish's time limit. |
| 7 | Advantage Diagram | Guide for Unit Type Advantages. |
| 8 | Units Deployed | Indicates the number and types of units deployed. |
ATB Gauge
The ATB Gauge tells you how many charges are available to use for units to be deployed. You can look at your Unit Info to know how much ATB charges they need.
Hero Unit Gauge
The Hero Unit Gauge will inform you if a Hero Unit is ready to be deployed. Hero Units can only be sent out if enough units of the same type have been deployed.
Deployment Area
The Deployment Area shows you where your selected unit will be deployed. As you progress, the available area for deployment increases, allowing you to send out units closer to the opponent's towers.
Advantage Indicator
The Advantage Indicator informs you if your unit has an advantage over that of the opponent's. This will be useful if you want to gauge your odds of winning.
Enemy Strategy
The Enemy Strategy meter will show you the enemy's next units and what type they're about to send out. Taking a look at this will give you an idea of what unit to send out next.
Timer
The time limit of the skirmish. Should this reach zero, the challenge will be considered a failure.
Advantage Diagram
A diagram of Unit Types and which types have advantages over which. Use this as a guide for what units to deploy next according to your opponent's strategy.
Units Deployed
This HUD keeps track of the units you've deployed and how many are left. Be sure to glance at the Units Depolyed HUD to know if you're running short on infantry.
How to Unlock Fort Condor
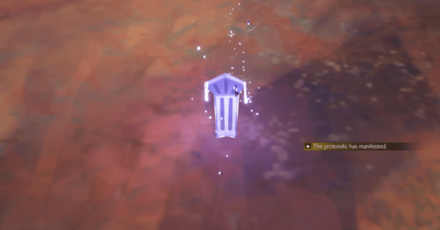
Visit Protorelic Site of Phenomenon Intel 1

Fort Condor can be unlocked upon visiting the Protorelic Site of Phenomenon Intel 1: Wrack and Ruin in the Junon region. To unlock this Protorelic Site, players must first activate the Seabreeze Renmawave Tower.
The Protorelic Site is a derelict ship that was seemingly under construction but was abandoned. Below the split ship is a campsite with the Protorelic on a table. Interact with it and you will be sent straight to Fort Condor.
How to Unlock Fort Condor Hard Mode
Complete All Fort Condor Challenges in Normal Mode
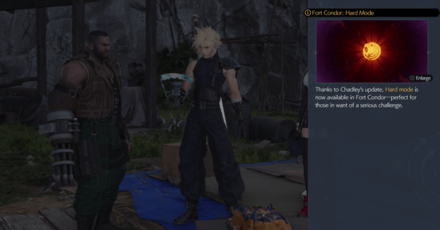
To unlock Fort Condor's Hard Mode, players must first clear all Fort Condor Stages in Normal Mode. Once complete, a prompt will appear telling you that Hard Mode will be available, and Fort Condor tables will start glowing purple.
Fort Condor Rewards
Protorelics for World Intel
Fort Condor is a minigame that rewards you with Protorelics in the Junon region. More often than not, Protorelics will require you to complete a Fort Condor skirmish before you acquire it.
Protorelics are part of the World Intel that Chadley needs for his research. Help him collect the World Intel he needs, and he will reward you with new and improved Materia, some of which you can't get anywhere else!
FF7 Rebirth Related Guides
List of All Available Minigames
All Minigame Guides
 Piano Minigame
 Hustle de Chocobo
 Moogle MIschief
 Dolphin Show Minigame
 Junon Parade and All 7th Infantry Locations
 Cactuar Caper and All Cactuar Locations
 Run Wild
 Card Carnival (Costa del Sol Queen's Blood Challenges)
 Pirate's Rampage
 Wheelie Rendezvous
 Minecart Adventure
 G-Bike Minigame
 Desert Rush
 Galactic Saviors
 3D Brawler
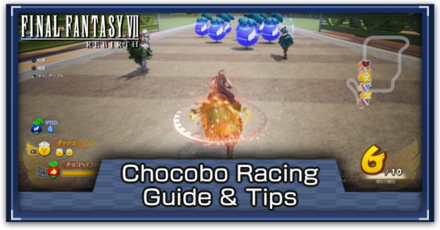 Chocobo Races
 Musclehead Colosseum
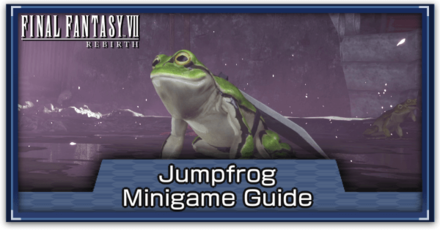 Jumpfrog
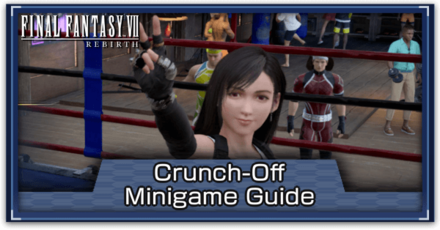 Crunch-Off
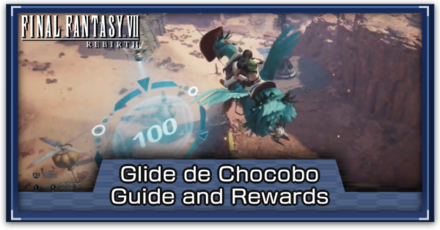 Glide de Chocobo
 Cactuar Crush
 Gears and Gambits
 Gold Saucer Queen's Blood Challenges
Comment
Author

Fort Condor Hard Mode Guide and Rewards
Rankings
- We could not find the message board you were looking for.
Gaming News

![Death Stranding 2: On The Beach [PC] Review | A Port That Delivers](https://img.game8.co/4447392/15310a0c9aa1b6843bb713b2ea216930.jpeg/show)


Popular Games

Genshin Impact Walkthrough & Guides Wiki
Umamusume: Pretty Derby Walkthrough & Guides Wiki
Crimson Desert Walkthrough & Guides Wiki
Monster Hunter Stories 3: Twisted Reflection Walkthrough & Guides Wiki
Honkai: Star Rail Walkthrough & Guides Wiki
Pokemon Pokopia Walkthrough & Guides Wiki
The Seven Deadly Sins: Origin Walkthrough & Guides Wiki
Wuthering Waves Walkthrough & Guides Wiki
Zenless Zone Zero Walkthrough & Guides Wiki
Arknights: Endfield Walkthrough & Guides Wiki


Recommended Games
Fire Emblem Heroes (FEH) Walkthrough & Guides Wiki
Diablo 4: Vessel of Hatred Walkthrough & Guides Wiki
Cyberpunk 2077: Ultimate Edition Walkthrough & Guides Wiki
Yu-Gi-Oh! Master Duel Walkthrough & Guides Wiki
Super Smash Bros. Ultimate Walkthrough & Guides Wiki
Pokemon Brilliant Diamond and Shining Pearl (BDSP) Walkthrough & Guides Wiki
Elden Ring Shadow of the Erdtree Walkthrough & Guides Wiki
Monster Hunter World Walkthrough & Guides Wiki
The Legend of Zelda: Tears of the Kingdom Walkthrough & Guides Wiki
Persona 3 Reload Walkthrough & Guides Wiki


All rights reserved
© SQUARE ENIX CO., LTD. All Rights Reserved.
CHARACTER DESIGN: TETSUYA NOMURA/ROBERTO FERRARI
LOGO ILLUSTRATION: © 1997 YOSHITAKA AMANO
The copyrights of videos of games used in our content and other intellectual property rights belong to the provider of the game.
The contents we provide on this site were created personally by members of the Game8 editorial department.
We refuse the right to reuse or repost content taken without our permission such as data or images to other sites.