Grasptropod Hard Mode Guide
Grasptropod is a boss in Chapter 6: Fool's Paradise of Final Fantasy 7 Rebirth (FF7 Rebirth). Learn how to beat Grasptropod on Hard Mode and normal difficulties, its weaknesses and resistances, and a list of its moves and attack patterns in this guide!
List of Contents
Grasptropod Weaknesses and Stats
Stats
 |
|||
| Easy | Normal | Hard | |
|---|---|---|---|
| HP | ? | 20309 | 78532 |
Weakness and Resistances
| Weaknesses | Lesser Resistances | Greater Resistances |
|---|---|---|
|
|
|
None |
| Absorbed Elements | Immunities | |
| None |
|
|
Changes When Staggered
| Weakness / Effective | Resistance |
|---|---|
| None | None |
Grasptropod doesn't have any changes to its weakness or resistance when staggered.
How to Pressure Grasptropod
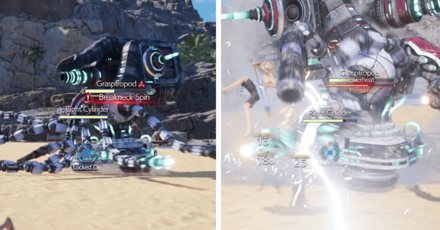
Deal Enough Damage or Wait for Breakneck Spin to End
|
|
There are only two reliable ways to pressure the boss. During Phases 1 and 2, you'll be able to Pressure it if you deal enough damage. Spam Cloud's high-damage ATB commands or exploit Grasptropod's weakness to lightning to proc the Pressured state.
During Phase 2 exclusively, Grasptropod will start using a new move called Breakneck Spin. Once it ends, it will Overheat and become Pressured automatically. Cripple the cylinders on either side of it to significantly increase the Stagger gauge.
While the Assess text does mention that you can Pressure Grasptropod using Synergy Skills and Abilities, this will be mostly useless since your party gets abducted throughout the fight.
How to Pressure and Stagger Enemies
Grasptropod Best Party and Builds
| This section is for players who are playing on Easy and Normal difficulties. To check out the best build and tips for Hard Mode, jump to our Hard Mode Guide section, below! |
Party Setup Determines Cloud's Relationship Levels
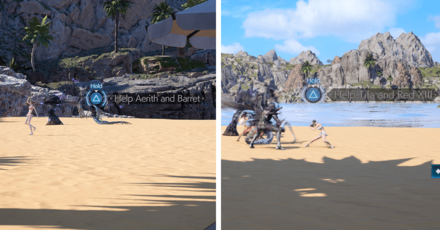
Before fighting the Grasptropod, you will need to decide who to help during the beach attack. Choose between Tifa and Red XIII or Aerith and Barret to lock-in the party you'll be using to fight the Grasptropod.
However, do note that your choice will affect your relationship with the characters. The group you choose will get boosts to their relationship levels, so make sure to choose between Tifa or Aerith if you're planning to romance them in Chapters 8 and 12.
Romance and Relationship Guide
Aerith Allows for Thunder Spell Casts and Ward Setup
| Party Roles if You Choose Aerith | |
|---|---|
 Cloud Cloud
|
【Main Damage Dealer】 ・Focus on survival in the early parts of the battle. ・Punish the boss after its big moves, like Breakneck Spin during Phase 2. ・Use Aerith's Arcane Ward to double-cast Lightning spells during Phase 1. |
 Aerith Aerith
|
【Ward Setup / Magic Damage】 ・Set up the Arcane Ward before getting abducted. ・Use any spare ATB charges to cast Lightning spells. |
If you're a meta gamer (and if you plan to romance Aerith anyway), she and Barret will be the best choice because of Aerith's utility. Getting her to set up Arcane Ward before she gets abducted allows you to double-cast Lightning spells until Phase 2 of the boss fight.
Tifa is the Harder Choice Due to the Group's Poor ATB Generation
| Party Roles if You Choose Tifa | |
|---|---|
|
Cloud
|
【Main Damage Dealer】 ・Focus on survival in the early parts of the battle. ・Punish the boss after its big moves, like Breakneck Spin during Phase 2. ・Play safe using Perfect Blocks and use Lightning spells whenever Grasptropod uses AoE attacks. |
If you're planning to romance Tifa, then do know that this is the harder choice of the two since Tifa and Red XIII will have poor ATB generation between them. Couple this with the warm up time of Chi Levels and Vengeance Mode, and the fight devolves into a 1v1 pretty early on.
Focus on Spamming Offensive Abilities
Since your party members are forced to leave the team during the boss fight, it's best to spam offensive ATB commands on them to help tear down the boss's HP. Use their strongest abilities or spells before they get abducted in Phase 1.
Best Materia to Use
| Materia | Effect |
|---|---|
|
|
・Can be used to exploit the weakness of the Grasptropod. ・Make sure Cloud and at least Aerith have one each. |
|
|
・Heal a single ally in battle.
・Best equipped on Cloud since he'll be staying around for Phase 2. |
|
|
・Increase the HP of a character.
・Can be equipped to all characters. If you only have a limited amount, make sure Cloud has the highest level one. |
|
|
・Increase the overall efficiency of Perfect Blocking.
・Best equipped on Cloud so he can Perfect Block Drill Charge easily. |
|
|
・Automatically use items without consuming ATB after performing several actions.
・Best equipped on Cloud since he'll be staying around for Phase 2. |
|
|
・Can help tear down the boss's HP with its lightning attacks. |
How to Beat Grasptropod
| Grasptropod Boss Fight Tips |
|---|
|
|
Use Lightning Attacks to Pressure Grasptropod
Grasptropod is weak against Lightning. Since one of its Pressure conditions is to deal enough damage to it, equip Lightning Materia to exploit its weakness and deal enough damage to send it into a Pressured state!
Note: Lightning is best equipped on Cloud (and Aerith if you chose to help her) since he will be the only one to fight Grasptropod later on during Phase 2. You can also equip the Ramuh summon if you want more periodic lightning damage during the fight.
Expend Your ATB Gauges Before Getting Caught
Characters are guaranteed to get caught by Grasptropod during the boss fight. Make sure to use their abilities as much as you can before they leave your party since this makes the fight a bit easier for Cloud later on in Phase 2.
Don't Let Cloud Die at all Costs
Your characters will get abducted eventually during the early stages of the boss fight. Make sure that Cloud is alive before your characters get caught, or it will end up in a game over once all of them are caught.
Yuffie will show up once it is Cloud's turn to get caged to save him. This triggers Phase 2 of the boss fight and it will be a one-on-one fight from this point on.
Attack After Grasptropod Uses Breakneck Spin
Grasptropod's Breakneck Spin attack will cause it to overheat, rendering it Pressured and open to attacks for a short time. Use that time window to inflict as much damage as you can to push it into a Stagger.
Once Staggered, unload with Cloud's Punisher Mode to build ATB and spam high-damage ATB commands to whittle away at its HP. When it recovers, keep your distance and spam Lightning spells until the next Breakneck Spin attack.
Avoid Attacks with Debuffs
| All Grasptropod Debuff Attacks | |
|---|---|
| Sprays liquid in a 180 degree arc in front of it that Silences on hit. | |
| Spreads a cloud of toxin gas around itself, Poisoning characters on hit. | |
| Phase 2 Only: Barrage of missiles that temporarily reduces your magic attack power on hit. | |
| Phase 2 Only: Barrage of missiles that temporarily reduces your physical attack power on hit. | |
| Phase 2 Only: Barrage of missiles that temporarily reduces your physical resistance on hit. | |
Grasptropod has various attacks that can inflict debuffs on your characters. During Phase 1, it will alternate between Sublimated Toxin and Silencing Solvent, which indicates poison and silencing effects, respectively. Dodge away when it starts casting these.
During Phase 2, it will gain access to new moves. When it uses any of its Ammo attacks, getting hit will inflict a debuff that can either lower your magic attack power, physical attack power, or physical resistance.
Grasptropod Hard Mode Guide
| Grasptropod Hard Mode Tips |
|---|
| ★ Best Hard Mode Builds for Grasptropod ★ |
|
|
Grasptropod Best Hard Mode Build
| The build featured in this Hard Mode section is at Weapon Level 8. If you find that you don't have enough Materia slots to complete the setup, consider getting all the possible Manuscripts on Normal, first. |
Since this fight eventually ends up in a one-on-one fight between Cloud and the Grasptropod, the build featured here will only be for Cloud. It should work regardless of who you choose before the fight.
|
Cloud
DPS |
|||||
| Weapon | Armor | ||||
|---|---|---|---|---|---|
| Igneous Saber | Cetran Armlet | ||||
| Accessory | Summon Materia | ||||
| Supernatural Wristguards | Odin | ||||
| Weapon Materia | Armor Materia | ||||
| Weapon Skills | |||||
|
|
|
||||
|
|
|
||||
Link Elemental and Lightning to have your normal attacks exploit Grasptropod's weakness to lightning. Enemy Skill is taken for its bonus stats and access to a no-MP Brave and Faith cast via Sonic Boom.
Focus on Building Stagger During Phase 1
During Phase 1, you should focus on building up Grasptropod's Stagger gauge in order to hit its max damage cap for the phase. Alternate between Cloud and Barret, spamming Focused Thrusts, Overcharges, and Focused Shots to build stagger.
Use Aerith to Set Up an Arcane Ward Before She Gets Captured
Once you see that Aerith has an ATB charge, have her create an Arcane Ward before she gets captured. This will persist between phases, allowing you to make the most of your Thundaga casts once Cloud is the last man standing on the battlefield.
Buff or Heal When Grasptropod Drops to 60% HP

If you manage to deplete Grasptropod's HP to 60% (47,119 HP) in Phase 1, it will stop taking damage. This will be the trigger for Phase 2 so use this time to heal or buff up. Chakra, Heals, or a Sonic Boom for a free Faith and Brave buff should do the trick going into Phase 2.
Destroy the Left and Right Cylinders to Build Stagger

After Grasptropod uses its new Phase 2 move called Breakneck Spin, it will Overheat and become Pressured. Before spamming Focused Thrusts, destroy the Left and Right Cylinders on its sides to greatly increase its Stagger gauge.
Use Infinity's End and Thundagas to Defeat the Boss

Once Staggered, spam Punisher Mode strikes to build ATB and cast Infinity's End to deal damage. If Grasptropod recovers or when it starts doing AoE attacks, maintain distance and opt to cast Thundaga instead to avoid taking damage.
If you chose Aerith earlier, you should have an Arcane Ward that you can use for Phase 2. Make sure to step inside it before casting Thundaga to maximize the damage dealt per MP spent casting.
Grasptropod Rewards and Details
Rewards
| Grasptropod Rewards | |||||||||||
|---|---|---|---|---|---|---|---|---|---|---|---|
| Easy/Normal | Hard Mode | ||||||||||
|
・950 EXP ・50 Party EXP ・10 AP ・950 Gil |
・6500 EXP ・30 AP ・3250 Gil ・The Way of the Fist Vol. X |
||||||||||
| Items Dropped | Rare Items Dropped | ||||||||||
|
None
|
None
|
||||||||||
| Stealable Items | Morphable Items | ||||||||||
|
None
|
None
|
||||||||||
Basic Information and Details
| Grasptropod | |
|---|---|
 |
|
| Location | Chapter Unlocked |
| Costa Del Sol | Chapter 6 |
| Species | Movement |
| Mechanical | Grounded |
| Details | |
|
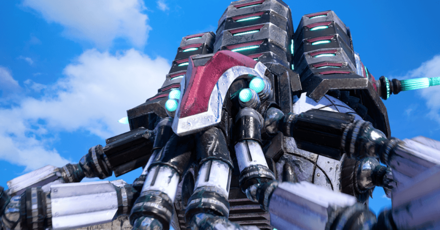
A robot manufactured by Shinra's Advanced Weaponry Division at Professor Hojo's request. It restrains targets with its tentacle-like appendages, then abducts them with drones. Inflicting enough damage or landing synergy skills and synergy abilities will pressure it. After a certain amount of time, it will use missiles and drones to capture targets. After using Breakneck Spin, it will overheat, rendering it temporarily inoperative. |
|
FF7 Rebirth Related Guides

Boss Fight Guide and List of All Bosses
Story Bosses
| All Major Story Bosses | |
|---|---|
| Chapter 1 | Materia Guardian |
| Chapter 2 | Midgardsormr |
| Chapter 3 |
Rude and Elena Mythril Golem |
| Chapter 4 |
Terror of the Deep Roche |
| Chapter 5 | Jenova Emergent |
| Chapter 6 | Grasptropod |
| Chapter 7 |
Custom Valkyrie Gigatrice |
| Chapter 8 |
Dyne Anuran Suppressor |
| Chapter 9 |
Specimen H1024 Crimson Mare Mk. II |
| Chapter 10 | Gi Nattak |
| Chapter 11 |
Diabolic Variant Yin and Yang Forgotten Specimen Galian Beast Roche |
| Chapter 12 |
Abzu Rude and Elena Rufus |
| Chapter 13 |
Red Dragon Ironclad Reno and Rude Tseng and Elena Moss-Grown Adamantoise Demon Gate |
| Chapter 14 |
Jenova Lifeclinger Sephiroth Reborn |
Optional Bosses
| Grasslands | |
|---|---|
| Summon | Titan |
| Classified Intel | Quetzalcoatl |
| Side Quests |
White Terror |
| Junon | |
| Summon | Phoenix |
| Classified Intel | Mindflayer |
| Side Quests |
White Mousse Hell Rider II Sandstorm Drake |
| Corel | |
| Summon | Alexander |
| Classified Intel | Tonberry King |
| Side Quests |
Dark Claw Joker |
| Minigame | Test 0 |
| Gongaga | |
| Summon | Kujata |
| Classified Intel | Great Malboro |
| Side Quests |
Levridon Mastodon Gorgon Mane Gigantoad |
| Cosmo Canyon | |
| Summon | Bahamut Arisen |
| Classified Intel | Jabberwock |
| Side Quests | Irasceros Gigaworm |
| Nibel | |
| Summon | Odin |
| Classified Intel | King Zu |
| Side Quests |
Queen Bee Dranabarga |
| Meridian Ocean | |
| Gilgamesh's Island |
Gilgamesh Titan and Bahamut Arisen Phoenix and Kujata Alexander and Odin |
| Pirate King's Treasure |
Ogre Raider Brineborn Demon Hueyacoatl Sea Dragon |
Comment
Author

Grasptropod Hard Mode Guide
Rankings
- We could not find the message board you were looking for.
Gaming News


Popular Games

Genshin Impact Walkthrough & Guides Wiki
Honkai: Star Rail Walkthrough & Guides Wiki
Arknights: Endfield Walkthrough & Guides Wiki
Umamusume: Pretty Derby Walkthrough & Guides Wiki
Wuthering Waves Walkthrough & Guides Wiki
Pokemon TCG Pocket (PTCGP) Strategies & Guides Wiki
Abyss Walkthrough & Guides Wiki
Zenless Zone Zero Walkthrough & Guides Wiki
Digimon Story: Time Stranger Walkthrough & Guides Wiki
Clair Obscur: Expedition 33 Walkthrough & Guides Wiki


Recommended Games
Fire Emblem Heroes (FEH) Walkthrough & Guides Wiki
Pokemon Brilliant Diamond and Shining Pearl (BDSP) Walkthrough & Guides Wiki
Diablo 4: Vessel of Hatred Walkthrough & Guides Wiki
Super Smash Bros. Ultimate Walkthrough & Guides Wiki
Yu-Gi-Oh! Master Duel Walkthrough & Guides Wiki
Elden Ring Shadow of the Erdtree Walkthrough & Guides Wiki
Monster Hunter World Walkthrough & Guides Wiki
The Legend of Zelda: Tears of the Kingdom Walkthrough & Guides Wiki
Persona 3 Reload Walkthrough & Guides Wiki
Cyberpunk 2077: Ultimate Edition Walkthrough & Guides Wiki


All rights reserved
© SQUARE ENIX CO., LTD. All Rights Reserved.
CHARACTER DESIGN: TETSUYA NOMURA/ROBERTO FERRARI
LOGO ILLUSTRATION: © 1997 YOSHITAKA AMANO
The copyrights of videos of games used in our content and other intellectual property rights belong to the provider of the game.
The contents we provide on this site were created personally by members of the Game8 editorial department.
We refuse the right to reuse or repost content taken without our permission such as data or images to other sites.