How to Beat Odin at Full Power
Odin is an optional boss found in the Combat Simulator of Final Fantasy 7 Rebirth (FF7 Rebirth). Read on to learn how to beat Odin at full power, its weaknesses and resistances, a list of its moves and attack patterns, as well as tips and rewards for beating it.
| Odin Guides | |
|---|---|
| Boss Guide | Sanctuary Locations |
List of Contents
Odin Weaknesses and Stats
Stats at Level 70
 |
|||
| HP | Easy | Normal | Hard |
|---|---|---|---|
| Full Might | 79228 | 113183 | ? |
| Power ↓ | 65087 | 92981 | ? |
| Power ↓↓ | 54908 | 78440 | ? |
| Power ↓↓↓ | 50376 | 71965 | ? |
| How to Unlock | |||
| Reach the Nibel Region | |||
Note: Odin's HP may be different during your battle since the boss' HP will sync with your party's level.
Weakness and Resistances
| Weaknesses | Lesser Resistances | Greater Resistances |
|---|---|---|
| None | ||
| Absorbed Elements | Immunities | |
| None | ||
Changes When Staggered
| Weakness / Effective | Resistance |
|---|---|
| None |
How to Pressure Odin
How to Pressure
|
|
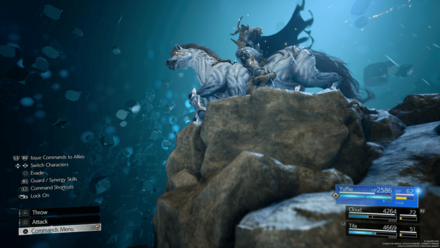
Landing ATB commands, evading attacks, or inflicting detrimental status effects will put Odin on the backfoot, both thrilling and pressuring him. Conversely, taking too many of his attacks will leave him disheartened, leading him to sound Gjallarhorn's Warning and unleash Zantetsuken.
How to Pressure and Stagger Enemies
How to Beat Odin at Full Power
| Odin Boss Fight Tips |
|---|
|
|
Prioritize Dodging Attacks
Dodging Odin's attacks should be your main priority during the fight since getting hit, including blocking, will cause him to use Zantetsuken and instantly KO your party. Take the fight slowly and only attack when you're sure it's safe to do so.
Use a Ranged Character
Since you want to prioritize dodging Odin's attacks, having a ranged character as your main attacker is ideal. This makes it easier for you to dodge its attacks without having too long for an opening to attack.
The ideal choice for this role is Yuffie since she's faster than Barret and Aerith, making it much easier for her to evade compared to the other two.
Use ATB Commands and Status Effects

To prevent Odin from using Zantetsuken, you also need to target him with Commands such as Abilities and Spells, as well as Negative Status Effects like Deprotect, Deshell, and Poison. Make sure to spam these moves so that Odin doesn't wipe your party.
Do note that it's not recommended to use Debrave and Defaith because you want to prioritize dodging his attacks, ignoring the weakened damage you would have taken.
Cast Haste on Your Main Attacker
Haste will greatly increase the rate your main attacker's ATB gauge will recharge, allowing them to use more abilities and spells on Odin. This helps guarantee that Odin won't use Zantetsuken, as long as you keep evading his attacks and hitting him in return.
Watch Out for Gjallarhorn's Warning
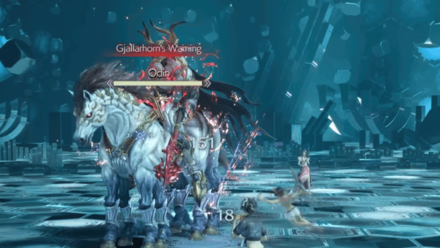
Watch out for when Odin uses Gjallarhorn's Warning as this means he's about to use Zantetsuken. If you see him use this move, make sure to not get hit and deal as much damage as possible to prevent Odin from using Zantetsuken.
Do note that dealing damage is the only way to stop him from wiping your party as dodging around will still cause Odin to get bored and use Zantetsuken.
Sleipnir's Furor is the Opposite of Gjallarhorn's Warning

Inversely, if you see Odin use Sleipnir's Furor, this means that you're doing a good job of dodging his attacks and dealing enough damage to keep Odin entertained. He will also get pressured in this state, allowing you to go for a quick stagger.
Bring Multiple Methods of Revival
| How to Revive Party Members |
|---|
|
1. Equip Everyone With Revival Earrings 2. Equip the Phoenix Materia for Reraise 3. Use Weapons with the Reprieve Weapon Skill 4. Equip Everyone With a Revival Materia |
Odin's Zantetsuken will deal 9999 damage to your party if you're not careful. It's advised to bring multiple forms of revival in case Odin uses this move so that you will be able to revive your fallen party members.
Do note that accessories like Safety Bit and Karmic Cowl do not work since Zantetsuken does damage and is not an Instant Death effect.
Equip Revival Earrings
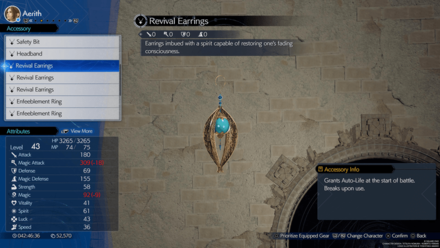
Revival Earrings will automatically give the character Auto-Life at the start of the fight, automatically reviving them if they go down.
Do note however that this is only a one-time use, and the earrings will break after they revive a character.
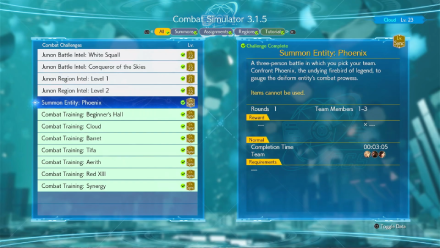
Equip the Phoenix Materia
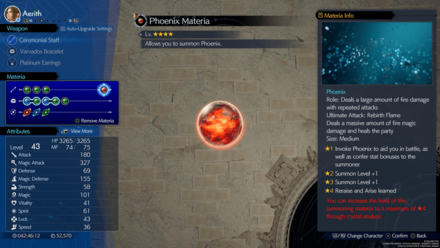
Phoenix is the best summon for this fight because it'll allow you to use Reraise on your party members, automatically reviving them if they go down.
Make sure that you have scanned all of Phoenix's Sanctuaries to enhance its Materia to 4-Star, unlocking the ability for it to use Reraise.
Use the Reprieve Weapon Skill

| Characters with Weapons That Have Reprieve | |
|---|---|
| Cloud | Buster Sword / Umbral Blade |
| Aerith | Ceremonial Staff / Gambanteinn |
Cloud and Aerith have weapons that can equip the Reprieve Weapon Skill. This will revive them back to 1 HP when they go down in battle.
If they're revived after Odin uses Zantetsuken, they're still susceptible to getting KO'd by a follow-up attack. Make sure that you immediately dodge and heal up before Odin defeats your party.
All Weapons and How to Get Them
Equip Revival Materia
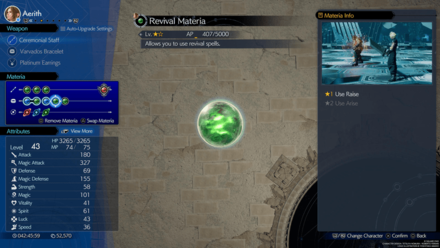
For cases where a party member doesn't get automatically resurrected, you will need to have someone else cast Raise or Arise on them. Make sure that all your party members have one equipped in case of emergencies.
How to Get the Revival Materia
Use Limit Break During Temporal Imprisonment
Temporal Imprisonment is an ability that stops your controlled character from moving. If you have a Limit Break on your controlled character while Odin is casting Temporal Imprisonment, use it as it will protect your controlled character from being frozen.
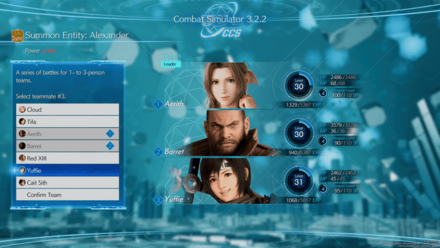
Odin Best Party and Builds
Recommended Party Setup
| Recommended Party Setup | |
|---|---|
 Yuffie Yuffie
|
【Main DPS】 ・Can attack safely at range ・Fast enough to dodge Odin's attacks Recommended Level: 42 |
 Aerith Aerith
|
【Support】 ・Has multiple useful Weapon Skills ・Stays away from Odin's attacks Recommended Level: 42 |
 Tifa Tifa
|
【Secondary DPS】 ・Used to increase stagger damage ・Stockpiles ATB Charges Recommended Level: 42 |
Control Yuffie for Most of the Fight
Yuffie will be your main attacker during this battle because she can attack Odin from afar and swiftly evade his attacks. This is important because you need to minimize the number of hits Odin will do on your party, otherwise, it will use Zantetsuken.
Aerith Has Multiple Weapon Skills That Benefits Her Role
With the Ceremonial Staff equipped, Aerith becomes a very effective Support for the team thanks to Altruistic Buff Up and Reprieve. This allows her to increase the duration of positive status effects by 25% and she'll automatically revive at 1 HP when she goes down.
Tifa Increases the Damage Odin Takes While Staggered
Tifa will be your secondary carry that will do massive damage once Odin is staggered. Make sure that she has enough ATB Charges for Unbridled Strength, so that she can use Omnistrike and Rise and Fall.
Odin Best Materia to Use
Recommended Materia for Yuffie
| Weapon: Bird of Prey |
Armor: Garm Bangle |
|---|---|
|
|
|
| Summon: |
Enervation and Poison linked to Magic Focus are used to target the negative status effects that can affect Odin. Alternatively, you could use any other Materia with offensive spells instead.
As for the Materias, HP Up, MP Up, and Assess are always useful to boost Yuffie's MP and to check Odin's status, while ATB Boost helps her quickly gain ATB charges so she can use more ATB commands.
Also, as with the other two builds, Revival is mandatory in case a party member doesn't have an auto-revive buff active to resurrect them when they go down.
Finally, Bahamut Arisen is used to give a balanced boost to her Attack and Magic.
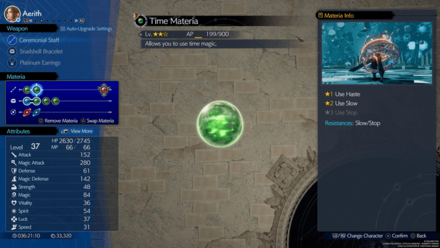
Recommended Materia for Aerith
| Weapon: Ceremonial Staff |
Armor: Varvados Bracelet |
|---|---|
|
|
|
| Summon: |
Time is the most important materia on this setup because it's needed to boost Yuffie's ATB Charge rate. Once that buff is active, she can then use Empowerment to boost her damage output or Comet to deal damage to Odin.
While Healing and Fortification aren't necessary since you'll be dodging attacks, it'll still be useful to have in case you do get hit.
Also, as with the other two builds, Revival is mandatory in case a party member doesn't have an auto-revive buff active to resurrect them when they go down.
Finally and most importantly, Phoenix is used because it can cast Reraise party, automatically reviving them when they go down.
Recommended Materia for Tifa
| Weapon: Kaiser Knuckles |
Armor: Celestial Bangle |
|---|---|
|
|
|
| Summon: |
Auto-Unique Ability is used so that Tifa will automatically use Unbridled Strength, allowing her to use Omnistrike and Ride and Fall immediately once Odin is staggered.
ATB Stagger and Boost are used so that Tifa can spam her abilities once Odin is staggered while Healing and Chakra are used in case Tifa or other party members take too much damage.
For the flexible options, HP, Luck, and Strength Up are used to give Tifa generally useful stat buffs, but you can replace these with any other Materia of your choosing.
Also, as with the other two builds, Revival is mandatory in case a party member doesn't have an auto-revive buff active to resurrect them when they go down.
Finally, Kujata is used because it gives her the highest Attack boost out of all the summons available until you get Odin's.
Odin Rewards and Details
Rewards
| Odin Rewards | |||||||||||
|---|---|---|---|---|---|---|---|---|---|---|---|
| Easy/Normal | Hard Mode | ||||||||||
|
TBD
|
TBD
|
||||||||||
| Items Dropped | Rare Items Dropped | ||||||||||
| ・Odin Materia |
None
|
||||||||||
| Stealable Items | Morphable Items | ||||||||||
|
None
|
None
|
||||||||||
Basic Information and Details
| Odin | |
|---|---|
|
|
|
| Location | Chapter Unlocked |
| Combat Simulator | Chapter 11 |
| Species | Movement |
| Unreadable | Grounded |
| Details | |
|
A noble summon recreated in virtual reality. This knight claims war and death as his domain, and atop his faithful steed Sleipnir, he rides into battle and rends his foes asunder. Landing ATB commands, evading attacks, or inflicting detrimental status effects will put Odin on the backfoot, both thrilling and pressuring him. Conversely, taking too many of his attacks will leave him disheartened, leading him to sound Gjallarhorn's Warning and unleash Zantetsuken. |
|
Odin Location
Unlocked at the Combat Simulator Once You Reach Nibel
Once you've reached the Nibel region in Chapter 11, you will be able to challenge Odin in the Combat Simulator.
Remember that you can also analyze Odin's Sanctuaries to unlock lower difficulty levels in the Combat Simulator, making the fight much more manageable.
Combat Simulator Guide: How to Unlock and Win All Battles
FF7 Rebirth Related Guides

Boss Fight Guide and List of All Bosses
Story Bosses
| All Major Story Bosses | |
|---|---|
| Chapter 1 | Materia Guardian |
| Chapter 2 | Midgardsormr |
| Chapter 3 |
Rude and Elena Mythril Golem |
| Chapter 4 |
Terror of the Deep Roche |
| Chapter 5 | Jenova Emergent |
| Chapter 6 | Grasptropod |
| Chapter 7 |
Custom Valkyrie Gigatrice |
| Chapter 8 |
Dyne Anuran Suppressor |
| Chapter 9 |
Specimen H1024 Crimson Mare Mk. II |
| Chapter 10 | Gi Nattak |
| Chapter 11 |
Diabolic Variant Yin and Yang Forgotten Specimen Galian Beast Roche |
| Chapter 12 |
Abzu Rude and Elena Rufus |
| Chapter 13 |
Red Dragon Ironclad Reno and Rude Tseng and Elena Moss-Grown Adamantoise Demon Gate |
| Chapter 14 |
Jenova Lifeclinger Sephiroth Reborn |
Optional Bosses
| Grasslands | |
|---|---|
| Summon | Titan |
| Classified Intel | Quetzalcoatl |
| Side Quests |
White Terror |
| Junon | |
| Summon | Phoenix |
| Classified Intel | Mindflayer |
| Side Quests |
White Mousse Hell Rider II Sandstorm Drake |
| Corel | |
| Summon | Alexander |
| Classified Intel | Tonberry King |
| Side Quests |
Dark Claw Joker |
| Minigame | Test 0 |
| Gongaga | |
| Summon | Kujata |
| Classified Intel | Great Malboro |
| Side Quests |
Levridon Mastodon Gorgon Mane Gigantoad |
| Cosmo Canyon | |
| Summon | Bahamut Arisen |
| Classified Intel | Jabberwock |
| Side Quests | Irasceros Gigaworm |
| Nibel | |
| Summon | Odin |
| Classified Intel | King Zu |
| Side Quests |
Queen Bee Dranabarga |
| Meridian Ocean | |
| Gilgamesh's Island |
Gilgamesh Titan and Bahamut Arisen Phoenix and Kujata Alexander and Odin |
| Pirate King's Treasure |
Ogre Raider Brineborn Demon Hueyacoatl Sea Dragon |
Comment
Author

How to Beat Odin at Full Power
Rankings
- We could not find the message board you were looking for.
Gaming News


Popular Games

Genshin Impact Walkthrough & Guides Wiki
Honkai: Star Rail Walkthrough & Guides Wiki
Arknights: Endfield Walkthrough & Guides Wiki
Umamusume: Pretty Derby Walkthrough & Guides Wiki
Wuthering Waves Walkthrough & Guides Wiki
Pokemon TCG Pocket (PTCGP) Strategies & Guides Wiki
Abyss Walkthrough & Guides Wiki
Zenless Zone Zero Walkthrough & Guides Wiki
Digimon Story: Time Stranger Walkthrough & Guides Wiki
Clair Obscur: Expedition 33 Walkthrough & Guides Wiki


Recommended Games
Fire Emblem Heroes (FEH) Walkthrough & Guides Wiki
Pokemon Brilliant Diamond and Shining Pearl (BDSP) Walkthrough & Guides Wiki
Diablo 4: Vessel of Hatred Walkthrough & Guides Wiki
Super Smash Bros. Ultimate Walkthrough & Guides Wiki
Yu-Gi-Oh! Master Duel Walkthrough & Guides Wiki
Elden Ring Shadow of the Erdtree Walkthrough & Guides Wiki
Monster Hunter World Walkthrough & Guides Wiki
The Legend of Zelda: Tears of the Kingdom Walkthrough & Guides Wiki
Persona 3 Reload Walkthrough & Guides Wiki
Cyberpunk 2077: Ultimate Edition Walkthrough & Guides Wiki


All rights reserved
© SQUARE ENIX CO., LTD. All Rights Reserved.
CHARACTER DESIGN: TETSUYA NOMURA/ROBERTO FERRARI
LOGO ILLUSTRATION: © 1997 YOSHITAKA AMANO
The copyrights of videos of games used in our content and other intellectual property rights belong to the provider of the game.
The contents we provide on this site were created personally by members of the Game8 editorial department.
We refuse the right to reuse or repost content taken without our permission such as data or images to other sites.